How to use OpenVPN to access your home network on AC VDSL/ADSL Modem Router (new logo)
In an OpenVPN connection, the home network can act as a server, and the remote device can access the server through the router which acts as an OpenVPN Server gateway. To use the VPN feature, you should enable OpenVPN Server on your router, install and run VPN client software on the remote device. Please follow the steps below to set up an OpenVPN connection.

Here takes Archer VR2800 as demonstration.
Step 1. Set up OpenVPN Server on Your Router
1. Log in the web interface of the modem router. You can refer to How to log into the web-based interface of the AC VDSL/ADSL Modem Router (new logo)?
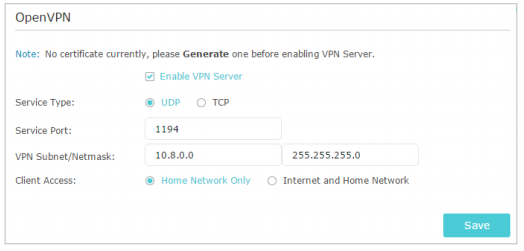
2. Go to Advanced > VPN > OpenVPN, and select Enable VPN Server.
Note:
• Before you enable VPN Server, we recommend you configure Dynamic DNS Service (recommended) or assign a static IP address for your router’s WAN port and synchronize your System Time via the internet.
• The first time you configure the OpenVPN Server, you may need to Generate a certificate before you enable the VPN Server.
3. Select the Service Type (communication protocol) for OpenVPN Server: UDP, TCP.
4. Enter a VPN Service Port to which a VPN device connects. The port number should be between 1024 and 65535.
5. In the VPN Subnet/Netmask fields, enter the range of IP addresses that can be leased to the device by the OpenVPN server.
6. Select your Client Access type. Select Home Network Only if you only want the remote device to access your home network; select Internet and Home Network if you also want the remote device to access the internet through the VPN Server.
7. Click Save.
8. Click Generate to get a new certificate.

Note: If you have already generated one, please skip this step, or click Generate to update the certificate.
9. Click Export to save the OpenVPN configuration file which will be used by the remote device to access your router.

Step 2. Configure OpenVPN Connection on Your Remote Device
1. Visit http://openvpn.net/index.php/download/community-downloads.html to download the OpenVPN software, and install it on your device where you want to run the OpenVPN client utility.
Note: You need to install the OpenVPN client utility on each device that you want to be able to use the VPN function. Mobile devices should download a third-party app from Google Play or Apple App Store.
2. After the installation, copy the file exported from your router to the OpenVPN client utility’s “config” folder (for example, C:\Program Files\OpenVPN\config on Windows). The path depends on where the OpenVPN client utility is installed.
3. Run the OpenVPN client utility and connect it to OpenVPN Server.
Get to know more details of each function and configuration please go to Download Center to download the manual of your product.
Byla tato FAQ užitečná?
Vaše zpětná vazba nám pomůže zlepšit naše webové stránky
