TL-WR902AC V3 User Guide
- About This Guide
- Chapter 1 Get to Know About Your Router
- Chapter 2 Connect the Hardware
- Chapter 3 Set Up Internet Connection Via Quick Setup Wizard
- Chapter 4 Configure the Router in Wireless Router Mode
- Chapter 5 Configure the Router in Access Point Mode
- Chapter 6 Configure the Router in Range Extender Mode
- Chapter 7 Configure the Router in Client Mode
- Chapter 8 Configure the Router in Hotspot Router Mode
- FAQ
- Authentication
Chapter 7 Configure the Router in Client Mode
This chapter presents how to configure the various features of the router working as a client.
It contains the following sections:
1.Visit http://tplinkwifi.net, and log in with the username and password you set for the router.
2.Go to Status. You can view the current status information of the router in Client Mode.
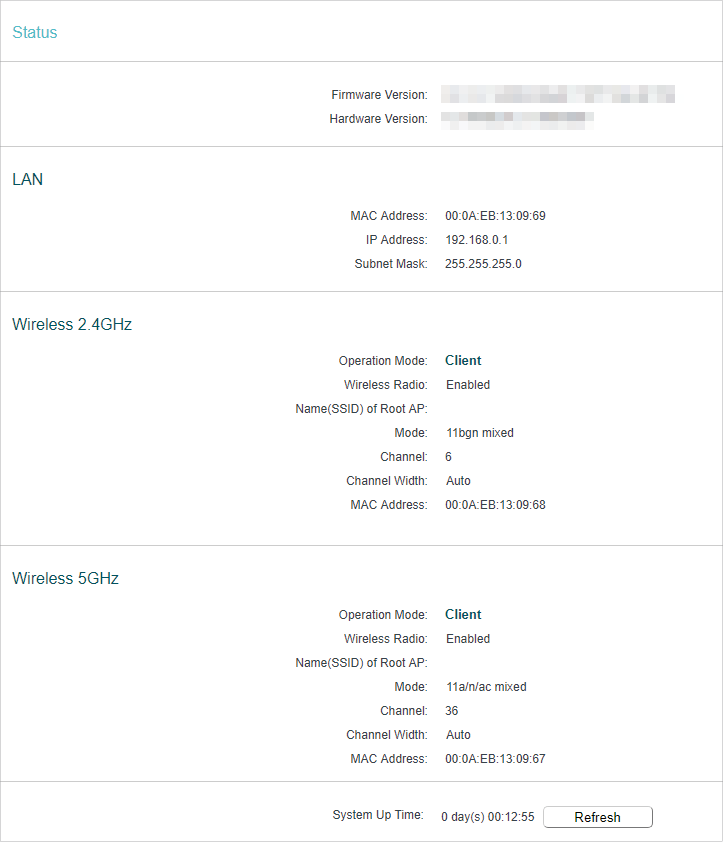
•Firmware Version - The version information of the router’s firmware.
•Hardware Version - The version information of the router’s hardware.
•LAN - This field displays the current settings of the LAN, and you can configure them on the Network > LAN page.
•MAC Address - The physical address of the router.
•IP Address - The LAN IP address of the router.
•Subnet Mask - The subnet mask associated with the LAN IP address.
•Wireless 2.4GHz/5GHz - This field displays the basic information or status of the wireless function, and you can configure them on the Wireless 2.4GHz/5GHz > Wireless Settings page.
•Operation Mode - The current operation mode of the router.
•Wireless Radio - Indicates whether the wireless feature is enabled or not.
•Name (SSID) of Root AP - The SSID of the connected host network.
•Mode - The current wireless working mode in use.
•Channel - The current wireless channel in use.
•Channel Width - The current wireless channel width in use.
•MAC Address - The physical address of the router.
•System Up Time - The length of the time since the router was last powered on or reset.
Click Refresh to get the latest status and settings of the router.
1.Visit http://tplinkwifi.net, and log in with the username and password you set for the router.
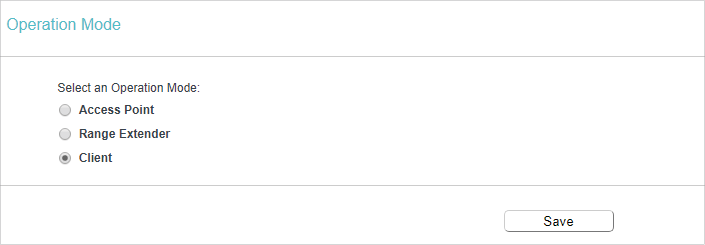
2.Go to Operation Mode.
3.Select the operation mode as needed and click Save.
1.Visit http://tplinkwifi.net, and log in with the username and password you set for the router.
2.Go to Network > LAN.
3.Configure the IP parameters of the LAN and click Save.
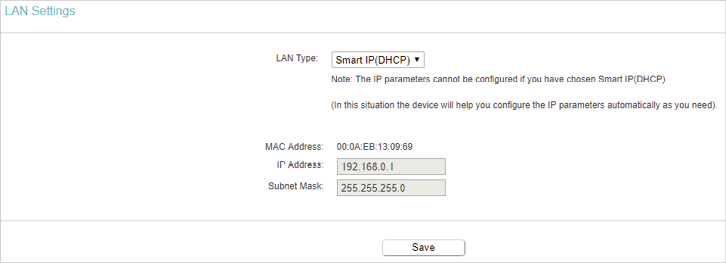
•LAN Type - Either select Smart IP(DHCP) to get IP address from DHCP server, or Static IP to configure IP address manually.
•MAC Address - The physical address of the LAN port. The value can not be changed.
•IP Address - Enter the IP address in dotted-decimal notation if your select Static IP (factory default - 192.168.0.254).
•Subnet Mask - An address code that determines the size of the network. Normally 255.255.255.0 is used as the subnet mask.
 Note:
Note:
•If you have changed the IP address, you must use the new IP address to login.
•If you select Smart IP(DHCP), the DHCP server of the router will not start up.
•If the new IP address you set is not in the same subnet as the old one, the IP Address pool in the DHCP Server will be configured automatically, but the Virtual Server and DMZ Host will not take effect until they are re-configured.
4.1. Wireless Settings
1.Visit http://tplinkwifi.net, and log in with the username and password you set for the router.
2.Go to Wireless 2.4GHz/5GHz > Basic Settings.
3.Configure the settings for the host network you want to connect to and click Save.
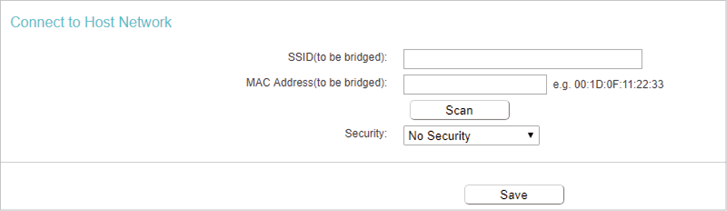
•Scan - Click to scan for wireless networks. When a host network is selected, the SSID, MAC Address and Security type will be automatically filled in.
•Password - Enter the password of the host network you want to connect to if it is encrypted.
By default, the DHCP (Dynamic Host Configuration Protocol) Server is enabled and the router acts as a DHCP server; it dynamically assigns TCP/IP parameters to client devices from the IP Address Pool. You can change the settings of DHCP Server if necessary, and you can reserve LAN IP addresses for specified client devices.
5.1. DHCP Settings
1.Visit http://tplinkwifi.net, and log in with the username and password you set for the router.
2.Go to DHCP > DHCP Settings.
3.Specify DHCP server settings and click Save.

•DHCP Server - Enable or disable the DHCP server. If disabled, you must have another DHCP server within your network or else you must configure the computer manually.
•Start IP Address - Specify an IP address for the DHCP Server to start with when assigning IP addresses. 192.168.0.100 is the default start address.
•End IP Address - Specify an IP address for the DHCP Server to end with when assigning IP addresses. 192.168.0.199 is the default end address.
•Address Lease Time - The Address Lease Time is the amount of time a network user will be allowed to connect to the router with the current dynamic IP Address. When time is up, the user will be automatically assigned a new dynamic IP address. The range of the time is 1 ~ 2880 minutes. The default value is 120.
•Default Gateway (Optional) - It is suggested to input the IP address of the LAN port of the router. The default value is 192.168.0.254.
•Default Domain (Optional) - Input the domain name of your network.
•Primary DNS (Optional) - Input the DNS IP address provided by your ISP.
•Secondary DNS (Optional) - Input the IP address of another DNS server if your ISP provides two DNS servers.
Note: To use the DHCP server function of the router, you must configure all computers on the LAN as Obtain an IP Address automatically.
5.2. DHCP Client List
1.Visit http://tplinkwifi.net, and log in with the username and password you set for the router.
2.Go to DHCP > DHCP Client List to view the information of the clients connected to the router.
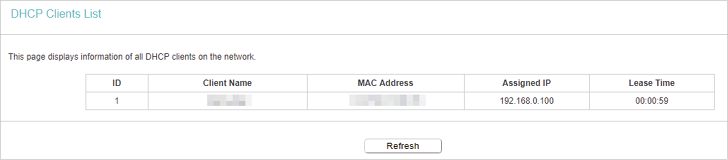
•Client Name - The name of the DHCP client.
•MAC Address - The MAC address of the DHCP client.
•Assigned IP - The IP address that the router has allocated to the DHCP client.
•Lease Time - The time of the DHCP client leased. After the dynamic IP address has expired, a new dynamic IP address will be automatically assigned to the user.
You cannot change any of the values on this page. To update this page and show the current attached devices, click Refresh.
6. USB Settings
You can insert a USB drive to share files among users on the LAN, access the USB drive remotely on the internet and enjoy videos and photos stored in the USB drive.
6.1. Storage Sharing
Share your USB storage device with different users on the network.
•To access the USB disk:
1.Connect Your USB Disk
Insert your USB storage device into the router’s USB port directly or using a USB cable. Wait several seconds until the USB LED becomes solid on.
 Tips:
Tips:
•If you use USB hubs, make sure no more than 2 devices are connected to the router.
•If the USB storage device requires using bundled external power, make sure the external power has been connected.
•If you use a USB hard drive, make sure its file system is FAT32 or NTFS.
•Before you physically disconnect a USB device from the router, safely remove it to avoid data damage: Go to USB Settings > USB Mass Storage and click Disconnect.
2.Access Your USB Disk
By default, all the network clients can access your USB disk. Refer to the following table for access instructions. You can customize user accounts by referring to User Accounts.
| Windows | Open the Windows Explorer (or go to Computer), type the server address \\tplinkwifi.net in the address bar, enter a username and password if required and then press [Enter].
|
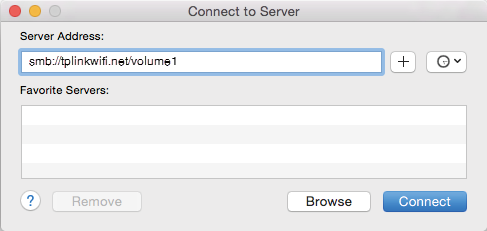
| Mac | 1 )Click Go in the top left corner of the desktop and go to Connect to Server. 2 )Type the server address smb://tplinkwifi.net/volume1.
3 )Click Connect.
4 )When prompted, select the Guest radio box (If you have set up a username and password to deny anonymous access to the USB disk, you should select the Registered User radio box. To learn how to set up an account for the access, refer to User Accounts). |
| Tablet | Use a third-party app for network files management. |

•To customize your settings:
1.Visit http://tplinkwifi.net, and log in with the username and password you set for the router.
2.Go to USB Settings > Storage Sharing.
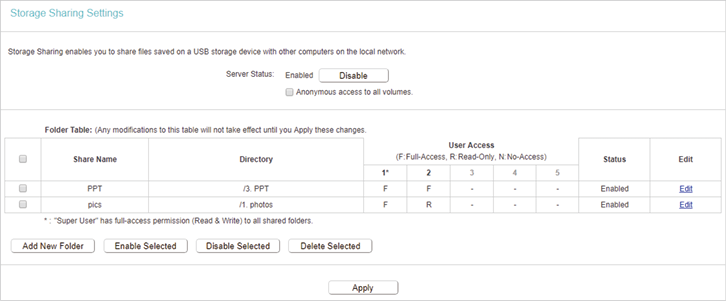
•Server Status - the Storage Sharing’s current status.
•Anonymous access to all volumes - This function is enabled by default, so users can access all activated volumes of Storage Sharing without accounts. If you want to add a shared folder which does not allow anonymous login, uncheck the box to disable this function. And Folder Table will be displayed as shown below.
•Share Name - This folder’s display name.
•Directory - The real full path of the specified folder.
•User Access - The authorization of the user is displayed. * users mean Super Users who have the full-access permission to all activated volumes and share folders. Grey users mean the users who have no right to use this function. Others are common users.
•Status - The status of the entry is enabled or disabled.
•Edit - Click Edit in the table, and then you can modify the entry.
6.2. FTP Server
You can share specific folders on you USB drive on the LAN or access your USB drive outside the local area network.
For example:
•Only share specific folders with clients on the LAN.
•Share photos and other large files with your friends without logging in to (and paying for) a photo-sharing site or email system.
•Get a safe backup for the material for a presentation.
•To set up your FTP server:
1.Insert your USB storage device into the router’s USB port directly or using a USB cable. Wait several seconds until the USB LED becomes solid on.
2.Visit http://tplinkwifi.net, and log in with the username and password you set for the router.
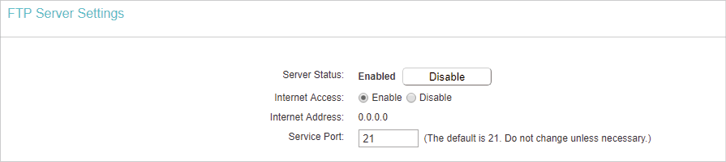
3.Go to USB Settings > FTP Server.
4.Click Enable to enable the FTP Server.
5.Click Enable to enable the internet access to the FTP server.
6.Specify a port number for the Service Port. The default value is 21.
7.Click Apply.
•To specify a folder to be accessed via the FTP server:
1.Visit http://tplinkwifi.net, and log in with the username and password you set for the router.
2.Go to USB Settings > FTP Server.
3.Click Add New Folder.
4.Specify a name for the folder to be shared in the Share Name field. And select the folder you want to share. And determine the access right of user accounts.
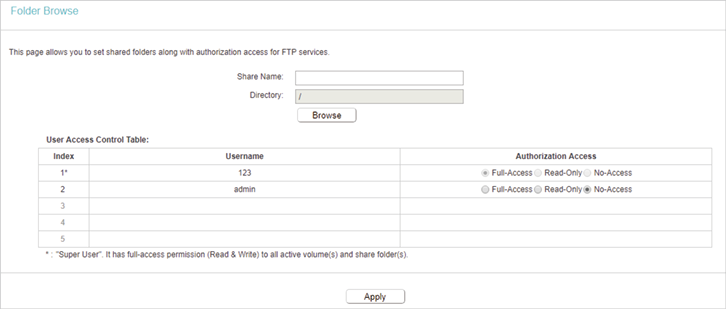
5.Click Apply.
6.You can check which folder is shared and also edit or delete the folder.

•To access the USB disk locally:
1.Connect Your USB Disk
Insert your USB storage device into the router’s USB port directly or using a USB cable. Wait several seconds until the USB LED becomes solid on.
Tips:
•If you use USB hubs, make sure no more than 2 devices are connected to the router.
•If the USB storage device requires using bundled external power, make sure the external power has been connected.
•If you use a USB hard drive, make sure its file system is FAT32 or NTFS.
•Before you physically disconnect a USB device from the router, safely remove it to avoid data damage: Go to USB Settings > USB Mass Storage and click Disconnect.
2.Access Your USB Disk Locally
Refer to the following table for access instructions. You can customize user accounts by referring to User Accounts.
| Windows | Open the Windows Explorer (or go to Computer), type the server address ftp://tplinkwifi.net in the address bar, enter a username and password and then press [Enter].
|
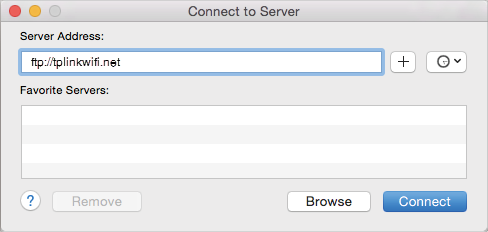
| Mac | 1 )Click Go in the top left corner of the desktop and go to Connect to Server. 2 )Type the server address ftp://tplinkwifi.net. 3 )Click Connect.
4 )When prompted, select the Registered User radio box and enter a username and password (To learn how to set up an account for the access, refer to User Accounts). |
| Tablet | Use a third-party app for network files management. |

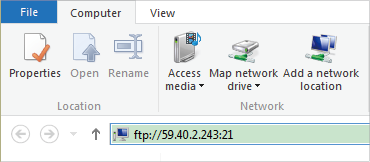
•To access the USB disk remotely:
Refer to the following table for access instructions. You can customize user accounts by referring to User Accounts.
| Windows | 1 )Open the Windows Explorer (or go to Computer, only for Windows users) or open a web browser. 2 )Type the server address in the address bar: Type in ftp://<WAN IP address of the router>:<port number> (such as ftp://59.40.2.243:21). If you have specified a domain name for the router, you can also type in ftp://<domain name>:<port number> (such as ftp://MyDomainName:21)
The Windows Explorer (Windows 8) 3 )Press [Enter]. 4 )Access with the username and password by referring to User Accounts.
|
| Tablet | Use a third-party app for network files management. |
6.3. Media Server
The Media Server feature allows to view photos, play music and watch movies on the USB drive directly with DLNA-supported devices, such as on your computer, pad and PS2/3/4.
•To share specific folders:
1.Insert your USB storage device into the router’s USB port directly or using a USB cable. Wait several seconds until the USB LED becomes solid on.
2.Visit http://tplinkwifi.net, and log in with the username and password you set for the router.
3.Go to USB Settings > Media Server.
4.Click Enable to enable the Media Server.

5.Click Add New Folder. Specify a name for the folder to be shared in the Share Name field. And select the folder you want to share.
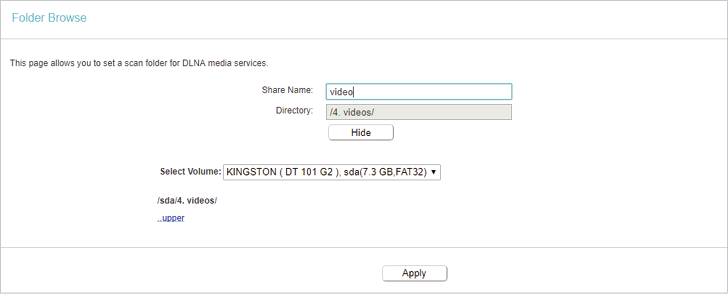
6.Click Apply.
•To access the USB disk:
1.Connect Your USB Disk
Insert your USB storage device into the router’s USB port directly or using a USB cable. Wait several seconds until the USB LED becomes solid on.
Tips:
•If you use USB hubs, make sure no more than 2 devices are connected to the router.
•If the USB storage device requires using bundled external power, make sure the external power has been connected.
•If you use a USB hard drive, make sure its file system is FAT32 or NTFS.
•Before you physically disconnect a USB device from the router, safely remove it to avoid data damage: Go to USB Settings > USB Mass Storage and click Disconnect.
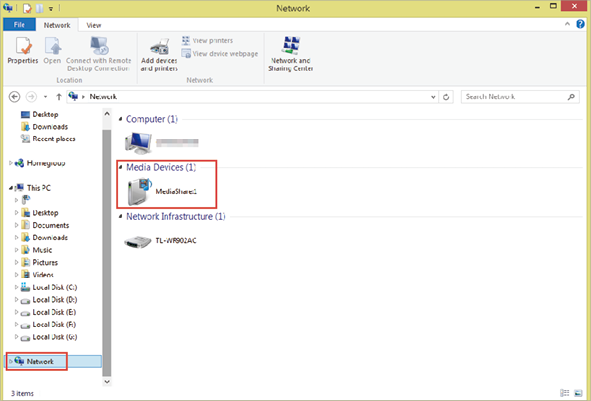
2.Access the Media Files on Your USB Disk
Now the DLNA-supported devices (such as your computer and pad) connected to the router can detect and play the media files on the USB disk.
| Windows | •Go to Computer > Network, and click the Media Server Name in the Media Devices section.
|
| Tablet | •Use a third-party DLNA-supported player. |
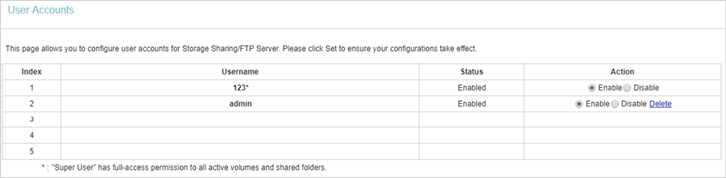
You can specify the username and password for Storage Sharing and FTP Server access.
1.Visit http://tplinkwifi.net, and log in with the username and password you set for the router.
2.Go to USB Settings > User Accounts.
3.Choose the Index for the account and specify a new username and password in the New Username and New Password fields, and reenter the password for confirmation.
![]() Note: For an account with Index 1, it is the Super User with full access to all active volumes and shared folders.
Note: For an account with Index 1, it is the Super User with full access to all active volumes and shared folders.

4.Click Set.
5.You can check the newly added account and also edit or delete the account.
7.1. Diagnostic
Diagnostic is used to test the connectivity between the router and the host or other network devices.
1.Visit http://tplinkwifi.net, and log in with the username and password you set for the router.
2.Go to System Tools > Diagnostic.
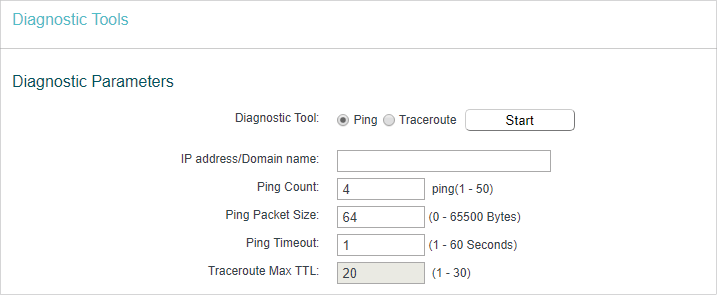
•Diagnostic Tool - Select one diagnostic tool.
•Ping - This diagnostic tool troubleshoots connectivity, reachability, and name resolution to a given host or gateway.
•Tracerouter - This diagnostic tool tests the performance of a connection.
Note: You can use ping/traceroute to test both numeric IP address or domain name. If pinging/tracerouting the IP address is successful, but pinging/tracerouting the domain name is not, you might have a name resolution problem. In this case, ensure that the domain name you are specifying can be resolved by using Domain Name System (DNS) queries.
•IP Address/Domain Name - Enter the destination IP address (such as 192.168.0.1) or Domain name (such as www.tp-link.com).
•Pings Count - The number of Ping packets for a Ping connection.
•Ping Packet Size - The size of Ping packet.
•Ping Timeout - Set the waiting time for the reply of each Ping packet. If there is no reply in the specified time, the connection is overtime.
•Traceroute Max TTL - The max number of hops for a Traceroute connection.
3.Click Start to check the connectivity of the internet.
4.The Diagnostic Results page displays the diagnosis result. If the result is similar to the following figure, the connectivity of the Internet is fine.
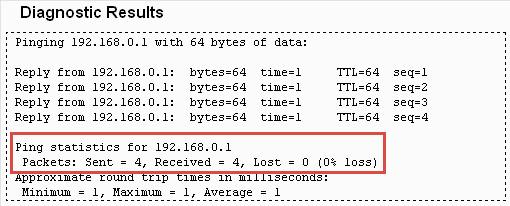
Note: Only one user can use this tool at one time. Options “Number of Pings”, “Ping Size” and “Ping Timeout” are used for the Ping function. Option “Tracert Hops” is used for the Tracert function.
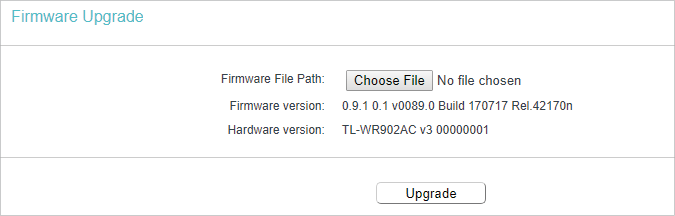
7.2. Firmware Upgrade
TP-Link is dedicated to improving and richening the product features, giving users a better network experience. We will release the latest firmware at TP-Link official website. You can download the latest firmware file from the Support page of our website
www.tp-link.com and upgrade the firmware to the latest version.
1.Download the latest firmware file for the router from our website www.tp-link.com.
2.Visit http://tplinkwifi.net, and log in with the username and password you set for the router.
3.Go to System Tools > Firmware Upgrade.
4.Click Choose File to locate the downloaded firmware file, and click Upgrade.
7.3. Factory Defaults
1.Visit http://tplinkwifi.net, and log in with the username and password you set for the router.
2.Go to System Tools > Factory Defaults. Click Restore to reset all settings to the default values.

•The default Username: admin
•The default Password: admin
•The default IP Address: 192.168.0.254
•The default Subnet Mask: 255.255.255.0
7.4. Backup & Restore
The configuration settings are stored as a configuration file in the router. You can backup the configuration file in your computer for future use and restore the router to the previous settings from the backup file when needed.
1.Visit http://tplinkwifi.net, and log in with the username and password you set for the router.
2.Go to System Tools > Backup & Restore.
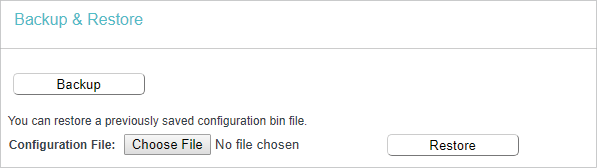
•To backup configuration settings:
Click Backup to save a copy of the current settings in your local computer. A “.bin“ file of the current settings will be stored in your computer.
•To restore configuration settings:
1.Click Choose File to locate the backup configuration file stored in your computer, and click Restore.
2.Wait a few minutes for the restoring and rebooting.
Note: During the restoring process, do not power off or reset the router.
7.5. Reboot
1.Visit http://tplinkwifi.net, and log in with the username and password you set for the router.
2.Go to System Tools > Reboot, and you can restart your router.

Some settings of the router will take effect only after rebooting, including:
•Change the LAN IP address (system will reboot automatically).
•Change the DHCP settings.
•Change the operation mode.
•Change the web management port.
•Upgrade the firmware of the router (system will reboot automatically).
•Restore the router to its factory defaults (system will reboot automatically).
•Update the configuration with the file (system will reboot automatically).
7.6. Password
1.Visit http://tplinkwifi.net, and log in with the username and password you set for the router.
2.Go to System Tools > Password, and you can change the factory default username and password of the router.
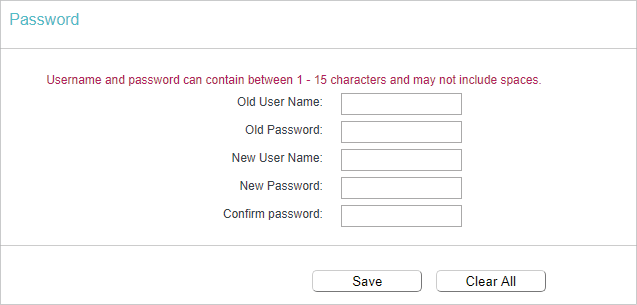
It is strongly recommended that you change the default username and password of the router, for all users that try to access the router’s web-based utility or Quick Setup will be prompted for the router’s username and password.
 Note: The new username and password must not exceed 15 characters and not include any spacing.
3.Click Save.
7.7. System Log
1.Visit http://tplinkwifi.net, and log in with the username and password you set for the router.
2.Go to System Tools > System Log, and you can view the logs of the router.
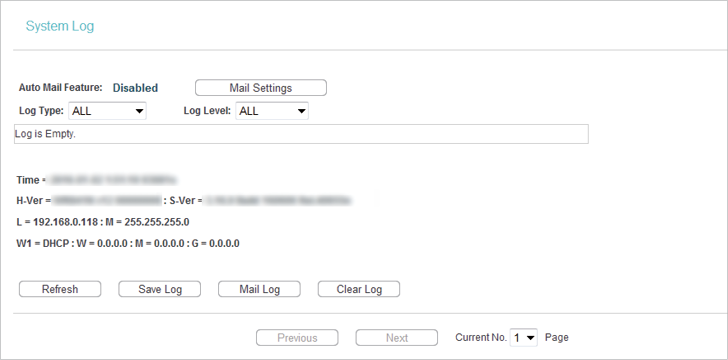
•Refresh - Refresh the page to show the latest log list.
•Clear Log - All the logs will be deleted from the router permanently, not just from the page.
•Save Log - Click to save all the logs in a txt file.
•Log Settings - Click to set the logs in the screen.
•Save Locally - If Save Locally is selected, events will be recorded in the local memory.
•Minimum Level - Select the Minimum level in the drop-down list, for the Minimum Level, all logged events above or equal to the selected level will be displayed.
•Save Remotely - If Save Remotely is selected, events will be sent to the specified IP address and UDP port of the remote system log server.
Click Logout at the bottom of the main menu, and you will log out of the web page and return to the login window.