TL-WR802N V4 User Guide
- About This Guide
- Chapter 1 Get to Know About Your Router
- Chapter 2 Connect the Hardware
- Chapter 3 Set Up Internet Connection Via Quick Setup Wizard
- Chapter 4 Configure the Router in Wireless Router Mode
- Chapter 5 Configure the Router in WISP Mode (Hotspot Mode)
- Chapter 6 Configure the Router in Access Point Mode
- Chapter 7 Configure the Router in Range Extender Mode
- Chapter 8 Configure the Router in Client Mode
- FAQ
- Authentication
Chapter 8 Configure the Router in Client Mode
This chapter presents how to configure the various features of the router working as a client.
It contains the following sections:
1.Visit http://tplinkwifi.net, and log in with the username and password you set for the router.
2.Go to Status. You can view the current status information of the router.
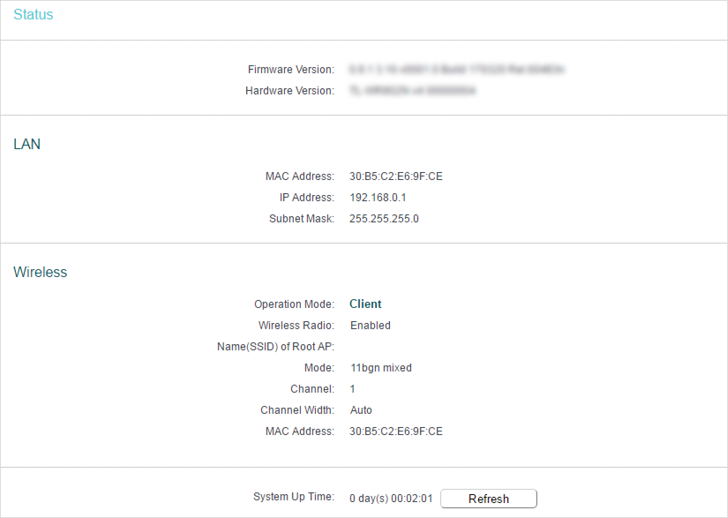
•Firmware Version - The version information of the router’s firmware.
•Hardware Version - The version information of the router’s hardware.
•LAN - This field displays the current settings of the LAN, and you can configure them on the Network > LAN page.
•MAC address - The physical address of the router.
•IP address - The LAN IP address of the router.
•Subnet Mask - The subnet mask associated with the LAN IP address.
•Wireless - This field displays the basic information or status of the wireless function, and you can configure them on the Wireless > Basic Settings page.
•Operation Mode - The current wireless working mode in use.
•Wireless Radio - Indicates whether the wireless radio feature of the router is enabled or disabled.
•Name(SSID) of Root AP - The wireless name of the root router.
•Mode - The current wireless mode which the router works on.
•Channel - The current wireless channel in use.
•Channel Width - The current wireless channel width in use.
•MAC Address - The physical address of the router.
•System Up Time - The length of the time since the router was last powered on or reset.
Click Refresh to get the latest status and settings of the router.
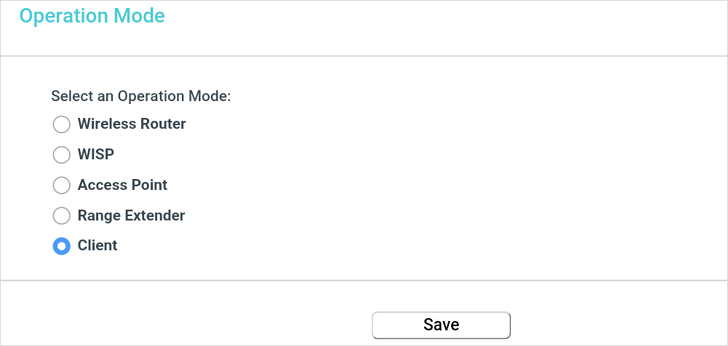
1.Visit http://tplinkwifi.net, and log in with the username and password you set for the router.
2.Go to Operation Mode.
3.Select the working mode as needed and click Save.
1.Visit http://tplinkwifi.net, and log in with the username and password you set for the router.
2.Go to Network > LAN.
3.Configure the IP parameters of the LAN and click Save.
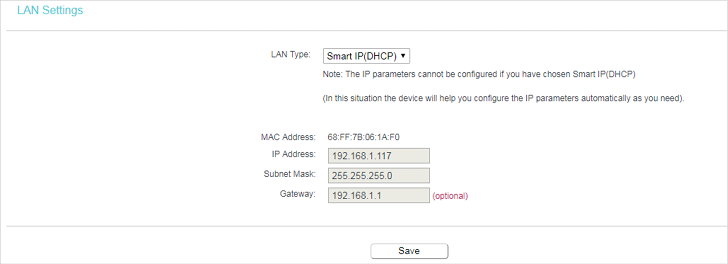
•Type - Either select Smart IP(DHCP) to get IP address from DHCP server, or Static IP to configure IP address manually.
•MAC Address - The physical address of the LAN ports. The value can not be changed.
•IP Address - Enter the IP address in dotted-decimal notation of your router if you select Static IP (the default one is 192.168.0.1).
•Subnet Mask - An address code that determines the size of the network. Normally 255.255.255.0 is used as the subnet mask.
 Note:
Note:
•If you have changed the IP address, you must use the new IP address to log in.
•If you select Smart IP(DHCP), the DHCP server of the router will not start up.
•If the new IP address you set is not in the same subnet as the old one, the IP address pool in the DHCP Server will be configured automatically, but the Virtual Server and DMZ Host will not take effect until they are re-configured.
4.1. Basic Settings
1.Visit http://tplinkwifi.net, and log in with the username and password you set for the router.
2.Go to Wireless > Basic Settings.
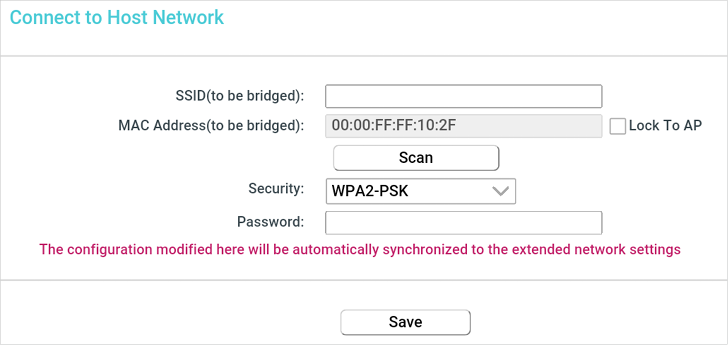
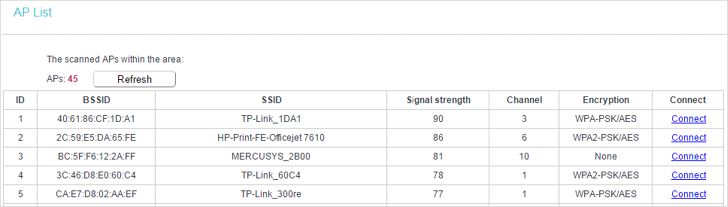
3.Click Scan, select your host network from the AP List and click Conenct.
4.Enter your host network’s wireless password in the Password field.
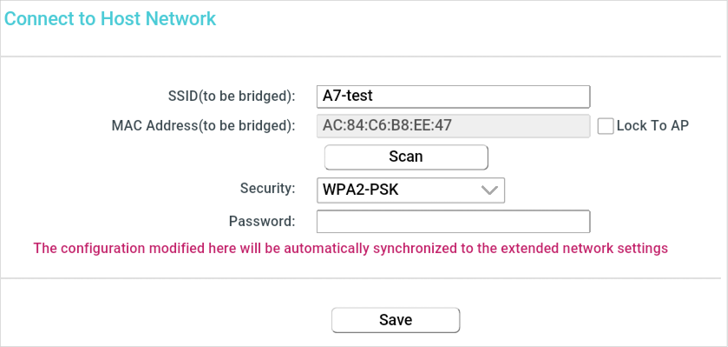
5.Tick Lock to AP checkbox if you want to restrict the device’s connection to only the network with this specific MAC address.
6.Click Save.
By default, the DHCP (Dynamic Host Configuration Protocol) Server is enabled and the router acts as a DHCP server; it dynamically assigns TCP/IP parameters to client devices from the IP Address Pool. You can change the settings of DHCP Server if necessary, and you can reserve LAN IP addresses for specified client devices.
5.1. DHCP Settings
1.Visit http://tplinkwifi.net, and log in with the username and password you set for the router.
2.Go to DHCP > DHCP Settings.
3.Specify DHCP server settings and click Save.
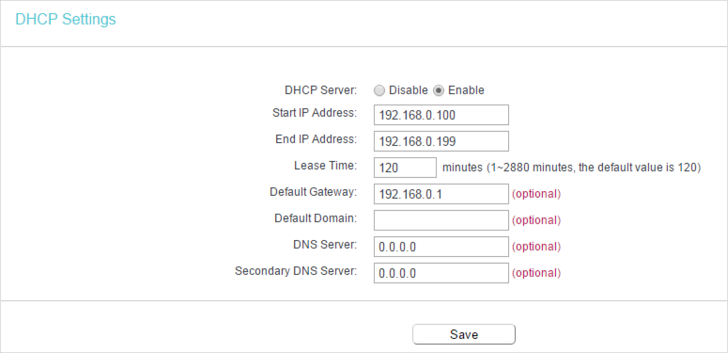
•DHCP Server - Enable or disable the DHCP server. If disabled, you must have another DHCP server within your network or else you must configure the computer manually.
•Start IP Address - Specify an IP address for the DHCP Server to start with when assigning IP addresses. 192.168.0.100 is the default start address.
•End IP Address - Specify an IP address for the DHCP Server to end with when assigning IP addresses. 192.168.0.199 is the default end address.
•Address Lease Time - The Address Lease Time is the amount of time a network user will be allowed to connect to the router with the current dynamic IP Address. When time is up, the user will be automatically assigned a new dynamic IP address. The range of the time is 1 ~ 2880 minutes. The default value is 120.
•Default Gateway (Optional) - It is suggested to input the IP address of the LAN port of the router. The default value is 192.168.0.1.
•Default Domain (Optional) - Input the domain name of your network.
•DNS Server (Optional) - Input the DNS IP address provided by your ISP.
•Secondary DNS Server (Optional) - Input the IP address of another DNS server if your ISP provides two DNS servers.
Note:
•To use the DHCP server function of the router, you must configure all computers on the LAN as Obtain an IP Address automatically.
•When you choose Smart IP(DHCP) in Network > LAN, the DHCP Server function will be disabled. You willsee the page as below.
.png)
5.2. DHCP Clients List
1.Visit http://tplinkwifi.net, and log in with the username and password you set for the router.
2.Go to DHCP > DHCP Clients List to view the information of the clients connected to the router.
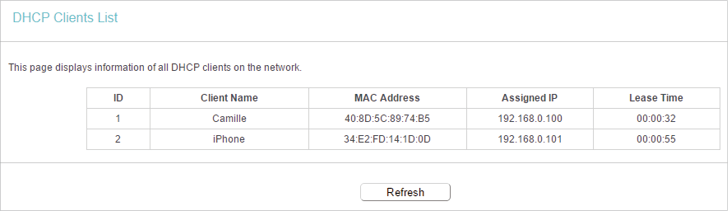
•Client Name - The name of the DHCP client.
•MAC Address - The MAC address of the DHCP client.
•Assigned IP - The IP address that the outer has allocated to the DHCP client.
•Lease Time - The time of the DHCP client leased. After the dynamic IP address has expired, a new dynamic IP address will be automatically assigned to the user.
You cannot change any of the values on this page. To update this page and show the current attached devices, click Refresh.
6.1. Diagnostic
Diagnostic is used to test the connectivity between the router and the host or other network devices.
1.Visit http://tplinkwifi.net, and log in with the username and password you set for the router.
2.Go to System Tools > Diagnostic.
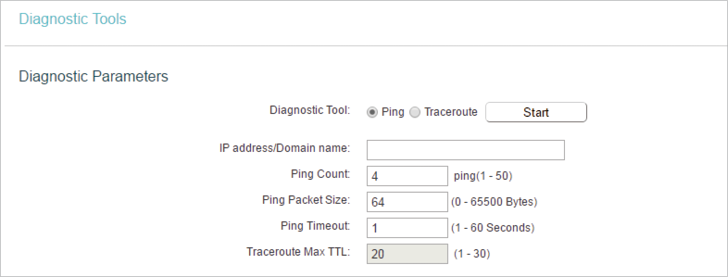
•Diagnostic Tool - Select one diagnostic tool.
•Ping - This diagnostic tool troubleshoots connectivity, reachability, and name resolution to a given host or gateway.
•Tracerouter - This diagnostic tool tests the performance of a connection.
 Note:
Note:
You can use ping/traceroute to test both numeric IP address or domain name. If pinging/tracerouting the IP address is successful, but pinging/tracerouting the domain name is not, you might have a name resolution problem. In this case, ensure that the domain name you are specifying can be resolved by using Domain Name System (DNS) queries.
•IP Address/Domain Name - Enter the destination IP address (such as 192.168.0.1) or Domain name (such as www.tp-link.com).
•Pings Count - The number of Ping packets for a Ping connection.
•Ping Packet Size - The size of Ping packet.
•Ping Timeout - Set the waiting time for the reply of each Ping packet. If there is no reply in the specified time, the connection is overtime.
•Traceroute Max TTL - The max number of hops for a Traceroute connection.
3.Click Start to check the connectivity of the internet.
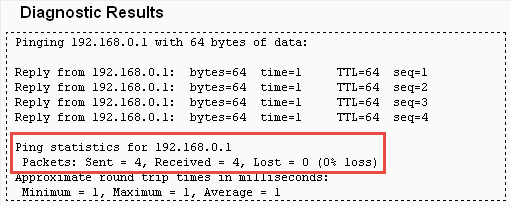
4.The Diagnostic Results page displays the diagnosis result. If the result is similar to the following figure, the connectivity of the internet is fine.
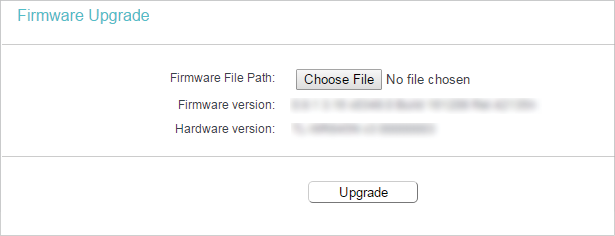
6.2. Firmware Upgrade
TP-Link is dedicated to improving and richening the product features, giving users a better network experience. We will release the latest firmware at TP-Link official website
www.tp-link.com. You can download the lastest firmware file from the Support page of our website and upgrade the firmware to the latest version.
1.Download the latest firmware file for the router from our website www.tp-link.com.
2.Visit http://tplinkwifi.net, and log in with the username and password you set for the router.
3.Go to System Tools > Firmware Upgrade.
4.Click Choose File to locate the downloaded firmware file, and click Upgrade.
6.3. Factory Defaults
1.Visit http://tplinkwifi.net, and log in with the username and password you set for the router.
2.Go to System Tools > Factory Defaults. Click Restore to reset all settings to the default values.

•Default Username: admin
•Default Password: admin
•Default IP Address: 192.168.0.1
•Default Subnet Mask: 255.255.255.0
6.4. Backup & Restore
The configuration settings are stored as a configuration file in the router. You can backup the configuration file in your computer for future use and restore the router to the previous settings from the backup file when needed.
1.Visit http://tplinkwifi.net, and log in with the username and password you set for the router.
2.Go to System Tools > Backup & Restore.
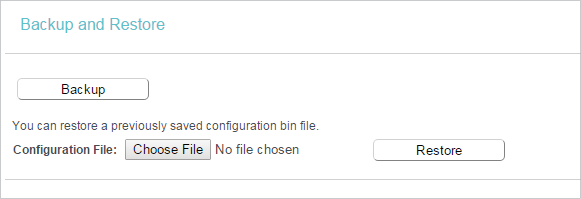
•To backup configuration settings:
Click Backup to save a copy of the current settings in your local computer. A “.bin“ file of the current settings will be stored in your computer.
•To restore configuration settings:
1.Click Choose File to locate the backup configuration file stored in your computer, and click Restore.
2.Wait a few minutes for the restoring and rebooting.
 Note:
Note:
During the restoring process, do not power off or reset the router.
6.5. Reboot
Some settings of the router will take effect only after rebooting, including:
•Change the LAN IP Address (system will reboot automatically).
•Change the DHCP Settings.
•Change the Working Modes.
•Change the Web Management Port.
•Upgrade the firmware of the router (system will reboot automatically).
•Restore the router to its factory defaults (system will reboot automatically).
•Update the configuration with the file (system will reboot automatically).
1.Visit http://tplinkwifi.net, and log in with the username and password you set for the router.
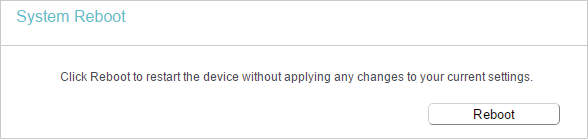
2.Go to System Tools > Reboot.
•To reboot manually
Click Reboot, and wait a few minutes for the router to rebooting.
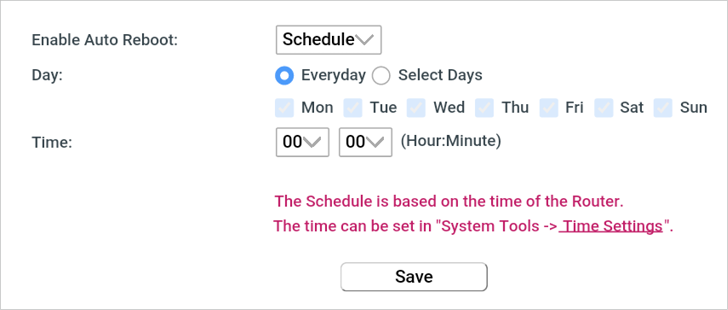
•To reboot automatically
•Select Timeout in the drop-down list of Enable Auto Reboot and specify a time period (1-72hours), then the router will reboot automatically after every this interval.

•Select Schedule in the drop-down list of Enable Auto Reboot and specify the Time when the router reboots and Day which to decide how often it reboots.
6.6. Account Management
1.Visit http://tplinkwifi.net, and log in with the username and password you set for the router.
2.Go to System Tools > Administrator, and focus on the Account Management section. You can change the factory default username and password of the router.

It is strongly recommended that you change the default username and password of the router, for all users that try to access the router’s web-based utility or Quick Setup will be prompted for the router’s username and password.
Note:
The new username and password must not exceed 15 characters and not include any spacing.
3.Click Save.
6.7. Local Management
This feature allows you to block computers on the LAN from accessing the router by using the MAC/IP-based authentication.
1.Visit http://tplinkwifi.net, and log in with the username and password you set for the router.
2.Go to System Tools > Administrator, and focus on the Service Configuration section.

•Allow all LAN conencted devices to manage the router locally
1.Keep the Available Host (IP/MAC) empty, which means you don’t specify any host to manage the router.
2.If you want to access the router via both HTTPS and HTTP, please tick the Enable checkbox in HTTPS Service column. Otherwise, keep it disbled.
3.Keep the local management port as default if you don’t know which port to use.
4.Click Save.
Note:
If the web management port conflicts with the one used for Virtual Server entry, the entry will be automatically disabled after the setting is saved.
•Allow a specific device to manage the router locally
1.Enter the IP or MAC address of the host that you want to manage the router in the Available Host (IP/MAC) entry. The format of the MAC address is XX:XX:XX:XX:XX:XX (X is any hexadecimal digit).
2.If you want to access the router via both HTTPS and HTTP, please tick the Enable box in HTTPS Service column. Otherwise, keep it disbled.
3.Keep the Port as default if you don’t know which port to use.
4.Click Save.
Note:
If your PC is blocked but you want to access the router again, press and hold the Reset button to reset the router to the factory defaults.
•Certificate
Download and install the certificate for management via HTTPS if you need it. Once the certificate is installed, warnings will not pop up when you access the router via HTTPS.

6.8. Remote Management
This feature allows you to manage your router from a remote location via the internet.
1.Visit http://tplinkwifi.net, and log in with the username and password you set for the router.
2.Go to System Tools > Remote Management, and focus on the Service Configuration section.
•Forbid all devices to manage the router remotely
Do not tick the Enable checkbox in both HTTP Service and HTTPS Service.
•Allow all devices to manage the router remotely
1.Tick the Enable checkbox in HTTP Service.
2.If you want to access the router via both HTTPS and HTTP, please tick the Enable checkbox in HTTPS Service column. Otherwise, keep it disbled.
3.For higher security, you can change the remote management web port by entering a number between 1024 and 65534.
4.Click Save.
•Allow a specific device to manage the router remotely
1.Tick the Enable checkbox in HTTP Service.
2.If you want to access the router via both HTTPS and HTTP, please tick the Enable checkbox in HTTPS Service column. Otherwise, keep it disbled.
3.For higher security, you can change the remote management web port by entering a number between 1024 and 65534.
4.Enter the IP or MAC address of the host that you want to manage the router in the Available Host (IP/MAC) entry. The format of the MAC address is XX:XX:XX:XX:XX:XX (X is any hexadecimal digit).
5.Click Save.
•Certificate
Download and install the certificate for management via HTTPS if you need it. Once the certificate is installed, warnings will not pop up when you access the router via HTTPS.
Note:
•To access the router, enter your router’s WAN IP address in your browser’s address bar, followed by a colon and the custom port number. For example, if your router’s WAN address is 202.96.12.8, and the port number used is 8080, please enter http://202.96.12.8:8080 in your browser. Later, you may be asked for the router’s password. After successfully entering the username and password, you will be able to access the router’s web management page.
•Be sure to change the router’s default password for security purposes.
6.9. System Log
1.Visit http://tplinkwifi.net, and log in with the username and password you set for the router.
2.Go to System Tools > System Log, and you can view the logs of the router.
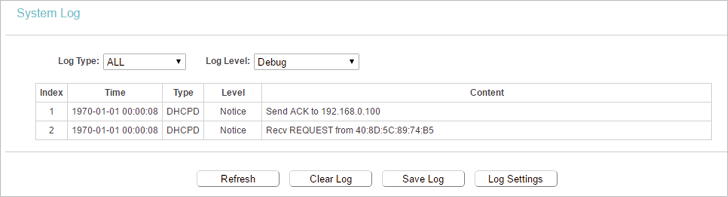
•Loge Type -By selecting the log type, only logs of this type will be shown.
•Log Level - By selecting the log level, only logs of this level will be shown.
•Refresh - Refresh the page to show the latest log list.
•Clear Log - All the logs will be deleted from the router permanently, not just from the page.
Click Logout at the bottom of the main menu, and you will log out of the web management page and return to the login window.