TL-WR802N V4 User Guide
- About This Guide
- Chapter 1 Get to Know About Your Router
- Chapter 2 Connect the Hardware
- Chapter 3 Set Up Internet Connection Via Quick Setup Wizard
- Chapter 4 Configure the Router in Wireless Router Mode
- Chapter 5 Configure the Router in WISP Mode (Hotspot Mode)
- Chapter 6 Configure the Router in Access Point Mode
- Chapter 7 Configure the Router in Range Extender Mode
- Chapter 8 Configure the Router in Client Mode
- FAQ
- Authentication
Chapter 2 Connect the Hardware
This chapter contains the following sections:
•The product should not be located in a place where it will be exposed to moisture or excessive heat.
•Place the router in a location where it can be connected to multiple devices as well as to a power source.
•Make sure the cables and power cord are safely placed out of the way so they do not create a tripping hazard.
•The router can be placed on a shelf or desktop.
•Keep the router away from strong devices with strong electromagnetic interference, such as Bluetooth devices, cordless phones and microwaves.
There are five operation modes supported by this router: Wireless Router, WISP, Access Point, Range Extender and Client. Please determine the operation mode you need and carry out the corresponding steps.
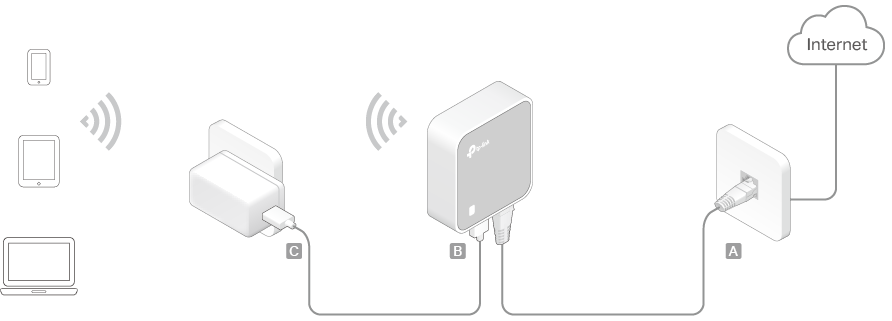
2.1. Wireless Router Mode
Create an instant private wireless network and share internet to multiple Wi-Fi devices. This mode is suitable for hotel rooms and home networks.
1.Connect the hardware according to Step A to C.
2.Use the default Wi-Fi Name and Wi-Fi Password printed on the Wi-Fi Info Card or on the product label at the bottom of your router to connect to the Wi-Fi.
 Note:
Note:
•If the hotel’s internet has an authentication process, you will need to authenticate only once and only on one device.
•Check the internet connection on your laptop or smartphone, and please note that:
•If you can access the internet without any restriction, no configuration is required.
•If you’re directed to an authentication page, please complete it to access the internet.
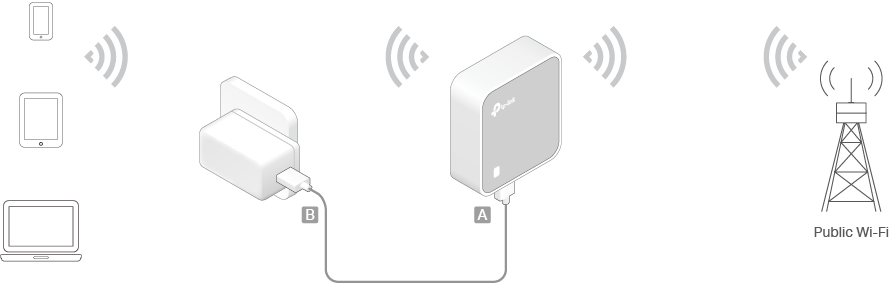
2.2. WISP Mode (Hotspot Mode)
In WISP mode, the router enables multiple users to share internet connection anywhere public Wi-Fi exists. For example: hotel room, trade show, ...
1.Connect the router according to Step A to B.
2.Use the default Wi-Fi Name and Wi-Fi Password printed on the Wi-Fi Info Card or on the product label at the bottom of your router to connect to the Wi-Fi.
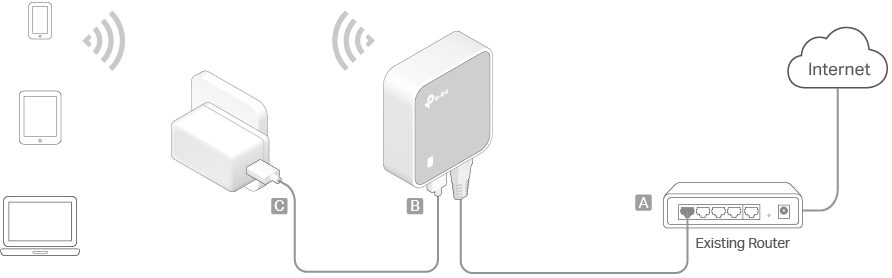
2.3. Access Point Mode
Create a wireless network from an Ethernet connection. This mode is suitable for dorm rooms or homes where there’s already a wired router but you need a wireless hotspot.
1.Connect the router according to Step A to C.
2.Use the default Wi-Fi Name and Wi-Fi Password printed on the Wi-Fi Info Card or on the product label at the bottom of your router to connect to the Wi-Fi.
Note:
If the hotel’s internet has an authentication process, you will need to authenticate it on EACH device.
2.4. Range Extender Mode
Repeat signal from an existing wireless network. This mode is suitable to extend wireless coverage, reaching devices that were previously too far from your primary router to maintain a stable wireless connection. The repeated signal will display the same network name and password as those of your existing wireless network.
1.Connect the router according to Step A to B.
2.Use the default Wi-Fi Name and Wi-Fi Password printed on the Wi-Fi Info Card or on the product label at the bottom of your router to connect to the Wi-Fi.

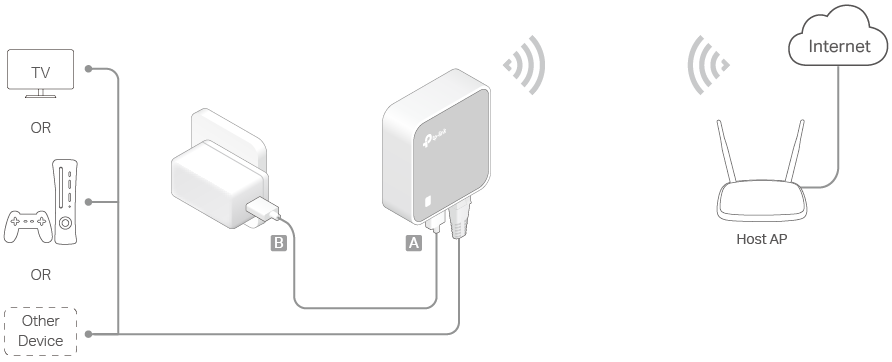
2.5. Client Mode
In this mode, this device can be connected to another device via an Ethernet cable and act as an adapter to grant your wired devices access to a wireless network, especially for a smart TV, media player, or game console.
1.Connect the router according to Step A to B.
2.On your wireless device, use the default Wi-Fi Name and Wi-Fi Password printed on the Wi-Fi Info Card or on the product label at the bottom of your router to connect to the Wi-Fi.