TD-W9960 V1.2 User Guide
- About This Guide
- Chapter 1 Get to Know Your Modem Router
- Chapter 2 Connect the Hardware
- Chapter 3 Log In to Your Modem Router
- Chapter 4 Set Up Internet Connections
- Chapter 5 TP-Link Cloud Service
- Chapter 6 IPTV
- Chapter 7 Guest Network
- Chapter 8 Parental Controls
- Chapter 9 Bandwidth Control
- Chapter 10 Network Security
- Chapter 11 NAT Forwarding
- Chapter 12 IPSec VPN
- Chapter 13 Specify Your Network Settings
- Chapter 14 Administrate Your Network
- Appendix: Troubleshooting
- Authentication
Chapter 14 Administrate Your Network
This chapter introduces how to change the system settings and administrate your modem router’s network.
This chapter contains the following sections:
•Back up and Restore Configuration Settings
System time is the time displayed while the modem router is running. The system time you configure here will be used for other time-based functions like Parental Controls and Wireless Schedule. You can manually set how to get the system time.
Follow the steps below to set your system time.
1.Visit http://tplinkmodem.net, and log in with the password you set for the modem router.
2.Go to Advanced > System Tools > Time Settings page.
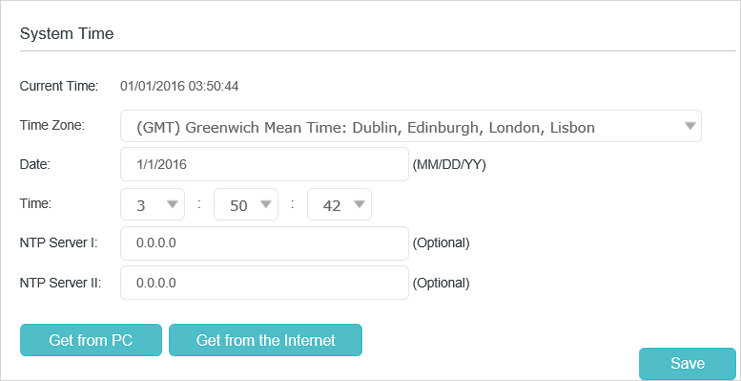
3.Configure the system time using the following methods:
Manually: Select your time zone and enter your local time.
Get from PC: Click this button if you want to use the time of the current managing PC.
Get GMT: Click this button if you want to get time from the internet. Make sure your modem router can access the internet before you select this way to get system time.
4.Click Save.
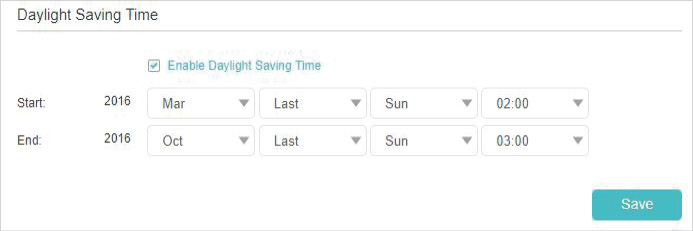
5.After setting the system time, you can set Daylight Saving Time according to your needs. Tick the check box to enable Daylight Saving Time, set the start and end time and then click Save to make the settings effective.
TP-Link is dedicated to improving product features, giving you a better network experience.
We will inform you through the web management page if there’s any update firmware available for your router. The latest firmware can also be downloaded from the Support page of our website www.tp-link.com for free.
 Note:
Note:
1.Make sure that you have a stable connection between the router and your computer. It is NOT recommended to upgrade the firmware wirelessly.
2.Make sure you remove any USB storage device connected to the router before the firmware upgrade to prevent data loss.
3.Back up your router configuration before upgrading the firmware.
4.Do NOT turn off the router during the firmware upgrade.
2.1. Online Upgrade
1.Visit http://tplinkmodem.net, and log in with the account you set for the router.
2.If there’s any firmware update available for your router, the update icon  will display on the top-right corner of the page. Click the icon to go to the Firmware Upgrade page.
Alternatively, you can go to Advanced > System Tools > Firmware Upgrade, and click Check for Upgrades to see if there’s any new firmware.

 Tips:
Tips:
If there’s any new important firmware update for your router, you will see the notification (similar as shown below) on your computer when open a new web page. Click Upgrade now, and log into the web management page. You will see the Firmware Upgrade page.

3.Wait a few moments for the upgrading and rebooting.
2.2. Local Upgrade
1.Download the latest firmware file for the router from our website www.tp-link.com.
2.Visit http://tplinkmodem.net, and log in with the account you set for the router.
3.Go to Advanced > System Tools > Firmware Upgrade.
4.Focus on the Device Information section. Make sure the downloaded firmware file matches with the Hardware Version.
5.Focus on the Local Upgrade section. Click Browse to locate the downloaded new firmware file, and click Upgrade.

6.Wait a few moments for the upgrading and rebooting.
3. Back up and Restore Configuration Settings
The configuration settings are stored as a configuration file in the router. You can back up the configuration file to your computer for future use and restore the modem router to a previous settings from the backup file when needed. Moreover, if needed you can erase the current settings and reset the modem router to the default factory settings.
•To back up configuration settings
1.Visit http://tplinkmodem.net, and log in with the account you set for the router.
1.Click Advanced > System Tools > Backup & Restore page.
2.Click Backup to save a copy of the current settings to your local computer. A conf.bin file will be stored to your computer.
•To restore configuration settings
1.Visit http://tplinkmodem.net, and log in with the account you set for the router.
1.Click Advanced > System Tools > Backup & Restore page.
_1.20.jpg)
2.Click Browse to locate the previous backup configuration file, and click Restore.
3.Wait for the restoring and then the modem router will automatically reboot.
•To reset the modem router to factory default settings
1.Visit http://tplinkmodem.net, and log in with the account you set for the router.
1.Click Advanced > System Tools > Backup & Restore page.
2.Click Restore to restore all configuration settings to default values, except your login and TP-Link ID information. Click Factory Restore to reset the modem router.
3.Wait for the reset process to complete, and then the modem router will automatically reboot.
Note:
1.During the resetting process, do not turn off the modem router.
2.We strongly recommend you back up the current configuration settings before resetting the modem router.
4. Change the Administrator Account
Admin account is used to log in to the modem router’s web management page. You are required to set the admin account at first login. You can also change it on the web page.
1.Visit http://tplinkmodem.net, and log in with the account you set for the router.
2.Go to Advanced > System Tools > Administration page. Locate the Account Management section.
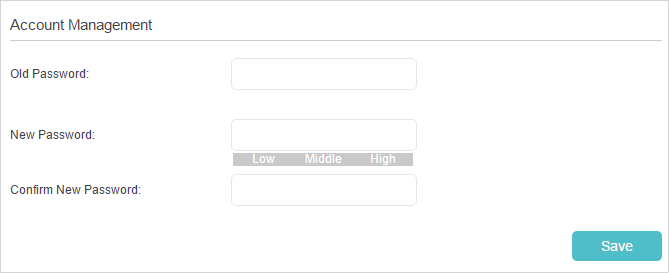
3.Enter the old password. Enter the new password and enter again to confirm.
4.Click Save to make the settings effective.
You can control the local devices’ authority to manage the modem router via Local Management feature. By default all local connected devices are allowed to manage the modem router. You can also specify one device to manage the modem router and enable local management over a more secure way, HTTPS.
Follow the steps below to allow only the specific device to manage the router via the local management over HTTPS.
1.Visit http://tplinkmodem.net, and log in with the account you set for the router.
2.Go to Advanced > System Tools > Administration page. Locate the Local Management section.
3.Keep the Port as the default setting. Enable Local Management via HTTPS and keep the Port for HTTPS as the default setting. Enter the IP address or MAC address of the local device to manage the modem router.
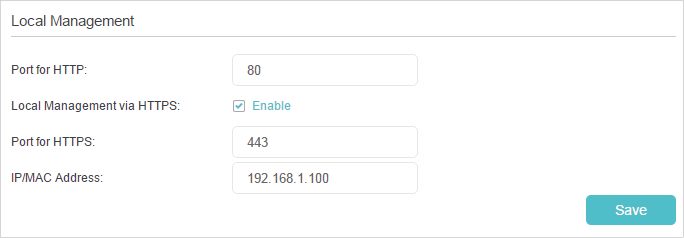
4.Click Save.
Now, you can manage the modem router over both HTTP (http://tplinkmodem.net) and HTTPS (https://tplinkmodem.net).
Note:
If you want that all local devices can manage the modem router, just leave the IP/MAC Address field blank.
By default, the remote devices are not allowed to manage the modem router from the internet. You can enable remote management over HTTP and/or HTTPS if needed. HTTPS is a more secure way to access the router.
Note:
If your ISP assigns a private WAN IP address (such as 192.168.x.x or 10.x.x.x), you cannot use the remote management feature because private addresses are not routed on the internet.
Follow the steps below to allow remote devices to manage the modem router over HTTPS.
1.Visit http://tplinkmodem.net, and log in with the account you set for the router.
2.Go to Advanced > System Tools > Administration page. Locate the Remote Management section.
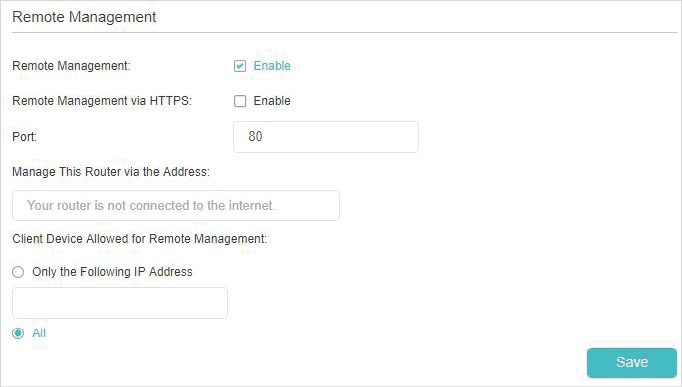
3.Tick the check box to enable Remote Management. Enable Remote Management via HTTPS to allow for HTTPS connection. Keep the Port as the default setting.
4.Set the client device allowed for remote management. Select All to allow all remote devices to manage the modem router. If you just want to allow a specific device to manage the modem router, select Only the Following IP Address and enter the IP address of the remote device.
5.Click Save.
All devices or the specific device on the internet can log in to your router using the address displayed on the Manage This Router via the Address field to manage the modem router.
 Tips:
Tips:
1.If you were warned about the certificate when visiting the web management page remotely, click Trust (or a similar option) to continue. To avoid this warning, you can download and install the certificate on the modem router’s web management page at Advanced > System Tools > Administration.

2.The router’s WAN IP is usually a dynamic IP. Please refer to Set Up a Dynamic DNS Service Account if you want to log in to the router through a domain name.
System Log can help you know what happened to your modem router, facilitating you to locate the malfunctions. For example when your modem router does not work properly, you will need to save the system log and send it to the technical support for troubleshooting.
1.Visit http://tplinkmodem.net, and log in with the account you set for the router.
1.Click Advanced > System Tools > System Log page.
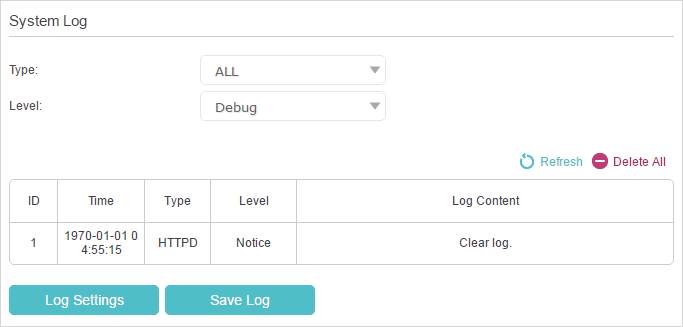
•To view the system logs:
You can view specific system logs by selecting the log Type and Level.
Click Refresh to refresh the log list.
•To save the system logs:
You can choose to save the system logs to your local computer or a remote server.
Click Save Log to save the logs in a txt file to your computer.
Click Log Settings to set the storage path of logs.
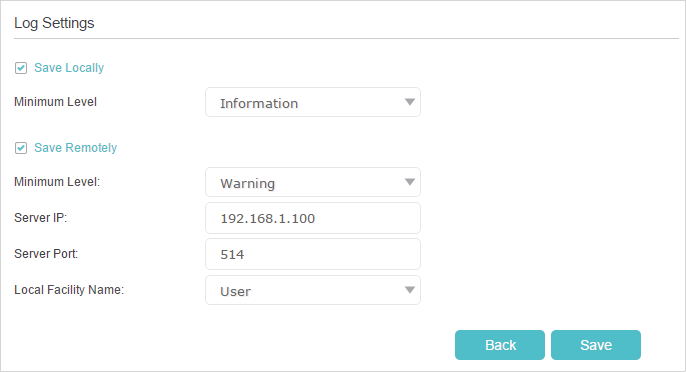
•Save Locally: Select this option to cache the system log to the router’s local memory, select the minimum level of system log to be saved from the drop-down list. The logs will be shown in the table in descending order on the System Log page.
•Save Remotely: Select this option to send the system log to a remote server, select the minimum level of system log to be saved from the drop-down list and enter the information of the remote server. If the remote server has a log viewer client or a sniffer tool implemented, you can view and analyze the system log remotely in real-time.
The modem router supports CWMP (CPE WAN Management Protocol), also called TR-069. This collects information, performs diagnostics and configures the devices automatically via ACS (Auto-Configuration Server).
1.Visit http://tplinkmodem.net, and log in with the account you set for the router.
2.Go to Advanced > System Tools > CWMP Settings page.
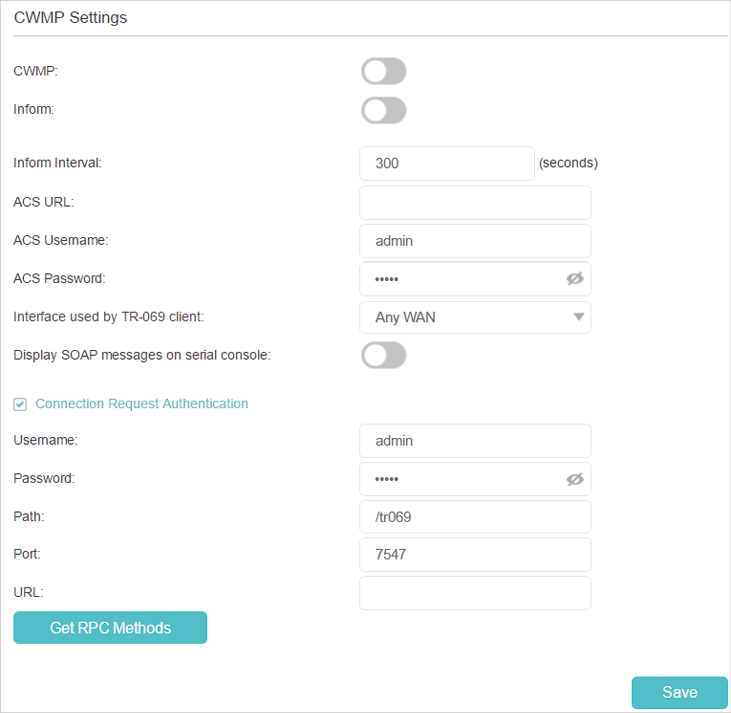
•CWMP: Toggle On to enable the CWMP (CPE WAN Management Protocol) feature.
•Inform: Enable this feature to send an Inform message to the ACS (Auto Configuration Server) periodically.
•Inform Interval: Enter the time interval in seconds when the Inform message will be sent to the ACS.
•ACS URL: Enter the web address of the ACS which is provided by your ISP.
•ACS Username/Password: Enter the username/password to log in to the ACS server.
•Interface used by TR-069 client: Select which interface to be used by the TR-069 client.
•Display SOAP messages on serial console: Toggle to enable or disable this feature.
•Connection Request Authentication: Select this check box to enable authentication for the connection request.
•Username/Password: Enter the username/password for the ACS server to log in to the router.
•Path: Enter the path for the ACS server to log in to the router.
•Port: Enter the port that connects to the ACS server.
•URL: Enter the URL that connects to the ACS server.
•Get RPC methods: Click to get the methods to support CWMP.
Click Save to make the settings effective.
SNMP (Simple Network Management Protocol) is widely applied in the computer networks of today, and is used for ensuring the transmission of the management information between two nodes. In this way, network administrators can easily search and modify the information on any node on the network. Meanwhile, they can locate faults promptly and implement the fault diagnosis, capacity planning and report generating.
An SNMP Agent is an application running on the modem router that performs the operational role of receiving and processing SNMP messages, sending responses to the SNMP manager, and sending traps when an event occurs. So a router that contains SNMP “agent” software can be monitored and/or controlled by SNMP Manager using SNMP messages.
1.Visit http://tplinkmodem.net, and log in with the password you set for the modem router.
2.Go to Advanced > System Tools > SNMP Settings page.
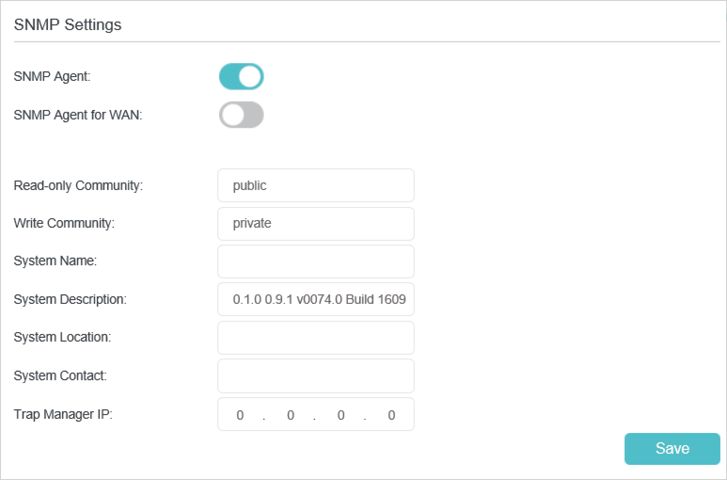
•SNMP Agent: Toggle On to enable the built-in SNMP agent that allows the router to operate as the operational role in receiving and processing of SNMP messages, sending responses to the SNMP manager, and triggering SNMP traps when an event occurs.
•Read-only Community: Displays the default public community string that protects the router from unauthorized access.
•Write Community: Displays the default write community string that protects the router from unauthorized changes.
•System Name: Displays the administratively-assigned name for this managed device.
•System Description: Displays the textual description of the managed device. This value should include the full name and version identification of the system’s hardware type, software operating-system, and networking software.
•System Location: Displays the physical location of this device (for example, the telephone closet, 3rd floor).
•System Contact: Displays the textual identification of the contact person for this managed device, together with information on how to contact this person.
•Trap Manager IP: Displays the IP address of the host to receive the traps.
You are suggested to keep the default settings. Click Save to make the settings effective.