TD-W9960 V1.2 User Guide
- About This Guide
- Chapter 1 Get to Know Your Modem Router
- Chapter 2 Connect the Hardware
- Chapter 3 Log In to Your Modem Router
- Chapter 4 Set Up Internet Connections
- Chapter 5 TP-Link Cloud Service
- Chapter 6 IPTV
- Chapter 7 Guest Network
- Chapter 8 Parental Controls
- Chapter 9 Bandwidth Control
- Chapter 10 Network Security
- Chapter 11 NAT Forwarding
- Chapter 12 IPSec VPN
- Chapter 13 Specify Your Network Settings
- Chapter 14 Administrate Your Network
- Appendix: Troubleshooting
- Authentication
Chapter 13 Specify Your Network Settings
This chapter introduces how to change the default settings or adjust the basic configuration of the modem router using the web management page.
It contains the following sections:
1.1. Change the LAN IP Address
The modem router is preset with a default LAN IP 192.168.1.1, which you can use to log in to its web management page. The LAN IP address together with the Subnet Mask also defines the subnet that the connected devices are on. If the IP address conflicts with another device in your local network or your network requires a specific IP subnet, you can change it.
Follow the steps below to change your IP address.
1.Visit http://tplinkmodem.net, and log in with the account you set for the router.
2.Go to Advanced > Network > LAN Settings page and select IPv4.
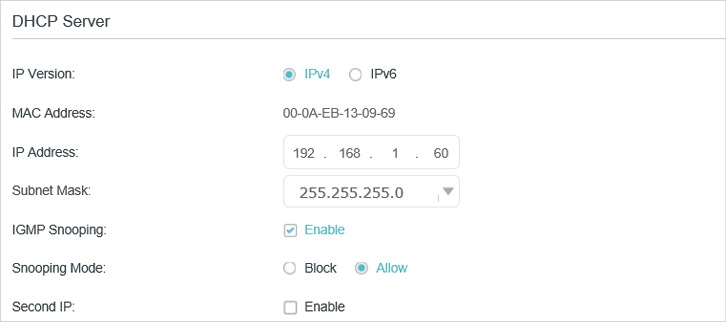
3.Type in a new IP Address appropriate to your needs.
4.Select the Subnet Mask from the drop-down list. The subnet mask together with the IP address identifies the local IP subnet.
5.Keep IGMP Snooping enabled by default. IGMP snooping is the process of listening to IGMP (Internet Group Management Protocol) network traffic. The function prevents hosts on a local network from receiving traffic for a multicast group they have not explicitly joined.
6.You can configure the modem router’s Second IP and Subnet Mask for LAN interface through which you can also access the web management page.
7.Leave the rest of the default settings as they are.
8.Click Save to make the settings effective.
1.2. Use the Modem Router as a DHCP Server
You can configure the modem router to act as a DHCP server to assign IP addresses to its clients. To use the DHCP server function of the modem router, you must configure all computers on the LAN to obtain an IP Address automatically.
Follow the steps below to configure DHCP server.
1.Visit http://tplinkmodem.net, and log in with the account you set for the router.
2.Go to Advanced > Network > LAN Settings page and select IPv4.
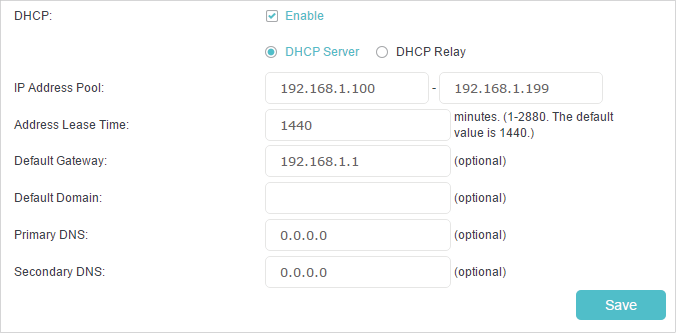
3.Select DHCP to enable the DHCP function and select DHCP Server.
4.Specify the IP Address Pool, the start address and end address must be on the same subnet with LAN IP. The modem router will assign addresses within this specified range to its clients. It is from 192.168.1.100 to 192.168.1.199 by default.
5.Enter a value for the Address Lease Time. The Address Lease Time is the amount of time in which a DHCP client can lease its current dynamic IP address assigned by the modem router. After the dynamic IP address expires, the user will be automatically assigned a new dynamic IP address. The default is 1440 minutes.
6.Keep the rest of the settings as default and click Save.
 Note:
Note:
1.The modem router can be configured to work as a DHCP Relay. A DHCP relay is a computer that forwards DHCP data between computers that request IP addresses and the DHCP server that assigns the addresses. Each of the device’s interfaces can be configured as a DHCP relay. If it is enabled, the DHCP requests from local PCs will be forwarded to the DHCP server that runs on WAN side.
2.You can also appoint IP addresses within a specified range to devices of the same type by using Condition Pool feature. For example, you can assign IP addresses within the range (192.168.1.50 to192.168.1.80) to Camera devices, thus facilitating the network management. Enable DHCP feature and configure the parameters according to your situation on the Advanced > Network > LAN Settings page.
You can view and add a reserved address for a client. When you specify an IP address for a device on the LAN, that device will always receive the same IP address each time when it accesses the DHCP server. If there are some devices in the LAN that require permanent IP addresses, please configure Address Reservation on the router for the purpose.
Follow the steps below to reserve an IP address for your device.
1.Visit http://tplinkmodem.net, and log in with the account you set for the router.
2.Go to Advanced > Network > LAN Settings page and select IPv4.
3.Scroll down to locate the Address Reservation table and click Add to add an address reservation entry for your device.
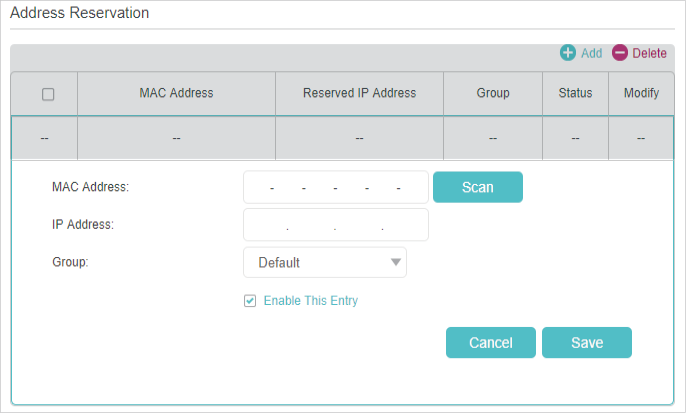
4.Enter the MAC address of the device for which you want to reserve IP address.
5.Specify the IP address which will be reserved by the router.
6.Check to Enable this entry and click Save to make the settings effective.
Based on the IPv6 protocol, the modem router provides two ways to assign IPv6 LAN addresses:
•Configure the RADVD (Router Advertisement Daemon) address type
•Configure the DHCPv6 Server address type
2.1. Configure the RADVD Address Type
1.Visit http://tplinkmodem.net, and log in with the account you set for the router.
2.Go to Advanced > Network > LAN Settings.
3.Select IPv6 to configure IPv6 LAN parameters.
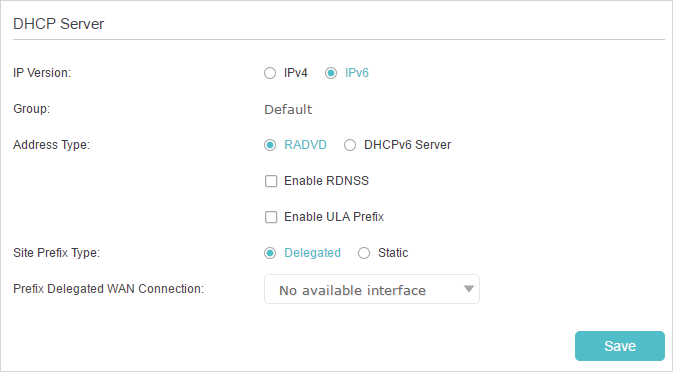
1 )Select the RADVD address type to make the modem router assign IPv6 address prefixes to hosts.
Note:
Do not select the Enable RDNSS and Enable ULA Prefix check boxes unless required by your ISP. Otherwise you may not be able to access the IPv6 network. For more information about RDNSS and ULA Prefix, contact our technical support.
2 )Keep Site Prefix Type as the default value Delegated. If your ISP has provided a specific IPv6 site prefix, select Static and enter the prefix.
3 )Keep Prefix Delegated WAN Connection as the default value.
4.Click Save to make the settings effective.
2.2. Configure the DHCPv6 Server Address Type
1.Visit http://tplinkmodem.net, and log in with the account you set for the router.
2.Go to Advanced > Network > LAN Settings.
3.Select IPv6 to configure IPv6 LAN parameters.
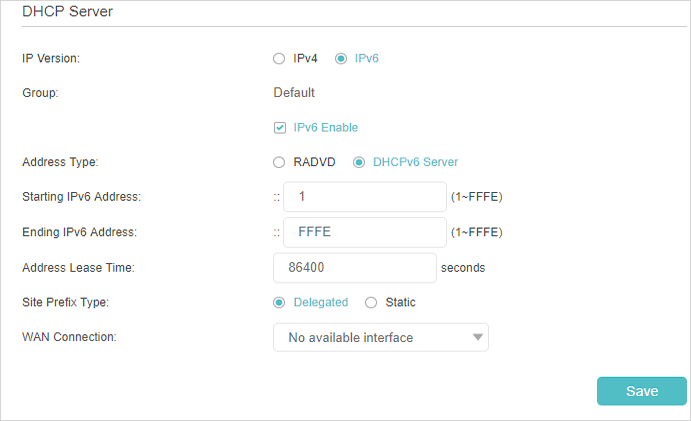
1 )Select the DHCPv6 Server address type to make the modem router assign IPv6 addresses to hosts.
2 )Specify the Start/End IPv6 Address for the IPv6 suffixes. The modem router will generate IPv6 addresses within the specified range.
3 )Keep Address Lease Time as the default value.
4 )Keep Site Prefix Type as the default value Delegated. If your ISP has provided a specific IPv6 site prefix, select Static and enter the prefix.
5 )Keep Prefix Delegated WAN Connection as the default value.
4.Click Save to make the settings effective.
3.1. Specify Basic Wireless Settings
The modem router’s wireless network name (SSID) and password, and security option are preset in the factory. The preset SSID and password can be found on the product label. You can customize the wireless settings according to your needs.
Visit http://tplinkmodem.net, and log in with the account you set for the router. Go to Basic > Wireless page.
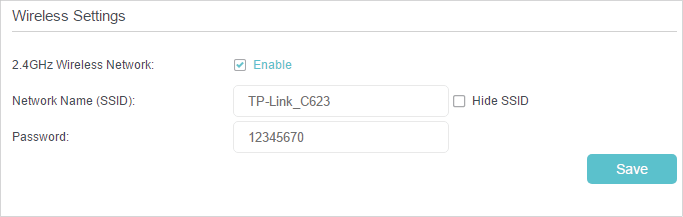
•To enable or disable the wireless function:
Enable the 2.4 GHz Wireless Network. If you don’t want to use the wireless function, just deselect the box. If you disable the wireless function, all the wireless settings won’t be effective.
•To change the wireless network name (SSID) and wireless password:
Enter a new SSID using up to 32 characters. The value is case-sensitive.
Note:
If you use a wireless device to change the wireless settings, you will be disconnected after the new settings are effective. Please write down the new SSID and password for future use.
•To hide SSID:
Select Hide SSID, and your SSID will not be broadcast. Your SSID won’t display on your wireless device when you scan for local wireless network list and you need to manually join the network.
•To change the mode or channel:
Go to Advanced > Wireless > Wireless Settings page.
Mode: Select the desired mode.
•802.11n only: Select only if all of your wireless clients are 802.11n devices.
•802.11gn mixed: Select if you are using both 802.11g and 802.11n wireless clients.
•802.11bgn mixed: Select if you are using a mix of 802.11b, 11g, and 11n wireless clients.
Note: When 802.11n only mode is selected, only 802.11n wireless stations can connect to the modem router. It is strongly recommended that you select 802.11bgn mixed, and all of 802.11b, 802.11g, and 802.11n wireless stations can connect to the modem router.
Channel: Select the channel you want to use from the drop-down list. This field determines which operating frequency will be used. It is not necessary to change the wireless channel unless you notice interference problems with another nearby access point.
Channel Width: Select the channel width from the drop-down list. The default setting is Automatic, which can adjust the channel width for your clients automatically.
Transmit Power: Select Low, Middle, or High to specify the data transmit power. The default and recommended setting is High.
•To change the security option:
1.Go to Advanced > Wireless > Wireless Settings page.
2.Select an option from the Security drop-down list. The router provides four options, None, WPA/WPA2 Personal (Recommended), WPA/WPA2 Enterprise, WEP. WPA2 uses the newest standard and the security level is the highest. We recommend you don’t change the default settings unless necessary.
3.2. Use WPS for Wireless Connection
You can use WPS (Wi-Fi Protected Setup) to add a new wireless device to your existing network quickly and easily.
Method 1: Use the WPS button
Use this method if your client device has a WPS button.
1.Press the WPS button the modem router for 1 second.
2.Press the WPS button of the client device directly.
3.The Wi-Fi LED flashes during the WPS process.
4.When the WPS LED turns solid on, the client device has successfully connected to the modem router.
Method 2: Use the WPS button on the web management page
Use this method if your client device has a WPS button.
1.Visit http://tplinkmodem.net, and log in with the account you set for the router.
2.Go to Advanced > Wireless > WPS page.
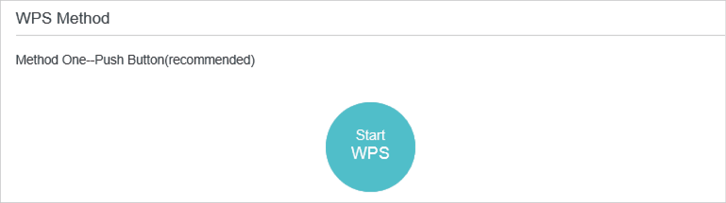
3.Click Start WPS on the page.
4.Press the WPS button of the client device directly.
5.The Wi-Fi LED of the router flashes quickly.
6.When the Wi-Fi LED turns solid on, the client device has successfully connected to the modem router.
Method 3: Enter the modem router’s PIN on your client device
Use this method if your client device asks for the modem router’s PIN.
1.Visit http://tplinkmodem.net, and log in with the account you set for the router.
2.Go to Advanced > Wireless > WPS page. Click Method Two--PIN.
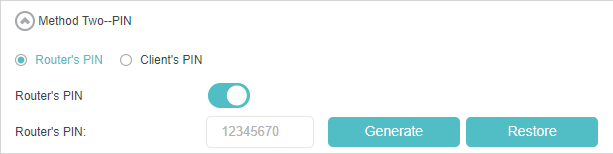
3.Take a note of the Current PIN of the modem router. You can also click the Generate button to get a new PIN.
4.On the client device, enter the modem router’s PIN. (The default PIN is also printed on the label of the modem router.)
5.The Wi-Fi LED of the router flashes quickly.
6.When the Wi-Fi LED turns solid on, the client device has successfully connected to the modem router.
Note:
The WPS function cannot be configured if the wireless function of the modem router is disabled. Please make sure the wireless function is enabled before configuring WPS.
Method 4: Enter the client device’s PIN on the modem router
1.Visit http://tplinkmodem.net, and log in with the account you set for the router.
2.Go to Advanced > Wireless > WPS page. Click Method Two--PIN.
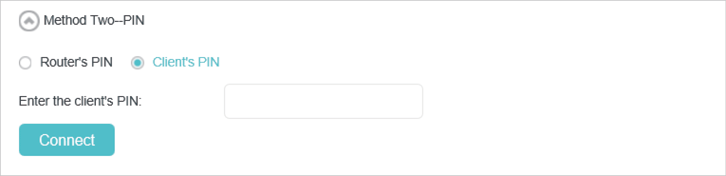
3.Select Client’s PIN.
4.Enter the client device’s PIN in the field. Then click the Connect button.
5.The Wi-Fi LED of the router flashes quickly.
6.When the Wi-Fi LED turns solid on, the client device has successfully connected to the modem router.
3.3. Schedule Your Wireless Function
You can automatically turn off your wireless network (both 2.4GHz and 5GHz) when you do not need the wireless connection.
1.Visit http://tplinkmodem.net, and log in with the account you set for the router.
2.Go to Advanced > Wireless > Wireless Schedule page.
3.Toggle on the button to enable the Wireless Schedule feature.
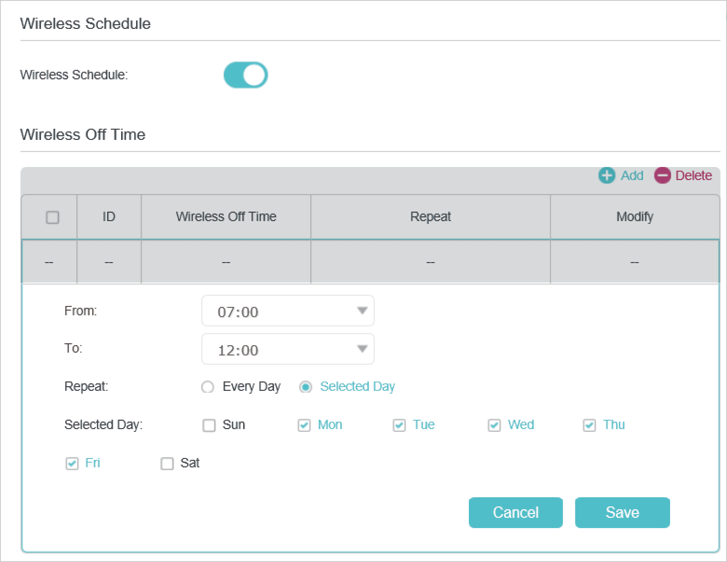
4.Click Add to set the Wireless Off Time, and click Save to save the settings.
5.Repeat steps 3 and 4 to set another entry.
Note:
1.Make sure that the time of the router is correct before using this function. For details, refer to Set System Time.
2.The wireless network will be automatically turned on after the time period you set.
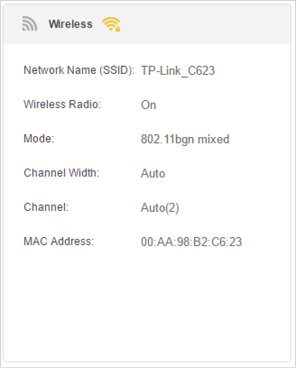
3.4. View Wireless Information
•To view the detailed wireless network settings:
1.Visit http://tplinkmodem.net, and log in with the account you set for the router.
2.Go to Advanced > Status page. You can see the Wireless box.
 Tips: You can also see the wireless details by clicking the router icon on Basic> Network Map.
•To view the detailed information of the connected wireless clients:
1.Visit http://tplinkmodem.net, and log in with the account you set for the router.
2.Go to Advanced > Wireless > Statistics page.
3.You can view the detailed information of the wireless clients, including its connected wireless band and security option as well as the packets transmitted.
Tips: You can also see the wireless details by clicking the wireless clients icon on Basic > Network Map.
3.5. Advanced Wireless Settings
Advanced wireless settings are for those who have a network concept. If you are not familiar with the settings on this page, it’s strongly recommended that you keep the provided default values; otherwise it may result in lower wireless network performance.
1.Visit http://tplinkmodem.net, and log in with the account you set for the router.
2.Go to Advanced > Wireless > Advanced Settings page.
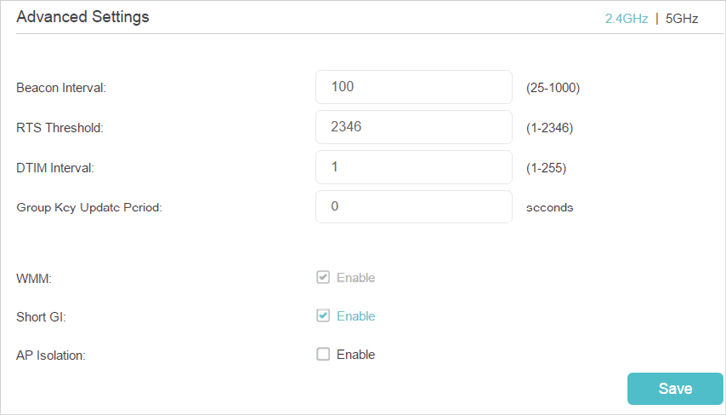
•Beacon Interval: Enter a value between 25 and 1000 in milliseconds to determine the duration between which beacon packets are broadcasted by the router to synchronize the wireless network. The default is 100 milliseconds.
•RTS Threshold: Enter a value between 1 and 2346 to determine the packet size of data transmission through the router. By default, the RTS (Request to Send) Threshold size is 2346. If the packet size is greater than the preset threshold, the router sends Request to Send frames to a particular receiving station and negotiates the sending of a data frame, or else the packet will be sent immediately.
•DTIM Interval: Enter a value between 1 and 255 to determine the interval of the Delivery Traffic Indication Message (DTIM). 1 indicates the DTIM Interval is the same as Beacon Interval.
•Group Key Update Period: Enter the number of seconds to control the time interval for the encryption key automatic renewal. The default is 0, indicating no key renewal.
•WMM: This feature guarantees the packets with high-priority messages being transmitted preferentially. WMM is enabled compulsively under 802.11n or 802.11ac mode.
•Short GI: This feature is enabled by default and recommended to increase the data capacity by reducing the Guard Interval (GI) time.
•AP Isolation: Select this check box to enable the AP Isolation feature that allows you to confine and restrict all wireless devices on your network from interacting with each other, but still able to access the internet. AP isolation is disabled by default.
4. Set Up a Dynamic DNS Service Account
Most ISPs (Internet service providers) assign a dynamic IP address to the router and you can use this IP address to access your router remotely. However, the IP address can change any time and you don’t know when it changes. In this case, you might need the DDNS (Dynamic Domain Name Server) feature on the router to allow you and your friends to access your router and local servers (FTP, HTTP, etc.) using domain name, in no need of checking and remembering the IP address.
Note: DDNS does not work if the ISP assigns a private WAN IP address (such as 192.168.1.x) to the modem router.
To set up DDNS, please follow the instructions below:
1.Visit http://tplinkmodem.net, and log in with the account you set for the router.
2.Go to Advanced > Network > Dynamic DNS.
3.Select the DDNS service provider (TP-Link, Dyndns or NO-IP).
4.To use TP-Link DDNS service, you should log in with your TP-Link ID.
5.If you choose other DDNS service, you should also log in with your DDNS account, select a service provider and click Go to register ... Enter the username, password and domain name of the account (such as lisa.ddns.net).
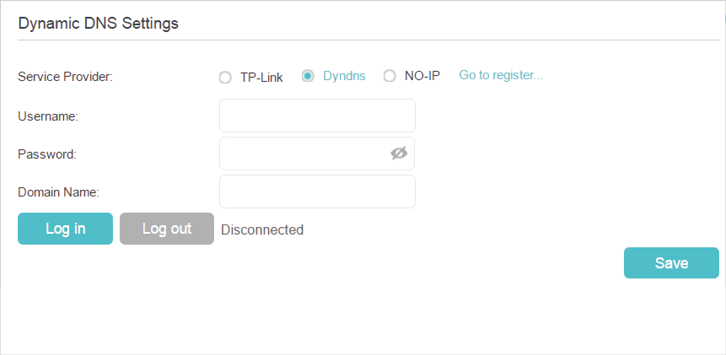
6.Click Log in and Save.
Tips: If you want to use a new DDNS account, please Logout first, then login with the new account.
A static route is a pre-determined path that network information must travel to reach a specific host or network. Data from one point to another will always follow the same path regardless of other considerations. Normal internet usage does not require this setting to be configured.
I want to:
Visit multiple networks and multiple servers at the same time.
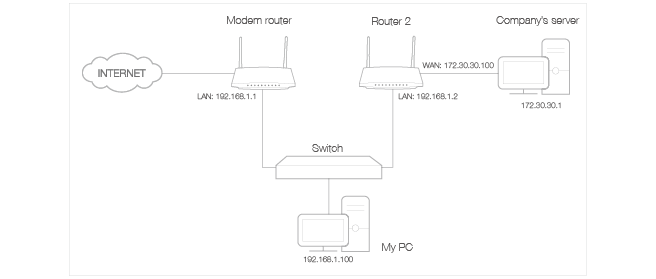
For example, in a small office, my PC can surf the internet, but I also want to visit my company’s server. Now I have a switch and another router. I connect the devices as shown in the following figure so that the physical connection between my PC and my company’s server is achieved. To surf the internet and visit my company’s network at the same time, I need to configure the static routing.
How can I do that?
1.Make sure the routers use different LAN IP addresses on the same subnet. Disable Router 2’s DHCP function.
2.Visit http://tplinkmodem.net, and log in with the account you set for the router.
3.Go to Advanced > Network > Static Routing. Select your current WAN Interface and click Save.
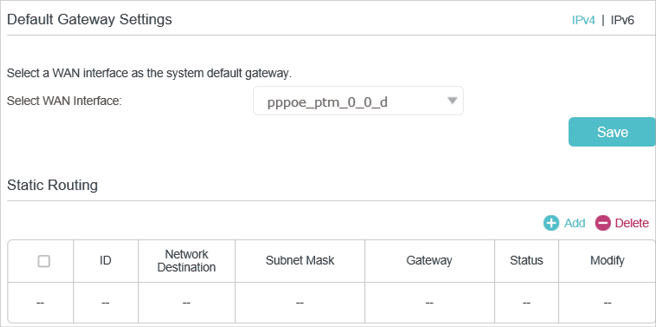
4.Click Add to add a new static routing entry. Finish the settings according to the following explanations:
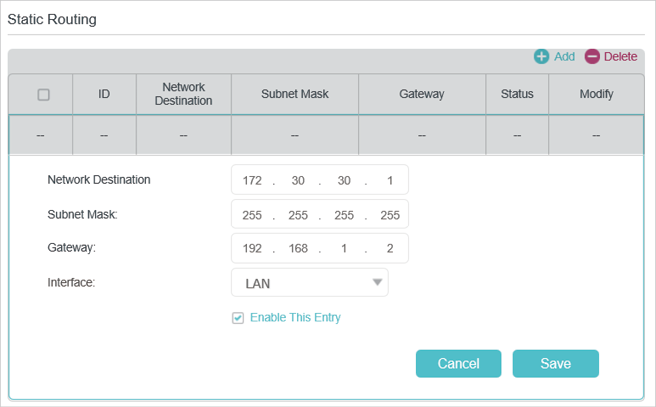
•Network Destination: The destination IP address that you want to assign to a static route. This IP address cannot be on the same subnet with the WAN IP or LAN IP of the router. In the example, the IP address of the company network is the destination IP address, so here enters 172.30.30.1.
•Subnet Mask: Determines the destination network with the destination IP address. If the destination is a single IP address, enter 255.255.255.255; otherwise, enter the subnet mask of the corresponding network IP. In the example, the destination network is a single IP, so here enters 255.255.255.255.
•Gateway: The IP address of the gateway device to which the data packets will be sent. This IP address must be on the same subnet with the router’s IP which sends out the data. In the example, the data packets will be sent to the LAN port of Router 2 and then to the Server, so the default gateway should be 192.168.1.2.
•Interface: Determined by the port (WAN/LAN) that sends out the data packets. In the example, the data is sent to the gateway through the LAN port, so LAN should be selected.
5.Select the check box to enable this entry.
6.Click Save to make the settings effective.
Done!
Open a web browser on your PC. Enter the company server’s IP address to visit the company network.
The IPv6 Tunnel feature helps you obtain IPv6 resources based on an IPv4 WAN connection or vice versa.
IPv6 Tunnel is a transition mechanism that enables IPv6-only hosts to reach IPv4 services or vice versa and allows isolated IPv6 hosts and networks to reach each other over IPv4-only infrastructure before IPv6 completely supplants IPv4. It is a temporary solution for networks that do not support native dual-stack, where both IPv6 and IPv4 run independently.
The modem router provides three tunneling mechanisms: 6to4, 6rd and DS-Lite. The way to set up 6rd and DS-Lite tunnel are similar.
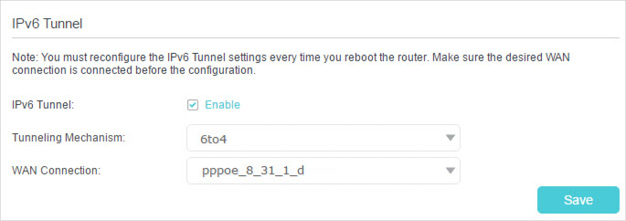
6.1. Use the Public IPv6 Tunnel Service-6to4
The 6to4 tunnel is a kind of public service. If there are any 6to4 servers on your network, you can use this mechanism to access IPv6 service. If your ISP provides you with an IPv4-only connection but you want to visit IPv6 websites, you can try to set up a 6to4 tunnel.
I want to:
Set up the IPv6 tunnel though my ISP doesn’t provide me with the tunnel service.
How can I do that?
1.Visit http://tplinkmodem.net, and log in with the account you set for the router.
2.Go to Advanced > Network > IPv6 Tunnel.
3.Tick the check box, select 6to4 as the tunneling mechanism and select a WAN connection from the drop-down list, then click Save.
 Note:
Note:
If there is no available WAN connection to choose, make sure you have connected to the internet and the connection type is not Bridge.
Done!
Now you can visit the IPv6 websites with the 6to4 tunnel.
Note:
Still not being able to access IPv6 resources means that not any 6to4 public server was found in your network. You can contact your ISP to sign up for IPv6 connection service.
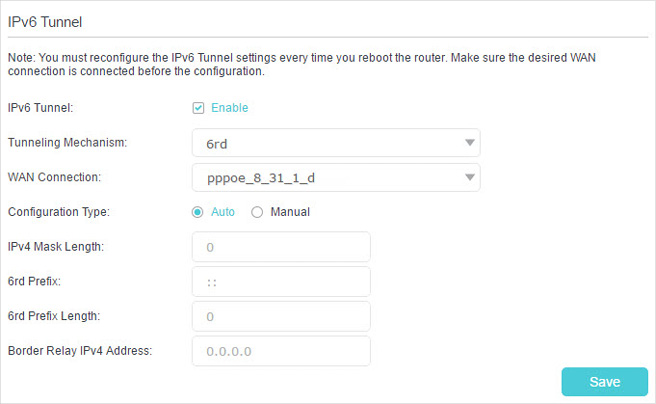
6.2. Specify the 6rd Tunnel with Parameters Provided by Your ISP
I want to:
Specify the 6rd tunnel with the parameters provided by my 6rd tunnel service provider.
How can I do that?
1.Visit http://tplinkmodem.net, and log in with the account you set for the router.
2.Go to Advanced > Network > IPv6 Tunnel.
3.Tick the check box, select 6rd as the tunneling mechanism and select a WAN connection from the drop-down list.
4.According to the parameters provided by your ISP, choose Auto or Manual. More parameters are needed if you choose Manual.
5.Click Save.
Note:
If there is no available WAN connection to choose, make sure you have connected to the internet and the connection type is not Bridge.
Done!
Now you can visit the IPv6 websites with the 6rd tunnel.
 Tips:
Tips:
The way to set up DS-Lite tunnel is similar to that of 6rd tunnel. If you are provided with an IPv6-only WAN connection and have signed up for DS-Lite tunnel service, specify the DS-Lite tunnel by referring to the steps above.