How to Deny or Allow Hosts from Accessing your VIGI Camera via IP/MAC Restriction
Contents
Modifying or deleting entries in the list
Introduction
VIGI IPC has now supported the configuration of the IP/MAC Restriction feature to further enhance the security of your VIGI system. By configuring this feature, you can allow or deny access to specific devices based on their IP or MAC addresses, ensuring that no unauthorized hosts can access your security devices.
Requirements
- VIGI IPC with latest firmware
- Personal Computer
Configuration
After accessing the IPC Web page via its IP address, please navigate to Settings > Network Settings > IP/MAC Restriction. From here, you can proceed with the IP/MAC Restriction configuration.
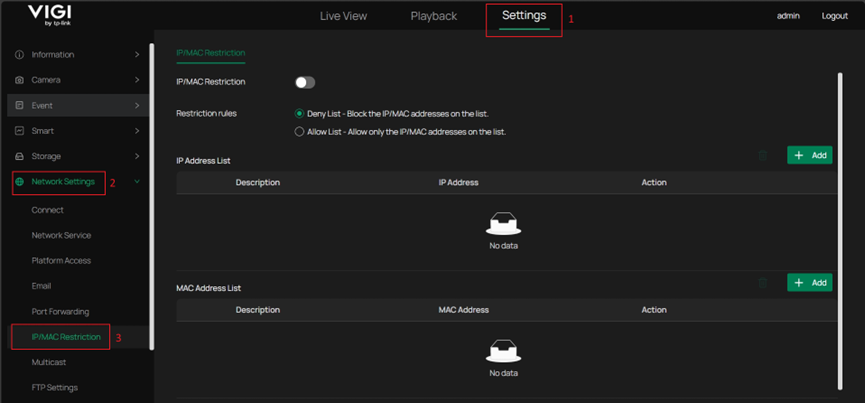
Via Deny list
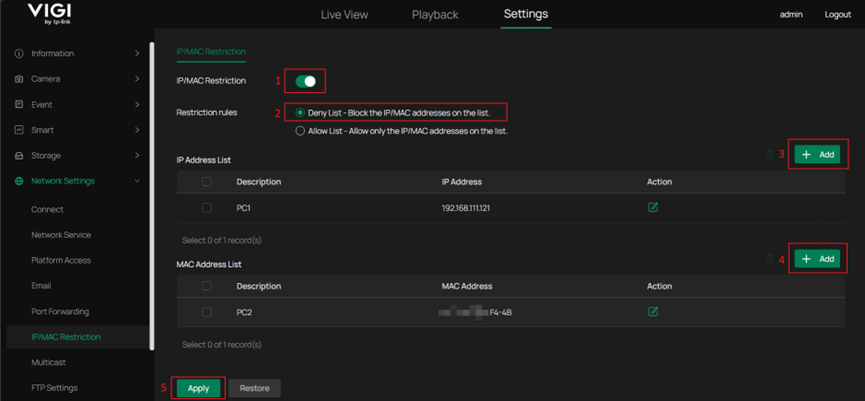
Step 1. Under the Deny List rules, devices with the configured IP and MAC addresses will be denied access to the IPC. The configuration involves the following steps:
1. On the IP/MAC Restriction page, first enable the feature by turning on the switch.
2. Select Deny List.
3. Below, click Add to enter the IP and MAC addresses of the devices you want to block.
4. Finally, click Apply to save the settings.
Notes: Please note that when configuring the Deny List for testing, if you add the MAC address or IP address of the device you are currently using to access the IPC, your access to the IPC will be restricted. If you do not have another device available to access it at that time, you may lose the ability to access the IPC entirely. In such a case, you may need to reset your IPC to regain access.
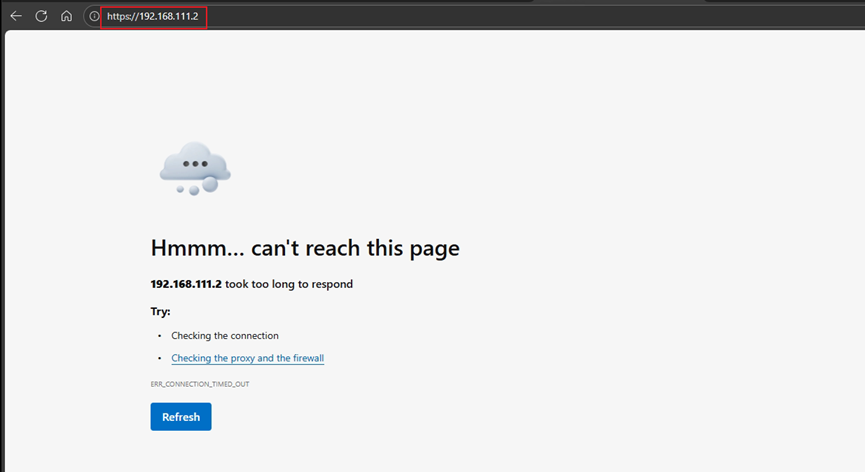
Step 2. To verify whether your configuration is effective, try accessing the IPC Web page from a device with the configured IP or MAC address. The browser should display that the page is unreachable. Here, 192.168.111.2 is the IP of the IPC and 192.168.111.121 is the IP of the PC.
Via Allow list
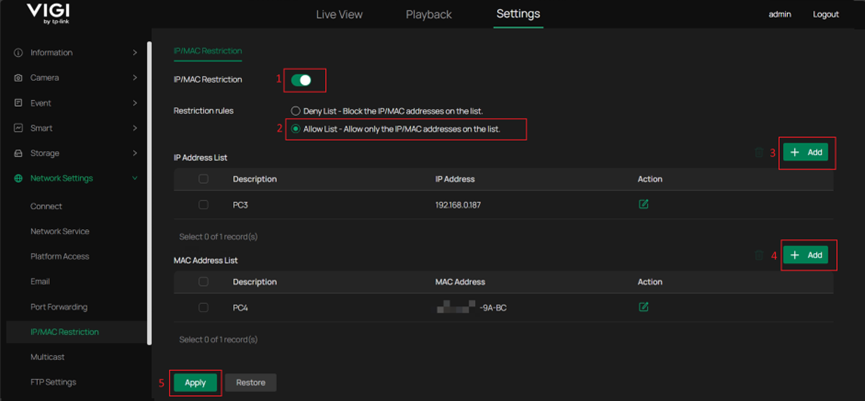
Step 1. Under the Allow List rules, only the devices with the configured IP and MAC addresses will be allowed access to the IPC. The configuration involves the following steps:
1. On the IP/MAC Restriction page, first enable the feature by turning on the switch.
2. Select Allow List.
3. Below, click Add to enter the IP and MAC addresses of the devices you want to allow access.
4. Finally, click Apply to save the settings.
Step 2. To verify whether your configuration is effective, try accessing the IPC Web page from a device with the configured IP or MAC address. The browser should display the Web login page successfully.
Modifying or deleting entries in the list
If the entries you configured in the list are incorrect, you can also modify or delete them directly in the list.
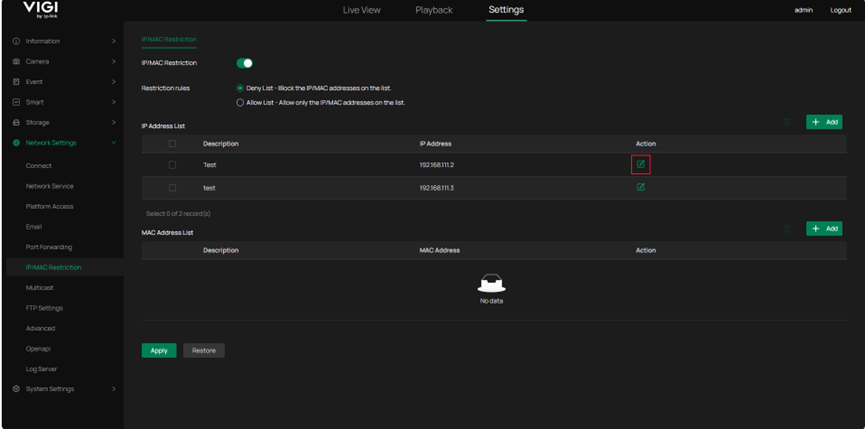
To modify an entry, you can click on the Action icon, and then you can change the description or the IP/MAC address.
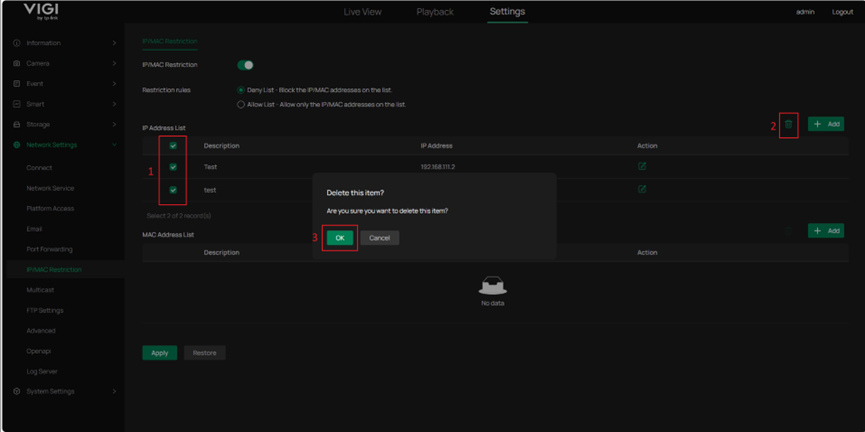
To delete an entry, you need to first select the entries you want to delete, click the delete icon, and then confirm.
Conclusion
You have now successfully configured the IP/MAC Restriction feature, allowing you to manage your IPC more securely.
Get to know more details of each function and configuration please go to Download Center to download the manual of your product.
This article applies to: All VIGI Cameras, please refer to the official website for detailed models: https://www.vigi.com/business-networking/vigi-network-camera/
Note: Some models may require future upgrades since the firmware is updated gradually.
คำถามที่พบบ่อยนี้มีประโยชน์หรือไม่?
ความคิดเห็นของคุณช่วยปรับปรุงเว็บไซต์นี้


