How to troubleshoot if remote management does not work on LTE Gateway Router with 3G/4G Router mode
Step 1: Check 4G Internet IP address on Advanced->Status page to see if it is a private IP address or public IP address.
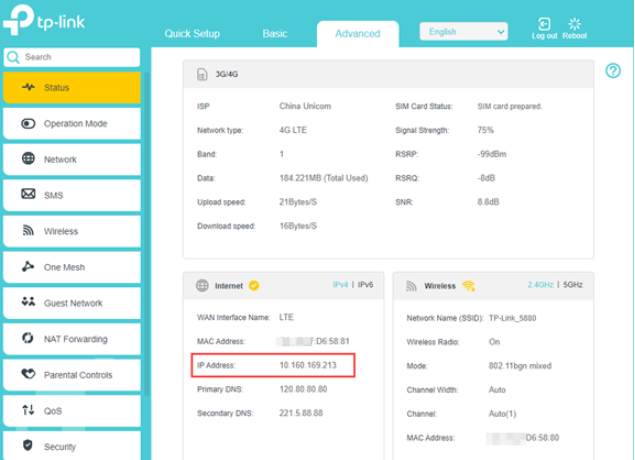
If the 4G Internet IP address is a real public IP address, you could move to Step 2;
However, if it is not a real public IP address, it means there is another NAT product in the front, which is on your SIM carrier side since you are using a SIM card only. Under such cases, remote management or other functions such as port forwarding, etc. will not work. You need to contact your SIM card carrier to see if they could assign you a public IP address.
Methods to tell whether it is a public IP address or not:
1) Private IPv4 addresses have the following class configurations:
Class A IP addresses: from 10.0.0.0 to 10.255.255.255
Class B IP addresses: from 172.16.0.0 to 172.31.255.255
Class C IP addresses: from 192.168.0.0 to 192.168.255.255
2) Apart from the private IP addresses in the above 3 classes, there is another range of IP addresses, which looks like a public IP address, but Carrier Grade NAT (CGNAT) address. They are from 100.64.0.0 to 100.127.255.255, which are usually not real public IP address either.
3) Or you could also check your real public IP address on “https://www.whatismyip.com/” website on a client device connected to the LTE router, then compare it with the 4G Internet IP displayed on Status page of its web interface. If they are the same, it means the 4G internet IP on the LTE router is a real public IP address, if not, it means it is private IP address or the CGNAT address.
Step 2: Check if remote management settings are correct
For detailed configurations, please refer to the FAQ How to configure local and remote management rule of TP-Link Wireless N 4G LTE Router (new logo)?
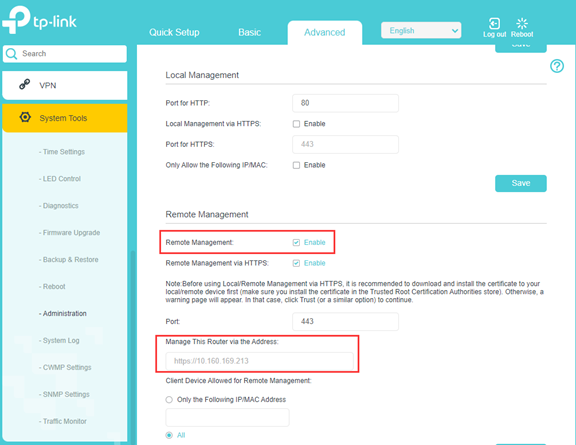
Step 3: Make sure you entered correct address when trying to access the web interface remotely.
Correct address should be “http://Internetip:port” or “https://Internetip:port”.
By default, the port for http is 80 and the port for https is 443, if they are both the default ports, there is no need to type the port at the end of the address, however, if you changed the ports to a different one, you have to add the port number at the end of the address.
Step 4: Configure DDNS if the Internet IP address is not static
If the remote management works at the beginning, but after some time, you are unable to access it remotely with the same address, please check if the Internet IP address has changed, if so, you could configure DDNS feature to bind the dynamic Internet IP address to a static DDNS domain name.
Here are the configuration guides about the DDNS: No-IP DDNS, DynDNS, TP-Link DDNS, you could use either of them if your router supports it.
Note: After configuring the DDNS, you could use “http or https://domain name:port” to access the web interface remotely.
Step 5: Contact TP-Link Technical Support
If remote management still does not work after the above troubleshooting, please contact TP-Link Technical Support and provide detailed information:
1. Model number, hardware, and firmware version
2. Screenshot of Advanced->Status page and Remote Management settings page
3. Address you’ve tried to access the web interface remotely and screenshots
To get to know more details of each function and configuration please go to Download Center to download the manual of your product.
Is this faq useful?
Your feedback helps improve this site.


TP-Link Community
Still need help? Search for answers, ask questions, and get help from TP-Link experts and other users around the world.