Deco X20 , Archer C1200( V3 ) , Archer AX12( V1 ) , Deco BE65-5G , Archer AX10( V1 V2 V3 ) , Archer AX95( V1 ) , Archer AX96( V1 ) , Archer C6U( V1 ) , Archer AX15( V1 ) , Archer BE450( (JP) V1 ) , Archer GE550( V1 ) , Archer BE850( V1 ) , Archer MR515 , Archer C58HP( V1 ) , Archer AXE95( V1 ) , Archer AX10000( V1 ) , Archer C8( V4 ) , Archer C7( V5 ) , Archer AX90( V1 ) , Archer AX5400( (RU) V1 V1 ) , Deco X50-PoE , Archer C60( V3 ) , Archer AXE5400( V1 V1.10 ) , Archer MR400 , Archer AX73 (EU)( V1 ) , Archer MR402 , Archer BE600( V1 ) , Archer AX5400 Pro( V1 ) , Archer AX80( V1 ) , Archer VR400 , TL-MR6500v , Archer BE9300( V1 ) , Archer C59( V2 ) , Archer BE6500(JP)( (JP) V1 ) , Archer AX75( V1 ) , Archer A2( V5 ) , Archer BE5100 , Archer BE9700( V1 ) , NE200-Outdoor , Archer AX73( V1 V2 ) , Archer VR2100 , Deco PX50 , Archer VR2800v , Deco BE95 , Archer BE550( V1 ) , Archer AXE75( V1 ) , Archer AX72 Pro( V1 ) , TL-WR1502X , Archer AX72( V1 ) , Archer A7( V5 ) , TL-MR150 , Archer BE400(JP)( (JP) V1 ) , Archer BE4800( V1 ) , Archer A9( V6 ) , Deco X95 , Deco X50 Pro , Archer NX205 , Archer AX55 Pro( V1 V2 ) , Archer AX53HP , Archer Air R5( V1 ) , Deco XE75 Pro , Deco XE200 , TL-WR842N( V5 ) , Archer AXE300( V1 ) , Archer AX1500( (KR) V1 V1 ) , Archer BE700( V1 ) , Archer NX200 , Archer NX600 , Archer AX73V( V1 ) , Archer AX3000( (KR) V1 (RU) V1 V1 ) , Archer BE220W( V1 ) , Archer AX55( V1 ) , Archer AX53( V1 V2 ) , Deco X68 , Deco BE75 , Archer VR2800 , Archer MR550 , TL-MR6400 , Archer BE650( V1 ) , Archer GE230( V1 ) , Deco X3000 , TL-WR1512X , Archer NX210 , Archer AX50( V1 ) , Deco XE75 , Archer AX6000( V1 ) , Deco X75 , Archer GXE75( V1 ) , Archer BE3600 Pro , Deco BE85 , Archer MX700 , Archer AX72 (RU)( V1 ) , Archer MR200 , Archer MR202 , Archer BE400( (JP) V1 V1 ) , Archer MR600 , Deco X50-Outdoor , Archer BE800( V1 ) , Archer BE3600( (EU) V1 (JP) V1 (KR) V1 V1 ) , Deco X80 , Archer NX500 , Archer VR600 , Archer BE805( V1 ) , Archer BE7200( V1 ) , TL-WR3602BE , Archer AX4400( V1 ) , TL-WR3002X , Archer BE9500( V1 ) , Archer A54( V1 ) , TL-WR941HP( V2 ) , Archer BE230( V1 ) , Archer GE650( V1 ) , Archer AX55 (RU)( V1 ) , Archer AXE200 Omni( V1 ) , Archer VX1800v , Archer GX90( V1 ) , Deco X50 , Deco BE68 , Archer BE550 Pro( V1 V2 ) , Archer AX23( V1 ) , Archer AX3000 Pro( V1 ) , Archer VR2100v , Deco X55 , Archer AX20( V1 V2 V3 ) , Archer BE6500( (JP) V1 V1 ) , Archer AX21( V1 V2 V3 ) , Deco BE65 , Archer AX55 (EU)( V1 ) , Archer BE220( (JP) V1 V1 ) , Archer MR500 , Archer BE900( V1 ) , Archer AX11000( V1 ) , Archer GE800( V1 ) , Archer AX3200( V1 ) , Deco X60 , Archer GE400( V1 )
최근 업데이트로 인해 이 FAQ에서 설명하는 기능에 대한 액세스가 확장되었을 수 있습니다. 제품 지원 페이지를 방문하여 올바른 하드웨어 버전을 선택하고 데이터시트나 펌웨어 섹션에서 제품의 최신 개선 사항을 확인하세요. 제품 가용성은 지역에 따라 다르며 일부 모델은 특정 지역에서 제공되지 않을 수 있습니다.

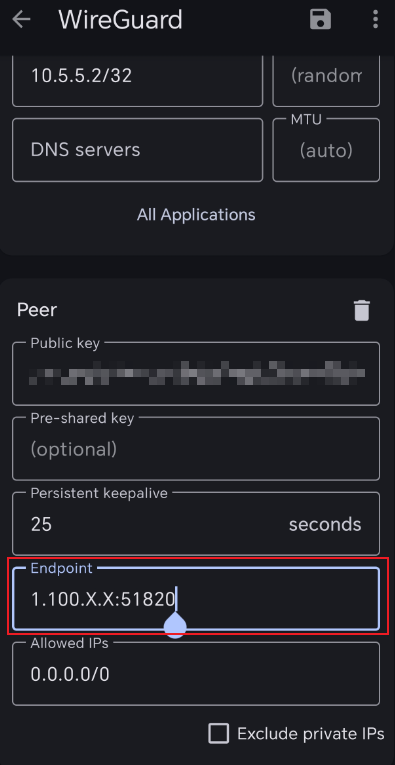
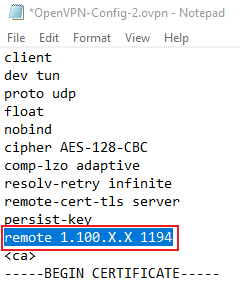
_Overview_normal_20211225093343a.png)
