How to Configure RAID on VIGI NVR (RAID 1 & RAID 5)
Contents
Introduction
Supported VIGI NVR models provide RAID functionality to improve storage reliability and help protect recordings from hard drive failures when multiple hard drives are installed.
This article explains the requirements for RAID, how to create and manage RAID arrays on supported VIGI NVRs, and how to rebuild an array after a drive failure.
Understanding RAID modes
VIGI NVRs support the following RAID modes:
- RAID 1 mirrors the same data across two or more hard drives, providing data redundancy in the event of a drive failure.
- RAID 5 distributes data and parity information across three or more hard drives, providing fault tolerance while maintaining higher storage efficiency than RAID 1.
For surveillance deployments that require both storage efficiency and protection against a single drive failure, RAID 5 is generally recommended.
Requirements
This article applies to
- VIGI NVR4032H / VIGI NVR4016H
Hardware Requirements
|
RAID Mode |
Minimum HDDs |
|
RAID 1 |
2 HDDs |
|
RAID 5 |
3 HDDs |
Configure a RAID array
RAID array can be configured from either the NVR GUI (using a display and mouse connected directly to the NVR), or from the NVR Web UI in a browser. This article uses the NVR GUI as the main example.
The corresponding Hard Drive Management and Array Management pages in the Web UI provide the same RAID settings and follow the same configuration workflow. See the notes in Step 3 and Step 4 for the Web UI navigation paths and screenshots.
Step 1. Access RAID settings
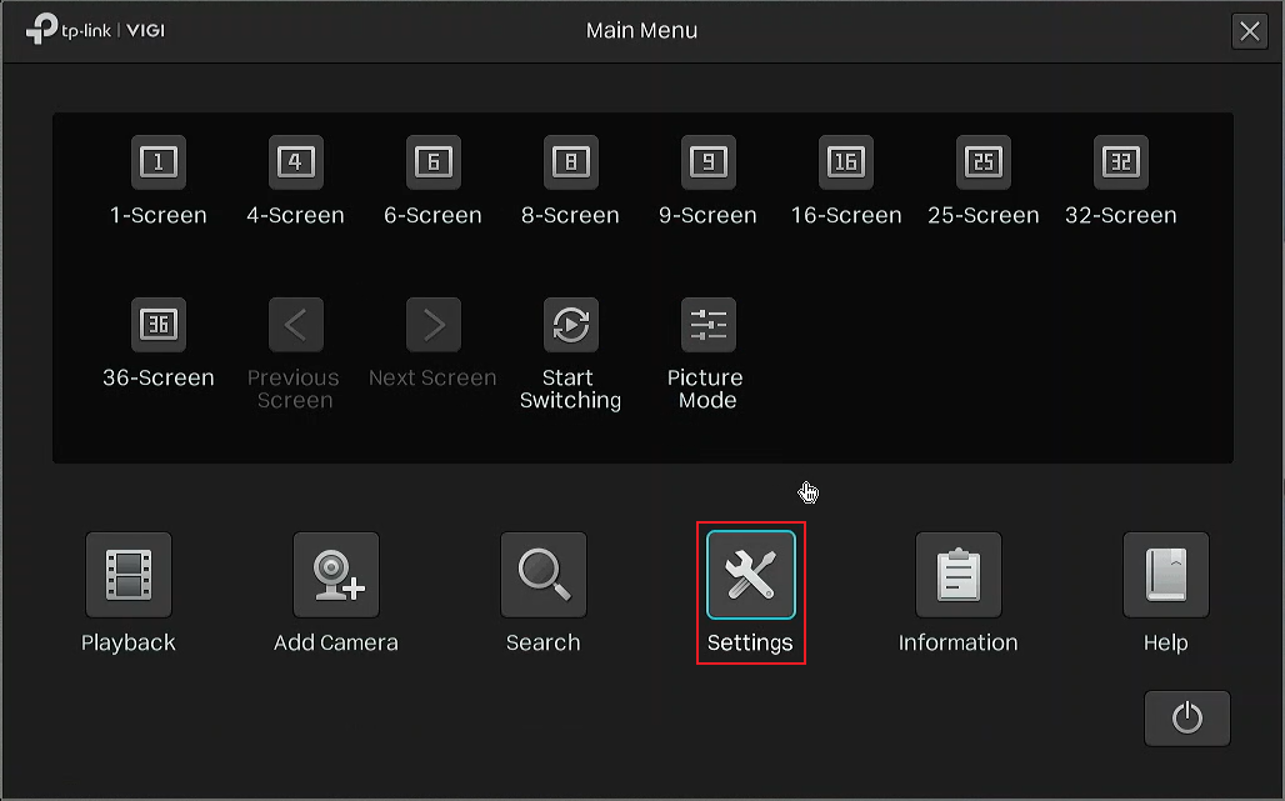
On the Live View screen, right-click anywhere and select Settings.
Step 2. Log in
Enter the administrator's credentials to access the Settings page.
Step 3. Verify hard drive status (Optional)
Go to Storage > Hard Drive Management and verify the required hard drives are detected and operating normally.
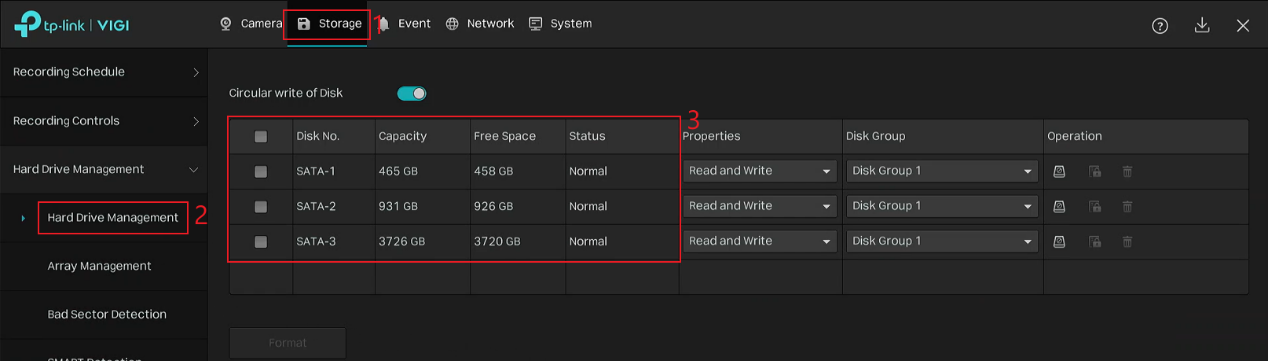
Note: When using the Web UI, log in to the NVR from a web browser and go to Settings > Storage > Hard Drive Management. The page provides the corresponding hard drive status and management options available on the NVR GUI.

Step 4. Enable RAID
Go to Storage > Array Management and enable Enable RAID.
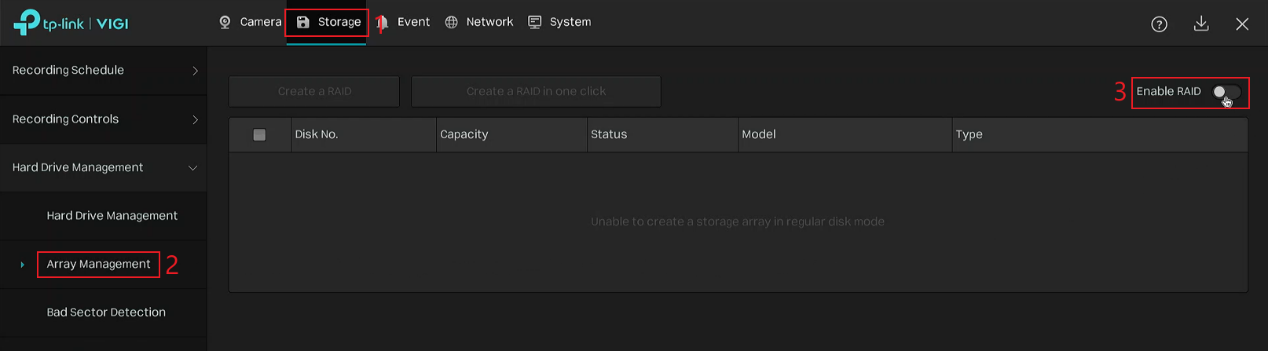
Note: When using the Web UI, go to Settings > Storage > Array Management. The RAID settings and configuration workflow are the same as on the NVR GUI, including Enable RAID and creating the RAID array as described in Step 4 and Step 5.
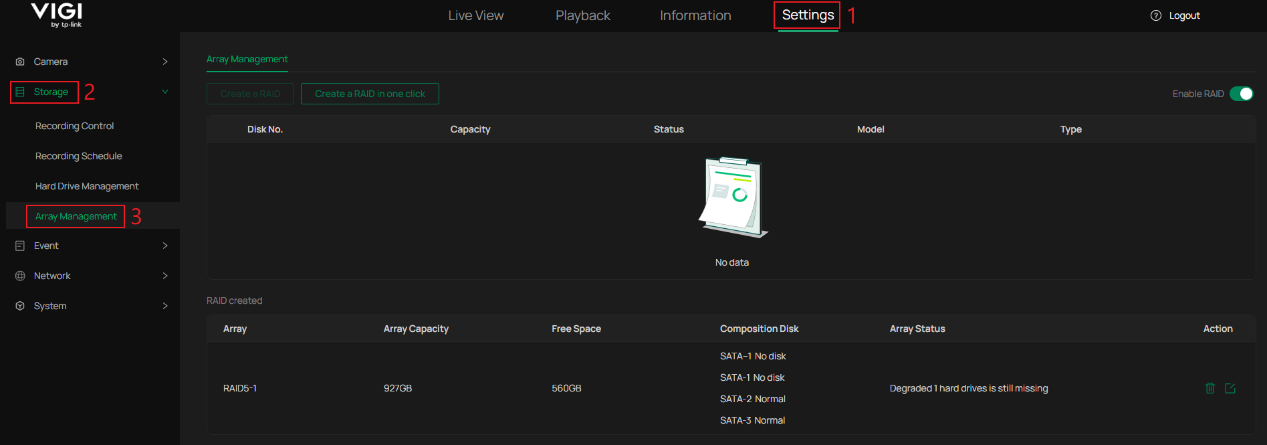
When prompted, choose one of the following options:
Auto Create: The NVR automatically creates a RAID array using all detected hard drives.
- Two hard drives: RAID 1
- Three or more hard drives: RAID 5
After the RAID array is created, the NVR automatically formats all detected hard drives and restarts.
Manual Create: The NVR restarts directly. After the restart, proceed to Step 5 to manually create the RAID array.
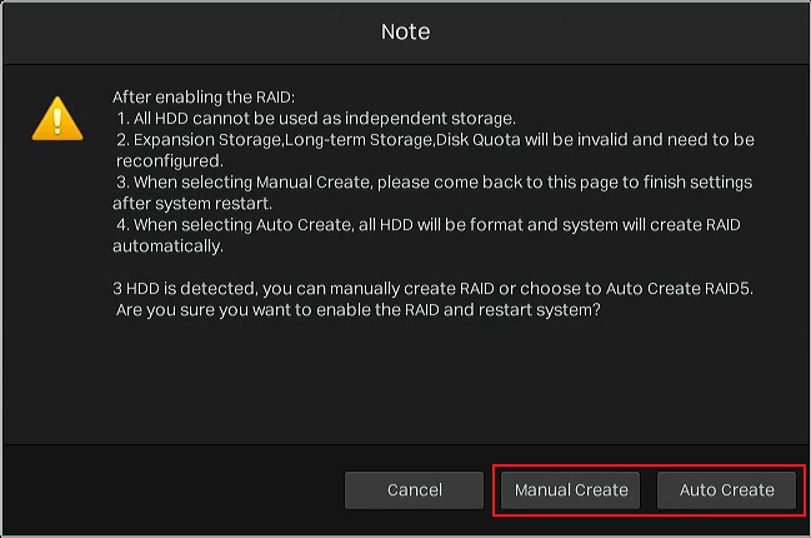
Note:
- After RAID is enabled, hard drives can no longer be used as independent storage devices.
- Expansion Storage, Long-term Storage, and Disk Quota settings become unavailable and must be reconfigured if needed.
- If Auto Create is selected, all detected hard drives will be formatted.
- If Manual Create is selected, complete RAID creation after the system restarts.
Step 5. Create the RAID array
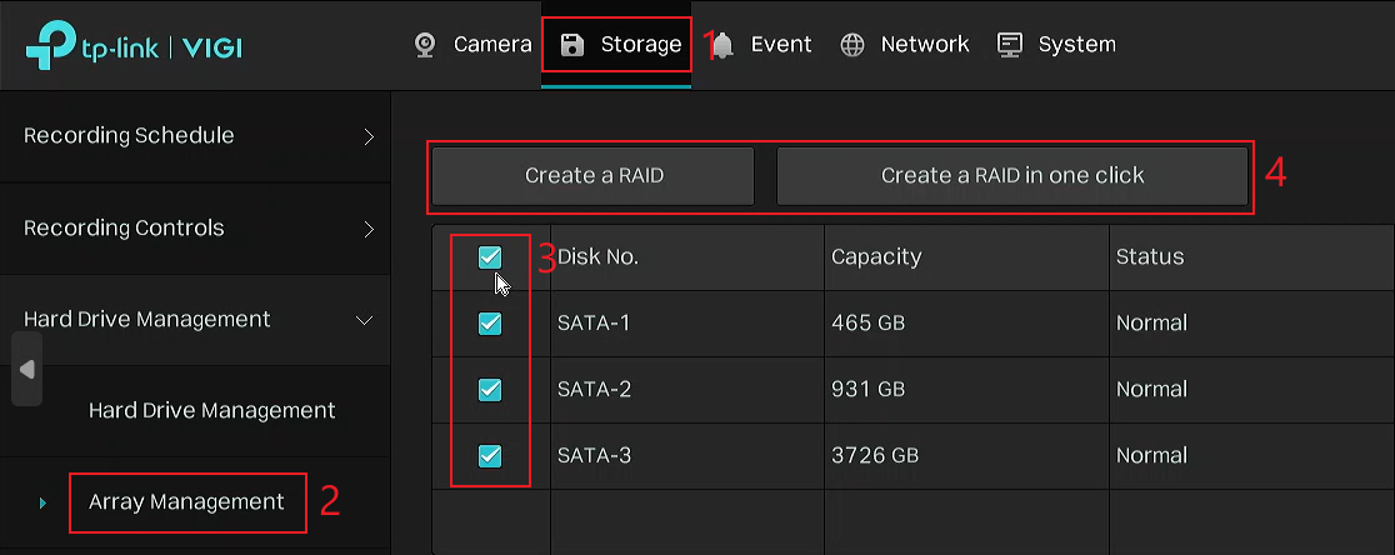
After the NVR restarts, click View in the prompt and log in to quickly navigate to Array Management, or manually go to Storage > Array Management.
Option 1: Create a RAID in one click
Select Create a RAID in one click to automatically create the RAID array. The RAID creation logic is the same as Auto Create in Step 4.
Option 2: Create a RAID manually
Select the hard drives to be included and click Create a RAID. Choose the desired Array Mode (RAID 1 or RAID 5), review the array information, and then click Create.
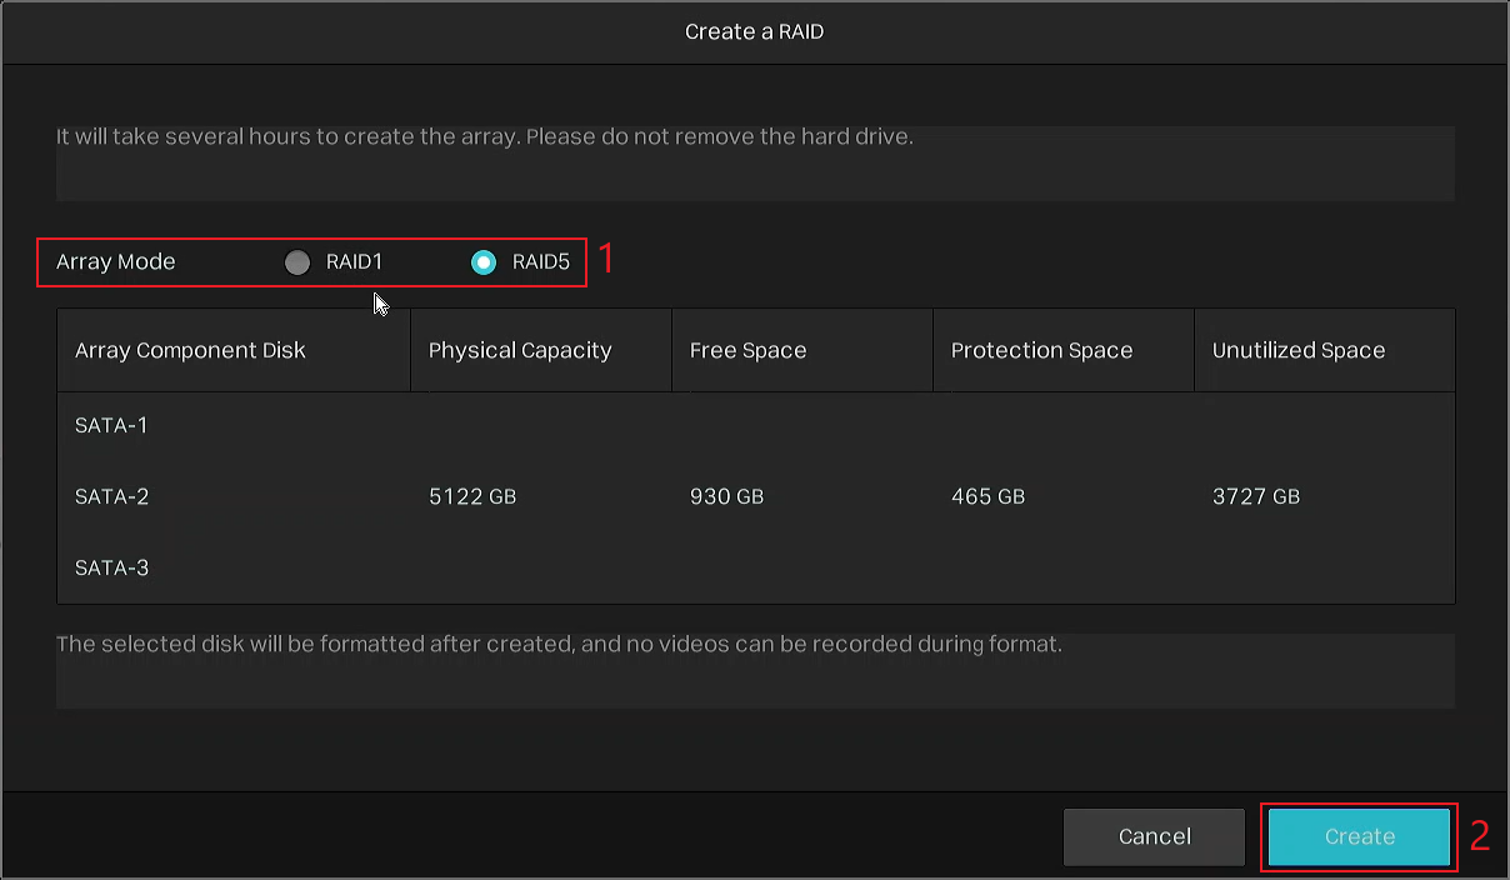
Array information reference
Array Component Disk: The hard drives included in the RAID array.
Physical Capacity: The combined physical capacity of all selected hard drives.
Free Space: The usable storage capacity available in the RAID array.
Protection Space: The portion of the RAID capacity reserved for data redundancy and protection.
Unutilized Space: Physical capacity that cannot be used by the RAID array. This commonly occurs when hard drives of different capacities are selected.
Verify and manage RAID array
Go to Storage > Array Management to view the RAID status.
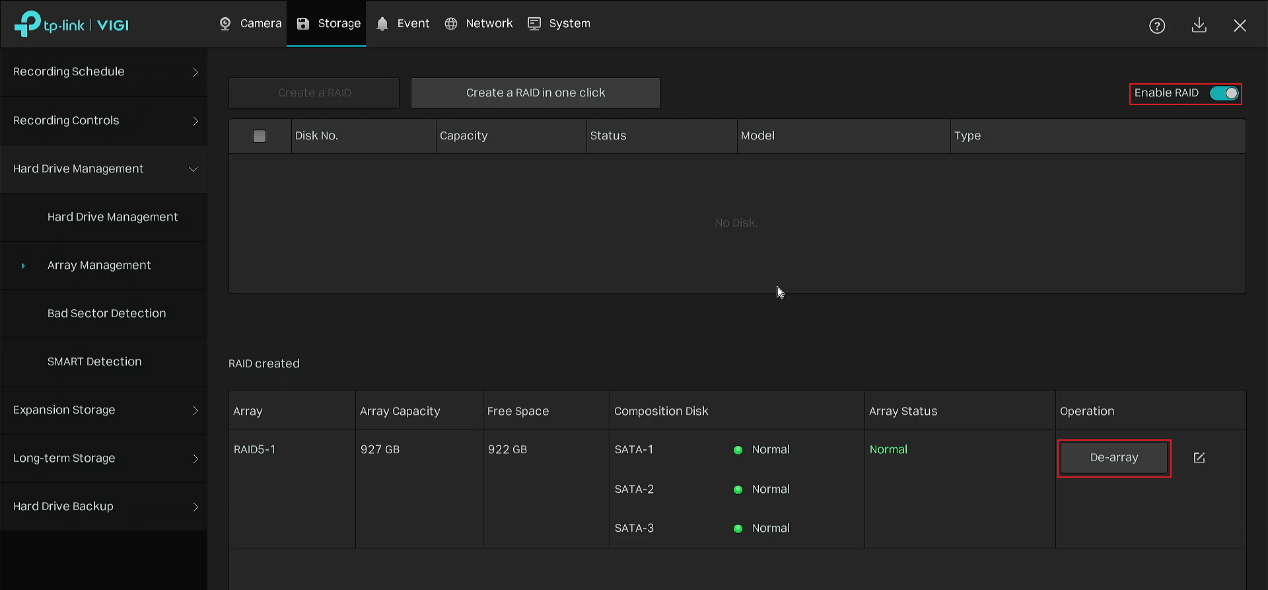
To remove an existing RAID array, click De-array.
To disable RAID entirely, turn off Enable RAID.
Note:
- All data in the array disk will be cleared after De-array; all RAIDs will be invalid and all storage in the array will disappear after disable Enable RAID.
- Expansiong Storage, Long-term Storage, Disk Quota will be invalid and need to be reconfigured.
- The NVR will restart after Enable RAID is disabled.
Conclusion
RAID configuration and management have now been completed on the VIGI NVR. RAID 1 and RAID 5 provide different levels of data redundancy and storage efficiency, helping improve storage reliability in surveillance environments.
To learn more about each function and configuration, please visit Support Home to download or check the manual for your product.
QA
Q1: Can hard drives with different capacities be used to create a RAID array?
A1: Yes. However, RAID uses the capacity of the smallest selected drive as the basis for each disk. If the drive capacities are different, some capacity on larger drives may remain unutilized.
Q2: Will creating or deleting a RAID array erase the recordings on the selected drives?
A2: Yes. Creating or deleting a RAID array will erase the existing data on the selected drives.
Q3: What is the difference between RAID 1 and RAID 5?
A3: RAID 1 stores the same data on two or more drives. As long as at least one drive remains functional, the data remains available. RAID 5 distributes data and parity across three or more drives and can tolerate the failure of one drive while providing higher usable capacity than RAID 1.
Q4: How much usable capacity does RAID 5 provide?
A4: The usable capacity of RAID 5 is approximately (N − 1) × the capacity of the smallest drive, where N is the number of drives in the array. If drives with different capacities are used, the additional capacity on larger drives cannot be used by the RAID array and will remain unutilized.
For example, if a RAID 5 array consists of one 2 TB drive and two 4 TB drives, the usable RAID capacity is approximately (3 − 1) × 2 TB = 4 TB, and the additional 2 TB on each 4 TB drive remains unutilized.
Q5: What happens if some drives in a RAID array fails?
A5: RAID provides data redundancy within its supported fault-tolerance range. For RAID 1, the data remains available as long as at least one drive in the array is functional. RAID 5 can tolerate the failure of one drive. A failed drive should be replaced and the array rebuilt as soon as possible to restore redundancy.
Q6: What should I do if one or more drives in the RAID array fail?
A6: If the number of failed drives is within the fault-tolerance range, the array enters the Degraded state. Follow the steps below to add a drive and rebuild the array:
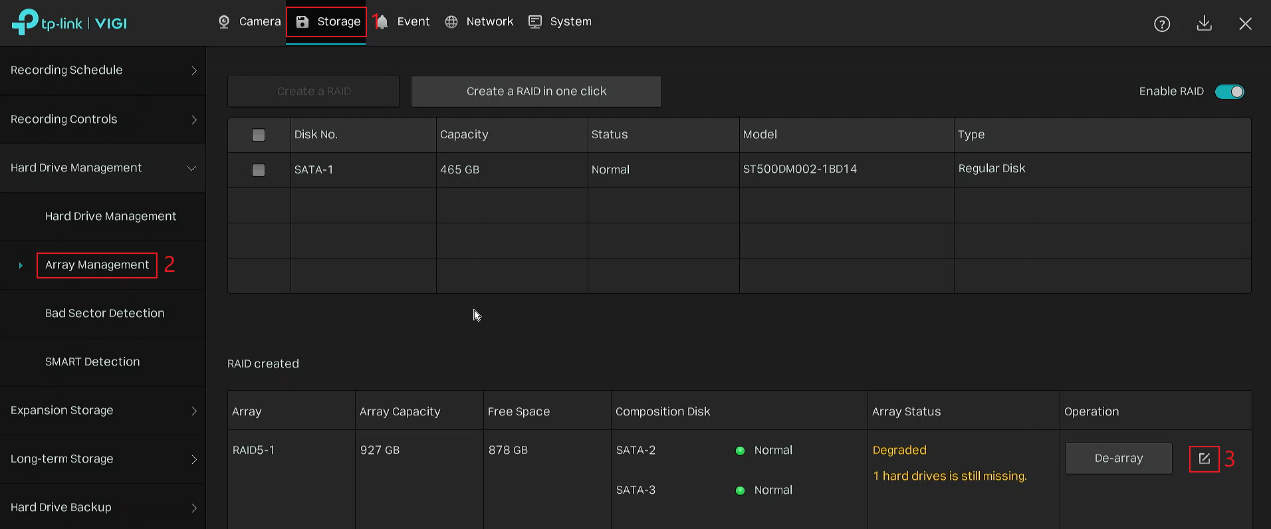
Go to Storage > Array Management, and edit the degraded array.
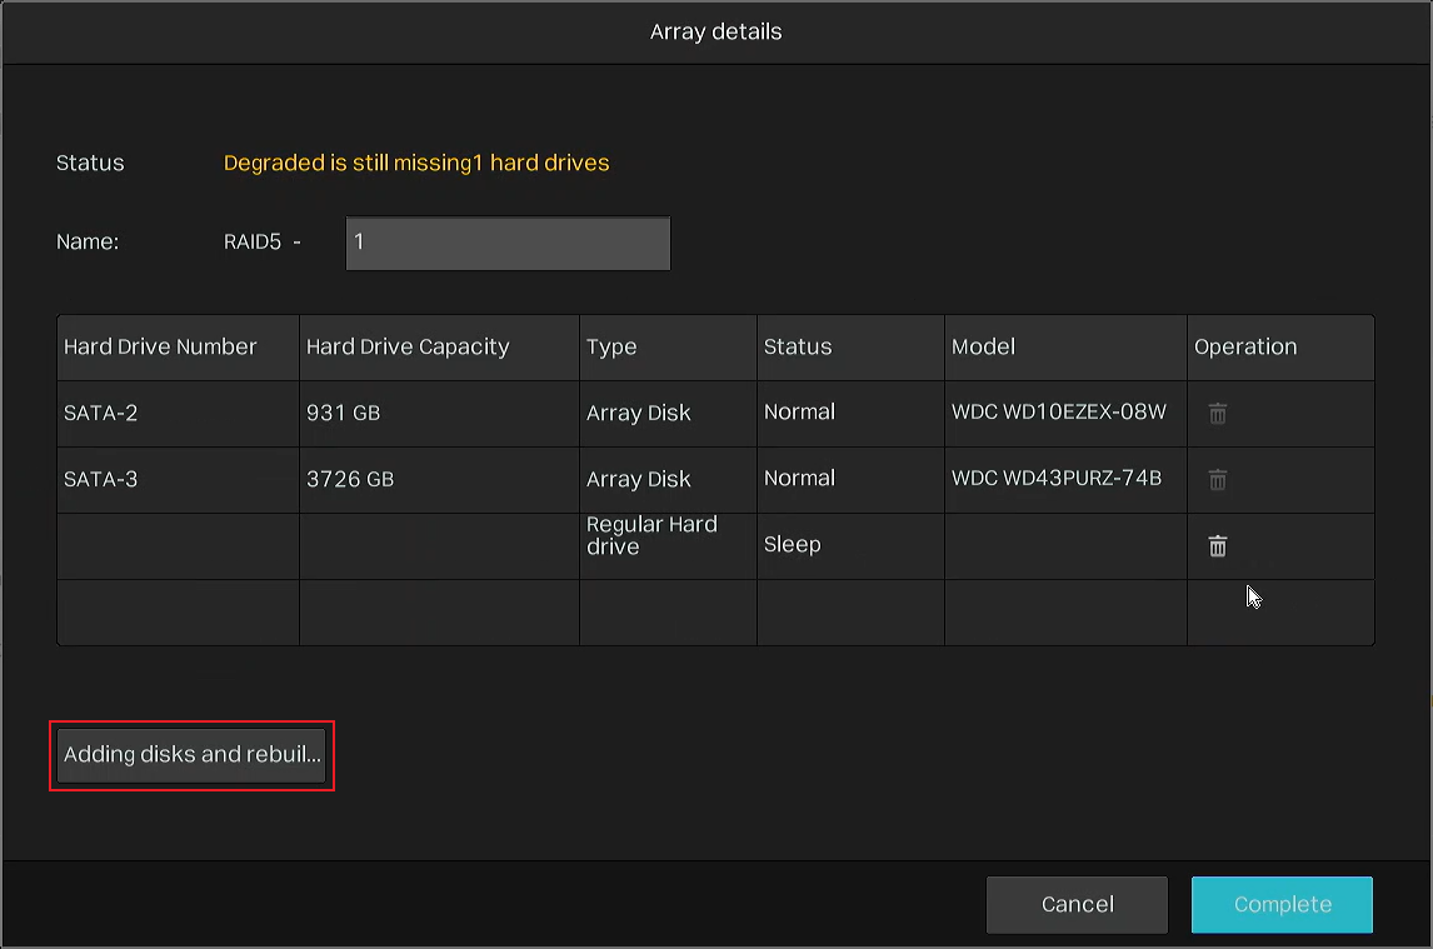
Click Adding disks and rebuilding the array.
Select the drive to be added, select a Reconstruction Mode, and click Yes to start rebuilding the array.
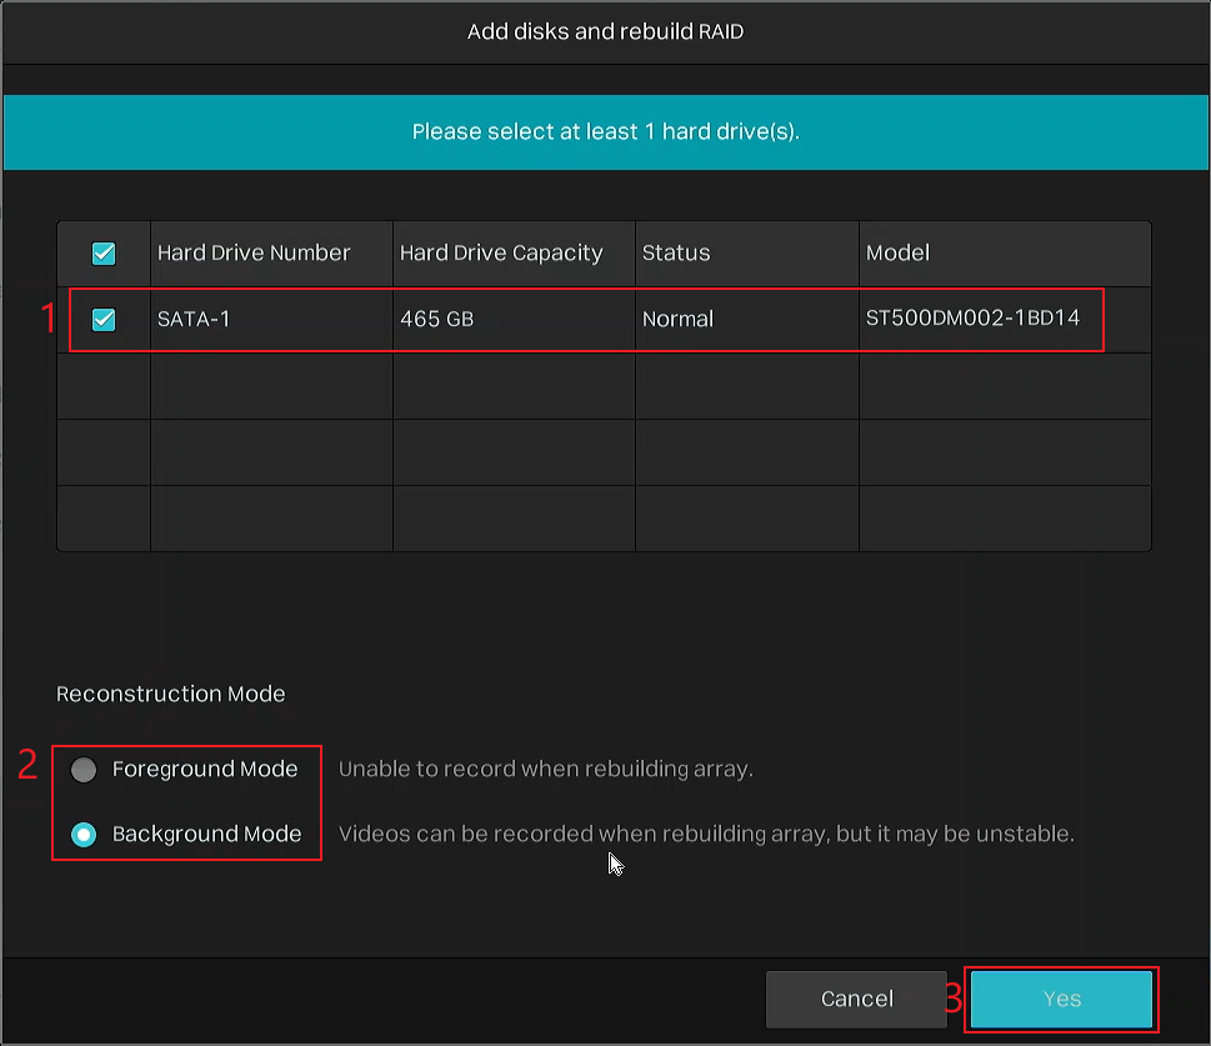
Reconstruction Mode:
- Foreground Mode: Recording is unavailable while the array is being rebuilt.
- Background Mode: Recording remains available while the array is being rebuilt, but recording may be unstable.
Note:
- You can also add a drive when the array is Normal. The newly added drive will serve as a hot spare. If a drive in the array fails, the system will automatically rebuild the array in the background using the hot spare.
- The capacity of the drive being added must not be smaller than that of the smallest drive in the array.
Q7: Does RAID replace the need to back up important recordings?
A7: No. RAID provides redundancy against drive failures, but it does not protect against all causes of data loss, such as accidental deletion, device failure, or other unexpected events. Back up important recordings separately when necessary.
Looking For More
Questa faq è utile?
Your feedback helps improve this site.



TP-Link Community
Still need help? Search for answers, ask questions, and get help from TP-Link experts and other users around the world.