How to add an Omada Gateway to the network? (Controller 4.4.3 or above)
If you would like to replace your existing router with an Omada Gateway to the working network, you will face some problems, such as IP conflict or adoption failure. This article will introduce the recommended configuration process and help sort out the configuration process, taking the below network as an example.
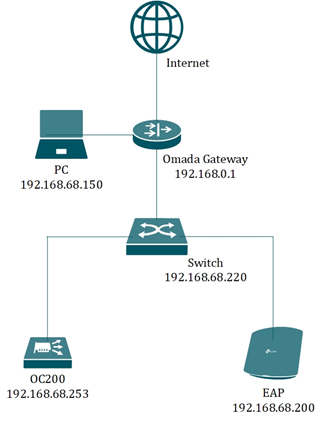
All existing devices in this network have obtained IP addresses in the subnet of 192.168.68.0/24. However, the default LAN IP address of Omada Gateway is 192.168.0.1, which is in a different subnet from the devices, and will cause adoption failure.
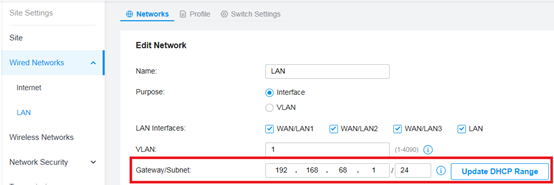
Step 1. Change the LAN IP address in Omada Controller
Before replacing the old router, please log into the Controller page, go to Settings-Wired Networks-LAN, edit LAN network, change the Gateway/Subnet to 192.168.68.1/24. Click ”Update DHCP range”, and then click “Save”.
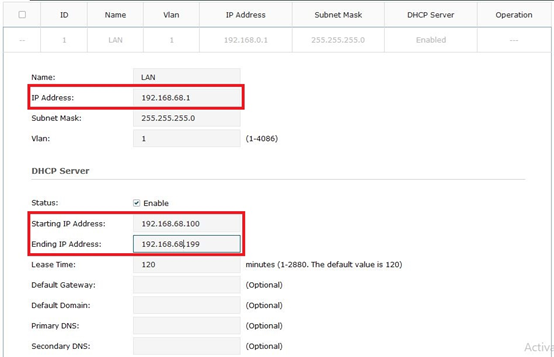
Step 2. Change the LAN IP address of Omada Gateway in standalone mode
Connect one PC and get an IP address from the Omada Gateway. Input 192.168.0.1 to the address bar in the web browser and you will visit the management page of Omada gateway.
After logging into the page, go to Network-LAN, change the IP Address to 192.168.68.1, and modify Starting IP Address and Ending IP Address, click save.
Now you can replace the old router with your Omada Gateway.
Note: When you enter the standalone GUI, you will need to create a username and password, please remember the newly created account as it will be used in the Step 3.
Step 3. Adopt the Omada Gateway
Here we discuss it in two steps.
1) Go back to the Controller page, you will see the Omada Gateway in Pending status. Please click the gateway and adopt it.
After clicking on Adopt, it will show “Failed to adopt the device because the username or password is incorrect” as below.

Then it will display “ADOPT FAILED”, with the following error message.

2) Please click Retry and type in the username and password you used when logging into the Standalone interface of the router, as shown in the following location. And Click Adopt again.

Note: This account is used in the Standalone web interface of the router before, the one you will use when filling in the image below.

It is neither the default account (admin/admin), because you have changed it when you login the router in the first time, nor the Device Account on the controller’s Site page.
Step 4. Renew IP address of devices or set static IP
Since we have changed the gateway in the network, the IP address of switch/EAP/OC200 will be changed if the DHCP release time expires. And then you may need to use the Omada Controller to manage these devices again.
1) We suggest settings static IP addresses for these devices in the Omada Controller in advance.
2) You can also unplug and plug the Ethernet cable of these devices to upgrade the IP address manually and use the Omada Controller to manage them again.
Is this faq useful?
Your feedback helps improve this site.


TP-Link Community
Still need help? Search for answers, ask questions, and get help from TP-Link experts and other users around the world.