How to migrate Omada Controller with the Migration feature
The migration function allows users to migrate the configurations and data of an old Controller to a new Controller. The migration functions include Site Migration and Controller Migration, covering all the needs to migrate both a single site and the whole Controller.
Before proceeding with migration, please check the following notes:
- The ER7212PC, a 3-in-1 router, supports configuration and data migration only between ER7212PC devices running the same or higher firmware version. Configurations cannot be imported or exported between the ER7212PC and software controllers, hardware controllers, or the Omada Central Controller.
- For controller versions 5.13.11.41 and higher, controller migration is supported only when importing a configuration file from a controller with the same Major.Minor.Patch version number (e.g., 5.13.11).
I. Site Migration
Site Migration allows administrators to export a site from the current Controller to any other Controller with the same or higher firmware version. All the site's configurations and data will be migrated to the target Controller. The process of migrating configurations and data from a site to another Controller can be summarized in three steps: Export Site, Migrate Site, and Migrate Devices.
Step 1: Export configurations and site data to be migrated as a backup file.
A. Go to Global View> Settings> Migration. On the Site Migration tab, click the start button on the following page.

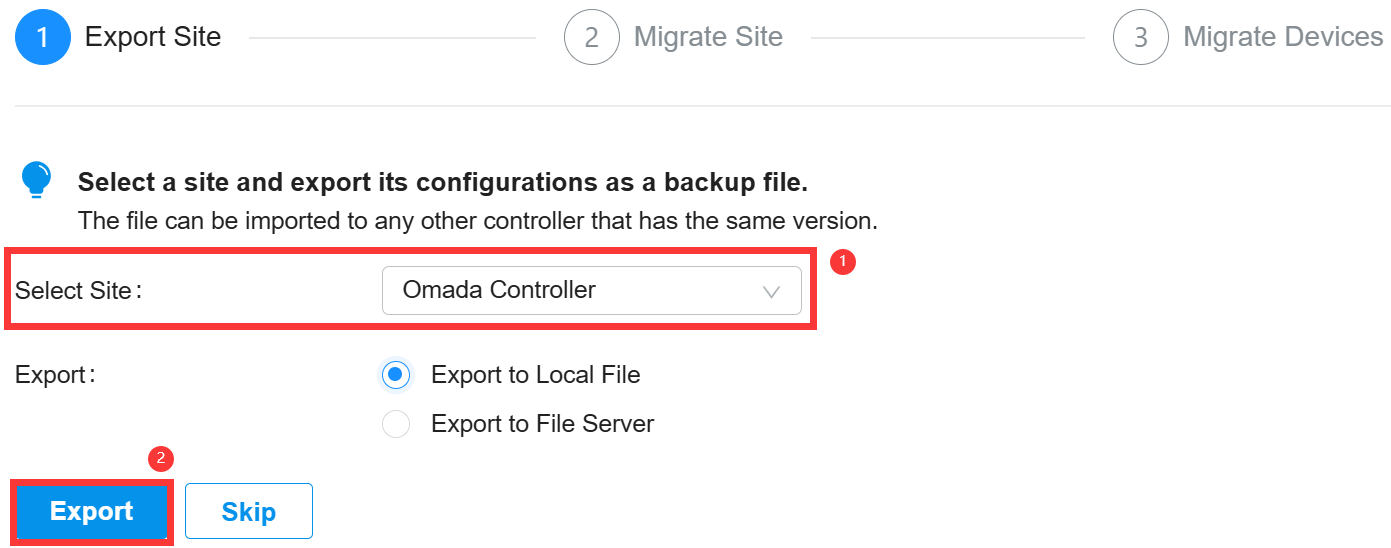
B. Select the site imported into the second Controller in the Select Site drop-down list. Then, choose where you want to export and save the backup file. Click Export to download the file for the current site. If you have backed up the file, click Skip.

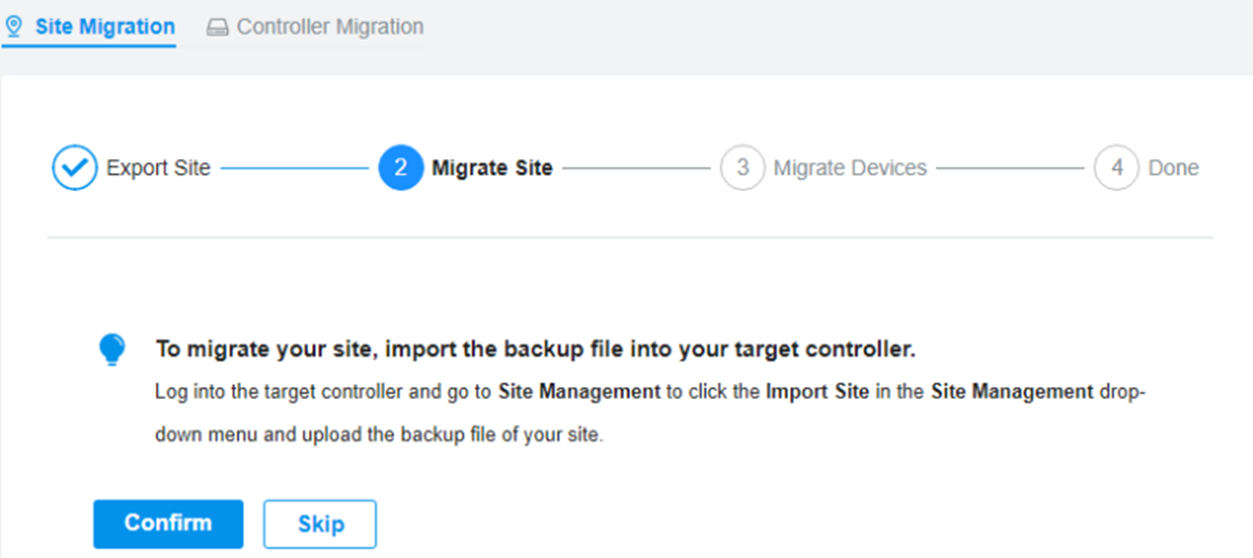
Step 2: In the target Controller, import the backup file of the original site.
A. Start and log in to the target Controller. Under “Global View,” select “Dashboard” in the menu, and click on import site.

B. Enter a different name for the new site. Click Browse to upload the file of the site to be imported and click Import to import the site

Note:
For Controller v 4.3.0 and above, only the file from the Controller with the same major and minor version number can be imported.
C. After importing the file to the target Controller, return to the previous Controller and click Confirm.

Step 3: Migrate Devices: Migrate the devices on the original site to the target Controller.
A. Enter your target Controller's IP address or URL into the Controller IP/Inform URL input field. In this case, the IP address of the target Controller is 10.0.3.23.

Note:
Ensure you enter the target Controller's correct IP address or URL to establish communication between Omada-managed devices and your target Controller. Otherwise, the target controller cannot adopt Omada-managed devices.
B. Click the box next to each device to select it for migration. By default, all devices are selected. Click Migrate Devices to migrate the selected devices to the target Controller.

C. Verify that all the migrated devices are visible and connected to the target Controller. When all the migrated devices are in Connected status on the Device page on the target Controller, click Forget Devices on the previous site to finish the migration process.

D. When the migration process is completed, all the configuration and data are migrated to the target Controller. You can delete the previous site if necessary.
II. Controller Migration
Controller Migration allows Omada administrators to migrate the configurations and data from the current Controller to any other Controller with the same or higher firmware version. The process of migrating configurations and data from the current Controller to another Controller can be summarized in three steps: Export Controller, Migrate Controller, and Migrate Devices.
Note: Please note that the ER7212PC is special. Its backup file cannot be imported into other controllers. It can only be imported into the ER7212PC with the same hardware.
Step 1: Export Controller Export the configurations and data of the current Controller as a backup file.
A. Go to Global View> Settings> Migration. On the Controller Migration tab, click the start button on the following page.

B. Select the time and days that data will be backed up in the Retained Data Backup and where you want to export and save the data. Click Export to export the configurations and data of your current Controller as a backup file. If you have backed up the file, click Skip.

Step 2: Migrate Controller: In the target Controller, import the backup file of the current Controller.
A. Log in to the target Controller, go to Settings > Maintenance > Backup & Restore. Click Browse to locate and choose the backup file of the previous Controller. Then click Restore to upload the file.
![]()

B. After importing the file to the target Controller, return to the previous Controller and click Confirm.

Note: During the migration operation for controller v5.15.24 and above, if you skip the backup file import step on the target controller and proceed directly to device migration, the target controller will fail to adopt the devices automatically. Always follow the operation sequence specified in the migration guide.
Step3: Migrate Devices: Migrate the devices on the current Controller to the target Controller
A. Enter your target Controller's IP address or URL into the Controller IP/Inform URL input field. In this case, the IP address of the target Controller is 10.0.3.23.

Note:
Ensure you enter the target Controller's IP address or URL to establish communication between Omada-managed devices and your target Controller. Otherwise, the target controller cannot adopt Omada-managed devices.
B. Click the box next to each device to select it for migration. By default, all devices are selected. Click Migrate Devices to migrate the selected devices to the target Controller.

C. Verify that all the migrated devices are visible and connected to the target Controller. When all the migrated devices are in Connected status on the Device page on the target Controller, click Forget Devices on the previous Controller to finish the migration process

D. When you try to migrate the on-premises Controller to Cloud-based Controller, the devices would be unactivated in target Controller, you may refer to the guide to activate it with assigning license: Omada License Configuration Guide

All the configuration and data are migrated to the target Controller when the migration process is completed. If necessary, you can uninstall the previous Controller.
Get to know more details of each function and configuration please go to Download Center to download the manual of your product.
Câu hỏi thường gặp này có hữu ích không?
Phản hồi của bạn giúp cải thiện trang web này.


1.0_normal_1592202397383a.png)
