Archer C58HP V1 User Guide
- About This Guide
- Chapter 1 Get to Know About Your Router
- Chapter 2 Connect to the Internet
- Chapter 3 Log In to Your Router
- Chapter 4 Guest Network
- Chapter 5 Parental Controls
- Chapter 6 QoS
- Chapter 7 Network Security
- Chapter 8 NAT Forwarding
- Chapter 9 VPN Server
- Chapter 10 Customize Your Network Settings
- Chapter 11 Manage the Router
- FAQ
- Authentication
•The product should not be located in a place where it will be exposed to moisture or excessive heat.
•Place the router in a location where it can be connected to multiple devices as well as to a power source.
•Make sure the cables and power cord are safely placed out of the way so they do not create a tripping hazard.
•The router can be placed on a shelf or desktop.
•Keep the router away from devices with strong electromagnetic interference, such as Bluetooth devices, cordless phones and microwaves.
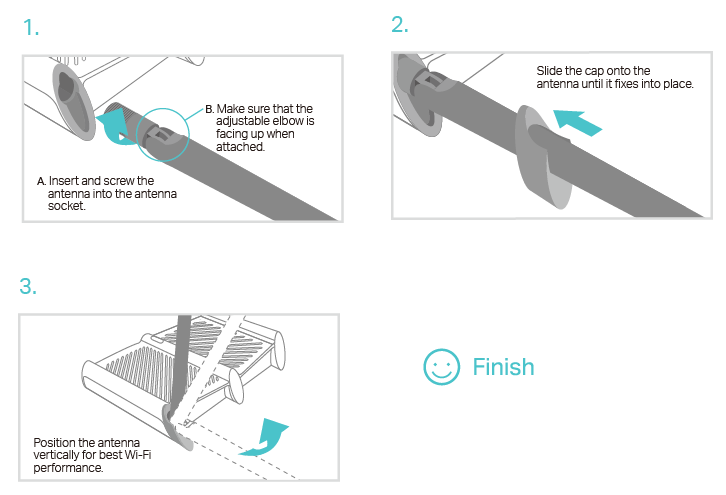
Please install the antennas first by following the steps shown below before you start.
The router provides three working modes: Router, Repeater, and Access Point. You can choose the mode to better suit your network needs and follow the guide to complete the configuration.
2.2. Router Mode
This mode enables multiple users to share internet connection via ADSL/Cable Modem.
1.Follow the steps below to connect your router.
If your internet comes from an Ethernet outlet, connect the router’s WAN port to it, then skip Step 1, 2 and 3.
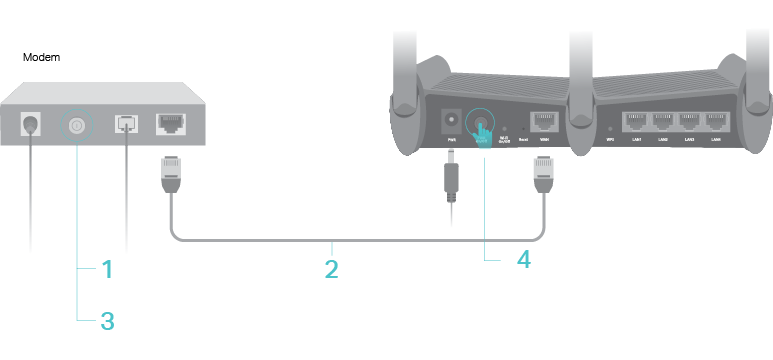
1 )Unplug your modem, and remove the backup battery if it has one.
2 )Connect the power-off modem to the WAN port on your router with an Ethernet cable.
3 )Power on the modem, and then wait about 2 minutes for it to restart.
4 )Connect the power adapter to the router and turn on the router.
5 )Verify that the hardware connection is correct by checking these LEDs.

 Tips: If the 2.4G or 5G LED is off, press and hold the Wi-Fi On/Off button until it is on.
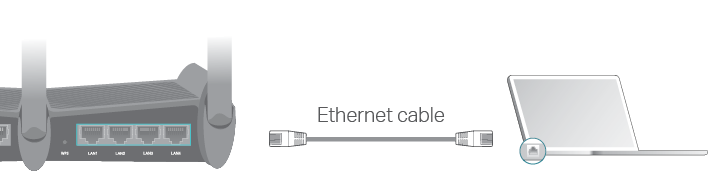
2.Connect your computer to the router.
•Method 1: Wired
Turn off the Wi-Fi on your computer and connect the devices as shown below.
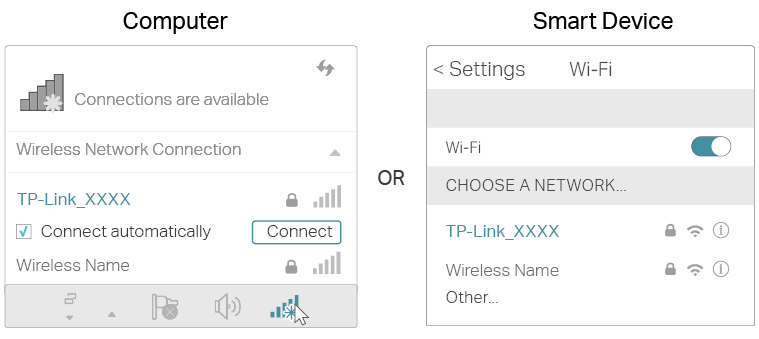
•Method 2: Wirelessly
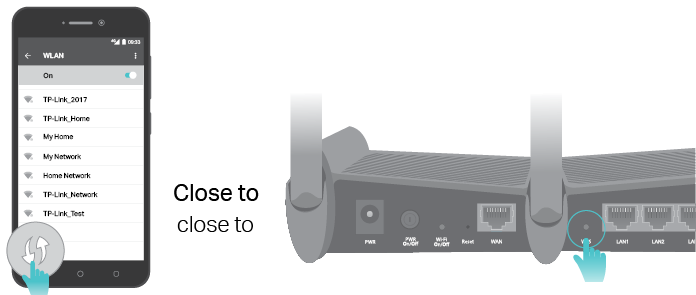
1 )Find the SSID (Network Name) and Wireless Password printed on the label at the bottom of the router.
2 )Click the network icon of your computer or go to Wi-Fi Settings of your smart device, and then select the SSID to join the network.
•Method 3: Use the WPS button
Wireless devices that support WPS, including Android phones, tablets, most USB network cards, can be connected to your router through this method (Not supported by iOS devices).
 Note: The WPS function cannot be configured if the wireless function of the router is disabled. Also, the WPS function will be disabled if your wireless encryption is WEP. Please make sure the wireless function is enabled and is configured with the appropriate encryption before configuring the WPS.
1 )Tap the WPS icon on the device’s screen. Here we take an Android phone for example.
2 )Within two minutes, press the WPS button on your router.
3.Enter http://tplinkwifi.net in the address bar of a web browse and create a password for future logins.

Note: If the login page does not appear, please refer to the FAQ section.
4.Go to Quick Setup and follow the step-by-step instructions to complete the setup.
5.Enjoy! For wireless devices, you may have to reconnect to the wireless network if you have customized the SSID (network name) and password during the configuration.
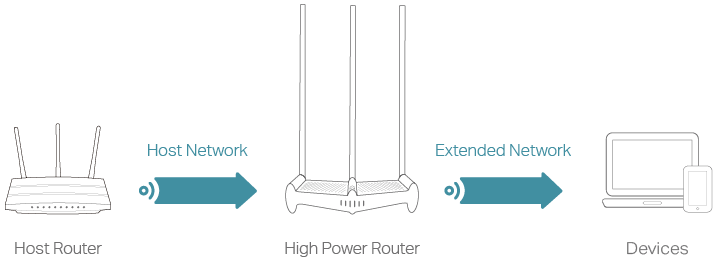
2.3. Repeater Mode
This mode boosts your home wireless coverage.
Step 1: Configure
Tips: Using WPS Button is an easy way to extend your host network. We recommend you to use this way if your host router has a WPS button. The button might look like one of these:  .
.
•Option One: Using the RE Button
1 )Press the WPS button on the host router.
2 )Press and hold the  (RE button) on the top panel of the router for about 3 seconds within 1 minute. The router will start to connect to the host router. Once connected, the router will reboot.
3 )Once rebooted, the RE LED should change from blinking to a solid state, indicating successful connection.
•Option Two: Using a Web Browser
1 )Connect a computer to the router via an Ethernet cable or wirelessly by using the SSID (Network Name) and password printed on the label at the bottom of the router.
2 )Enter http://tplinkwifi.net in the address bar of a web browser and create a password for future logins.
Note: If the login page does not appear, please refer to the FAQ section.
3 )Go to Advanced > Operation Mode, select Repeater and click Save. The router will reboot automatically.
4 )Log in to the web management page. Go to Quick Setup and follow the step-by-step instructions to complete the setup.
Step 2: Relocate:
Place the router between your host router and the Wi-Fi dead zone. The location you choose must be within the range of your existing host network.
Step 3: Enjoy!
The extended network shares the same password as that of your host network. If you have customized the SSID (network name) of the extended network, connect to the new Wi-Fi.
2.4. Access Point Mode
This mode transforms your existing wired network to a wireless one.
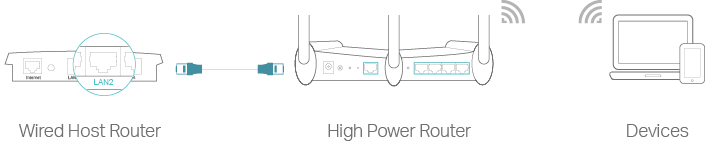
1.Connect the router to your wired host router’s Ethernet port via an Ethernet cable as shown above and turn on the router.
2.Connect a computer to the router via an Ethernet cable or wirelessly by using the SSID (network name) and password printed on the bottom label of the router.
3.Enter http://tplinkwifi.net in the address bar of a web browser and create a password for future logins.
Note: If the login page does not appear, please refer to the FAQ section.
4.Go to Advanced > Operation Mode, select Access Point and click Save. The router will reboot automatically.
5.Enjoy! Connect to the wireless network by using the SSID (network name) and password of the router.