Archer AX3200 V1 User Guide
- About This Guide
- Chapter 1 Get to Know About Your Router
- Chapter 2 Connect the Hardware
- Chapter 3 Log In to Your Router
- Chapter 4 Set Up Internet Connection
- Chapter 5 TP-Link Cloud Service
- Chapter 6 Guest Network
- Chapter 7 USB Settings
- Chapter 8 Parental Controls
- Chapter 9 QoS
- Chapter 10 Network Security
- Chapter 11 NAT Forwarding
- Chapter 12 VPN Server
- Chapter 13 Customize Your Network Settings
- Chapter 14 Manage the Router
- FAQ
- Authentication
This chapter describes how to use the USB ports to share files and media from the USB storage devices over your home network locally, or remotely through the internet.
The router supports USB external flash drives and hard drives.
It contains the following sections:
1. Access the USB Storage Device
Insert your USB storage device into the router’s USB port and then access files stored there locally or remotely.
 Tips:
Tips:
•If you use USB hubs, make sure no more than 4 devices are connected to the router.
•If the USB storage device requires using bundled external power, make sure the external power has been connected.
•If you use a USB hard drive, make sure its file system is FAT32, exFat, NTFS or HFS+.
•Before you physically disconnect a USB device from the router, safely remove it to avoid data damage: Go to Advanced > USB > USB Storage Device and click Remove.
1.1. Access the USB Device Locally
Insert your USB storage device into the router’s USB port and then refer to the following table to access files stored on your USB storage device.
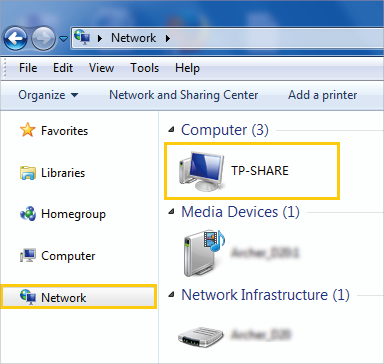
| Windows computer | •Method 1: Go to Computer > Network, then click the Network Server Name (TP-SHARE by default) in the Computer section.
Operations in different systems are similar. Here we take Windows 7 as an example.
|

| Windows computer | •Method 2: Open the Windows Explorer (or go to Computer) and type the server address \\tplinkwifi.net or ftp://tplinkwifi.net in the address bar, then press Enter.
|
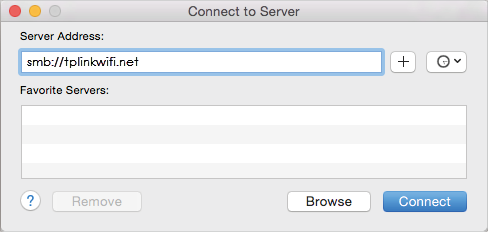
| Mac | 1 )Select Go > Connect to Server. 2 )Type the server address smb://tplinkwifi.net. 3 )Click Connect.
4 )When prompted, select the Guest radio box. (If you have set up a username and a password to deny anonymous access to the USB disks, you should select the Registered User radio box. To learn how to set up an account for the access, refer to To Set Up Authentication for Data Security.) |
| Tablet | Use a third-party app for network files management. |

Tips:
You can also access your USB storage device by using your Network/Media Server Name as the server address. Refer to To Customize the Address of the USB Storage Device to learn more.
1.2. Access the USB Device Remotely
You can access your USB disk outside the local area network. For example, you can:
•Share photos and other large files with your friends without logging in to (and paying for) a photo-sharing site or email system.
•Get a safe backup for the materials for a presentation.
•Remove the files on your camera’s memory card from time to time during the journey.
 Note:
Note:
If your ISP assigns a private WAN IP address (such as 192.168.x.x or 10.x.x.x), you cannot use this feature because private addresses are not routed on the internet.
Follow the steps below to configure remote access settings.
1.Visit http://tplinkwifi.net, and log in with your TP-Link ID or the password you set for the router.
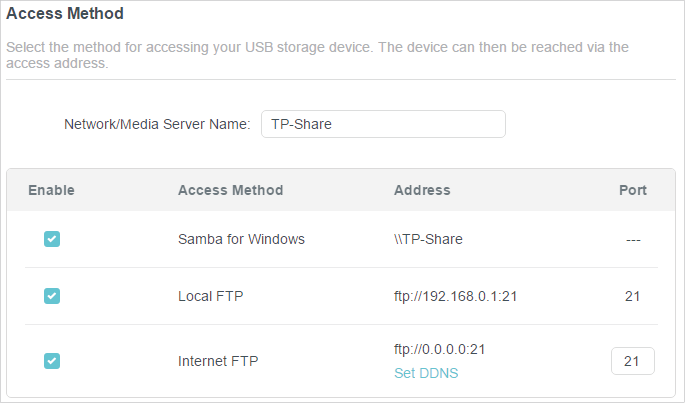
2.Go to Advanced > USB > USB Storage Device.
3.Tick the Internet FTP checkbox, and then click Save.
4.Refer to the following table to access your USB disk remotely.
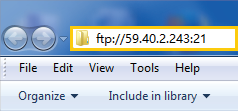
| Computer | 1 )Open the Windows Explorer (or go to Computer, only for Windows users) or open a web browser. 2 )Type the server address in the address bar: Type in ftp://<WAN IP address of the router>:<port number> (such as ftp://59.40.2.243:21). If you have specified the domain name of the router, you can also type in ftp://<domain name>:<port number> (such as ftp://MyDomainName:21)
3 )Press Enter on the keyboard. 4 )Access with the username and password you set in To Set Up Authentication for Data Security.
You can also access the USB disk via a third-party app for network files management, which can resume broken file transfers. |
| Tablet | Use a third-party app for network files management. |
Tips:
Click Set Up a Dynamic DNS Service Account to learn how to set up a domain name for you router.
1.3. Customize the Access Settings
By default, all the network clients can access all folders on your USB disk. You can customize your sharing settings by setting a sharing account, sharing specific contents and setting a new sharing address on the router’s web management page.
1.Visit http://tplinkwifi.net, and log in with your TP-Link ID or the password you set for the router.
2.Go to Advanced > USB > USB Storage Device.
•To Customize the Address of the USB Storage Device
You can customize the server name and use the name to access your USB storage device.
1.In the Access Method session, make sure Samba for Windows is ticked, and enter a Network/Media Server Name as you like, such as MyShare, then click Save.
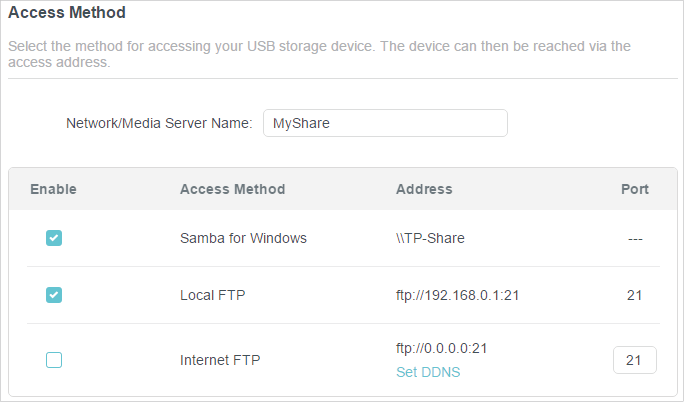
2.Now you can access the USB storage device by visiting \\MyShare (for Windows) or smb://MyShare (for Mac).
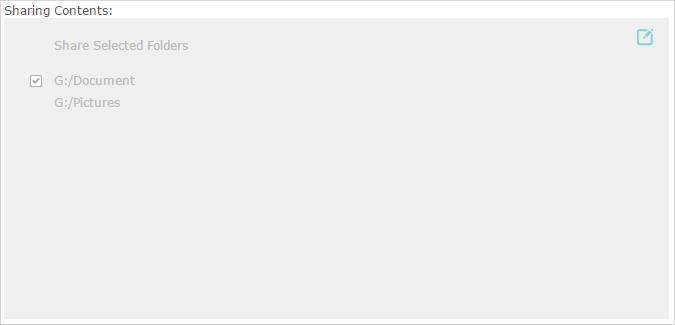
•To Only Share Specific Content
Focus on the File Sharing section. Specify sharing folders that you want to share and click Save.
•To Set Up Authentication for Data Security
You can set up authentication for your USB storage device so that network clients will be required to enter username and password when accessing the USB storage device.
1.In the File Sharing section, enable Secure Sharing.
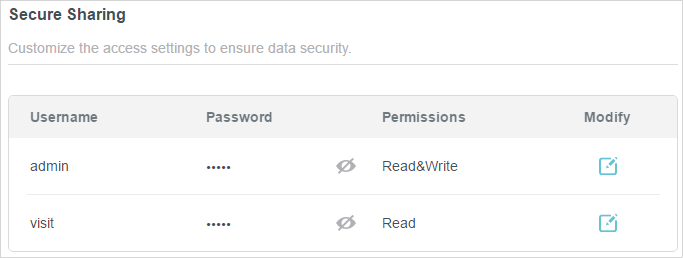
2.Click  to modify the access account. The username and password are both admin for default administrator account, and both visit for default visitor account. Accessing as an administrator can read and modify the shared folders while visitors can only read the shared folders.
Note:
1.For Windows users, do not set the sharing username the same as the Windows username. Otherwise, Windows credential mechanism may cause the following problems:
•If the sharing password is also the same as the Windows password, authentication will not work since the Windows will automatically use its account information for USB access.
•If the sharing password is different from the Windows password, the Windows will be unable to remember your credentials and you will always be required to enter the sharing password for USB access.
2.Due to Windows credential mechanism, you might be unable to access the USB disk after changing Authentication settings. Please log out from the Windows and try to access again. Or you can change the address of the USB disk by referring to To Customize the Address of the USB Storage Device.
The feature of Media Sharing allows you to view photos, play music and watch movies stored on the USB storage device directly from DLNA-supported devices, such as your computer, tablet and PS2/3/4.
1.Visit http://tplinkwifi.net, and log in with your TP-Link ID or the password you set for the router.
2.Go to Advanced > USB > USB Storage Device.
3.Enable Media Sharing.

4.When your USB storage device is inserted into the router, your DLNA-supported devices (such as your computer and pad) connected to the router can detect and play the media files on the USB storage devices.
5.Refer to the following table for detailed instructions.
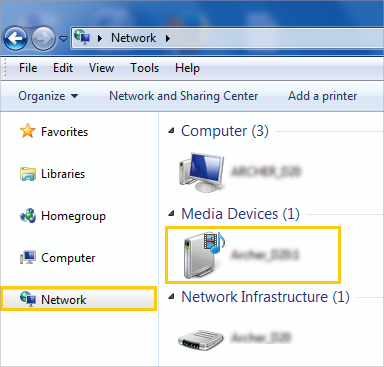
| Windows Computer | •Go to Computer > Network, then click the Media Server Name (Model number-share by default) in the Media Devices section.
Here we take Windows 7 as an example.
|
| Tablet | •Use a third-party DLNA-supported player. |
Time Machine backs up all files on your Mac computer to a USB storage device connected to your router.
1.Visit http://tplinkwifi.net, and log in with your TP-Link ID or the password you set for the router.
2.Go to Advanced > USB > Time Machine.
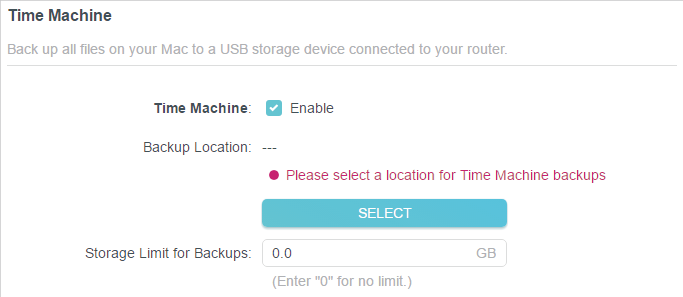
3.Tick the checkbox to enable Time Machine.
4.Click Select to select a location for Time Machine backups.
5.Set the Size Limit for Backups.
 Note: 0 means no limit for the space.
6.Click Save.