Archer AX3200 V1 User Guide
- About This Guide
- Chapter 1 Get to Know About Your Router
- Chapter 2 Connect the Hardware
- Chapter 3 Log In to Your Router
- Chapter 4 Set Up Internet Connection
- Chapter 5 TP-Link Cloud Service
- Chapter 6 Guest Network
- Chapter 7 USB Settings
- Chapter 8 Parental Controls
- Chapter 9 QoS
- Chapter 10 Network Security
- Chapter 11 NAT Forwarding
- Chapter 12 VPN Server
- Chapter 13 Customize Your Network Settings
- Chapter 14 Manage the Router
- FAQ
- Authentication
Chapter 11 NAT Forwarding
The router’s NAT (Network Address Translation) feature makes devices on the LAN use the same public IP address to communicate with devices on the internet, which protects the local network by hiding IP addresses of the devices. However, it also brings about the problem that an external host cannot initiatively communicate with a specified device on the local network.
With the forwarding feature the router can penetrate the isolation of NAT and allows devices on the internet to initiatively communicate with devices on the local network, thus realizing some special functions.
The TP-Link router supports four forwarding rules. If two or more rules are set, the priority of implementation from high to low is Port Forwarding, Port Triggering, UPNP and DMZ.
It contains the following sections:
•Share Local Resources on the Internet by Port Forwarding
•Open Ports Dynamically by Port Triggering
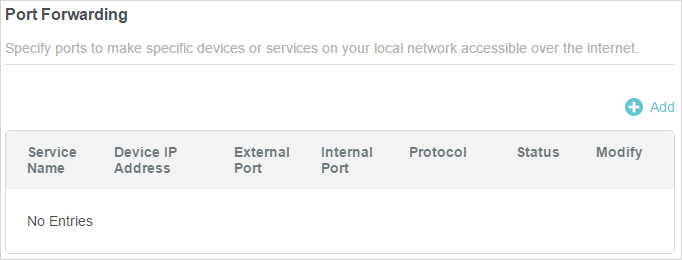
1. Share Local Resources on the Internet by Port Forwarding
When you build up a server on the local network and want to share it on the internet, Port Forwarding can realize the service and provide it to internet users. At the same time Port Forwarding can keep the local network safe as other services are still invisible from the internet.
Port Forwarding can be used for setting up public services on your local network, such as HTTP, FTP, DNS, POP3/SMTP and Telnet. Different services use different service ports. Port 80 is used in HTTP service, port 21 in FTP service, port 25 in SMTP service and port 110 in POP3 service. Please verify the service port number before the configuration.
I want to:
Share my personal website I’ve built in local network with my friends through the internet.
For example, the personal website has been built on my home PC (192.168.0.100). I hope that my friends on the internet can visit my website in some way. The PC is connected to the router with the WAN IP address 218.18.232.154.

How can I do that?
1.Assign a static IP address to your PC, for example 192.168.0.100.
2.Visit http://tplinkwifi.net, and log in with your TP-Link ID or the password you set for the router.
3.Go to Advanced > NAT Forwarding > Port Forwarding.
4.Click  .
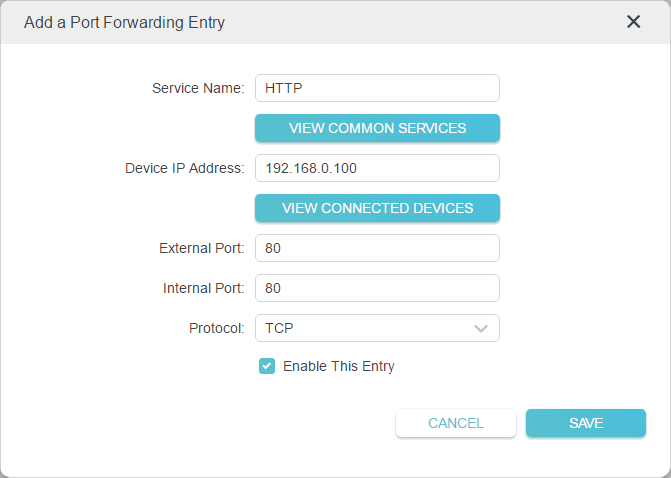
.
5.Click VIEW COMMON SERVICES and select HTTP. The External Port, Internal Port and Protocol will be automatically filled in.
6.Click VIEW CONNECTED DEVICES and select your home PC. The Device IP
Address will be automatically filled in. Or enter the PC’s IP address 192.168.0.100 manually in the Device IP Address field.
7.Click SAVE.
 Tips:
Tips:
•It is recommended to keep the default settings of Internal Port and Protocol if you are not clear about which port and protocol to use.
•If the service you want to use is not in the common services list, you can enter the corresponding parameters manually. You should verify the port number that the service needs.
•You can add multiple port forwarding rules if you want to provide several services in a router. Please note that the External Port should not be overlapped.
Done!
Users on the internet can enter http:// WAN IP (in this example: http:// 218.18.232.154) to visit your personal website.
Tips:
•The WAN IP should be a public IP address. For the WAN IP is assigned dynamically by the ISP, it is recommended to apply and register a domain name for the WAN referring to Set Up a Dynamic DNS Service Account. Then users on the internet can use http:// domain name to visit the website.
•If you have changed the default External Port, you should use http:// WAN IP: External Port or http:// domain name: External Port to visit the website.
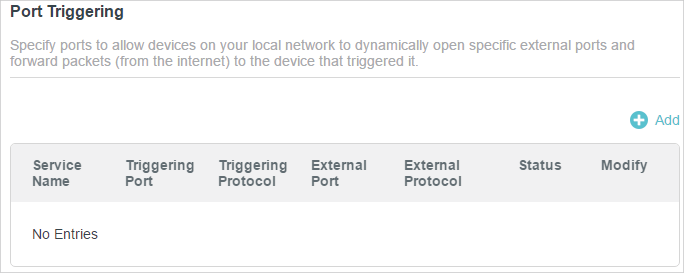
2. Open Ports Dynamically by Port Triggering
Port Triggering can specify a triggering port and its corresponding external ports. When a host on the local network initiates a connection to the triggering port, all the external ports will be opened for subsequent connections. The router can record the IP address of the host. When the data from the internet return to the external ports, the router can forward them to the corresponding host. Port Triggering is mainly applied to online games, VoIPs, video players and common applications including MSN Gaming Zone, Dialpad and Quick Time 4 players, etc.
Follow the steps below to configure the Port Triggering rules:
1.Visit http://tplinkwifi.net, and log in with your TP-Link ID or the password you set for the router.
2.Go to Advanced > NAT Forwarding > Port Triggering and click  .
.
3.Click VIEW COMMON SERVICES, and select the desired application. The Triggering Port, Triggering Protocol and External Port will be automatically filled in. The following picture takes application MSN Gaming Zone as an example.
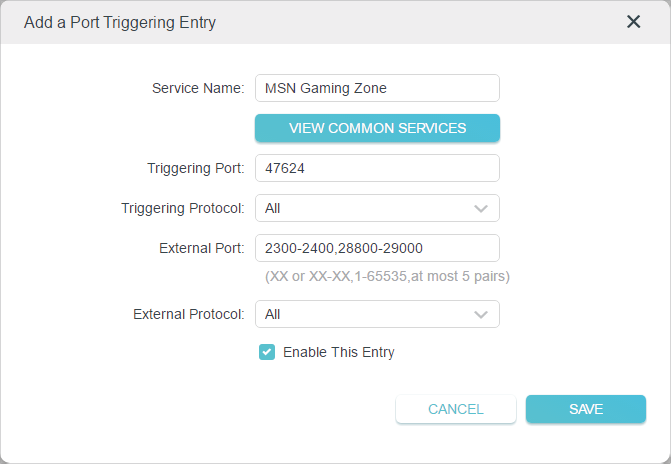
4.Click SAVE.
Tips:
•You can add multiple port triggering rules according to your network need.
•The triggering ports can not be overlapped.
•If the application you need is not listed in the Existing Applications list, please enter the parameters manually. You should verify the external ports the application uses first and enter them into External Port field according to the format the page displays.
3. Make Applications Free from Port Restriction by DMZ
When a PC is set to be a DMZ (Demilitarized Zone) host on the local network, it is totally exposed to the internet, which can realize the unlimited bidirectional communication between internal hosts and external hosts. The DMZ host becomes a virtual server with all ports opened. When you are not clear about which ports to open in some special applications, such as IP camera and database software, you can set the PC to be a DMZ host.
 Note:
Note:
When DMZ is enabled, the DMZ host is totally exposed to the internet, which may bring some potential safety hazards. If DMZ is not in use, please disable it in time.
I want to:
Make the home PC join the internet online game without port restriction.
For example, due to some port restriction, when playing the online games, you can log in normally but cannot join a team with other players. To solve this problem, set your PC as a DMZ host with all ports open.
How can I do that?
1.Assign a static IP address to your PC, for example 192.168.0.100.
2.Visit http://tplinkwifi.net, and log in with your TP-Link ID or the password you set for the router.
3.Go to Advanced > NAT Forwarding > DMZ and tick to enable DMZ.
4.Click VIEW CONNECTED DEVICES and select your PC. The Device IP
Address will be automatically filled in. Or enter the PC’s IP address 192.168.0.100 manually in the DMZ Host IP Address field.
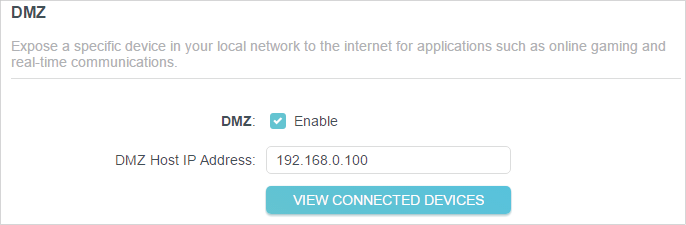
5.Click SAVE.
Done!
The configuration is completed. You’ve set your PC to a DMZ host and now you can make a team to game with other players.
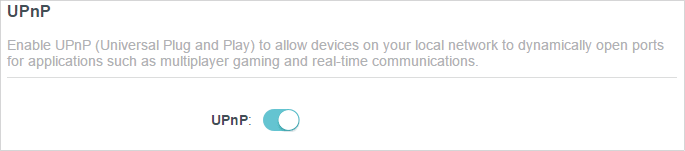
4. Make Xbox Online Games Run Smoothly by UPnP
The UPnP (Universal Plug and Play) protocol allows applications or host devices to automatically find the front-end NAT device and send request to it to open the corresponding ports. With UPnP enabled, the applications or host devices on the local network and the internet can freely communicate with each other thus realizing the seamless connection of the network. You may need to enable the UPnP if you want to use applications for multiplayer gaming, peer-to-peer connections, real-time communication (such as VoIP or telephone conference) or remote assistance, etc.
 Tips:
Tips:
•UPnP is enabled by default in this router.
•Only the application supporting UPnP protocol can use this feature.
•UPnP feature needs the support of operating system (e.g. Windows Vista/ Windows 7/ Windows 8, etc. Some of operating system need to install the UPnP components).
For example, when you connect your Xbox to the router which has connected to the internet to play online games, UPnP will send request to the router to open the corresponding ports allowing the following data penetrating the NAT to transmit. Therefore, you can play Xbox online games without a hitch.

If necessary, you can follow the steps to change the status of UPnP.
1.Visit http://tplinkwifi.net, and log in with your TP-Link ID or the password you set for the router.
2.Go to Advanced > NAT Forwarding > UPnP and toggle on or off according to your needs.