TL-MR6400 V4 User Guide
- About This Guide
- Chapter 1 Get to Know Your 4G LTE Router
- Chapter 2 Connect the Hardware
- Chapter 3 Log In to Your 4G LTE Router
- Chapter 4 Set Up Internet Connections
- Chapter 5 QoS
- Chapter 6 Network Security
- Chapter 7 Parental Controls
- Chapter 8 SMS
- Chapter 9 Guest Network
- Chapter 10 NAT Forwarding
- Chapter 11 Specify Your Network Settings
- Chapter 12 Administrate Your Network
- FAQ
- Authentication
Chapter 11 Specify Your Network Settings
This chapter introduces how to change the default settings or adjust the basic configuration of the router using the web-based management page.
This chapter contains the following sections:
USSD (Unstructured Supplementary Service Data) is used to communicate with the service provider’s computer. You can query service data on this page.
Follow the steps below to get service data.
1.Visit http://tplinkmodem.net, and log in with the password you set for the router.
2.Go to Advanced > Network > USSD page.
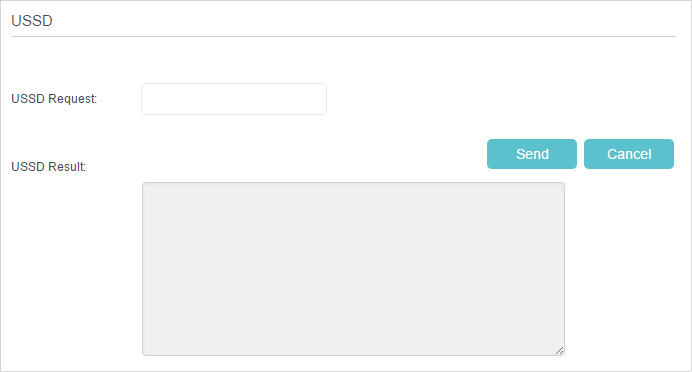
3.Enter the USSD request and click Send. You will see the message returned from the carrier in the USSD Result box.
PIN (Personal Identification Number) is used to protect the SIM card from embezzlement. PIN Management allows you to easily change the PIN settings of your SIM card as needed.
Follow the steps below to change your PIN settings.
1.Visit http://tplinkmodem.net, and log in with the password you set for the router.
2.Go to Advanced > Network > PIN Management page.
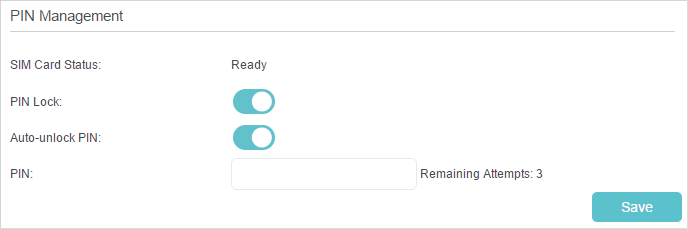
•SIM Card Status - Displays the status of your SIM card.
•PIN Lock - Toggle on to enable PIN Lock. Once it is enabled, every time you start the router with this SIM card inserted, you need to enter the PIN.
•Auto-unlock PIN - When the PIN is required upon router restarting or inserting a SIM card, it will be validated automatically, saving you the trouble to enter the PIN each time you start the router or insert a SIM card. If validation failed, you need to enter the PIN on this page.
•PIN - Enter the PIN to unlock the SIM card. It consists of 4-8 digits.
•PUK - PIN Unlocked Key, also known as Personal Unlock Code (PUC), is used to reset a PIN that has been lost or forgotten. The PUK is a SIM-specific code assigned by the service provider. You need to enter the PUK after 3 incorrect login attempts of PIN. Contact your service provider if you do not know the PUK. It consists of 8 digits.
•New PIN - Enter 4-8 digits to reset the PIN of your SIM card.
•Remaining Attempts - Shows how many attempts are left for you to try entering the PIN or PUK. You have only 3 attempts for entering the PIN and 10 attempts for entering the PUK. If you accidentally fail in 3 attempts, the SIM card will be locked and you will be required to enter the PUK that is written on your SIM card.
3.Click Save to save the settings.
Data Settings is used to monitor the data usage of your router in real-time. You can limit your data usage according to your monthly allowance or total allowance and you will receive a warning if your data usage reaches the specified level.
Follow the steps below to monitor your data usage.
1.Visit http://tplinkmodem.net, and log in with the password you set for the router.
2.Go to Advanced > Network > Data Settings page.
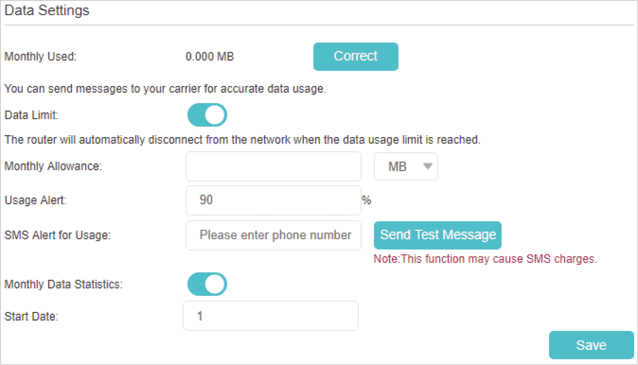
3.Enable Data Limit to set total/monthly data allowance and usage alert to prevent data overuse.
4.Enter the allowed amount of total/monthly data in the Total/Monthly Allowance field. When data usage exceeds the allowed level, the router will disconnect from the internet and notify you on the Basic > Network Map Page.
5.Enter a percentage in the Usage Alert field to prevent data overuse. When data usage reaches the alert level, a warning will be shown on the Basic > Network Map Page. If you want to want receive the alert on your phone, enter your mobile phone number in the SMS Alert for Usage field.
6.Enable Monthly Data Statistics to reset data statistics when the next billing cycle starts.
7.Enter the start date of the billing cycle in the Start Date field.
8.Click Save to save the settings.
4.1. Change the LAN IP Address
The router is preset with a default LAN IP 192.168.1.1, which you can use to log in to its web management page. The LAN IP address together with the Subnet Mask also defines the subnet that the connected devices are on. If the IP address conflicts with another device on your local network or your network requires a specific IP subnet, you can change it.
Follow the steps below to change your IP address.
1.Visit http://tplinkmodem.net, and log in with the password you set for the router.
2.Go to Advanced > Network > LAN Settings page.
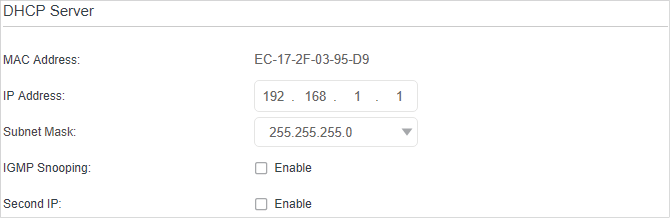
3.Type in a new IP Address as needed.
4.Select the Subnet Mask from the drop-down list. The subnet mask together with the IP address identifies the local IP subnet.
5.You can configure the router’s Second IP and Subnet Mask for LAN interface through which you can also access the web management page.
6.Leave the rest of the default settings as they are.
7.Click Save to make the settings effective.
4.2. Use the 4G LTE Router as a DHCP Server
You can configure the router to act as a DHCP server to assign IP addresses to its clients. To use the DHCP server function of the router, you must configure all computers on the LAN to obtain an IP Address automatically.
Follow the steps below to configure DHCP server.
1.Visit http://tplinkmodem.net, and log in with the password you set for the router.
2.Go to Advanced > Network > LAN Settings page.
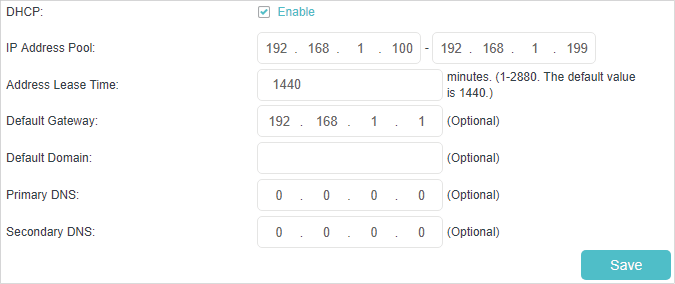
3.Select DHCP to enable the DHCP function and select DHCP Server.
4.Specify the IP Address Pool, the start address and end address must be on the same subnet with LAN IP. The router will assign addresses within this specified range to its clients. It is from 192.168.1.100 to 192.168.1.199 by default.
5.Enter a value for the Address Lease Time. The Address Lease Time is the amount of time in which a DHCP client can lease its current dynamic IP address assigned by the router. After the dynamic IP address expires, the user will be automatically assigned a new dynamic IP address. The default is 1440 minutes.
6.Keep the rest of the settings as default and click Save to make the settings effective.
 Note:
Note:
1.The router can be configured to work as a DHCP Relay. A DHCP relay is a computer that forwards DHCP data between computers that request IP addresses and the DHCP server that assigns the addresses. Each of the device’s interfaces can be configured as a DHCP relay. If it is enabled, the DHCP requests from local PCs will be forwarded to the DHCP server that runs on WAN side.
2.You can also appoint IP addresses within a specified range to devices of the same type by using Condition Pool feature. For example, you can assign IP addresses within the range (192.168.1.50 to192.168.1.80) to Camera devices, thus facilitating the network management. Enable DHCP feature and configure the parameters according to your actual situation on Advanced > Network > LAN Settings page.
You can view and add a reserved address for a client. When you specify an IP address for a device on the LAN, that device will always receive the same IP address each time when it accesses the DHCP server. If there are some devices in the LAN that require permanent IP addresses, please configure Address Reservation on the router for the purpose.
Follow the steps below to reserve an IP address for your device.
1.Visit http://tplinkmodem.net, and log in with the password you set for the router.
2.Go to Advanced > Network > LAN Settings page.
3.Scroll down to locate the Address Reservation table and click Add to add an address reservation entry for your device.
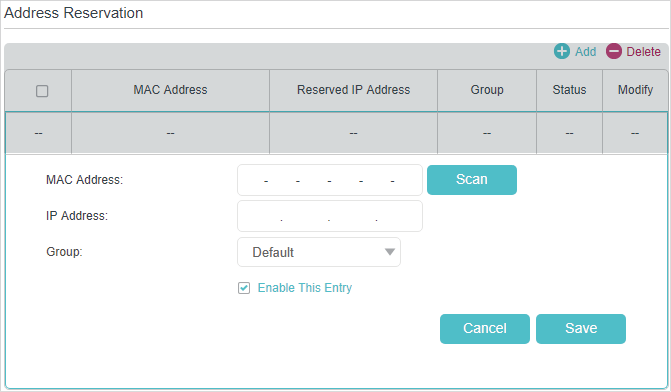
4.Enter the MAC address of the device for which you want to reserve IP address.
5.Specify the IP address which will be reserved by the router.
6.Check to Enable this entry and click Save to make the settings effective.
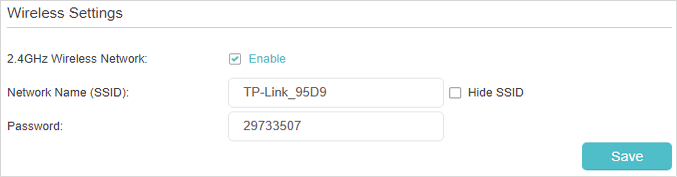
5.1. Specify Basic Wireless Settings
The router’s wireless network name (SSID) and password, and security option are preset in the factory. The preset SSID and password can be found on the product label. You can customize the wireless settings according to your needs.
1.Visit http://tplinkmodem.net, and log in with the password you set for the router.
2.Go to Basic > Wireless page.
•To enable or disable the wireless function:
Enable the Wireless Network 2.4GHz. If you don’t want to use the wireless function, just uncheck the box. If you disable the wireless function, all the wireless settings won’t be effective.
•To change the wireless network name (SSID) and wireless password:
Enter a new SSID. The default SSID is TP-Link_XXXX and the value is case-sensitive.
Note:
If you use a wireless device to change the wireless settings, you will be disconnected when the settings are effective. Please write down the new SSID and password for future use.
•To hide SSID:
Select Hide SSID, and your SSID will not broadcast. Your SSID won’t display when you scan for local wireless network list on your wireless device and you need to manually join the network.
•To change the mode or channel:
Go to Advanced > Wireless > Wireless Settings page.
•Mode - Select the desired mode.
•802.11n only - Select only if all of your wireless clients are 802.11n devices.
•802.11gn mixed - Select if you are using both 802.11g and 802.11n wireless clients.
•802.11bgn mixed - Select if you are using a mix of 802.11b, 11g, and 11n wireless clients.
Note:
When 802.11n only mode is selected, only 802.11n wireless stations can connect to the router. It is strongly recommended that you select 802.11bgn mixed, and all of 802.11b, 802.11g, and 802.11n wireless clients can connect to the router.
•Channel - Select the channel you want to use from the drop-down list. This field determines which operating frequency will be used. It is not necessary to change the wireless channel unless you notice interference problems with another nearby access point.
•Channel Width - Select the channel width from the drop-down list. The default setting is Automatic, which can adjust the channel width for your clients automatically.
•Transmit Power - Select either High, Middle, or Low to specify the data transmit power. The default and recommended setting is High.
•To change the security option:
1.Go to Advanced > Wireless > Wireless Settings page.
2.Select an option from the Security drop-down list. The router provides four options, None, WPA/WPA2 Personal (Recommended), WPA/WPA2 Enterprise, WEP. WPA2 uses the newest standard and the security level is the highest. We recommend you don’t change the default settings unless necessary.
5.2. Use WPS for Wireless Connection
You can use WPS feature to add a new wireless device to your existing network quickly.
Method 1 Use the Wi-Fi Protected Setup Button
Use this method if your client device has a Wi-Fi Protected Setup button.
1.Press the WPS/RESET button on the back panel of the router for 1 second.
Note:
You can also use the Push button on the web management page. Go to Advanced > Wireless > WPS page and click the Start WPS button on the screen.
4.0_B.png)
2.Press the WPS button of the client device within two minutes.
3.The WPS LED flashes for about two minutes during the WPS process.
4.When the WPS LED is on, the client device has successfully connected to the router.
Method 2 Enter the client device’s PIN on the router
1.Visit http://tplinkmodem.net, and log in with the password you set for the router.
2.Go to Advanced > Wireless > WPS page.
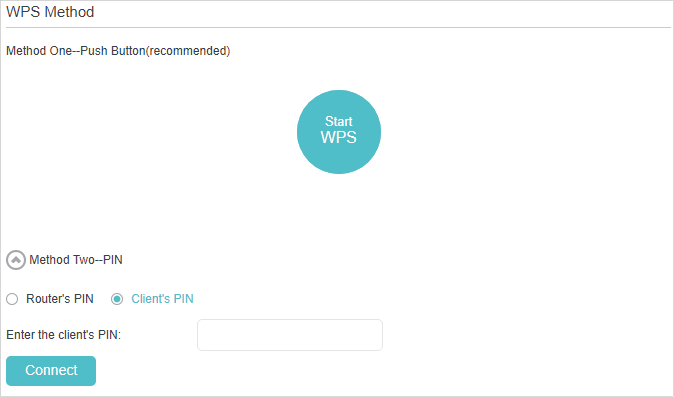
3.Select Method Two--PIN and select Client’s PIN radio button.
4.Enter the client device’s PIN in the field, then click Connect.
5.Connect successfully will appear on the above screen, which means the client device has successfully connected to the router.
Method 3 Enter the router’s PIN on your client device
Use this method if your client device asks for the router’s PIN.
1.Visit http://tplinkmodem.net, and log in with the password you set for the router.
2.Go to Advanced > Wireless > WPS page.
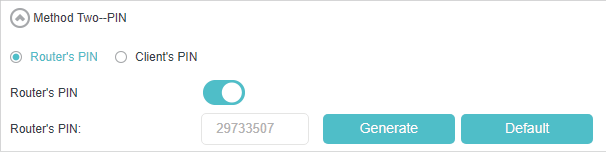
3.Take a note of the Current PIN of the router. You can also click the Generate button to get a new PIN.
4.On the client device, enter the router’s PIN. (The default PIN is also labeled on the bottom of the router.)
5.The WPS LED flashes for about two minutes during the WPS process.
6.When the WPS LED is on, the client device has successfully connected to the router.
Note:
1.The WPS LED on the router will light on for no more than five minutes if the device has been successfully added to the network.
2.The WPS function cannot be configured if the wireless function of the router is disabled. Please make sure the wireless function is enabled before configuring the WPS.
5.3. Schedule Your Wireless Function
You can automatically turn off your wireless network at time when you do not need the wireless connection.
1.Visit http://tplinkmodem.net, and log in with the password you set for the router.
2.Go to Advanced > Wireless > Wireless Schedule page.
3.Toggle on the button to enable the Wireless Schedule feature.
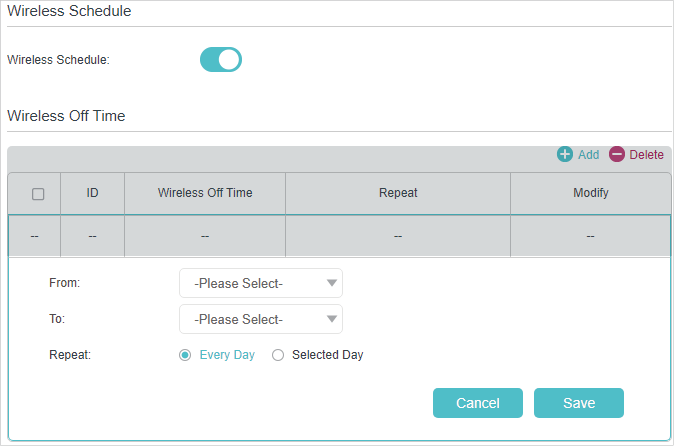
4.Set the wireless off time. Select From and To time and click Save to make the settings effective. You can repeat the schedule every day or just certain days in a week.
Note:
1.Please make sure that the time of the router is correct before using this function. For more details, refer to Set System Time.
2.The wireless LED will turn off if both wireless networks are disabled.
3.The wireless network will be automatically turned on after the time period you set.
5.4. View Wireless Information
•To view the detailed wireless network settings:
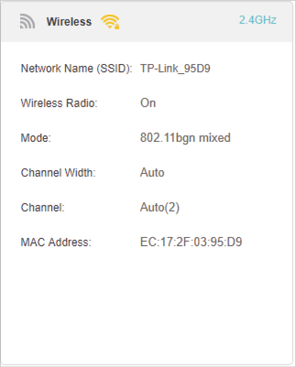
1.Visit http://tplinkmodem.net, and log in with the password you set for the router.
2.Go to Advanced > Status page. You can see the Wireless box.
 Tips:
Tips:
You can also see the wrieless details by clicking the router icon on Basic > Network Map.
•To view the detailed information of the connected wireless clients:
1.Visit http://tplinkmodem.net, and log in with the password you set for the router.
2.Go to Advanced > Wireless > Statistics page.
3.You can view the detailed information of the wireless clients, including its connected wireless band and security option as well as the packets transmitted.
Tips:
You can also see the wrieless details by clicking the wireless clients icon on Basic> Network Map.
5.5. Advanced Wireless Settings
Advanced wireless settings are for those have a network concept. If you are not familiar with the settings on this page, it’s strongly recommended that you keep the provided default values; otherwise it may result in lower wireless network performance.
1.Visit http://tplinkmodem.net, and log in with the password you set for the router.
2.Go to Advanced > Wireless > Advanced Settings page.

•Beacon Interval - Enter a value between 25 and 1000 in milliseconds to determine the duration between which beacon packets are broadcasted by the router to synchronize the wireless network. The default is 100 milliseconds.
•RTS Threshold - Enter a value between 1 and 2346 to determine the packet size of data transmission through the router. By default, the RTS (Request to Send) Threshold size is 2346. If the packet size is greater than the preset threshold, the router sends Request to Send frames to a particular receiving station and negotiates the sending of a data frame, or else the packet will be sent immediately.
•DTIM Interval - Enter a value between 1 and 255 to determine the interval of the Delivery Traffic Indication Message (DTIM). 1 indicates the DTIM Interval is the same as Beacon Interval.
•Group Key Update Period - Enter the number of seconds (minimum 30) to control the time interval for the encryption key automatic renewal. The default is 0, indicating no key renewal.
•WMM - This feature guarantees the packets with high-priority messages being transmitted preferentially. WMM is enabled compulsively under 802.11n or 802.11ac mode. It is strongly recommended to enable WMM.
•Short GI - This feature is enabled by default and recommended to increase the data capacity by reducing the Guard Interval (GI) time.
•AP Isolation - Select this checkbox to enable the AP Isolation feature that allows you to confine and restrict all wireless devices on your network from interacting with each other, but still able to access the internet. AP isolation is disabled by default.
6. Set Up a Dynamic DNS Service Account
Most ISPs (internet service providers) assign a dynamic IP address to the router and you can use this IP address to access your router remotely. However, the IP address can change any time and you don’t know when it changes. In this case, you might need the DDNS (Dynamic Domain Name Server) feature on the router to allow you and your friends to access your router and local servers (FTP, HTTP, etc.) using domain name, in no need of checking and remembering the IP address.
Note:
DDNS does not work if the ISP assigns a private WAN IP address (such as 192.168.1.x) to the router.
To set up DDNS, please follow the instructions below:
1.Visit http://tplinkmodem.net, and log in with the password you set for the router.
2.Go to Advanced > Network> Dynamic DNS.
3.Select the DDNS service provider (Dyndns or NO-IP). If you don’t have a DDNS account, select a service provider and click Go to register.
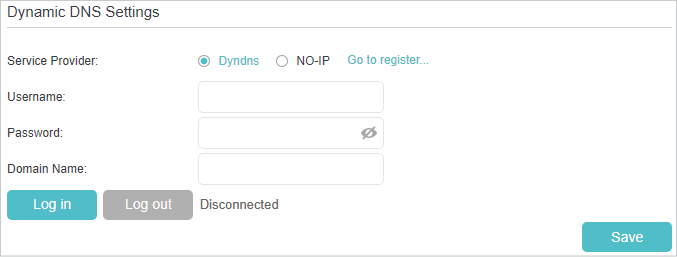
4.Enter the username, password and domain name of the account (such as lisa.ddns.net).
5.Click Log in and Save.
 Tips:
Tips:
If you want to use a new DDNS account, please log out first, then log in with the new account.
A static route is a pre-determined path that network information must travel to reach a specific host or network. Data from one point to another will always follow the same path regardless of other considerations. Normal internet usage does not require this setting to be configured.
I want to:
Visit multiple networks and multiple servers at the same time.
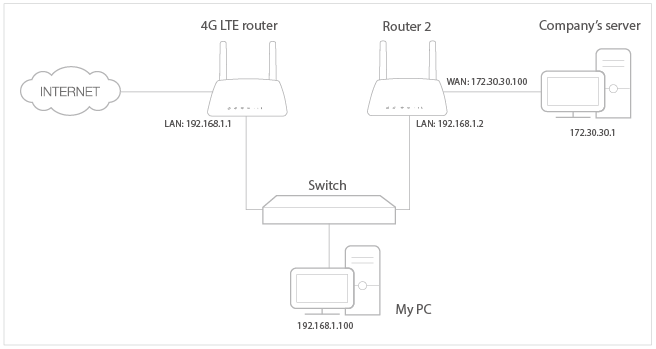
For example, in a small office, my PC can surf the internet, but I also want to visit my company’s server. Now I have a switch and another router. I connect the devices as shown in the following figure so that the physical connection between my PC and my company’s server is achieved. To surf the internet and visit my company’s network at the same time, I need to configure the static routing.
How can I do that?
1.Make sure the routers use different LAN IP addresses on the same subnet. Disable DHCP function of Router 2.
2.Visit http://tplinkmodem.net, and log in with the password you set for the router.
3.Go to Advanced > Network > Static Routing.
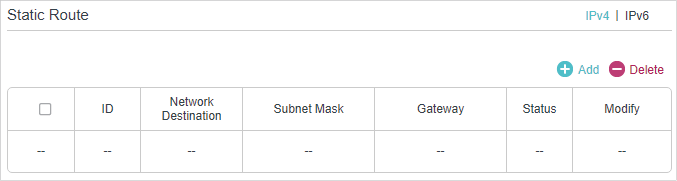
4.Click Add to add a new static routing entry. Finish the settings according to the following explanations:
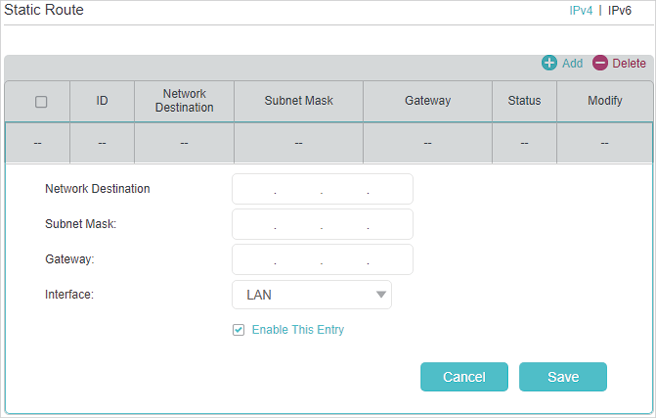
•Network Destination - The destination IP address that you want to assign to a static route. This IP address cannot be on the same subnet with the WAN IP or LAN IP of the router. In the example, the IP address of the company network is the destination IP address, so here enters 172.30.30.1.
•Subnet Mask - Determines the destination network with the destination IP address. If the destination is a single IP address, enter 255.255.255.255; otherwise, enter the subnet mask of the corresponding network IP. In the example, the destination network is a single IP, so here enters 255.255.255.255.
•Gateway - The IP address of the gateway device to which the data packets will be sent. This IP address must be on the same subnet with the router’s IP which sends out the data. In the example, the data packets will be sent to the LAN port of Router 2 and then to the Server, so the gateway should be 192.168.1.2
•Interface - Determined by the port that sends out the data packets. In the example, the data is sent to the gateway through the LAN port.
5.Select the checkbox to enable this entry.
6.Click Save to save the settings.
Done!
Open a web browser on your PC. Enter the company server’s IP address to visit the company network.
VPN (Virtual Private Network) is a private network established across the public network, generally via the internet. However, the private network is a logical network without any physical network lines, so it is called Virtual Private Network.
With the wide application of the internet, more and more data need to be shared through the internet. Connecting the local network to the internet directly, though can allow the data exchange, will cause the private data to be exposed to all the users on the internet.
8.1. Use IPSec VPN to Access Your Home Network
The VPN (Virtual Private Network) technology is developed and used to establish the private network through the public network, which can provide a secure communication to a remote computer or remote network, and guarantee a secure data exchange. IPSec is one of the major implementations of VPNs.
I want to:
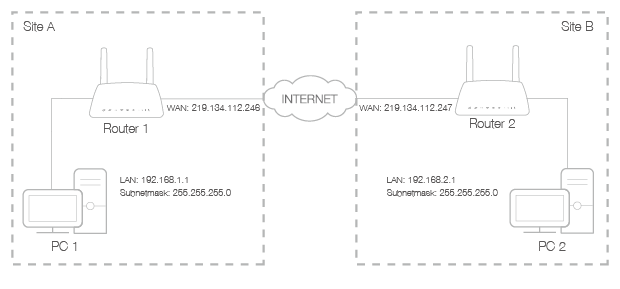
Establish an IPSec VPN tunnel to connect two LANs via internet so that the hosts in different remote LANs are able to communicate with each other as if they are in the same LAN.
For example, I am the network administrator of a regional office, I need to let my office staff to visit the headquarters’ servers and resources, and vice versa. I know that the router in my office and the device in headquarters both support IPSec VPN feature, so I decide to set up a VPN connection with the headquarter office.
The following diagram is a typical VPN topology. Here Site A refers to regional office’s network (local network). And Site B refers to the headquarters’ network (remote network) which I want to connect to.
How can I do that?
1.Make sure of the topology you want to build and record site A (local network) and site B (remote network)’s LAN IP and WAN IP.
2.Configuration on site A (local network).
1 )Visit http://tplinkmodem.net, and log in with the password you set for the router.
2 )Go to Advanced > VPN > IPSec VPN to open the configuration page. Click Add to set up a VPN tunnel.
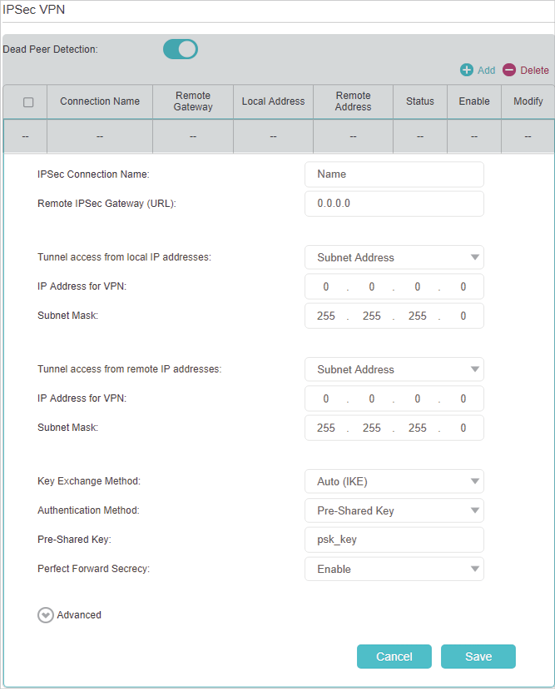
3 )In the IPSec Connection Name column, specify a name.
4 )In the Remote IPSec Gateway (URL) column, Enter Site B’s WAN IP address.
5 )To configure Site A’s LAN:
In the Tunnel access from local IP addresses column, here we take Subnet Address as an example. Then input the LAN IP range of Site A in the IP Address for VPN column, and input Subnet Mask of Site A.
6 )To configure Site B’s LAN:
In the Tunnel access from local IP addresses column, here we take Subnet Address as an example. Then input the LAN IP range of Site B in the IP Address for VPN column, and input Subnet Mask of Site B.
7 )Select the Key Exchange Method for the policy. We select Auto(IKE) here.
8 )Enter the Pre-Shared Key for IKE authentication. Then keep Perfect Forward Secrecy enabled.
 Note:
Note:
Make sure Site A and Site B use the same key.
9 )Leave the Advanced Settings as default value. Then click OK to save.
3.Configuration on Site B (remote network). Refer to step 2 configuration on Site A and make sure that Site A and Site B use the same pre-shared keys and Perfect Forward Secrecy settings.
4.The Status column will change to Up if the VPN connection has been set up successfully.
5.Check the VPN connection. You can ping site B’ LAN IP from your computer to verify that the IPSec VPN connection is set up correctly.
To check the VPN connection, you can do the following.
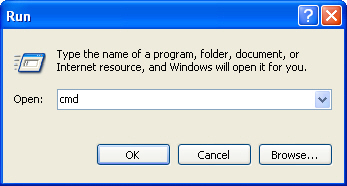
a .On the host in Site A, press [Windows Logo] + [R] to open Run dialog. Input “cmd” and hit OK.
b .In the CLI window, type in “ping 192.168.2.x” (“192.168.2.x” can be IP address of any host in Site B). Then press [Enter].
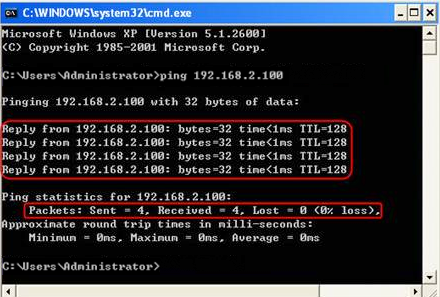
c .If Ping proceeds successfully (gets replies from host in Site B), the IPSec connection is working properly now.
Done!
Now IPSec VPN is implemented to establish a connection.
Note:
1.The product supports a maximum of ten simultaneous connections.
2.If one of the site has been off line for a while, for example, if Site A has been disconnected, on Site B you need to click Disable and then click Enable after Site A back on line in order to re-establish the IPSec tunnel.
8.2. Use OpenVPN to Access Your Home Network
In the OpenVPN connection, the home network can act as a server, and the remote device can access the server through the router which acts as an OpenVPN Server gateway. To use the VPN feature, you should enable OpenVPN Server on your router, and install and run VPN client software on the remote device. Please follow the steps below to set up an OpenVPN connection.

Step1. Set up OpenVPN Server on Your Router
1.Visit http://tplinkmodem.net, and log in with the password you set for the router.
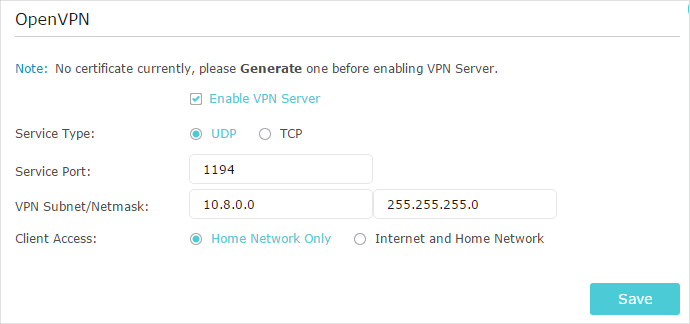
2.Go to Advanced > VPN Server > OpenVPN, and select Enable VPN Server.
Note:
•Before you enable VPN Server, we recommend you configure Dynamic DNS Service (recommended) or assign a static IP address for router’s WAN port and synchronize your System Time with internet.
•The first time you configure the OpenVPN Server, you may need to Generate a certificate before you enable the VPN Server.
3.Select the Servive Type (communication protocol) for OpenVPN Server: UDP, TCP.
4.Enter a VPN Service Port to which a VPN device connects, and the port number should be between 1024 and 65535.
5.In the VPN Subnet/Netmask fields, enter the range of IP addresses that can be leased to the device by the OpenVPN server.
6.Select your Client Access type. Select Home Network Only if you only want the remote device to access your home network; select Internet and Home Network if you also want the remote device to access internet through the VPN Server.
7.Click Save.
8.Click Generate to get a new certificate.

Note:
If you have already generated one, please skip this step, or click Generate to update the certificate.
9.Click Export to save the OpenVPN configuration file which will be used by the remote device to access your router.

Step 2. Configure OpenVPN Connection on Your Remote Device
1.Visit http://openvpn.net/index.php/download/community-downloads.html to download the OpenVPN software, and install it on your device where you want to run the OpenVPN client utility.
Note:
You need to install the OpenVPN client utility on each device that you plan to apply the VPN function to access your router. Mobile devices should download a third-party app from Google Play or Apple App Store.
2.After the installation, copy the file exported from your router to the OpenVPN client utility’s “config” folder (for example, C:\Program Files\OpenVPN\config on Windows). The path depends on where the OpenVPN client utility is installed.
3.Run the OpenVPN client utility and connect it to OpenVPN Server.
8.3. Use PPTP VPN to Access Your Home Network
PPTP VPN Server is used to create a VPN connection for remote device. To use the VPN feature, you should enable PPTP VPN Server on your router, and configure the PPTP connection on the remote device. Please follow the steps below to set up a PPTP VPN connection.
Step 1. Set up PPTP VPN Server on Your Router
1.Visit http://tplinkmodem.net, and log in with the password you set for the router.
2.Go to Advanced > VPN Server > PPTP VPN, and select Enable VPN Server.

Note:
Before you enable VPN Server, we recommend you configure Dynamic DNS Service (recommended) or assign a static IP address for router’s WAN port and synchronize your System Time with internet.
3.In the Client IP Address filed, enter the range of IP addresses (up to 10) that can be leased to the devices by the PPTP VPN server.
4.In the Username/Password filed, enter the username and password to authenticate clients to the PPTP VPN server.
5.Click Save.
Step 2. Configure PPTP VPN Connection on Your Remote Device
The remote device can use the Windows built-in PPTP software or a third-party PPTP software to connect to PPTP Server. Here we use the Windows built-in PPTP software as an example.
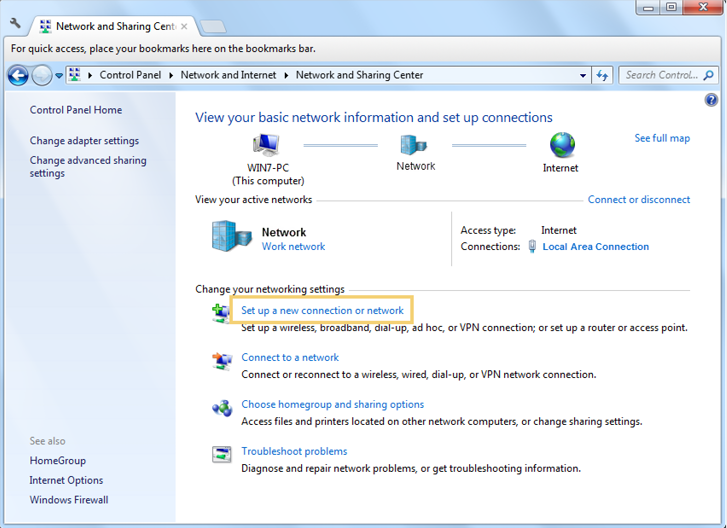
1.Go to Start > Control Panel > Network and Internet > Network and Sharing Center.
2.Select Set up a new connection or network.
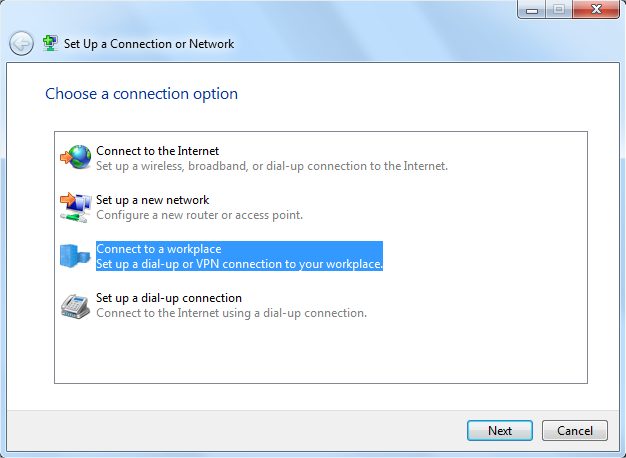
3.Select Connect to a workplace and click Next.
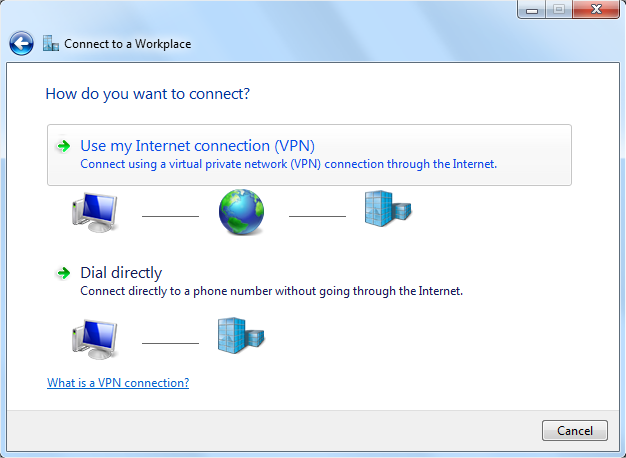
4.Select Use my Internet connection (VPN).
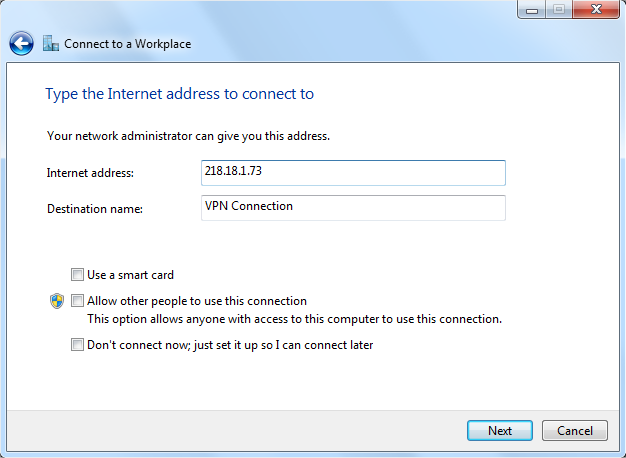
5.Enter the internet IP address of the router (for example: 218.18.1.73) in the Internet address field. Click Next.
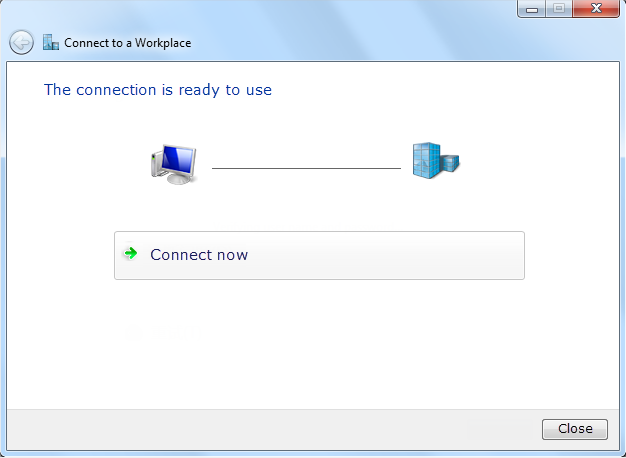
6.Enter the User name and Password you have set for the PPTP VPN server on your router, and click Connect.
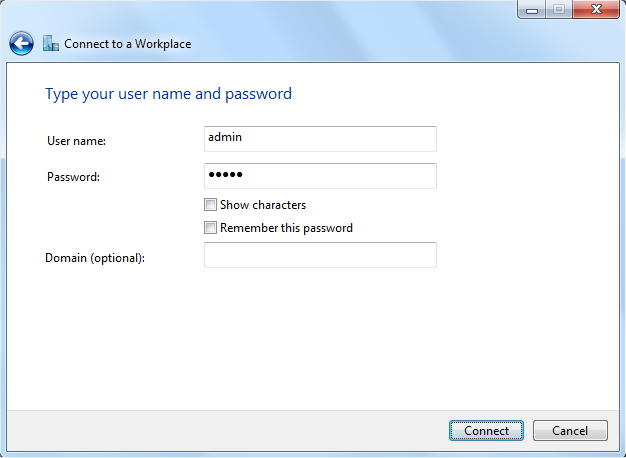
7.The PPTP VPN connection is created and ready to use.