How to set up Port Forwarding feature on TP-Link Wireless N 4G LTE Router (new UI)
Virtual servers can be used for setting up public services on your LAN. A virtual server is defined as a service port, and all requests from internet to this service port will be redirected to the computer specified by the server IP.
Here takes TL-MR6400 as demonstration.
1. Log into the router’s web management page:
How do I log into the web-based Management Page of TL-MR6400 (new logo)?
2. Go to Forwarding → Virtual Servers, you can view and add virtual servers.
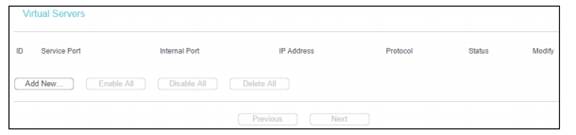
Service Port - The numbers of External Service Ports. You can enter a service port or a range of service ports (the format is XXX - YYY, XXX is Start port, YYY is End port).
Internal Port - The Internal Service Port number of the PC running the service application. You can enter a specific port number, or leave it blank if the Internal Port is the same as the Service Port.
IP Address - The IP Address of the PC providing the service application.
Protocol - The protocol used for this application, either TCP, UDP, or All (all protocols supported by the router).
Status - The status of this entry, "Enabled" means the virtual server entry is enabled. The status of this entry is either Enabled or Disabled.
To setup a virtual server entry:
1. Click Add New….
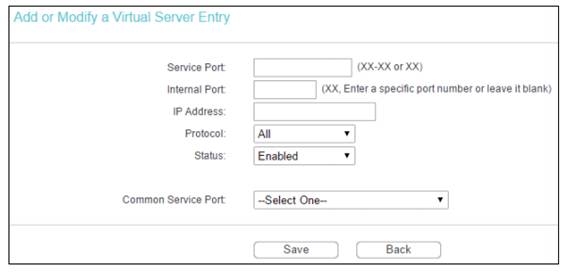
2. Select the service you want to use from the Common Service Port list. If the Common Service Port list does not have the service that you want to use, type the number of the service port or service port range in the Service Port box.
3. Type the IP Address of the computer in the IP Address box.
4. Select the protocol used for this application, either TCP or UDP, or All.
5. Select Enabled to enable the virtual server.
6. Click Save.
Note:
1. You´d better assign a static IP address for your server, so the Virtual Server entry will take effect all the time. Or you can just do an IP address reservation for the server. Please refer to the following link to do that: How to configure Address Reservation of Archer MR6400 (new logo)?
2. If you set the service port of the virtual server as 80, you must set the web management port on Security → Remote Management page to be any other value except 80 such as 8080. Otherwise there will be a conflict to disable the virtual server.
Get to know more details of each function and configuration please go to Download Center to download the manual of your product.
Bu SSS faydalı mı?
Your feedback helps improve this site.


