How to configure my TL-WA5110G or TL-WA5210G to work on Client Mode

TL-WA5110G , TL-WA5210G
Recent updates may have expanded access to feature(s) discussed in this FAQ. Visit your product's support page, select the correct hardware version for your device, and check either the Datasheet or the firmware section for the latest improvements added to your product. Please note that product availability varies by region, and certain models may not be available in your region.
The topology below shows how an AP client works.
|
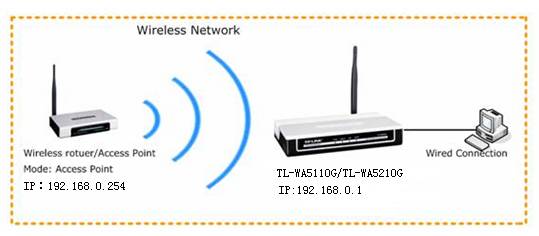
![]() Here we take the following information as an example. However, you need configure it properly according to the basic information of your own router.
Information of Root Router:
Preparation:
Since the DHCP function on the AP is disabled by default, we have to manually assign an IP address for the computer to match the IP address (192.168.1.254 in default) of the Client. Please click here for detailed instructions.
Here, you can configure the IP address as 192.168.1.100/255.255.255.0.
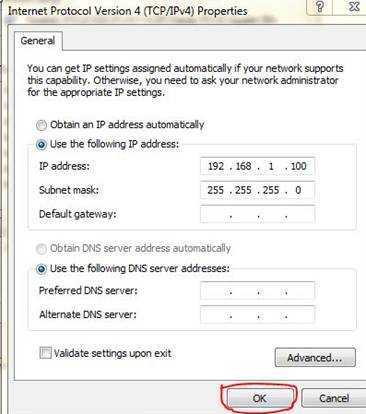
![]() Connect the computer to the LAN port of AP with an Ethernet cable.
Configuration on Client (TL-WA5110G OR TL-WA5210G):
Step 1
Log onto the Client’s management page.
In the address bar, type in http://192.168.1.254, then press enter.
![]() Then type in the username and password, which are both “admin” in default.
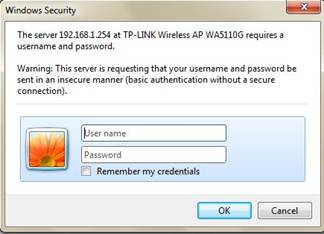
![]() Step 2
Click Network on the left side menu. Please make sure the AP’s IP address is in the same IP segment with the Root Router’s to avoid the IP conflict. In this instance, we can change the IP to “192.168.0.1”. Then click Save.
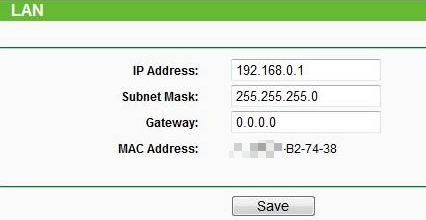
![]() And then change the IP address of your computer back to 192.168.0.100/255.255.255.0, logon the web page with 192.168.0.1 again.
Step 3
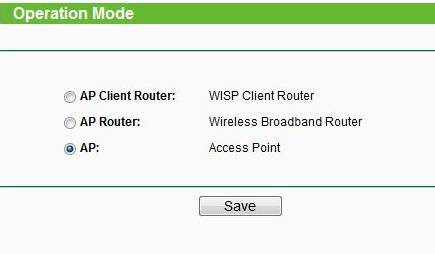
On the left side menu, click on Operation Mode, selectAP/Standard APmode, and clickSave.
![]() Step 4
Click Wireless ->Wireless mode. Select Client as the wireless Mode. Then click Survey.
![]() Step 5
Find the Root Router’s SSID on the AP list, and click Connect.
![]() Step 6
Click Save.
If you see this picture, please wait until it refresh back to the status page.
![]() Step 7
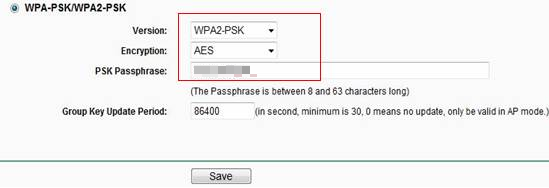
Click Wireless ->Security settings. You must make sure the Security type of your root AP. Here we take wpa2-psk as a example. Select WAP-PSK/WPA2-PSK, and type in the password “0123456789”. Then click Save.
![]() After you go through all the above steps, the Client should work properly with the Root Router.
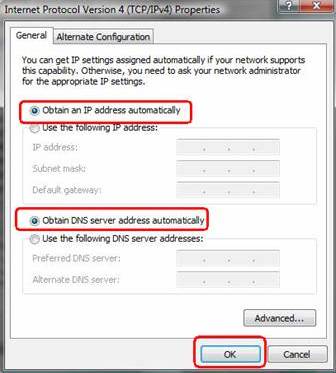
Please re-configure the IP settings of your computer to Obtain an IP address automatically/Obtain a DNS server address automatically in order to connect to Internet after all the settings, click here for detailed instructions. Then you can check the connectivity by using Ping in command prompt on that computer. For how to use Ping, please refer to how to use Ping command.
![]() NOTE:
If you have a broadband router which provide you Internet connection, please re-configure the IP settings of your computer to Obtain an IP address automatically/Obtain a DNS server address automatically to suitable for the router in order to connect to Internet after done the settings.
![]() If the Ping is not successful, please check all above settings carefully, or contact TP-Link support for help.
|
Est-ce que ce FAQ a été utile ?
Vos commentaires nous aideront à améliorer ce site.
Quelle est votre préoccupation avec cet article ?
- Mécontent du produit
- Trop compliqué
- Titre déroutant
- Ne s'applique pas à moi
- Trop vague
- Autre
Merci
Pour nous écrire.
Cliquer ici pour contacter le service support TP-Link.
Ce site Web utilise des cookies pour améliorer la navigation sur le site Web, analyser les activités en ligne et offrir aux utilisateurs la meilleure expérience sur notre site Web. Vous pouvez vous opposer à tout moment à l'utilisation de cookies. Vous pouvez obtenir plus d'informations dans notre politique de confidentialité .
Cookies basiques
Ces cookies sont nécessaires au fonctionnement du site Web et ne peuvent pas être désactivés dans vos systèmes.
TP-Link
SESSION, JSESSIONID, accepted_local_switcher, tp_privacy_base, tp_privacy_marketing, tp_smb-select-product_scence, tp_smb-select-product_scenceSimple, tp_smb-select-product_userChoice, tp_smb-select-product_userChoiceSimple, tp_smb-select-product_userInfo, tp_smb-select-product_userInfoSimple, tp_top-banner, tp_popup-bottom, tp_popup-center, tp_popup-right-middle, tp_popup-right-bottom, tp_productCategoryType
Youtube
id, VISITOR_INFO1_LIVE, LOGIN_INFO, SIDCC, SAPISID, APISID, SSID, SID, YSC, __Secure-1PSID, __Secure-1PAPISID, __Secure-1PSIDCC, __Secure-3PSID, __Secure-3PAPISID, __Secure-3PSIDCC, 1P_JAR, AEC, NID, OTZ
Zendesk
OptanonConsent, __cf_bm, __cfruid, _cfuvid, _help_center_session, _pendo___sg__.<container-id>, _pendo_meta.<container-id>, _pendo_visitorId.<container-id>, _zendesk_authenticated, _zendesk_cookie, _zendesk_session, _zendesk_shared_session, ajs_anonymous_id, cf_clearance
Cookies d'analyse et marketing
Les cookies d'analyse nous permettent d'analyser vos activités sur notre site Web pour améliorer et ajuster les fonctionnalités de notre site Web.
Les cookies marketing peuvent être définis via notre site Web par nos partenaires publicitaires afin de créer un profil de vos intérêts et pour vous montrer des publicités pertinentes sur d'autres sites Web.
Google Analytics & Google Tag Manager
_gid, _ga_<container-id>, _ga, _gat_gtag_<container-id>
Google Ads et DoubleClick
test_cookie, _gcl_au