Comment se connecter à Internet à l'aide de l'assistant PPPoE intégré à Windows XP avec un modem en mode pont
Ici, nous prenons Windows XP comme exemple et assurez-vous que votre adaptateur Ethernet fonctionne bien.
Pour Windows Vista, la procédure est très similaire :
Menu Démarrer — Panneau de configuration — Centre Réseau et partage — Configurer une connexion — Se connecter à Internet — Haut débit (PPPoE) — Nom d'utilisateur et mot de passe — Terminer.
Remarque : Le modem/routeur ADSL doit être configuré pour fonctionner en mode Bridge afin d'utiliser l'assistant de nouvelle connexion pour configurer la connexion Internet.
Étape 1 Dans la barre des tâches Windows, cliquez sur Démarrer - > Panneau de configuration , puis sélectionnez et double-cliquez sur Connexions réseau .
Étape 2 Sélectionnez Créer une nouvelle connexion . L'assistant de nouvelle connexion apparaîtra puis Suivant .
Étape 3 Sur la page Type de connexion réseau , choisissez Se connecter à Internet puis Suivant .
Étape 4 Sur la page Préparation , choisissez Configurer ma connexion manuellement puis Suivant.
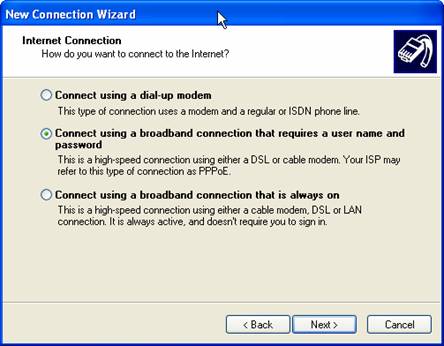
Étape 5 Sur la page Connexion Internet , choisissez Se connecter à l'aide d'une connexion haut débit nécessitant un nom d'utilisateur et un mot de passe, puis Suivant.
Étape 6 Sur la page Nom de la connexion , le nom du FAI est celui que vous souhaitez, puis Next .
Étape 7 Sur la page Informations sur le compte Internet , saisissez le nom d'utilisateur et le mot de passe fournis par votre FAI si vous avez appliqué un service haut débit, puis Suivant .
Étape 8 Ok, ce qui est nécessaire pour accéder à Internet a été configuré. Si vous souhaitez vous connecter rapidement à Internet à chaque fois, sélectionnez Ajouter un raccourci vers cette connexion sur mon bureau . Cliquez ensuite sur Terminer, cela enregistrera automatiquement la configuration.
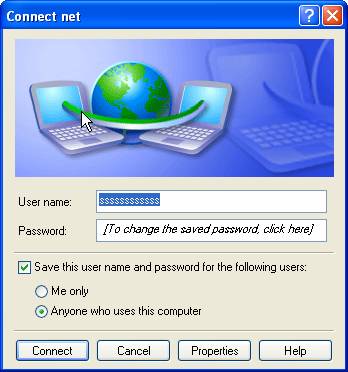
Étape 9 Après avoir enregistré la configuration, la connexion à Internet apparaîtra. Vérifiez le nom d'utilisateur et le mot de passe , s'ils sont corrects, cliquez sur Connecter pour accéder à Internet.
Est-ce que ce FAQ a été utile ?
Vos commentaires nous aideront à améliorer ce site.
4.0_1516616629639a.jpg)

