How to connect TP-Link wireless router into your network to work with Cable or DSL modem (Hardware Installation)?
Ce document concerne les modèles suivants :
Note: Before connecting TP-Link Router into your network, please refer to FAQ_91 for getting some basic network knowledge, such as system requirements, installation environment requirements, and wireless installation consideration
Follow the steps below to connect your network:
Step 1
Power off your PC, Cable/DSL Modem, and the router.
Step 2
Locate an optimum location for the router. The best place is usually near the center of the area in which your PCs will connect wirelessly.
Step 3
Adjust the direction of the antenna. Normally, upright is a good direction.
Step 4
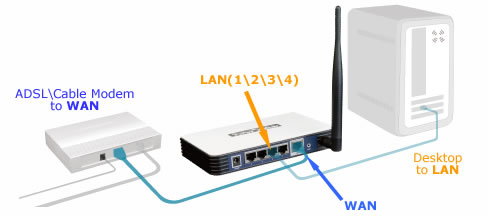
Connect the PC(s) and Switch/Hub to the LAN Ports of the router, shown as below. (If you have the wireless NIC and want to use wireless function, you can skip this step.)
Step 5
Connect the DSL/Cable Modem to the WAN port on the router, shown in figure above.
Step 6
Power on or plug in your modem. Wait for the modem to boot.
Step 7
Connect the AC power adapter to the AC power socket on the router, and the other end into an electrical outlet. The router will start to work automatically.
Step 8
Power on your PC.
Step 9
Verify the LED status of your TP-Link Router; make sure the PWR LED, WAN LED and the LAN LED (the port that your computer is connecting to) should be lit, and the SYS LED should be flashing. If not, please verify if the cable connections are correct and the CAT5 Ethernet cables work fine.
Get to know more details of each function and configuration please go to Download Center to download the manual of your product.
Est-ce que ce FAQ a été utile ?
Vos commentaires nous aideront à améliorer ce site.

6.0-A-2000px_normal_1584497323008l.png)
