How to add VIGI devices to VIGI VMS
VIGI VMS can discover and add VIGI devices in three ways: Auto Add, Manually Add, and Remotely Add. From this article, you can learn how to add VIGI devices to VIGI VMS via different methods.
Auto Add
Auto Add is used in topologies where the VIGI device and the VIGI VMS are located on the same network. VIGI VMS broadcast and scan VIGI devices on the same network using the TP-Link private protocol and perform association to add them.
1. Connect the VIGI device to the network and ensure it can communicate with the VIGI VMS.
2. Log in to the VIGI VMS web management interface and navigate to the Device menu. Click the “Add” button to add the device.

3. Click on the "+" button next to the device you want to add.
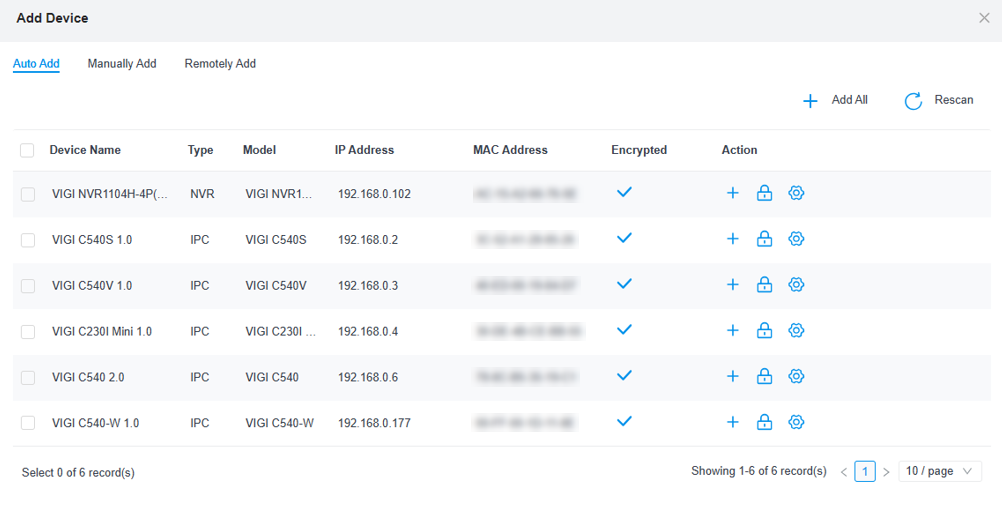
4. Select the corresponding Site. Enter the device's username and password.


5. If the device has been added successfully, it will be displayed in the Device List. To view the Device List, return to it.

Manually Add
Manually Add is frequently used to add VIGI cameras with a specific IP address or located within a specific IP range.
Customer specifies the relevant IP address, and the VIGI VMS initiates association with the VIGI device at the specific address, including single IP address addition and multiple IP address addition.
1. The steps for preparation are identical to the Auto Add steps.
2. If Single mode is selected, enter the specific IP address. If Multiple mode is selected, enter the corresponding IP address range.


3. Click on “Obtain Device” to retrieve device information.
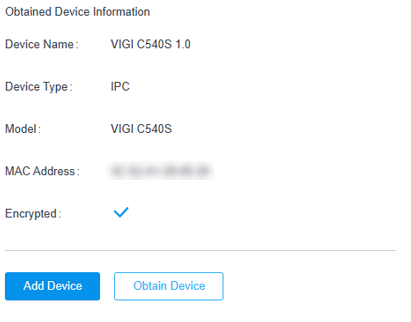
4. Check the device information and click on the “Add Device” button. Then, select the site and enter the username and password for verification.
Remotely Add
Remotely Add is typically used when the VIGI VMS and VIGI devices are not on the same network and need to connect via the Internet. In this case, adding the device is highly dependent on the network. If NAT exists at the front-end of the VIGI VMS, port forwarding on the routes at the front-end of the server is usually necessary.
1. log in to the web management interface of the VIGI device o, go to the “Platform Access” section in the Network Configuration item.
2. Enable 'Access to VIGI VMS' and fill in the IP address and connection port of VIGI VMS (default is 10123).

3. log in to the VMS web management interface, navigate to the Device menu, and select “Remotely Add”.
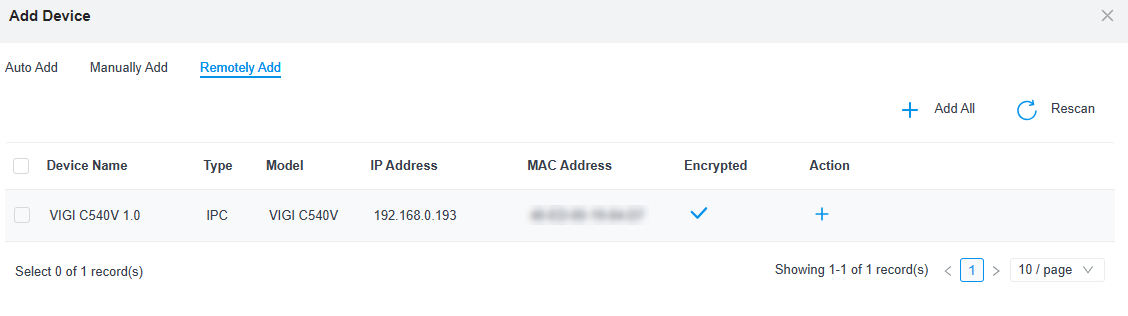
4. Select the corresponding VIGI device, choose the site, and enter the username and password for verification.
Byla tato FAQ užitečná?
Vaše zpětná vazba nám pomůže zlepšit naše webové stránky
