How to Setup IPSec Tunnel (VPN) on TD-W8960N/TD-W8950ND/TD-W8968(V3 V4)
This article illustrates a configuration instance for building an IPSec VPN tunnel between two units of TD-W8960N/TD-W8950ND/TD-W8968(V3).
IPSec tunnel is usually built to connect two or more remote LANs via Internet so that hosts in different remote LANs are able to communicate with each other as if they are all in the same LAN. For more details about VPN tunnel please refer to Wikipedia.
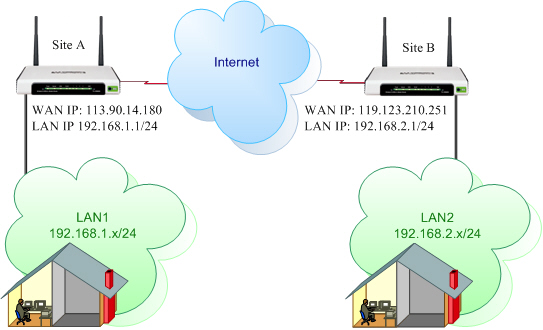
Figure 1 Configuration Instance
Here are step by step instructions for your reference (the following steps are based on Figure 1):
Configuration on Site A
1. Login to the management page of TD-W8960N/TD-W8950ND/TD-W8968(V3). If you are not sure how to enter the management page, please click here for details.
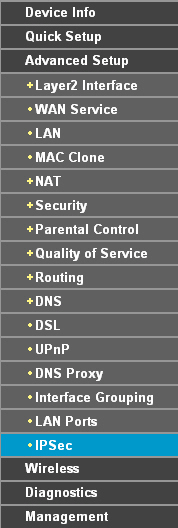
2. On the left menu of the management page, please click Advanced Setup and then click IPSec.
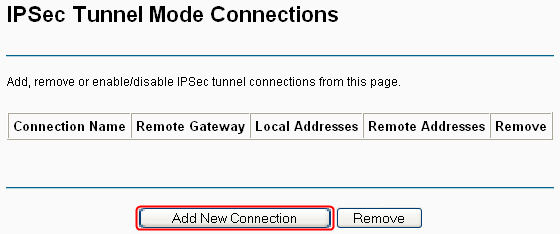
3. On the IPSec main page, please click Add New Connection.
4. On the IPSec configuration page, please do configuration as follows:
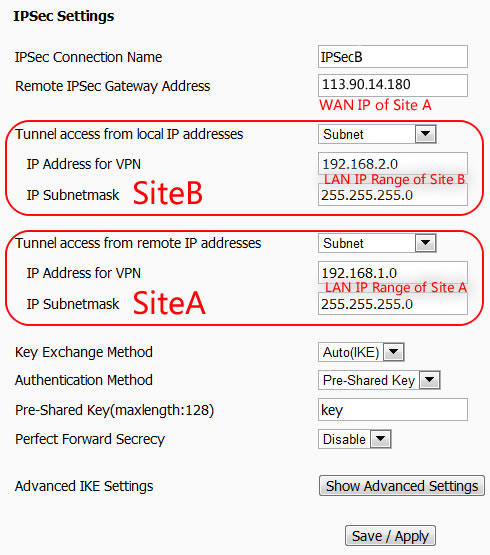
IPSec Connection Name: Define a name for this connection;
Remote IPSec Gateway Address: Input he WAN IP address of site B;
Site A
Tunnel access from local IP addresses: For a whole LAN please select Subnet; for a single host please select Single Address. In this instance we select Subnet;
IP Address for VPN: Input the LAN IP range of site A. In this instance, we should input 192.168.1.0;
IP Subnetmask: Input the LAN subnet mask of site A. In this instance, we should input 255.255.255.0;
Site B
Tunnel access from remote IP addresses: For a whole LAN please select Subnet; for a single host please select Single Address. In this instance we select Subnet;
IP Address for VPN: Input the LAN IP range of site B. In this instance, we should input 192.168.2.0;
IP Subnetmask: Input the LAN subnet mask of site B. In this instance, we should input 255.255.255.0;
5. Leave other settings as the default value and click Save/Apply.
Configuration on Site B
1. Log onto the management page of TD-W8960N/TD-W8950ND/TD-W8968(V3).
2. On the left menu of the management page, please click Advanced Setup and then click IPSec.
3. On the IPSec main page, please click Add New Connection.
4. On the IPSec configuration page, please do configuration as follows:
IPSec Connection Name: Define a name for this connection;
Remote IPSec Gateway Address: Input he WAN IP address of site B;
Site A
Tunnel access from local IP addresses: For a whole LAN please select Subnet; for a single host please select Single Address. In this instance we select Subnet;
IP Address for VPN: Input the LAN IP range of site B. In this instance, we should input 192.168.2.0;
IP Subnetmask: Input the LAN subnet mask of site B. In this instance, we should input 255.255.255.0;
Site B
Tunnel access from remote IP addresses: For a whole LAN please select Subnet; for a single host please select Single Address. In this instance we select Subnet;
IP Address for VPN: Input the LAN IP range of site A. In this instance, we should input 192.168.1.0;
IP Subnetmask: Input the LAN subnet mask of site A. In this instance, we should input 255.255.255.0;
5. Leave other settings as the default value and click Save/Apply.
Check the IPSec Connection
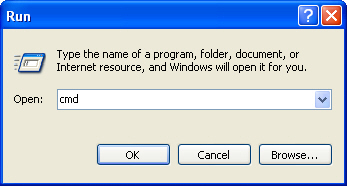
1. On the host in LAN1, press [Windows Logo] + [R] to open Run dialog. Input “cmd” and hit OK.
2. In the CLI window, type in “ping 192.168.2.x” (“192.168.2.x” can be IP address of any host in LAN2). Then press [Enter].
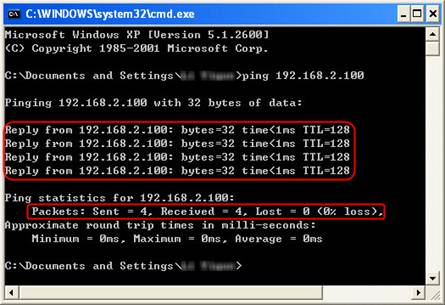
If Ping proceeds successfully (gets replies from host in LAN2), the IPSec connection must be working properly now.
Here until, all basic configuration required for an IPSec tunnel is completed. If one of the site has been off line for a while, for example, if Site A has been disconnected, on Site B you need to click Disable and then click Enable after Site A back on line in order to re-establish the IPSec tunnel.
If there are any further problems, please click here to contact TP-Link technical support.
Get to know more details of each function and configuration please go to Download Center to download the manual of your product.
Is this faq useful?
Your feedback helps improve this site.


TP-Link Community
Still need help? Search for answers, ask questions, and get help from TP-Link experts and other users around the world.