How to Configure 802.1X on VIGI Camera via Web Management Page
Contents
Prepare and Configure the RADIUS Server
Configure 802.1X on the IPC Web Management page
Configure the Switch & Enable 802.1X Authentication
Introduction
To enhance network security, many enterprise networks adopt the IEEE 802.1X standard to authenticate devices, such as IP cameras, before allowing them to access the LAN. The 802.1X protocol is a port-based Network Access Control mechanism that authenticates and controls access for devices connected to network ports. Devices that pass authentication by the authentication server are granted access to the LAN, while those that fail are denied.
This document provides basic instructions for configuring VIGI cameras through the web management page to enable IEEE 802.1X authentication.
The 802.1x authentication uses client-server model which contains three device roles: client/supplicant, authenticator and authentication server. This is described in the figure below:
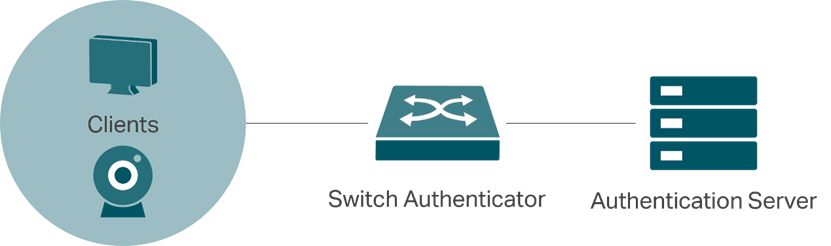
- Client
A client, such as an IPC or a PC, connects to the authenticator through a physical port. In this document, the VIGI camera is the focus and serves as the supplicant, sending authentication requests to the server through the authenticator.
- Authenticator
An authenticator is usually a network device, such as a switch, that supports the 802.1X protocol. It forwards authentication information between the client and the authentication server, allowing authenticated clients to access the LAN while blocking unauthenticated ones.
- Authentication Server
An authentication server is typically a RADIUS server. It verifies the client’s credentials and informs the authenticator whether the client is permitted to access the LAN.
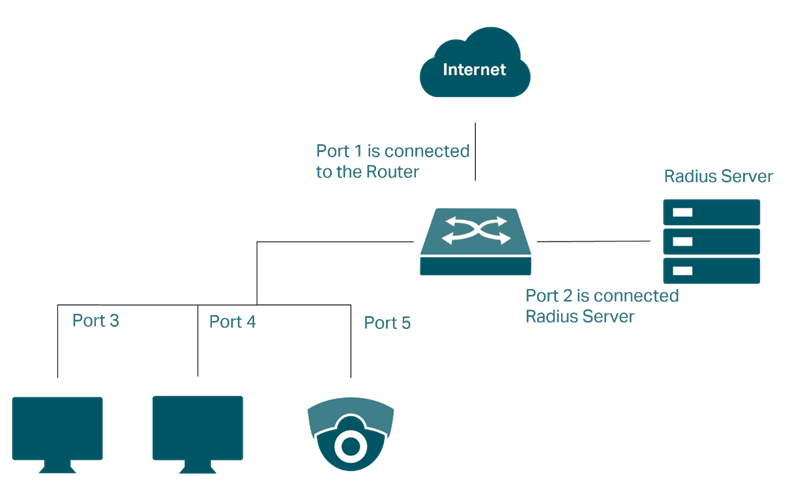
The following topology is used as an example in this document. In this setup, the switch connects to the RADIUS server through port 2 and provides uplink access through port 1. A VIGI Camera, connected to port 5, functions as the 802.1X supplicant and communicates with the RADIUS server for authentication through the switch acting as the authenticator.
Requirements
- Radius Server
- VIGI Camera
- Switch Authenticator
Configuration
To ensure a smooth configuration process and avoid losing access to the IPC, refer to the workflow below. Configure the IPC for 802.1X first, while it is connected to an open network port. Then, as the final step, enable 802.1X authentication on the target switch port.
- Prepare and Configure the RADIUS Server: Set up the server with the username and password for the IPC, and the shared secret for the switch.
- Configure the IPC: Connect the IPC to a network port that allows open access, log in to its web management page, and enter the 802.1X credentials that match the user account on the RADIUS server.
- Configure the Switch & Enable 802.1X Authentication: Add the RADIUS server to the switch, then immediately enable 802.1X authentication on the specific port where the IPC will be connected. This is the final step that activates the security policy.
Prepare and Configure the RADIUS Server
This section takes FreeRadius as an example to build up a Radius Server on a local computer.
Step 1. Install FreeRadius on Ubuntu. Freeradius can be installed online with the command sudo apt install freeradius, or from the source file Build with the freeradius installation guide Building FreeRADIUS.
Step 2. Configure clients.conf for FreeRadius. For testing from external machines, edit /etc/freeradius/clients.conf and add an entry. There are many examples and the syntax is easy:
client tplink {
ipaddr = 192.168.0.1/24
secret = testing123
}
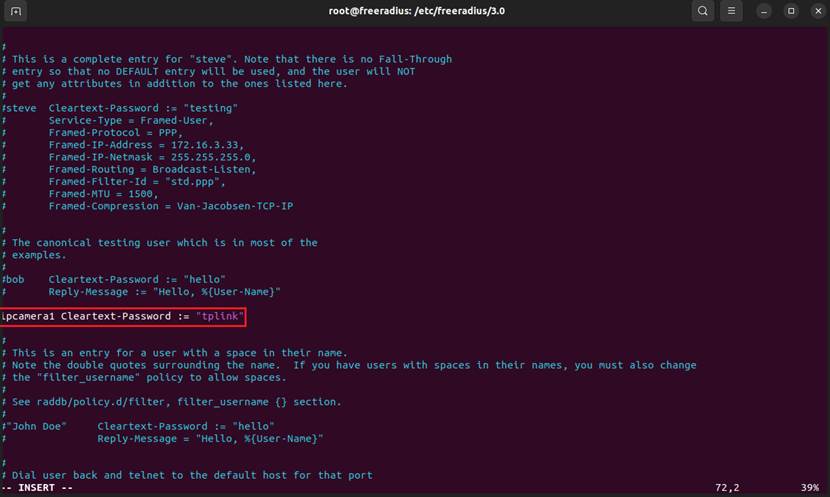
Step 3. Define a user and password Edit the /etc/freeradius/users file and add a new user entry at the beginning of the file. For example, to create a user account with the username ipcamera1 and password tplink, add the following line:.
ipcamera1 Cleartext-Password := "tplink"
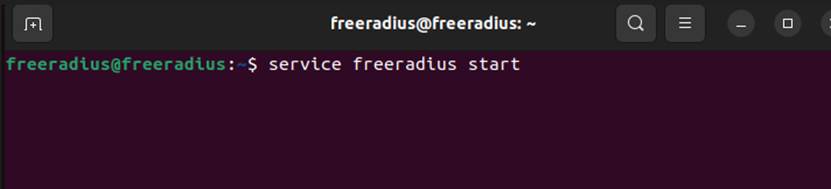
Step 4. Save the configuration file and start the FreeRADIUS service.
Use the following command to start the server: service freeradius start.
Configure 802.1X on the IPC Web Management page
Note:Ensure the IPC is connected to a port without 802.1X enabled before starting. Once 802.1X is enabled on a port, unauthenticated devices are blocked.
Step 1. Log in to the IPC‘s web management page using its IP address.
Navigate to Settings > Network Settings > Advanced > 802.1X. Enable the 802.1X switch, select the appropriate Protocol Type and EAPOL Version, and enter the Username, Password, and Confirm Password as defined on the RADIUS server (for example, ipcamera1 and tplink, which were created in Step 3 under section Prepare and Configure the RADIUS Server).
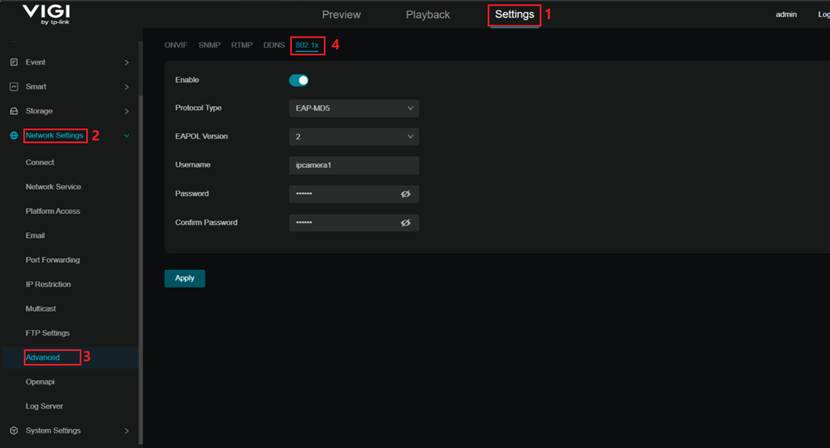
Note: Ensure that the selected Protocol Type matches the authentication method supported by the RADIUS server, and that the EAPOL Version is compatible with the switch acting as the authenticator. Otherwise, the authentication may fail.
The VIGI Camera supports the following Protocol Types: EAP-MD5, EAP-LEAP, and EAP-PEAP, and is compatible with EAPOL Version 1 and Version 2.
Step 2. After completing the configuration, click Apply to save the settings.
Configure the Switch & Enable 802.1X Authentication
This section uses the Omada Switch web management page as an example to illustrate the configuration of 802.1X authentication.
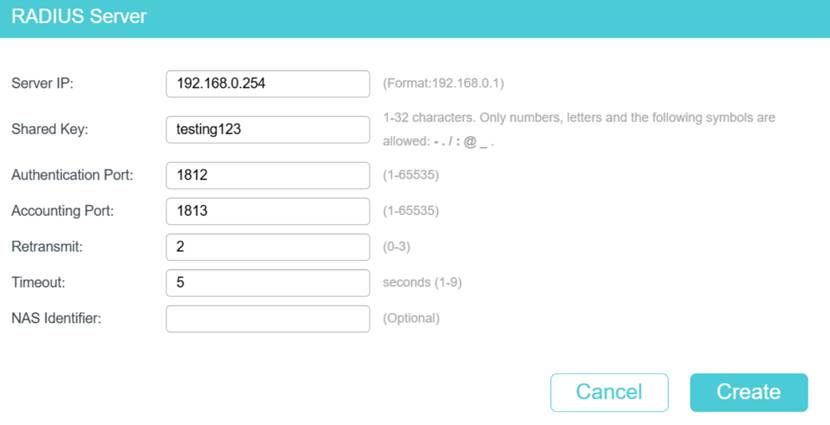
Step 1. Add the RADIUS Server: Log in to the switch’s web management page using its IP address. Navigate to SECURITY > AAA > RADIUS Config and click Add to add a RADIUS server. Enter the Server IP, which is the IP address of the computer running the RADIUS service, and then set the Shared Key to the key value configured in Step 2 undersection Prepare and Configure the RADIUS Server.
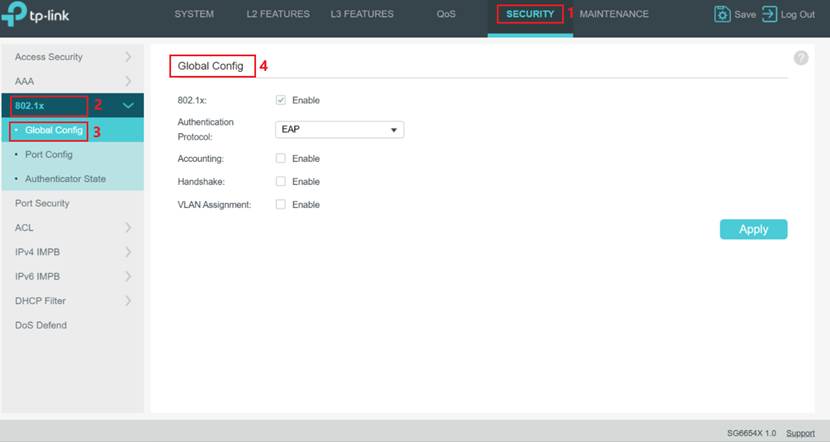
Step 2: Globally Enable 802.1X. Navigate to SECURITY > 802.1X > Global Config. Enable the 802.1X global switch, and select EAP as the Authentication Protocol.
Note: Since the IPC supports only EAP-based authentication, the switch must also use EAP to ensure compatibility with the RADIUS server. Here use the Omada switch as an example.
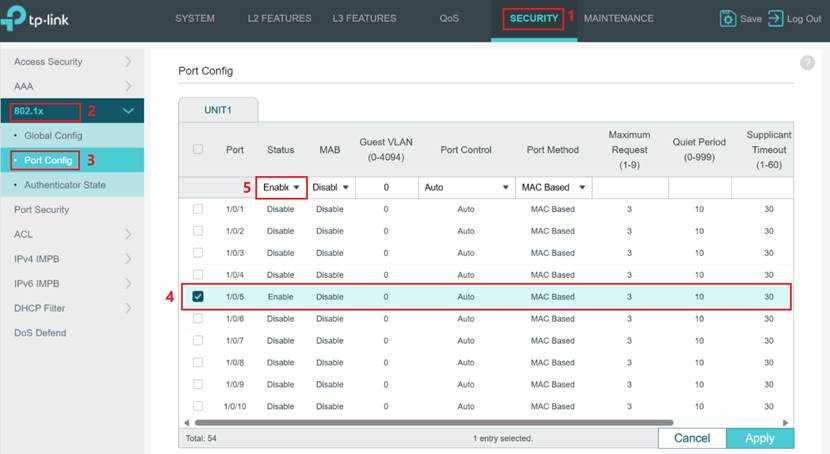
Step 3: Enable 802.1X on the desired Port. Navigate to SECURITY > 802.1X > Port Config to configure 802.1X authentication on the desired port. Select the port to which the IPC is connected (for example, port 5), set the Status to Enable, then enable 802.1X authentication on that port.
Step 4: Connect the IPC to the configured port (for example, port 5). If it is already connected, disconnect and reconnect it to initiate authentication.
Verification
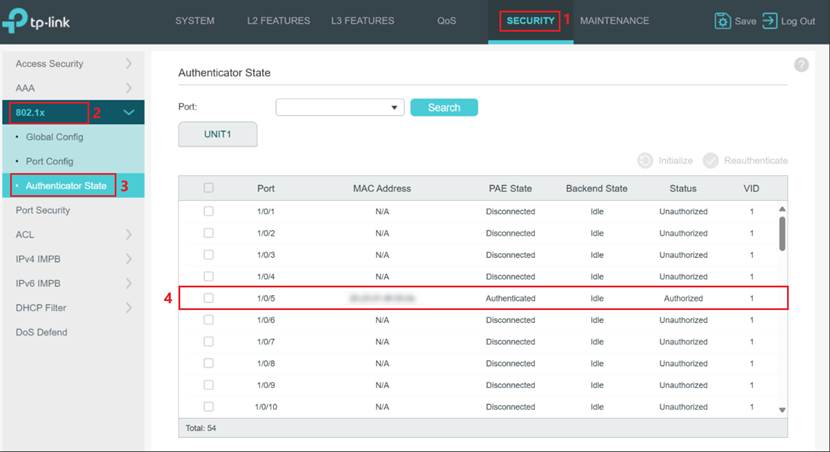
1. Verify Authentication Status on the Switch
On the switch’s web management page, navigate to Security > 802.1X > Authenticator State. Check the configured port (for example, port 5) and verify that its status is Authorized. The IPC has passed the 802.1X authentication and is now allowed to access the network.
2. Confirm IPC Network Accessibility
On a computer within the same network, open the VIGI Config Tool and verify that the IPC appears in the device list. Use the displayed IP address to access the IPC's web management interface through a browser. A successful login confirms that the device has full network connectivity and is operating normally.
Conclusion
You have successfully configured 802.1X authentication for the VIGI Camera, and the device is now authenticated and able to access the network.
Get to know more details of each function and configuration please go to Download Center to download the manual of your product.
Is this faq useful?
Your feedback helps improve this site.


TP-Link Community
Still need help? Search for answers, ask questions, and get help from TP-Link experts and other users around the world.