Archer MR600 V1 User Guide
- About This Guide
- Chapter 1 Get to Know Your 4G LTE Router
- Chapter 2 Connect the Hardware
- Chapter 3 Log In to Your 4G LTE Router
- Chapter 4 Set Up Internet Connections
- Chapter 5 QoS
- Chapter 6 Network Security
- Chapter 7 Parental Controls
- Chapter 8 SMS
- Chapter 9 Guest Network
- Chapter 10 NAT Forwarding
- Chapter 11 Specify Your Network Settings
-
Chapter 12 Administrate Your Network
- Set System Time
- Control LEDs
- Test the Network Connectivity
- Update the Firmware
- Back up and Restore Configuration Settings
- Set the Router to Reboot Regularly
- Change the Administrator Account
- Local Management
- Remote Management
- System Log
- CWMP Settings
- SNMP Settings
- Monitor the Internet Traffic Statistics
- Chapter 13 TP-Link Cloud Service
- Chapter 14 OneMesh with Seamless Roaming
- FAQ
- Authentication
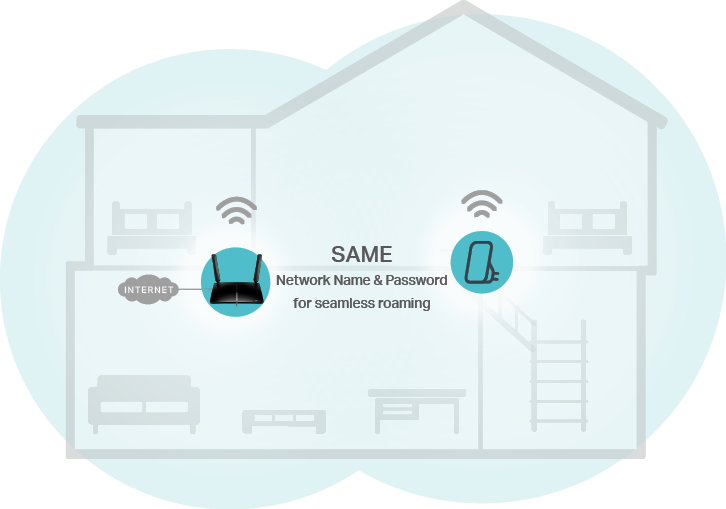
TP-Link OneMesh  router and TP-Link OneMesh extenders work together to form one unified Wi-Fi network. Walk through your home and stay connected with the fastest possible speeds thanks to OneMesh’s seamless coverage.
 Unified Wi-Fi Network
Router and extenders share the same wireless settings, including network name, password, access control settings and more.
 Seamless Roaming
Devices automatically switch between your router and extenders as you move through your home for the fastest possible speeds.
 Easy Setup and Management
Set up a OneMesh network with a push of WPS buttons. Manage all network devices on the Tether app or at your router’s web management page.
To check full list of TP-Link OneMesh devices, scan the QR code, or visit https://www.tp-link.com/One-Mesh/compatibility.

Unified OneMesh Network
TP-Link OneMesh extender will automatically join the router’s OneMesh network once connected. Check on the router‘s web management page to see if the OneMesh network is well-configured.
•If the extender is connected to this router:
1.Visit http://tplinkmodem.net, and log in with your TP-Link ID or the password you set for the router.
2.Go to Basic > OneMesh or Advanced > OneMesh.
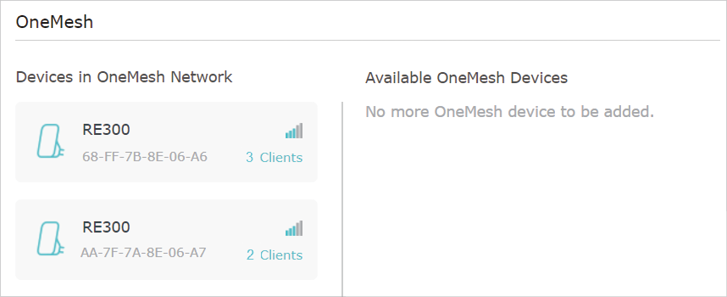
3.When an extender joins the OneMesh network, it will be listed in the Devices in OneMesh Network list. Otherwise, you need to find it in the Available OneMesh Devices list and click Add to add it to the OneMesh network.
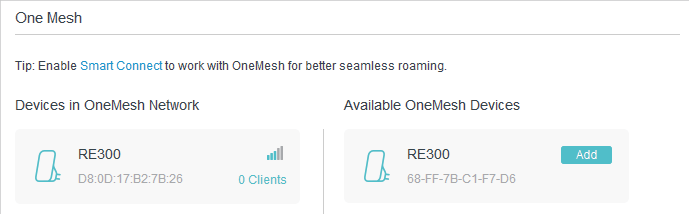
Now your router and extenders successfully form one OneMesh network!
 Tips:
Tips:
It is recommended to enable Smart Connect feature on Wireless > Wireless Settings to enjoy a seamless connection between dual-band networks. With Smart Connect enabled, the router’s 2.4GHz and 5GHz share the same SSID (network name) and password.
•If the extender is not connected to this router
1.Connect one or more OneMesh extenders to this router by following the setup instructions in the extenders’ manuals.
 Note:
Note:
To check full list of TP-Link OneMesh extenders or other devices, visit https://www.tp-link.com/onemesh/compatibility.
2.Visit http://tplinkmodem.net, and log in with your TP-Link ID or the password you set for the router.
3.Go to Basic > OneMesh or Advanced > OneMesh to check the devices list.
Tips:
It is recommended to enable Smart Connect feature on Wireless > Wireless Settings to enjoy a seamless connection between dual-band networks. With Smart Connect enabled, the router’s 2.4GHz and 5GHz share the same SSID (network name) and password.
2. Manage Devices in the OneMesh Network
In a OneMesh network, you can manage all mesh devices and clients on your router’s web page.
•To view all mesh devices and clients in the OneMesh network:
1.Visit http://tplinkmodem.net, and log in with your TP-Link ID or the password you set for the router.
2.Go to Basic > Network Map.
3.Click the Mesh Devices, Wired Clients, or Wireless Clients icon to view the related device or client list.
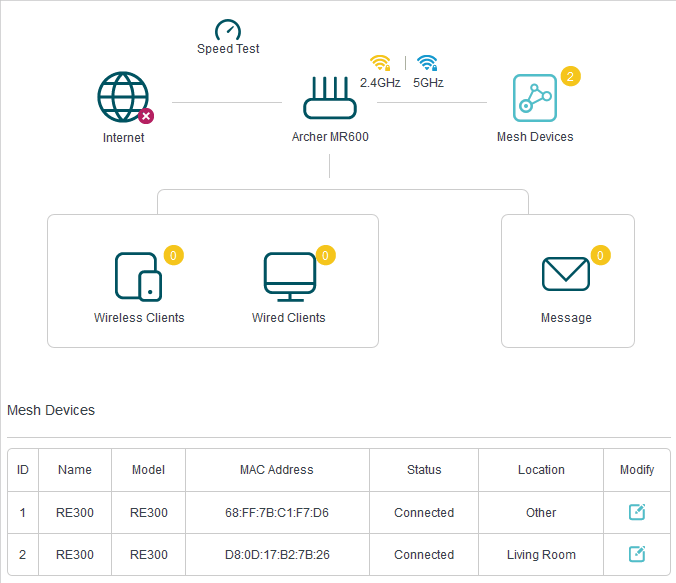
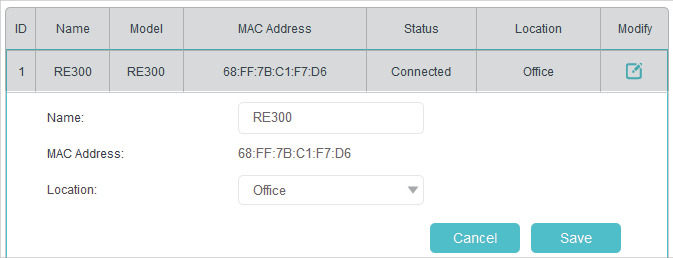
4.Click Modify icon to customize the device‘s name and location.
•To manage each OneMesh device in the network:
1.Visit http://tplinkmodem.net, and log in with your TP-Link ID or the password you set for the router.
2.Go to Basic > OneMesh or Advanced > OneMesh.
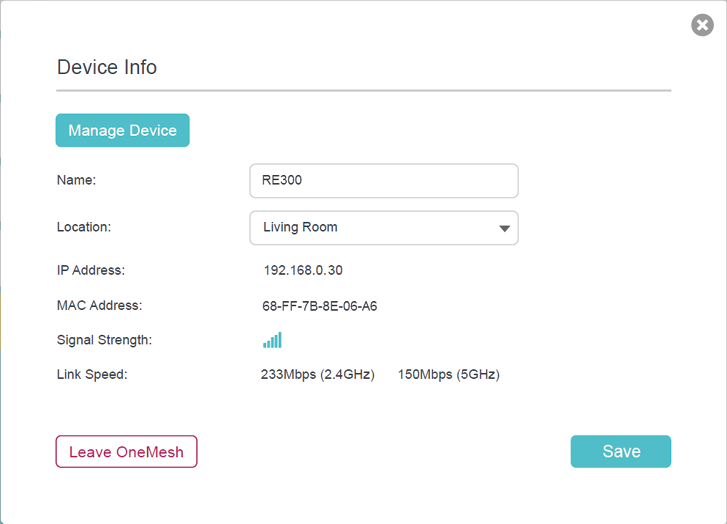
3.Click a OneMesh device to view the device information, or click <number> Clients to view the clients connected to this device.
On the Device Info page, you can:
•Click Manage Device to redirect to the web management page of this OneMesh device.
•Click Leave OneMesh to delete this device from the OneMesh network.