Archer AX10 & AX1500 User Guide
- About This Guide
- Chapter 1 Get to Know About Your Router
- Chapter 2 Connect the Hardware
- Chapter 3 Log In to Your Router
- Chapter 4 Set Up Internet Connection
- Chapter 5 TP-Link Cloud Service
- Chapter 6 Guest Network
- Chapter 7 Parental Controls
- Chapter 8 QoS
- Chapter 9 Network Security
- Chapter 10 NAT Forwarding
- Chapter 11 VPN Server
- Chapter 12 Customize Your Network Settings
- Chapter 13 Manage the Router
- FAQ
- Authentication
Chapter 12 Customize Your Network Settings
This chapter guides you on how to configure advanced network features.
It contains the following sections:
•Configure to Support IPTV Service
•Set Up a Dynamic DNS Service Account
•Schedule Your Wireless Function
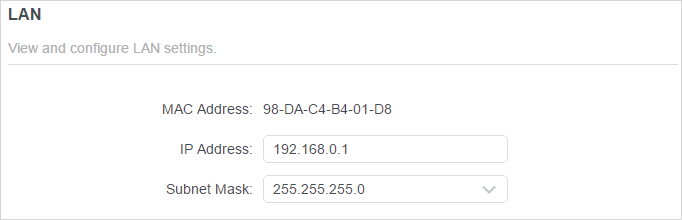
The router is preset with a default LAN IP 192.168.0.1, which you can use to log in to its web management page. The LAN IP address together with the Subnet Mask also defines the subnet that the connected devices are on. If the IP address conflicts with another device on your local network or your network requires a specific IP subnet, you can change it.
1.Visit http://tplinkwifi.net, and log in with your TP-Link ID or the password you set for the router.
2.Go to Advanced > Network > LAN.
3.Type in a new IP Address appropriate to your needs. And leave the Subnet Mask as the default settings.
4.Click Save.
 Note: If you have set the Port Forwarding, DMZ or DHCP address reservation, and the new LAN IP address is not in the same subnet with the old one, then you should reconfigure these features.
2. Configure to Support IPTV Service
I want to:
Configure IPTV setup to enable Internet/IPTV/Phone service provided by my internet service provider (ISP).
How can I do that?
1.Visit http://tplinkwifi.net, and log in with your TP-Link ID or the password you set for the router.
2.Go to Advanced > Network > IPTV/VLAN.
3.If your ISP provides the networking service based on IGMP technology, e.g., British Telecom(BT) and Talk Talk in UK:
1 )Tick the IGMP Proxy and IGMP Snooping checkbox, then select the IGMP Version, either V2 or V3, as required by your ISP.
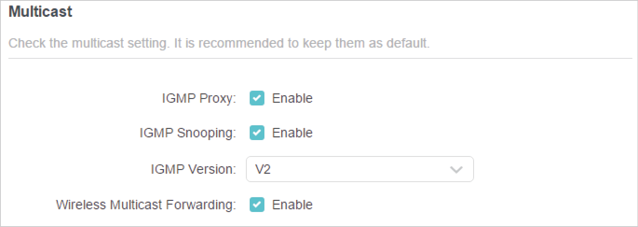
2 )Click Save.
3 )After configuring IGMP proxy, IPTV can work behind your router now. You can connect your set-top box to any of the router’s Ethernet port.
If IGMP is not the technology your ISP applies to provide IPTV service:
1 )Tick Enable IPTV/VLAN.
2 )Select the appropriate Mode according to your ISP.
•Select Bridge if your ISP is not listed and no other parameters are required.
•Select Custom if your ISP is not listed but provides necessary parameters.
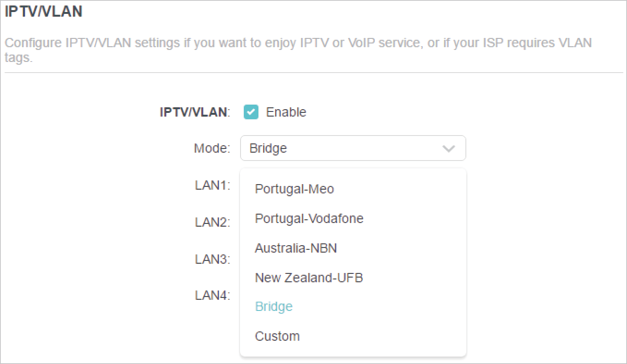
3 )After you have selected a mode, the necessary parameters, including the LAN port for IPTV connection, are predetermined. If not, select the LAN type to determine which port is used to support IPTV service.
4 )Click Save.
5 )Connect the set-top box to the corresponding LAN port which is predetermined or you have specified in Step 3.
Done!
Your IPTV setup is done now! You may need to configure your set-top box before enjoying your TV.
3. Specify DHCP Server Settings
By default, the DHCP (Dynamic Host Configuration Protocol) Server is enabled and the router acts as a DHCP server; it dynamically assigns TCP/IP parameters to client devices from the IP Address Pool. You can change the settings of the DHCP Server if necessary, and you can reserve LAN IP addresses for specified client devices.
1.Visit http://tplinkwifi.net, and log in with your TP-Link ID or the password you set for the router.
2.Go to Advanced > Network > DHCP Server.
•To specify the IP address that the router assigns:
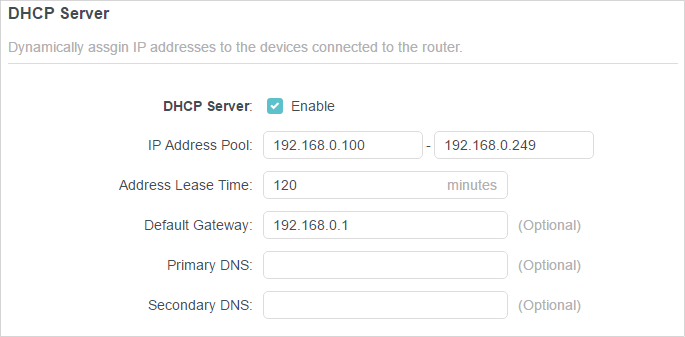
1.Tick the Enable checkbox.
2.Enter the starting and ending IP addresses in the IP Address Pool.
3.Enter other parameters if the ISP offers. The Default Gateway is automatically filled in and is the same as the LAN IP address of the router.
4.Click SAVE.
•To reserve an IP address for a specified client device:
1.Click Add in the Address Reservation section.
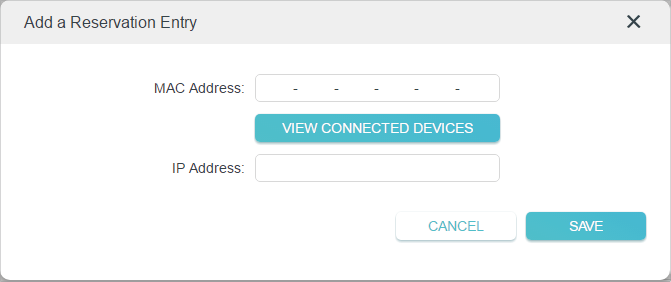
2.Click VIEW CONNECTED DEVICES and select the you device you want to reserve an IP for. Then the MAC Address will be automatically filled in. Or enter the MAC address of the client device manually.
3.Enter the IP address to reserve for the client device.
4.Click SAVE.
4. Set Up a Dynamic DNS Service Account
Most ISPs assign a dynamic IP address to the router and you can use this IP address to access your router remotely. However, the IP address can change from time to time and you don’t know when it changes. In this case, you might apply the DDNS (Dynamic Domain Name Server) feature on the router to allow you and your friends to access your router and local servers (FTP, HTTP, etc.) using a domain name without checking and remembering the IP address.
Note: DDNS does not work if the ISP assigns a private WAN IP address (such as 192.168.1.x) to the router.
1.Visit http://tplinkwifi.net, and log in with your TP-Link ID or the password you set for the router.
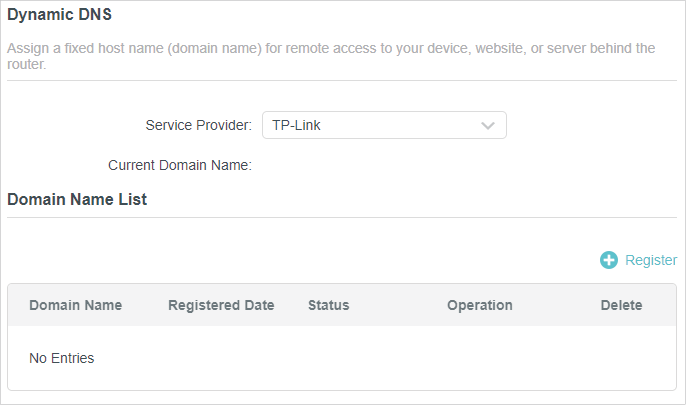
2.Go to Advanced > Network > Dynamic DNS.
3.Select the DDNS Service Provider: TP-Link, NO-IP or DynDNS. It is recommended to select TP-Link so that you can enjoy TP-Link’s superior DDNS service. Otherwise, please select NO-IP or DynDNS. If you don’t have a DDNS account, you have to register first by clicking Register Now.

Note: To enjoy TP-Link’s DDNS service, you have to log in with a TP-Link ID. If you have not logged in with one, click log in.
4.Click Register in the Domain Name List if you have selected TP-Link, and enter the Domain Name as needed.
If you have selected NO-IP or DynDNS, enter the username, password and domain name of your account.
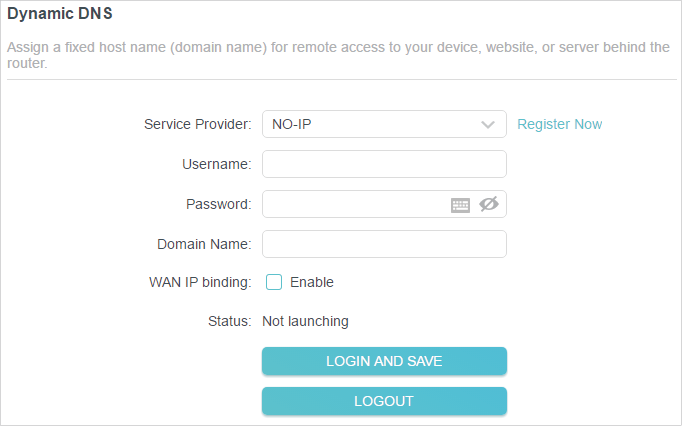
5.Click LOGIN AND Save.
 Tips: If you want to use a new DDNS account, please click Logout first, and then log in with a new account.
Static routing is a form of routing that is configured manually by a network administrator or a user by adding entries into a routing table. The manually-configured routing information guides the router in forwarding data packets to the specific destination.
I want to:
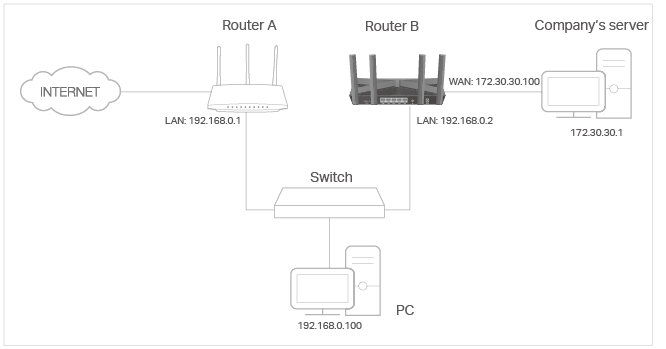
Visit multiple networks and servers at the same time.
For example, in a small office, my PC can surf the internet through Router A, but I also want to visit my company’s network. Now I have a switch and Router B. I connect the devices as shown in the following figure so that the physical connection between my PC and my company’s server is established. To surf the internet and visit my company’s network at the same time, I need to configure the static routing.
How can I do that?
1.Change the routers’ LAN IP addresses to two different IP addresses on the same subnet. Disable Router B’s DHCP function.
2.Visit http://tplinkwifi.net, and log in with your TP-Link ID or the password you set for Router A.
3.Go to Advanced > Network > Routing.
4.Click Add and finish the settings according to the following explanations:
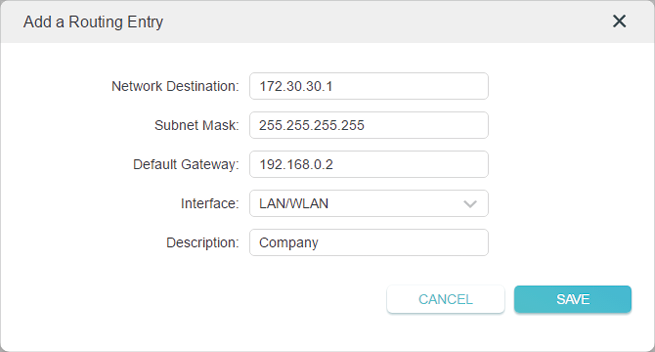
Network Destination: The destination IP address that you want to assign to a static route. This IP address cannot be on the same subnet with the WAN IP or LAN IP of Router A. In the example, the IP address of the company network is the destination IP address, so here enter 172.30.30.1.
Subnet Mask: Determines the destination network with the destination IP address. If the destination is a single IP address, enter 255.255.255.255; otherwise, enter the subnet mask of the corresponding network IP. In the example, the destination network is a single IP, so here enter 255.255.255.255.
Default Gateway: The IP address of the gateway device to which the data packets will be sent. This IP address must be on the same subnet with the router’s IP which sends out data. In the example, the data packets will be sent to the LAN port of Router B and then to the Server, so the default gateway should be 192.168.0.2.
Interface: Determined by the port (WAN/LAN) that sends out data packets. In the example, the data are sent to the gateway through the LAN port of Router A, so LAN/WLAN should be selected.
Description: Enter a description for this static routing entry.
5.Click Save.
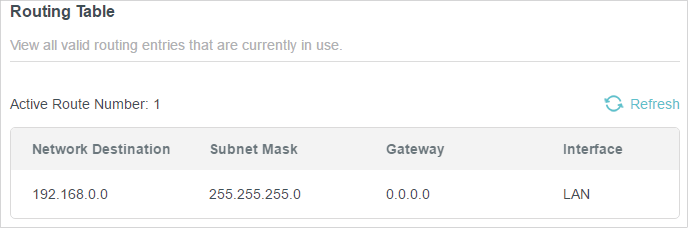
6.Check the Routing Table below. If you can find the entry you’ve set, the static routing is set successfully.
Done!
Open a web browser on your PC. Enter the company server’s IP address to visit the company network.
The router’s wireless network name (SSID) and password, and security option are preset in the factory. The preset SSID and password can be found on the label of the router. You can customize the wireless settings according to your needs.
Visit http://tplinkwifi.net, and log in with your TP-Link ID or the password you set for the router.
•To enable or disable the wireless function:
1.Go to Wireless or Advanced > Wireless > Wireless Settings.
2.The wireless function is enabled by default. If you want to disable the wireless function of the router, just untick the Enable checkbox of each wireless network. In this case, all the wireless settings will be invalid.
•To change the wireless network name (SSID) and wireless password:
1.Go to Wireless or Advanced > Wireless > Wireless Settings.
2.Create a new SSID in Network Name (SSID) and customize the password for the network in Password. The value is case-sensitive.
Note: If you change the wireless settings with a wireless device, you will be disconnected when the settings are effective. Please write down the new SSID and password for future use.
•To hide SSID:
1.Go to Wireless or Advanced > Wireless > Wireless Settings.
2.Select Hide SSID, and your SSID won’t display when you scan for local wireless networks on your wireless device and you need to manually join the network.
•To use the Smart Connect function:
The Smart Connect function lets you to enjoy a more high-speed network by assigning your devices to best wireless bands based on actual conditions to balance network demands.
1.Go to Advanced > Wireless > Wireless Settings.
2.Enable Smart Connect.

3.Keep the default values or set a new SSID and password, and click SAVE. This SSID and password will be applied for the 2.4GHz and 5GHz wireless networks.
•To change the security option:
1.Go to Advanced > Wireless > Wireless Settings.
2.Select an option from the Security drop-down list. We recommend you don’t change the default settings unless necessary.
In addition
•Transmit Power - Select either High, Middle or Low to specify the data transmit power. The default and recommended setting is High.
•Channel Width - Select a channel width (bandwidth) for the wireless network.
•Channel - Select an operating channel for the wireless network. It is recommended to leave the channel to Auto, if you are not experiencing the intermittent wireless connection issue.
•Mode - Select a transmission mode according to your wireless client devices. It is recommended to just leave it as default.
•To enable the MU-MIMO feature:
A router with the MU-MIMO feature serves multiple devices simultaneously while a traditional router serves only one user at a time. That means MU-MIMO can provide a faster, more efficient Wi-Fi network for multiusers.
Note:
Devices supporting 5GHz wireless band can enjoy the MU-MIMO service.
1.Go to Advanced > Wireless > Wireless Settings.
2.Locate the 5GHz network.
3.Tick the Enable box for MU-MIMO.
4.Click Save.
7. Schedule Your Wireless Function
The wireless network can be automatically off at a specific time when you do not need the wireless connection.
1.Visit http://tplinkwifi.net, and log in with your TP-Link ID or the password you set for the router.
2.Go to Advanced > Wireless > Wireless Schedule.
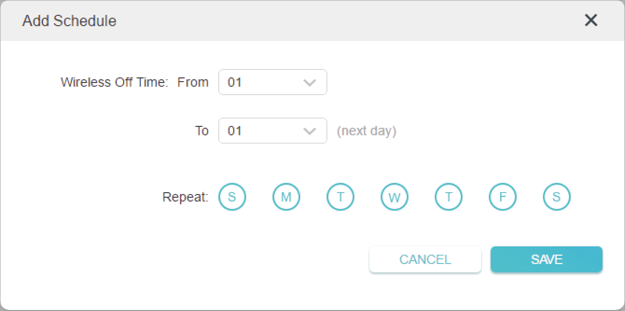
3.Enable the Wireless Schedule feature.

4.Click Add to specify a wireless off period during which you need the wireless off automatically, and click Save.
Note:
•The Effective Time Schedule is based on the time of the router. You can go to Advanced > System > Time & Language to modify the time.
•The wireless network will be automatically turned on after the time period you set.
8. Use WPS for Wireless Connection
Wi-Fi Protected Setup (WPS) provides an easier approach to set up a security-protected Wi-Fi connection.
1.Visit http://tplinkwifi.net, and log in with your TP-Link ID or the password you set for the router.
2.Make sure the Wi-Fi of your router is on and go to Advanced > Wireless > WPS.
8.1. Connect via the Client’s PIN
Enter the PIN of your device and click Connect. Then your device will get connected to the router.
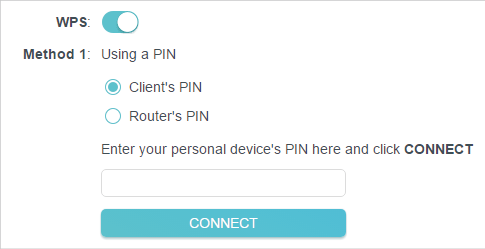
8.2. Connect via the Router’s PIN
Select Router’s PIN in Method 1 to enable Router’s PIN. You can use the default PIN or generate a new one.
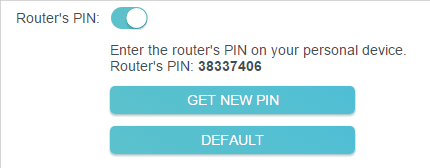
Note:
PIN (Personal Identification Number) is an eight-character identification number preset to each router. WPS supported devices can connect to your router with the PIN. The default PIN is printed on the label of the router.
8.3. Push the WPS Button
Click Start on the screen or directly press the router’s WPS button. Within two minutes, enable WPS on your personal device. Success will appear on the screen and the WPS LED of the router should change from flashing to solid on, indicating successful WPS connection.

Check advanced wireless settings for your device.
1.Visit http://tplinkwifi.net, and log in with your TP-Link ID or the password you set for the router.
2.Go to Advanced > Wireless > Additional Settings.
3.Configure advanced wireless settings.
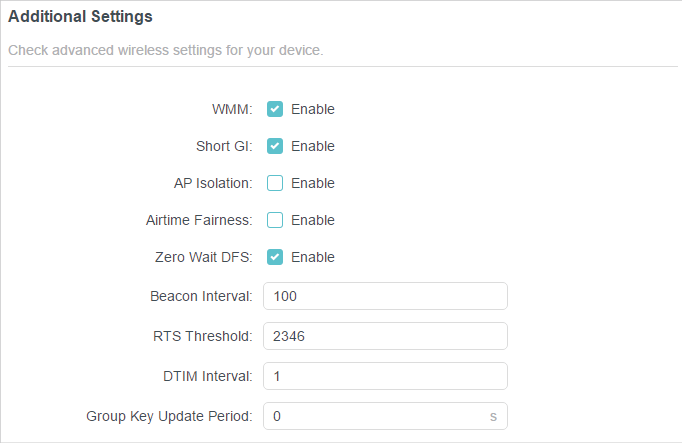
•WMM - WMM function can guarantee the packets with high-priority messages being transmitted preferentially.
•Short GI - It is recommended to enable this function, for it will increase the data capacity by reducing the guard interval time.
•AP Isolation - This function isolates all connected wireless stations so that wireless stations cannot access each other through WLAN.
•Airtime Fairness - This function can improve the overall network performance by sacrificing a little bit of network time on your slow devices.
•Zero Wait DFS - Zero Wait DFS (Dynamic Frequency Selection) allows the router to immediately reselect a new channel once the radar signal is detected on a channel allocated to radar devices to ensure lag-free network experience.
•Beacon Interval - Enter a value between 40 and 1000 in milliseconds to determine the duration between beacon packets that are broadcasted by the router to synchronize the wireless network. The default value is 100 milliseconds.
•RTS Threshold- Enter a value between 1 and 2346 to determine the packet size of data transmission through the router. By default, the RTS (Request to Send) Threshold size is 2346. If the packet size is greater than the preset threshold, the router will send RTS frames to a particular receiving station and negotiate the sending of a data frame.
•DTIM Interval - The value determines the interval of DTIM (Delivery Traffic Indication Message). Enter a value between 1 and 15 intervals. The default value is 1, which indicates the DTIM Interval is the same as Beacon Interval.
•Group Key Update Period - Enter a number of seconds (minimum 30) to control the time interval for the encryption key automatic renewal. The default value is 0, meaning no key renewal.