How to adjust the image for a license plate recognition camera
Contents
Configuration for license plate recognition camera
Introduction
License plate recognition (LPR) cameras are typically deployed at vehicle entrances and exits or across various LPR application scenarios. Proper image adjustment and recognition area settings are essential to ensure accurate recognition performance. This guide provides instructions on how to optimize the image and configure the appropriate recognition area for license plate recognition.
Requirements
- VIGI InSight LPR345Z
Configuration
The following content describes how to configure the license plate recognition (LPR) camera from installation to basic setup. The process includes installing the device, connecting the required cables and external equipment, adjusting the image, and configuring the LPR settings to ensure recognition performance.
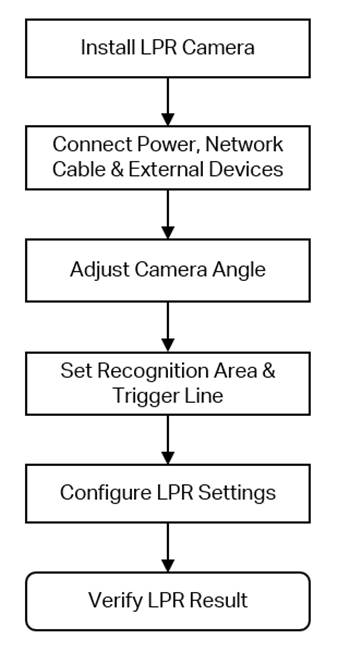
Configuration for license plate recognition camera
Step 1. Install the LPR camera according to the diagrams and instructions in the installation guide. Ensure that the mounting height, angle, and position are within the recommended ranges, and confirm that the camera’s field of view is free from obstructions.
Step 2. Connect the Power Cable, Network Cable, and External Devices.
Connect the power cable and network cable for the LPR camera. As required by the application, connect external devices such as barrier gates or alarm equipment. For detailed wiring and configuration of external devices, refer to How to connect and configure external devices when using a license plate recognition camera .
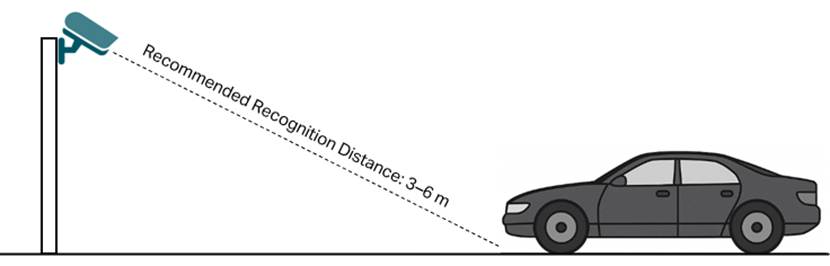
Step 3. Adjust the Camera Angle.
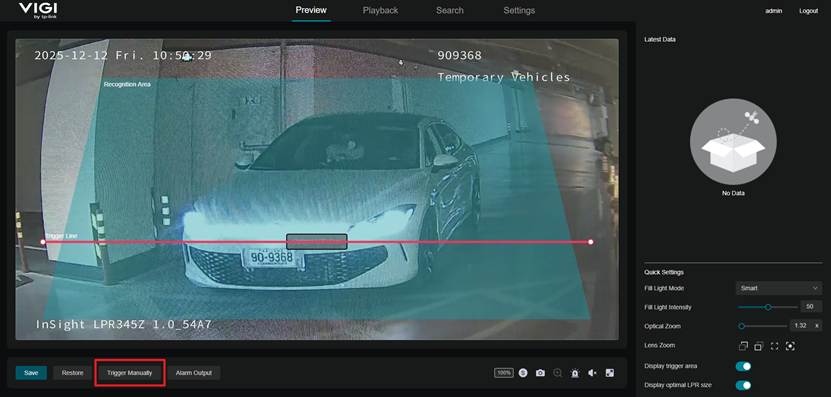
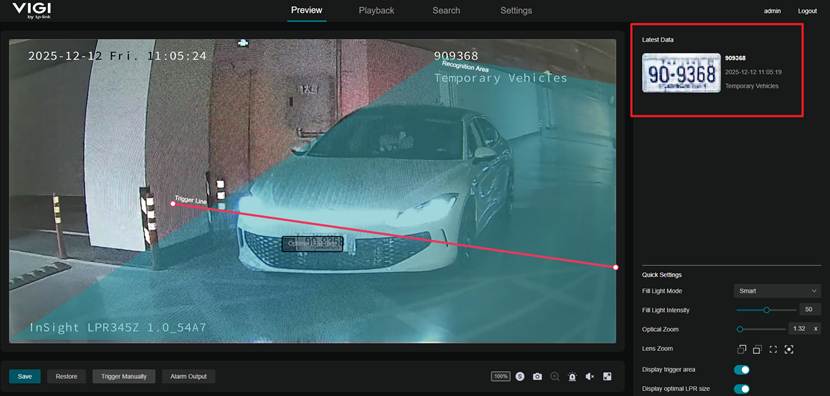
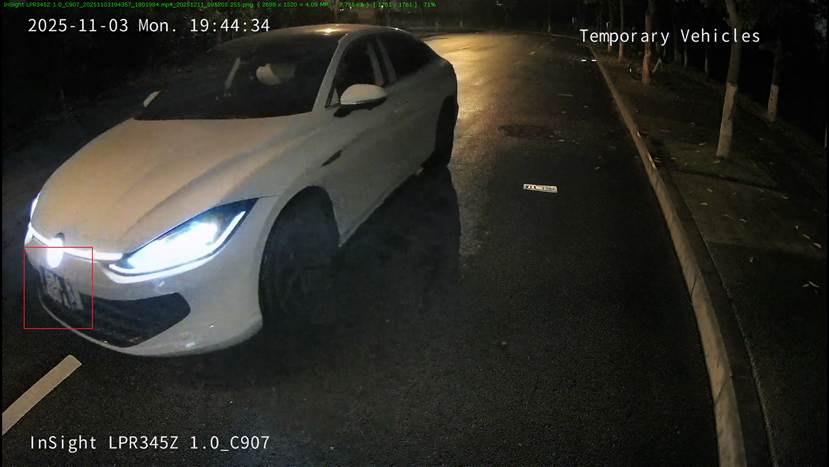
Park a vehicle at the intended triggering position in the actual scene. Then log in to the camera’s web management interface using its IP address and navigate to the Preview page. Fine-tune the camera angle so that the license plate appears close to the “Optimal LPR Size” indicator shown on the Preview page and is positioned in the lower one-third of the image.
After adjustment, click Trigger Manual in the lower-left corner to manually capture an image and verify whether the captured image meets the required recognition quality.
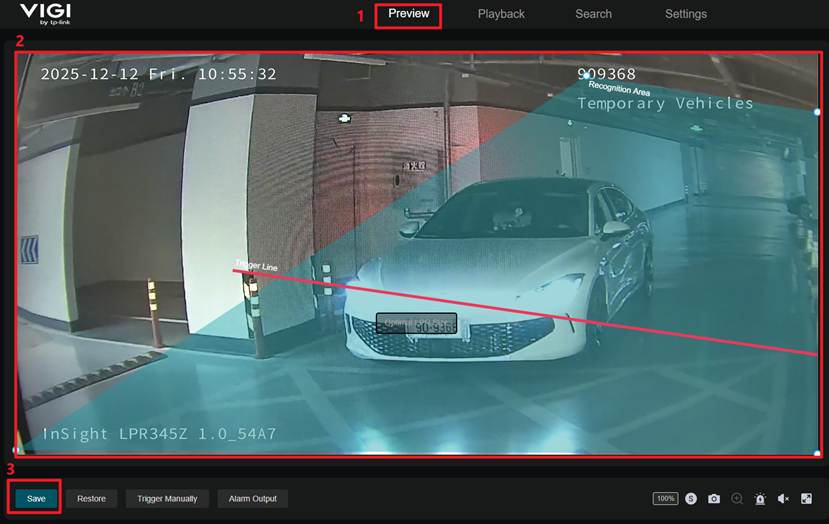
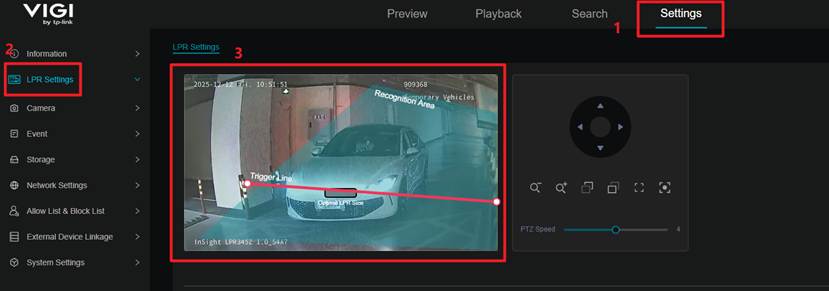
Step 4. Configure the Recognition Area and Trigger Line. After the image meets the required visual conditions, draw the recognition area and trigger line on the Preview page or under Settings > LPR Settings > LPR Settings.
For the recognition area, ensure that the configured region covers the intended vehicle lane and that a complete license plate can appear within the designated area. For the trigger line, the camera prioritizes capturing the license plate closest to the line; therefore, the trigger line should be positioned where the license plate angle is appropriate and not affected by other vehicles entering the field of view. After configuration, click Save on the Preview page or Apply under LPR Settings to save the settings.
Note: Avoid including irrelevant areas within the recognition area. Covering unintended regions may cause the camera to detect and capture license plates from other lanes or background areas, resulting in misrecognition.
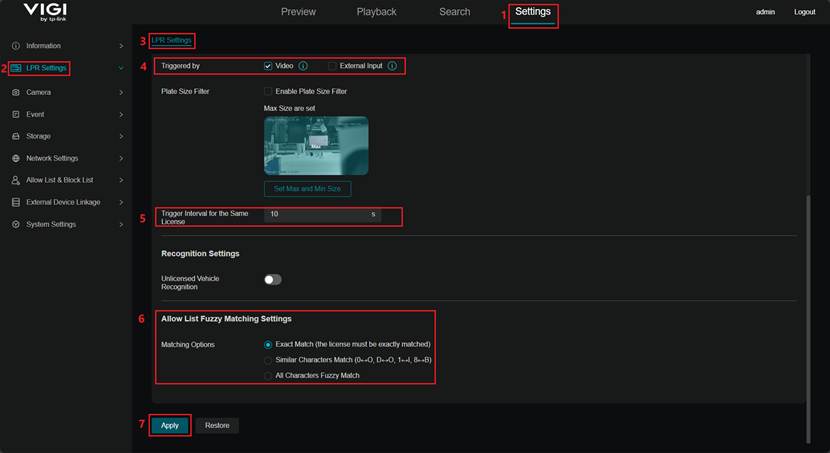
Step 5. Navigate to Settings > LPR Settings > LPR Settings, configure the following parameters as needed:
- Trigger Mode: Determines how license plate recognition is activated.
Video Triggered: Recognition is activated when a vehicle crosses the red trigger line.
External Input: Recognition is activated when a physical sensor (such as a loop detector or barrier-gate signal) provides a trigger.
- Trigger Interval for the Same License: Sets the minimum number of seconds before the same license plate can be recognized again.
- Matching Options: Defines how the system determines whether two recognition results belong to the same license plate.
Exact Match: All characters must match the allow-list entry exactly.
Similar Characters Match: Accepts visually similar characters as valid matches.
All Characters Fuzzy Match: Widest tolerance for character variations or mismatches.
Click Apply to save the settings.
Step 6. Verify the Capture Result. Drive a vehicle through the entrance or exit and check whether the camera automatically captures the license plate. If the capture is not successful, it is recommended to troubleshoot by reviewing the camera installation, recognition area, trigger line configuration, and the LPR Settings.
Note: The capture and recognition performance of LPR camera depends on multiple factors, including environment, distance, vehicle speed, angle, license plate condition, and lighting. If abnormalities occur, review these factors and troubleshoot accordingly.
Conclusion
With the steps above, you have completed the configuration of the license plate recognition camera.
Get to know more details of each function and configuration please go to Download Center to download the manual of your product.
QA
Q1: How can I improve the clarity or alignment of the captured license plate image
A1: This issue may be caused by the following factors:
- Dirt or smudges on the lens surface
- The focal length (zoom level) not properly adjusted
- Suboptimal capture conditions such as improper angle or poor lighting
Try cleaning the lens, adjusting the camera’s focal length and image settings, or repositioning the camera to improve the capture quality. The solutions described in Q2–Q4 can further assist in addressing image issues resulting from suboptimal installation or environmental factors.
Q2: How can I resolve overexposure or underexposure of license plates?
A2:
(1) Navigate to Settings > Camera > Display > Image > Image Adjustment > Brightness and adjust the brightness based on the actual scene. For example, reduce the brightness if the image is overexposed, or increase it if it is too dark.
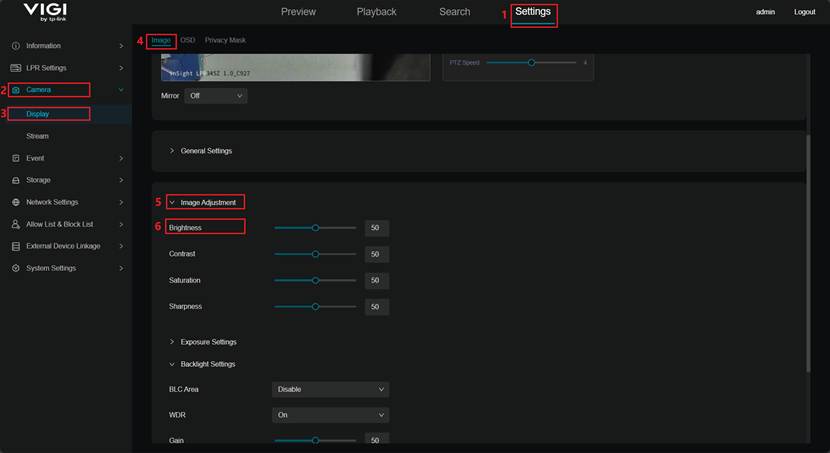
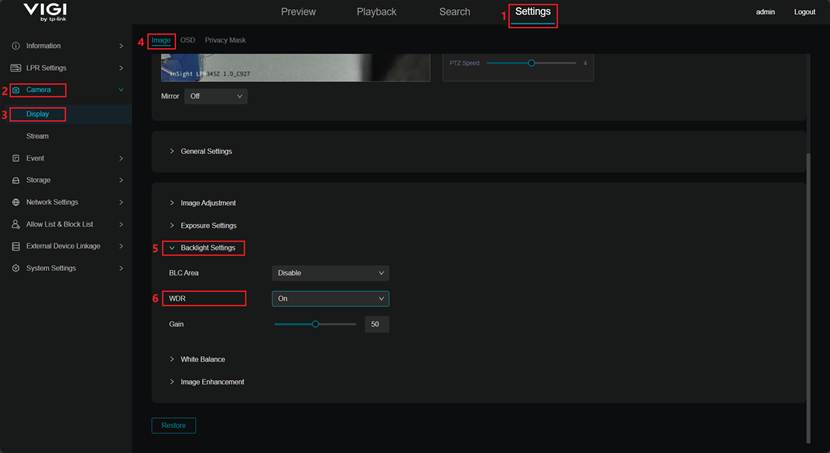
(2) Navigate to Settings > Camera > Display > Image > Backlight Settings > WDR and enable WDR.
When WDR is enabled, the camera optimizes high-contrast scenes—such as strong light or backlight conditions—to reduce overexposure in key areas like license plates. This helps ensure clearer and more readable plate details, especially in environments with rapidly changing or complex lighting.
WDR dynamically balances brightness across the image to improve overall stability and detail reproduction. In dynamic scenes, such as fast-moving vehicles, WDR also helps maintain smooth transitions and reduces flickering caused by sudden light changes.
For scenarios involving high vehicle speed or challenging lighting, it is recommended to test the camera with WDR enabled and disabled, and adjust the configuration based on the actual environment.

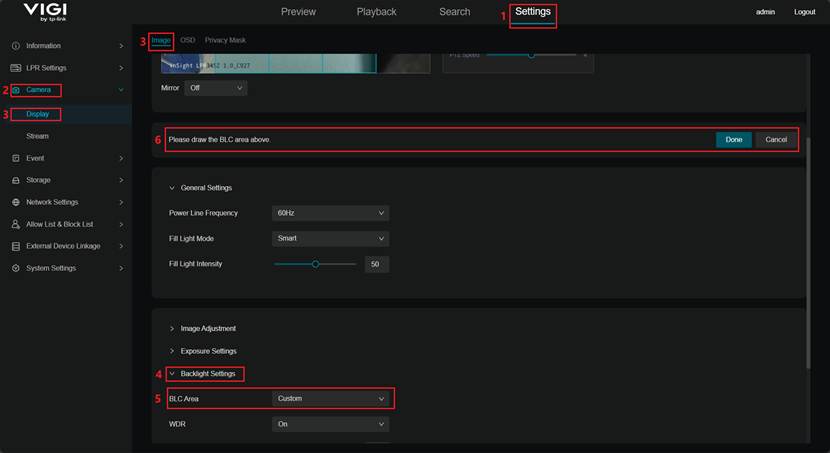
(3) Navigate to Settings > Camera > Display > Image > Backlight Settings > BLC Area, and set the mode to Custom, and draw the BLC area over the license plate region.
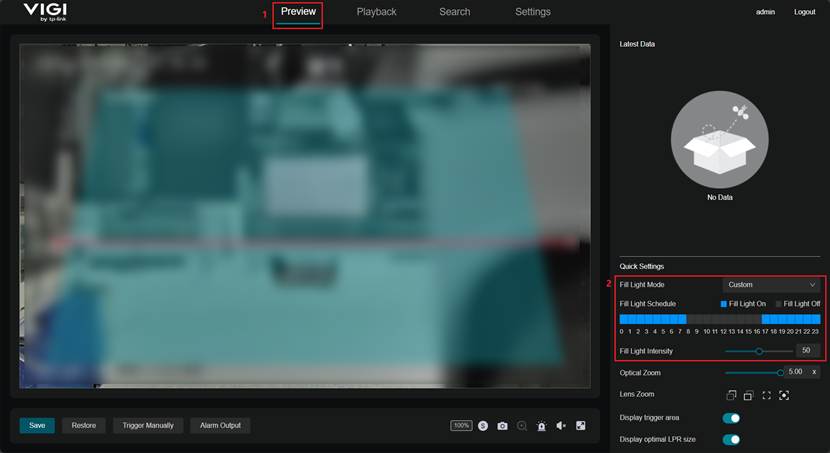
(4) When the image is underexposed at night, ensure that the Fill Light is turned on or install an external illumination device as needed.
Navigate to the Preview page and adjust the Fill Light Mode by setting it to Smart for automatic activation based on ambient lighting or Custom to enable the light according to a scheduled time.
Q3: How can I resolve unclear license plate images at night?
(1) Adjust the camera angle to avoid capturing the license plate from an excessively tilted position.
(2) Ensure that the Fill Light is enabled at night or install an external illumination device as needed.
Navigate to the Preview page and modify the Fill Light Mode. Set the mode to Smart to allow the fill light to turn on automatically based on ambient illumination or set it to Custom to enable the light according to a scheduled time.

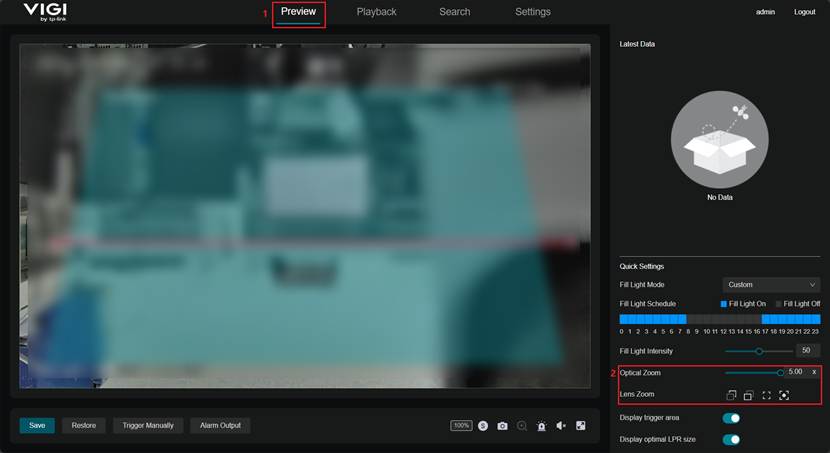
(3) Adjust the Optical Zoom and Lens Zoom to ensure that the license plate is not smaller than the “Optimal LPR Size” indicator shown on the Preview page.
Q4. How can I resolve issues caused by overly bright vehicle headlights (high contrast between light and dark areas)?
A4:
(1) Navigate to Settings > Camera > Display > Image > Exposure Settings > Shutter Speed and reduce the shutter speed appropriately (the default value is 5000).

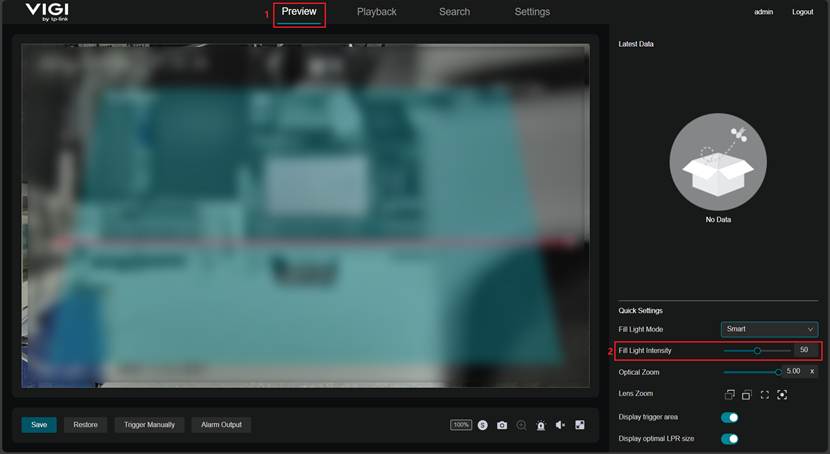
(2) Navigate to the Preview page and increase the Fill Light Intensity to enhance the brightness of the built-in fill light and improve license plate visibility.
(3) Navigate to Settings > Camera > Display > Image > Backlight Settings > WDR and enable WDR.
(4) Enhance the ambient lighting or install an external illumination device to reduce the impact of strong headlights and provide supplemental lighting for the license plate.
Q5. What is the capture rule in multi-vehicle scenarios?
A5: The camera detects and captures license plates based on the configured recognition area and trigger line. The license plate must first appear within the recognition area. If multiple license plates are present at the same time, the camera prioritizes capturing the plate that is closest to the center of the trigger line.
Q6. What should I do if the camera fails to capture a license plate or the recognition result is incorrect?
A6: Several factors may cause this issue. Recommended checks include:
- No image output: The camera or video signal may be faulty. Check the power supply, cabling, and network connection.
- Improper installation angle or height: The camera may be mounted too high, too low, or at an incorrect angle. Refer to the installation guide for recommended angles and verify that the recognition area is properly aligned.
- Poor lighting conditions: The plate may appear too dark or overexposed. Refer to Q2–Q4 for lighting optimization.
- Excessive vehicle speed: Install speed bumps or other measures to slow vehicles for effective recognition.
- Unreasonable LPR parameter settings: Verify settings such as trigger interval and recognition mode according to Step 5, and adjust based on actual traffic conditions.
- Insufficient image resolution: Check the video stream settings and ensure the preview stream resolution meets LPR requirements. The saved plate image should always use the fixed highest resolution.
- Damaged or heavily contaminated license plate: In such cases, manual verification or manual pass-through is recommended.
Q7. How can I resolve incorrect license plate recognition results?
A7: Incorrect recognition may occur when characters on the plate are visually similar (such as 0 and O, or 1 and I). Enable the Similar Characters Match function and configure the mapping between easily confused characters to improve recognition accuracy.
Q8. What are the recommended maintenance practices?
A8: To reduce failures and improve capture performance, regular maintenance is recommended:
- Clean the device: Periodically clean dust or smudges from the camera lens and fill light surface.
- Check cabling: Ensure cables are intact and free from aging, damage, or animal bites.
- Update firmware: Keep the system firmware up to date to fix known issues and improve stability.
- Optimize configuration: Review software configurations periodically and remove unused or expired license plate entries.
- Optimize the environment: Avoid strong light shining directly into the camera and ensure uniform lighting in the recognition area.
Is this faq useful?
Your feedback helps improve this site.
TP-Link Community
Still need help? Search for answers, ask questions, and get help from TP-Link experts and other users around the world.