How to Use VIGI Camera OpenAPI Function
Content
Configuration for OpenAPI Access
Control Interface Authentication and API Requests
Stream Interface Authentication and Stream Requests
Introduction
VIGI Camera OpenAPI allows third-party applications to communicate with VIGI cameras over the network for device configuration, event subscription, and stream-related operations. Through the Control Interface, an OpenAPI client can query or configure camera parameters and subscribe to event messages. Through the Stream Interface, it can perform stream-related operations, such as preview, playback, recording download, and talk.
This article introduces how to enable OpenAPI on a VIGI camera, complete authentication, call Control Interface APIs, and understand the general workflow of Stream Interface requests.
Requirements
- VIGI IPC that supports OpenAPI. (To check supported models, refer to Devices Supported by VIGI Open API)
- VIGI IPC OpenAPI Document
- An OpenAPI client that can access the camera over the network
Configuration
Configuration for OpenAPI Access
Before calling the VIGI Camera OpenAPI interfaces, enable OpenAPI on the camera. The following steps use the camera web management page as an example.
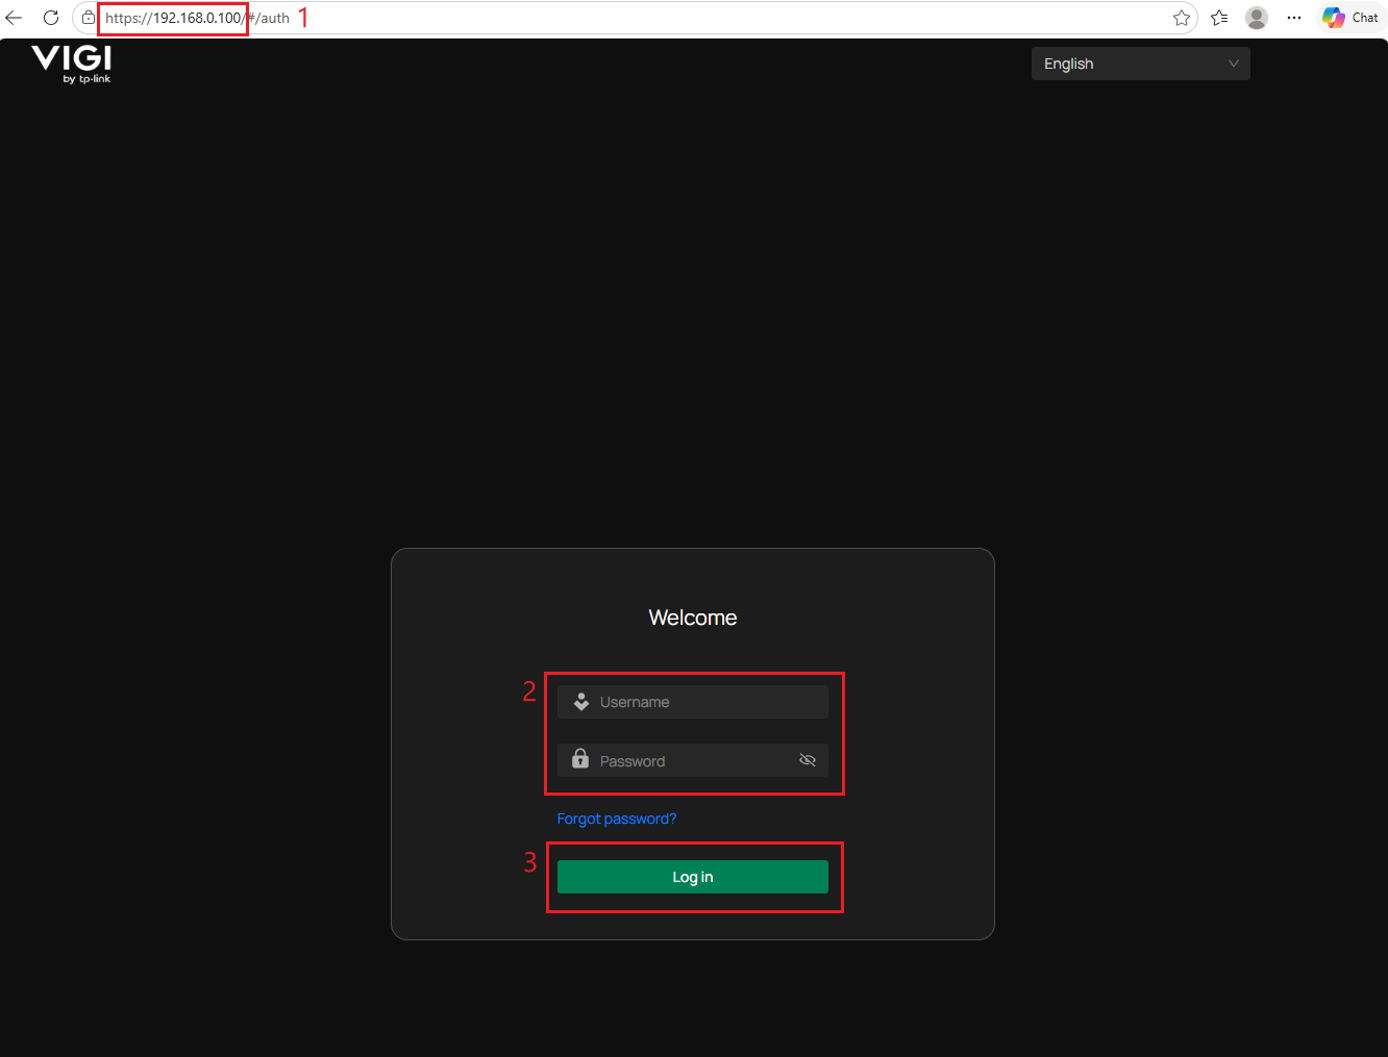
Step 1. Log in to the camera web interface using its IP address. Enter the username and password, then click Log In.
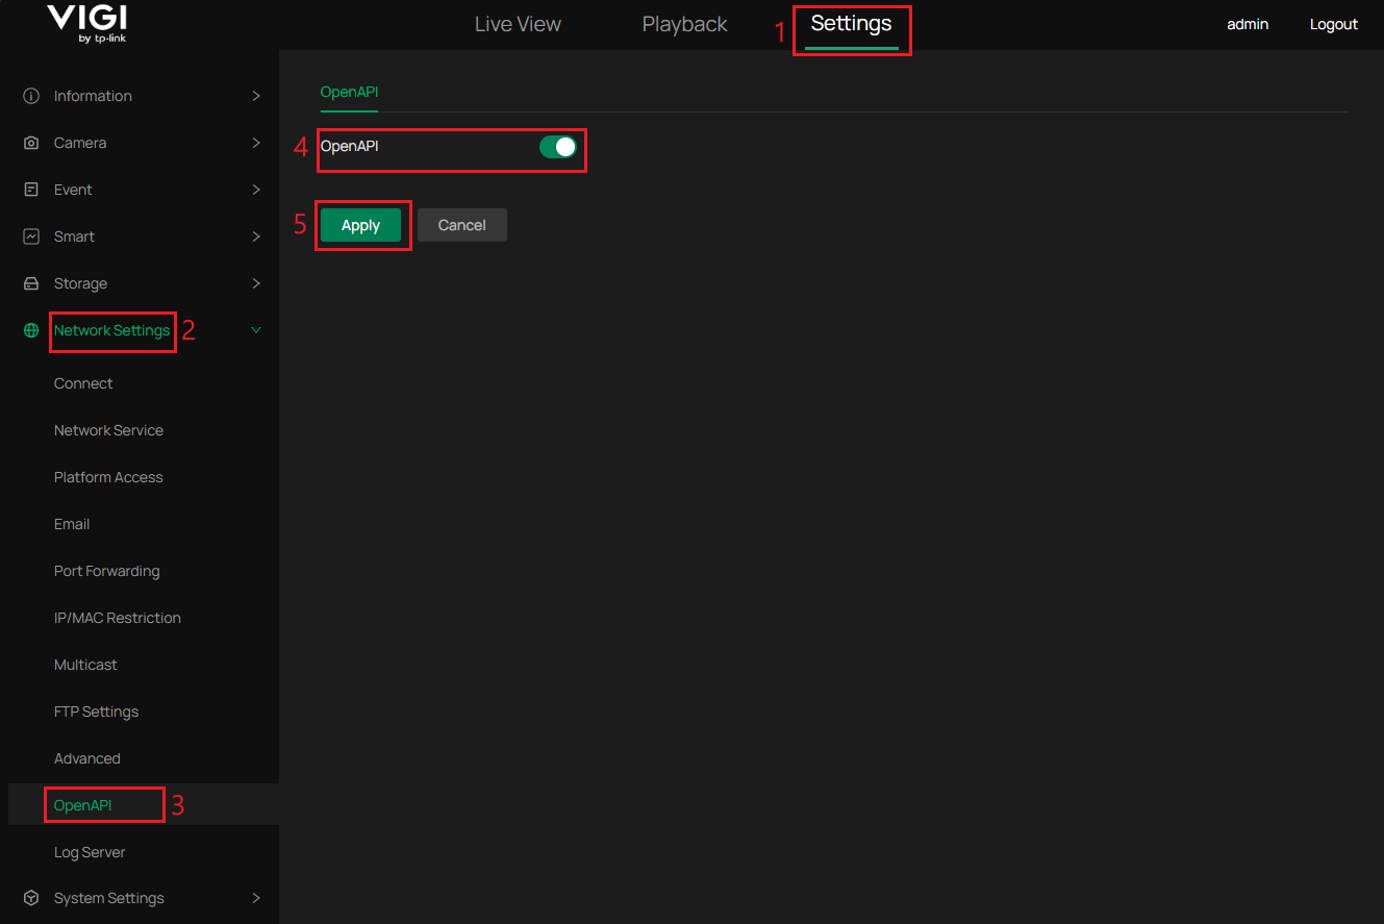
Step 2. Go to Settings > Network Settings > OpenAPI, turn on the OpenAPI switch, and click Apply to save the configuration.
Control Interface Authentication and API Requests
The VIGI Camera OpenAPI Control Interface uses HTTPS. Before calling a control interface, the OpenAPI client needs to complete Do Auth authentication and obtain the stok. The default OpenAPI control port is 20443.
Step 1. Send the first doAuth request to obtain the authentication fields.
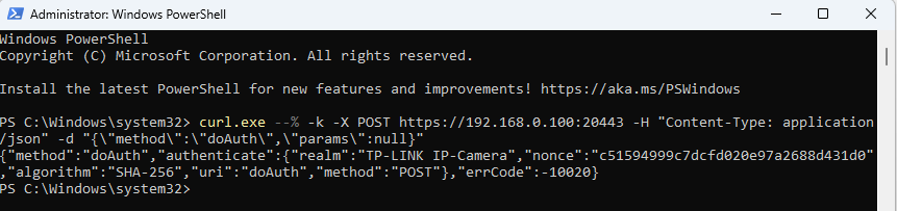
Send a POST request to https://<Camera_IP>:20443. In the request body, set method to doAuth and params to null. The camera returns the authentication fields used to calculate the response, including realm, nonce, algorithm, uri, and method.
An example of the curl command on Windows is as follows:
Request:
curl.exe --% -k -X POST https://192.168.0.100:20443 -H "Content-Type: application/json" -d "{\"method\":\"doAuth\",\"params\":null}"
Response:
{"method":"doAuth","authenticate":{"realm":"TP-LINK IP-Camera","nonce":"c51594999c7dcfd020e97a2688d431d0","algorithm":"SHA-256","uri":"doAuth","method":"POST"},"errCode":-10020}
Step 2. Send the second doAuth request to obtain the stok.
Calculate the response based on the authentication fields returned in Step 1 and the camera login password. If the returned algorithm is SHA-256, calculate the response as follows:
A1 = SHA256(admin:<realm>:<password>)
A2 = SHA256(<method>:<uri>)
response = SHA256(A1:<nonce>:A2)
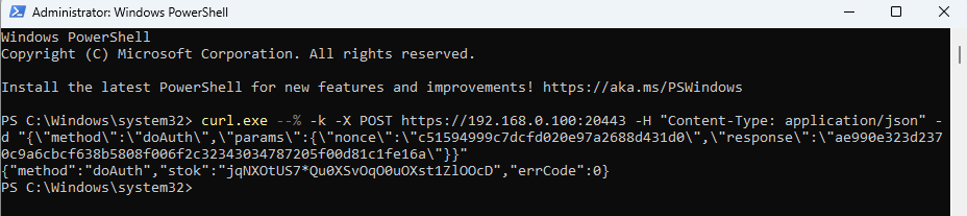
Then send a POST request to https://<Camera_IP>:20443. In the request body, set method to doAuth, and include the returned nonce and calculated response in params.
An example of the curl command on Windows is as follows:
Request:
curl.exe --% -k -X POST https://192.168.0.100:20443 -H "Content-Type: application/json" -d "{\"method\":\"doAuth\",\"params\":{\"nonce\":\"c51594999c7dcfd020e97a2688d431d0\",\"response\":\"ae990e323d2370c9a6cbcf638b5808f006f2c32343034787205f00d81c1fe16a\"}}"
Response:
{"method":"doAuth","stok":"jqNXOtUS7*Qu0XSvOqO0uOXst1ZlOOcD","errCode":0}
Step 3. Call Control Interface APIs
After obtaining the stok, add it to the request URL and send the target Control Interface request in JSON format. The request method is POST, and the request URL format is https://<Camera_IP>:20443/stok=<stok>.
This section provides two examples: one common Control Interface request for setting the camera time zone, and one event subscription request for receiving event messages.
Example 1: Set the Camera Time Zone
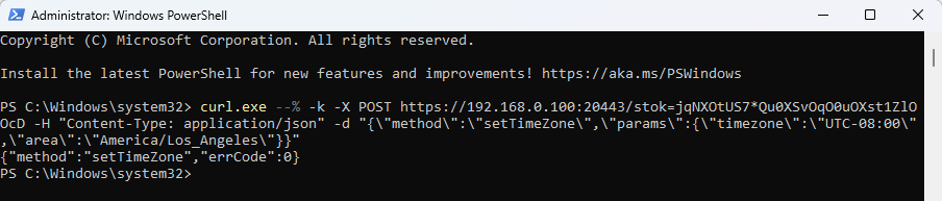
The setTimeZone interface is used to set the camera time zone. In the request body, set method to setTimeZone, and configure timezone and area in params. The following example sets the camera time zone to America/Los_Angeles.
Request:
curl.exe --% -k -X POST https://192.168.0.100:20443/stok=jqNXOtUS7*Qu0XSvOqO0uOXst1ZlOOcD -H "Content-Type: application/json" -d "{\"method\":\"setTimeZone\",\"params\":{\"timezone\":\"UTC-08:00\",\"area\":\"America/Los_Angeles\"}}"
Response:
{"method":"setTimeZone","errCode":0}
Example 2: Subscribe to Event Messages
The subscribeMsg interface is used to subscribe to event detection messages. In the request body, set method to subscribeMsg, and configure event_type and heartbeat in params. After the request is sent, keep the connection open. The camera sends heartbeat packets periodically and pushes event messages through the same connection when an event is triggered.
Request:
curl.exe --% -k -N -X POST https://192.168.0.100:20443/stok=jqNXOtUS7*Qu0XSvOqO0uOXst1ZlOOcD -H "Content-Type: application/json" -d "{\"method\":\"subscribeMsg\",\"params\":{\"event_type\":[\"all\"],\"heartbeat\":10}}"
Response:
{"method":"subscribeMsg","errCode":0}

Stream Interface Authentication and Stream Requests
The VIGI Camera OpenAPI Stream Interface is established over RTSP. The OpenAPI client needs to complete Digest Authentication before sending stream-related requests. This section uses the recording download scenario as an example to describe the general Stream Interface workflow.
Step 1. Obtain stream request parameters if required.
For some stream operations, such as the Stream Interface download request, the client must first obtain the required parameters through the Control Interface. For example, before sending a download request, call getMediaList in Section 4.11.1 of the VIGI IPC OpenAPI Document to obtain the recording start time, end time, FileID, event_type, and other related information. Then use the required parameters in the Stream Interface download request.
Step 2. Check the RTSP port.
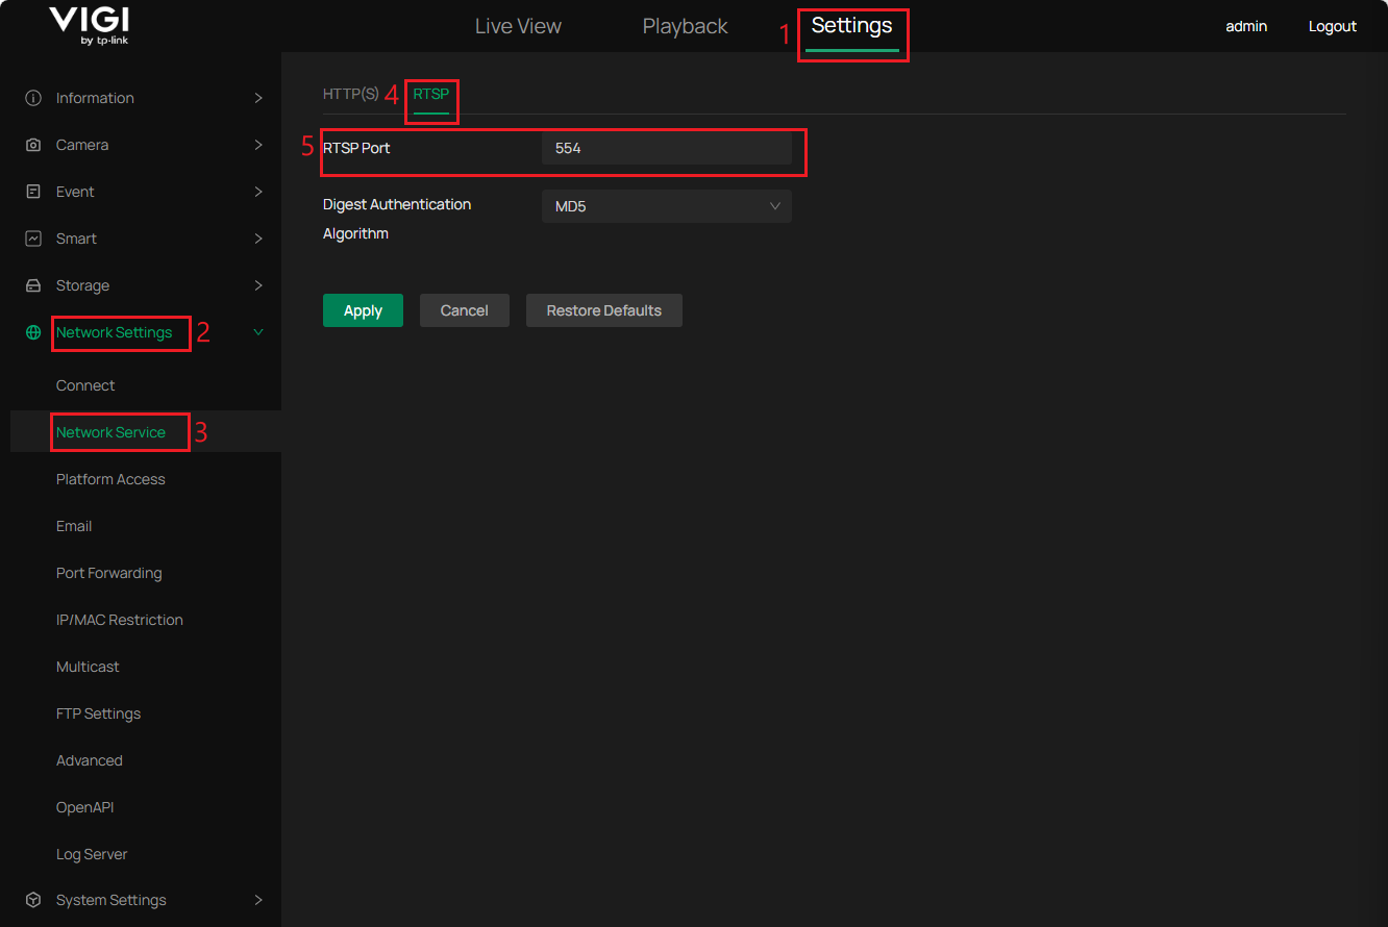
Check the camera RTSP port on the camera web management page under Settings > Network Settings > Network Service > RTSP. In this example, the RTSP port is 554. If the camera is accessed through port forwarding, use the external RTSP port mapped on the router instead of the camera’s internal RTSP port.
Step 3. Establish the RTSP connection and complete Digest Authentication.
The client establishes a TCP connection to the camera RTSP port and sends an initial MULTITRANS request. The camera returns 401 Unauthorized with Digest Authentication parameters. The client calculates the authentication response based on the username, password, request method, request URI, and returned authentication parameters, then sends the MULTITRANS request again with the authentication header. For details about the Digest Authentication calculation, refer to Section 2.2.2 Digest Authentication in the VIGI IPC OpenAPI Document
Step 4. Send the Stream Interface request.
After Digest Authentication succeeds, the client sends the required Stream Interface request, such as preview, playback, recording download, stop, play, force I-frame, or talk. For recording download, the camera returns 200 OK with codec information and starts sending RTP data over the TCP connection. For details about Stream Interface methods and parameters, refer to Section 5 OpenAPI Stream Interface in the VIGI IPC OpenAPI Document.
Step 5. Receive and parse RTP data.
The stream data is transmitted as RTP over TCP. The client needs to identify RTP packets by the leading $ byte, read the channel ID and payload length, and then parse the RTP header and payload. The client should also identify the media type according to the RTP payload type. For details about the RTP over TCP packet structure, refer to Section 2.3 Data Transmission. For the payload type definitions, refer to Appendix 2 Payload Type in the VIGI IPC OpenAPI Document.
Step 6. Check and process the audio codec if audio data is involved.
If the stream operation involves audio data, such as recording download with audio or talk, call the getAudioEncode interface in Section 4.4.6 of the VIGI IPC OpenAPI Document to check the camera audio codec first. The client should process the audio RTP payload according to the returned encode_type.
Verification
After calling the Control Interface APIs in the examples above, verify the results as follows.
Verify Example 1: Set the Camera Time Zone
After the setTimeZone request returns "errCode": 0, log in to the camera web management page and go to Settings > System Settings > Basic Settings > Date. Check whether the Time Zone value has been changed to the configured time zone. In this example, the time zone should be changed to (UTC-08:00) Pacific Time.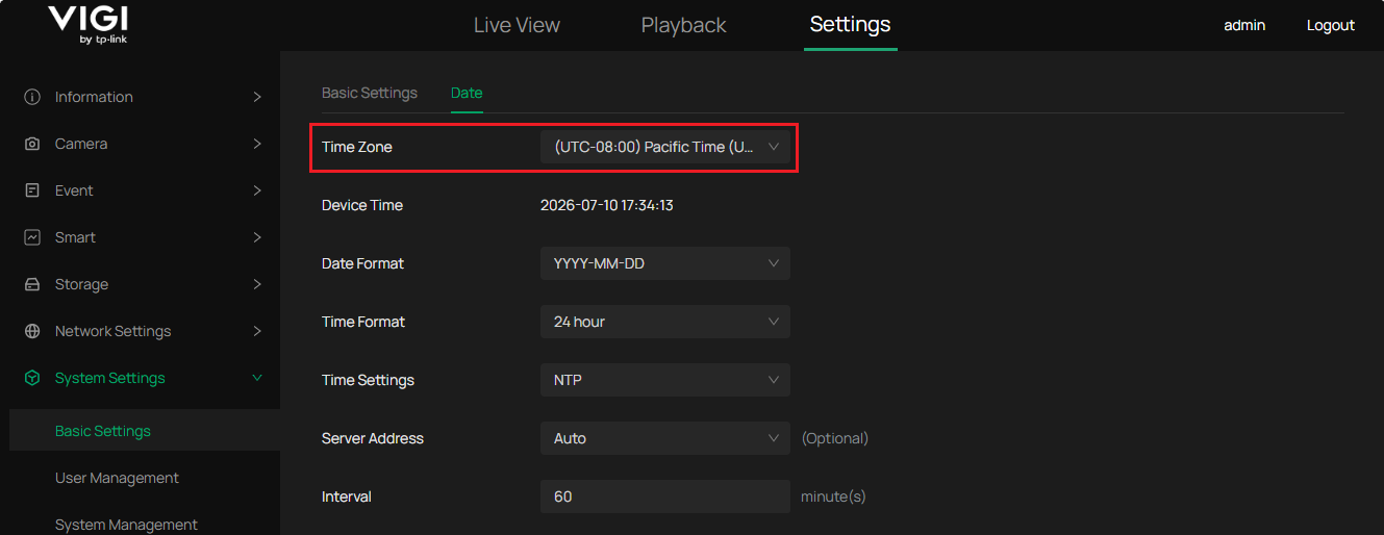
Verify Example 2: Subscribe to Event Messages
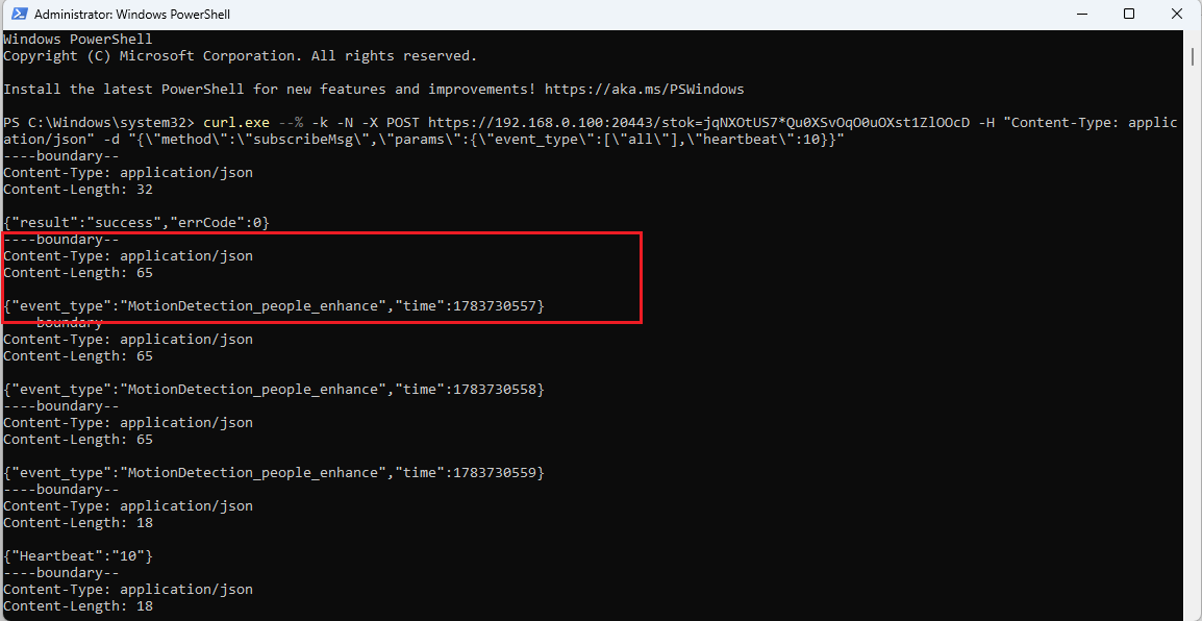
After the subscribeMsg request returns "result": "success" and "errCode": 0, keep the command running. The camera sends heartbeat packets according to the configured heartbeat interval and pushes event messages through the same connection when an event is triggered.
In this example, event_type is set to all, and heartbeat is set to 10. Therefore, the terminal should print heartbeat packets every 10 seconds and print event messages when any subscribed event is triggered.
Conclusion
After completing the steps in this article, you can enable OpenAPI on the VIGI camera, complete authentication, and call the Control Interface or Stream Interface as required. The examples also show how to verify common Control Interface calls and understand the general workflow for Stream Interface requests.
QA
Q1: How should the client manage connections when calling the Control Interface?
A1: For Control Interface calls, create a new connection for each API request.
After obtaining the stok through doAuth, use the stok to call the required Control Interface API, such as getDeviceInfo or setTimeZone. Each API request should be sent through a separate connection so that the request can be sent and processed independently.
For subscribeMsg, keep the connection open after the subscription succeeds. The camera uses this connection to send heartbeat packets and event messages.
Q2: Where can I find the VIGI IPC OpenAPI Document?
A2: Go to Download Center earch for the camera model, and open the product download page. Under Manual, download the corresponding VIGI IPC OpenAPI Document.
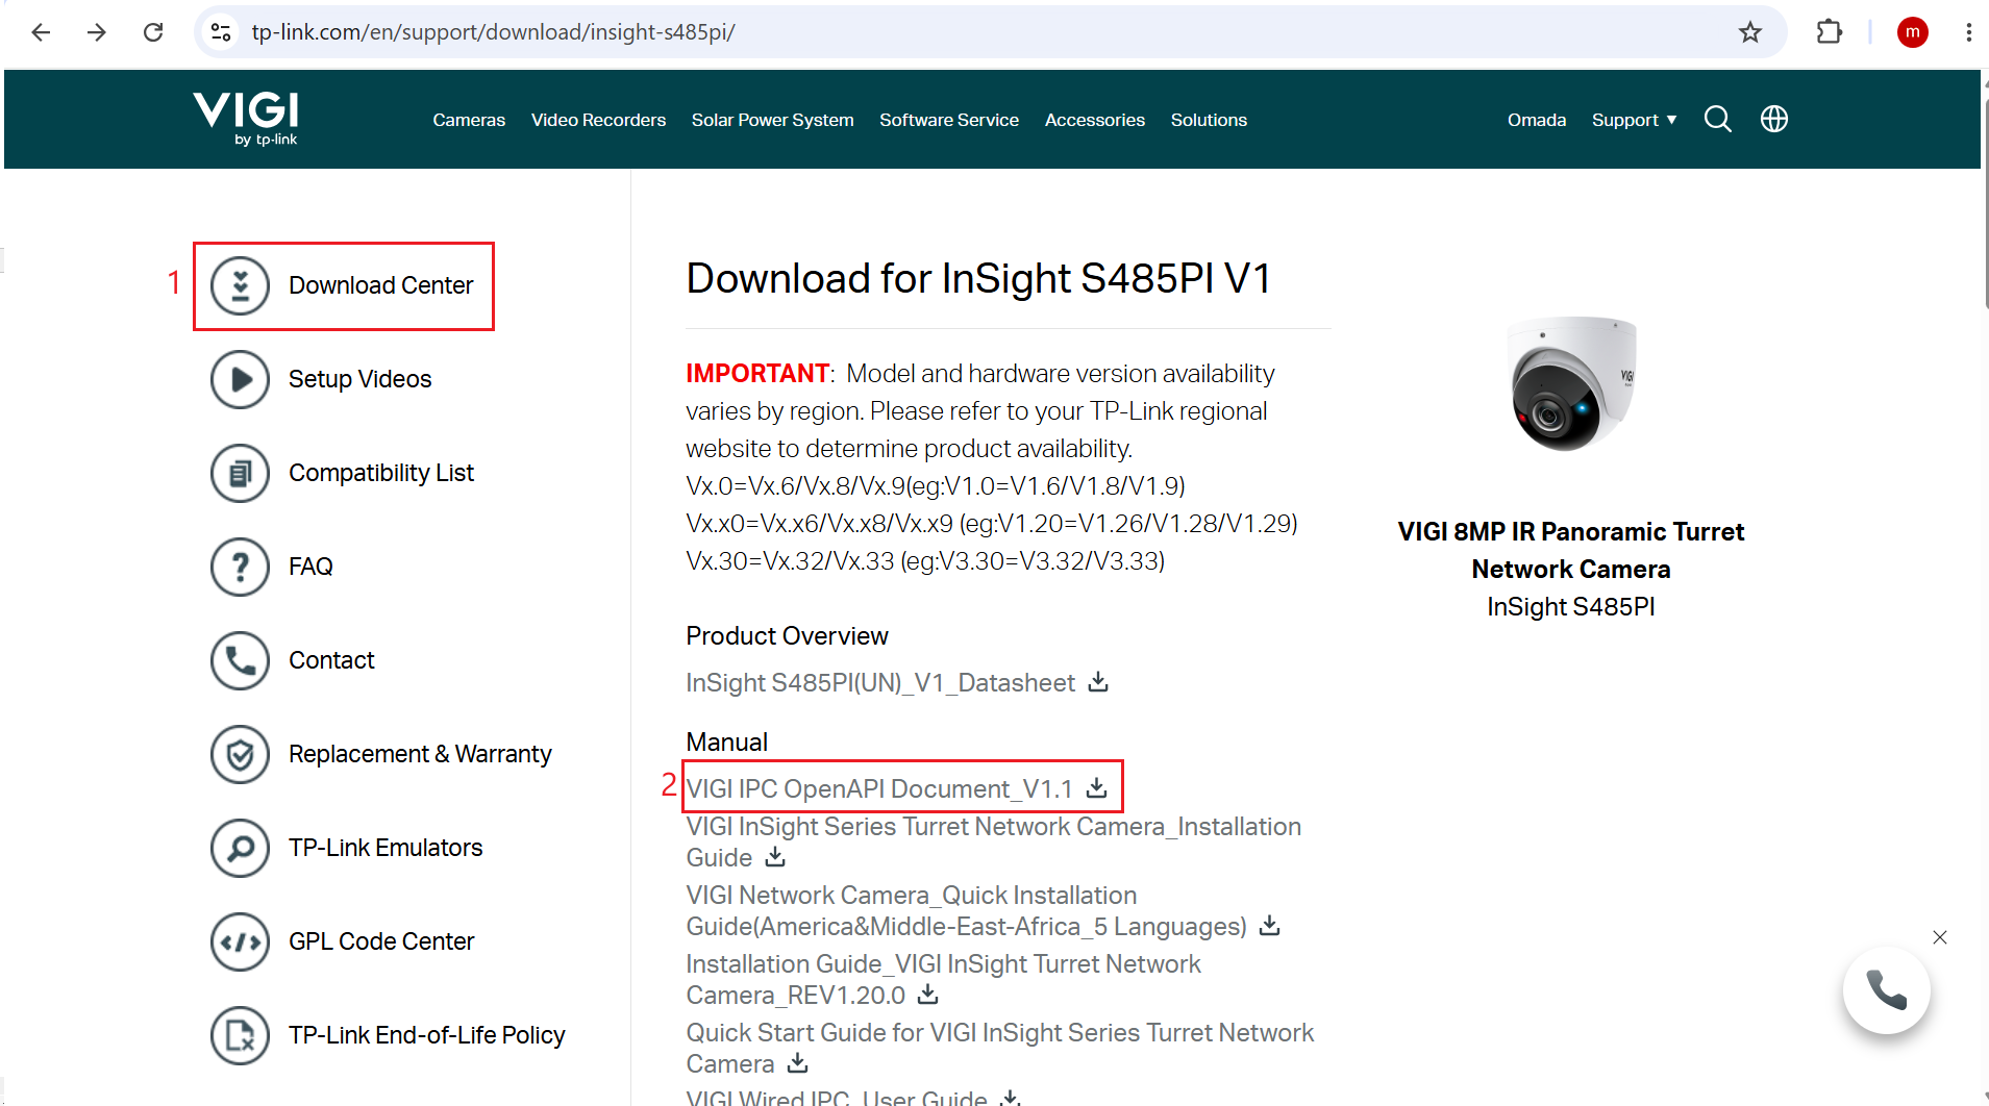
Get to know more details of each function and configuration please go to Download Center to download the manual of your product.
Więcej
Czy ten poradnik FAQ był pomocny?
Twoja opinia pozwoli nam udoskonalić tę stronę.



TP-Link Community
Still need help? Search for answers, ask questions, and get help from TP-Link experts and other users around the world.
z United States?
Uzyskaj produkty, wydarzenia i usługi przeznaczone dla Twojego regionu.