


How to manage EAPs in different VLANs using Omada Controller (Old UI)
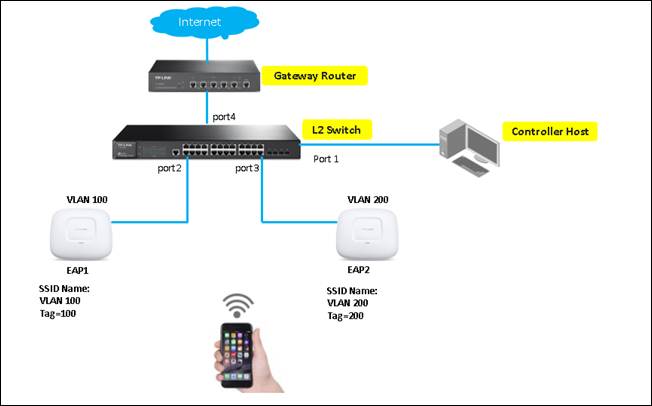
In the network topology below, we configured three VLANs on the L2 switch and EAPs. VLAN1 is the default vlan used for Internet access and management, EAP1 is in VLAN100 while EAP2 is in VLAN200.
Note: this article is not suitable for EAP330 & EAP 320.
This document will implement the requirement that EAP1 and EAP2 are in different VLANs, but can be managed by one EAP Controller via L2 switch.
Step 1. Configuration on L2 Switch
1.1 Change port mode as “General” for port 1-4 as shown below.
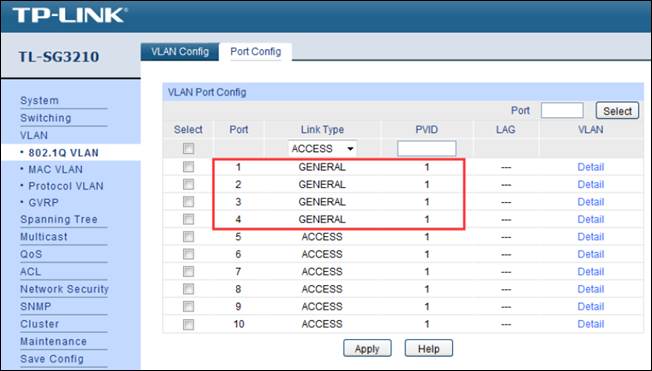
1.2 Create VLAN100, add port1, 2, 4. Create VLAN200, add port1,3 and 4.
Note: in VLAN 1, port 1-4 should be untagged; in VLAN 100, port 1, 4 should be untagged while port 2 should be tagged; in VLAN 200, port 1, 4 should be untagged while port 3 should be tagged.

Step2. Configurations on EAP/Omada controller.
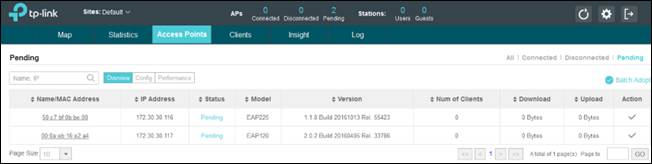
After step1, connect your EAP to switch according to the topology. Then EAP1 and EAP2 will be displayed in “pending” status.
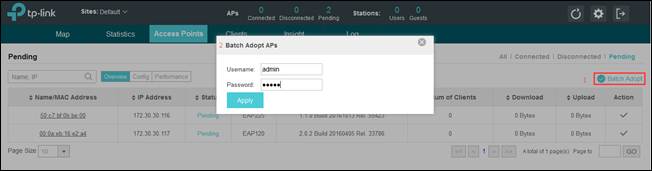
2.1 “Batch adopt” EAP 1 and EAP 2.
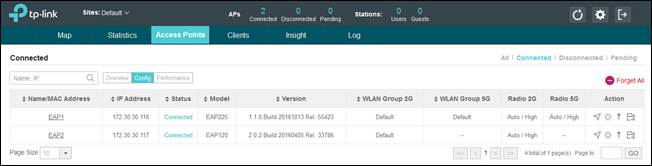
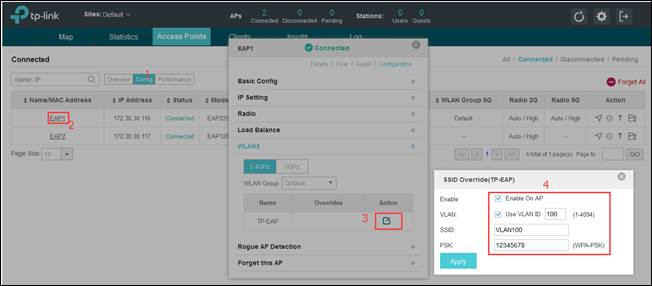
2.2 Configuration on EAP1, go to Config—WLANS—Actions, and Override SSID.
Create VLAN100 as the SSID name on EAP1, enable VLAN ID 100. Set up WPA-PSK password.
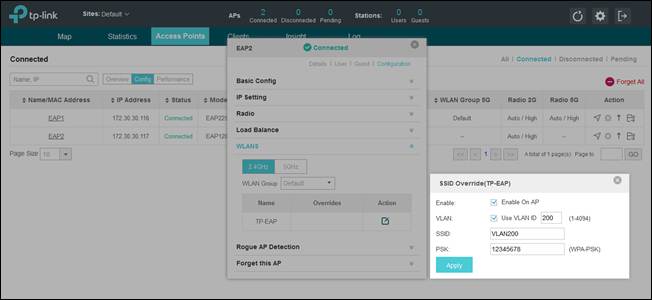
2.3 Configuration on EAP2 is similar.
Till now, we have finished all the settings on switch and on EAP. The wireless network of EAP1 is in VLAN100 while that of EAP2 is in VLAN200. EAP controller can manage EAP1 and EAP2 by VLAN1.
¿Es útil esta pregunta frecuente?
Sus comentarios nos ayudan a mejorar este sitio.
4.0-F_normal_20221110005047h.png)
4.0-F_normal_1593323206680k.png)