How to Use VIGI NVR OpenAPI Function
Contents
Complete the Digest Authentication and Obtain the access_token
Requirements
- VIGI NVR (The firmware requires support for openAPI)
- VIGI NVR Open API Document
- Laptop and Postman
Introduction
The VIGI NVR OpenAPI allows third-party software platforms to integrate with VIGI NVR through standardized NVR API interfaces. In this guide, you'll learn how to use the OpenAPI Document to authenticate with the NVR, obtain an access_token, and call API interfaces using Postman. This tutorial provides step-by-step instructions and example API requests to help developers integrate VIGI NVR with external management and application platforms.
Configuration
Complete the Digest Authentication and Obtain the access_token
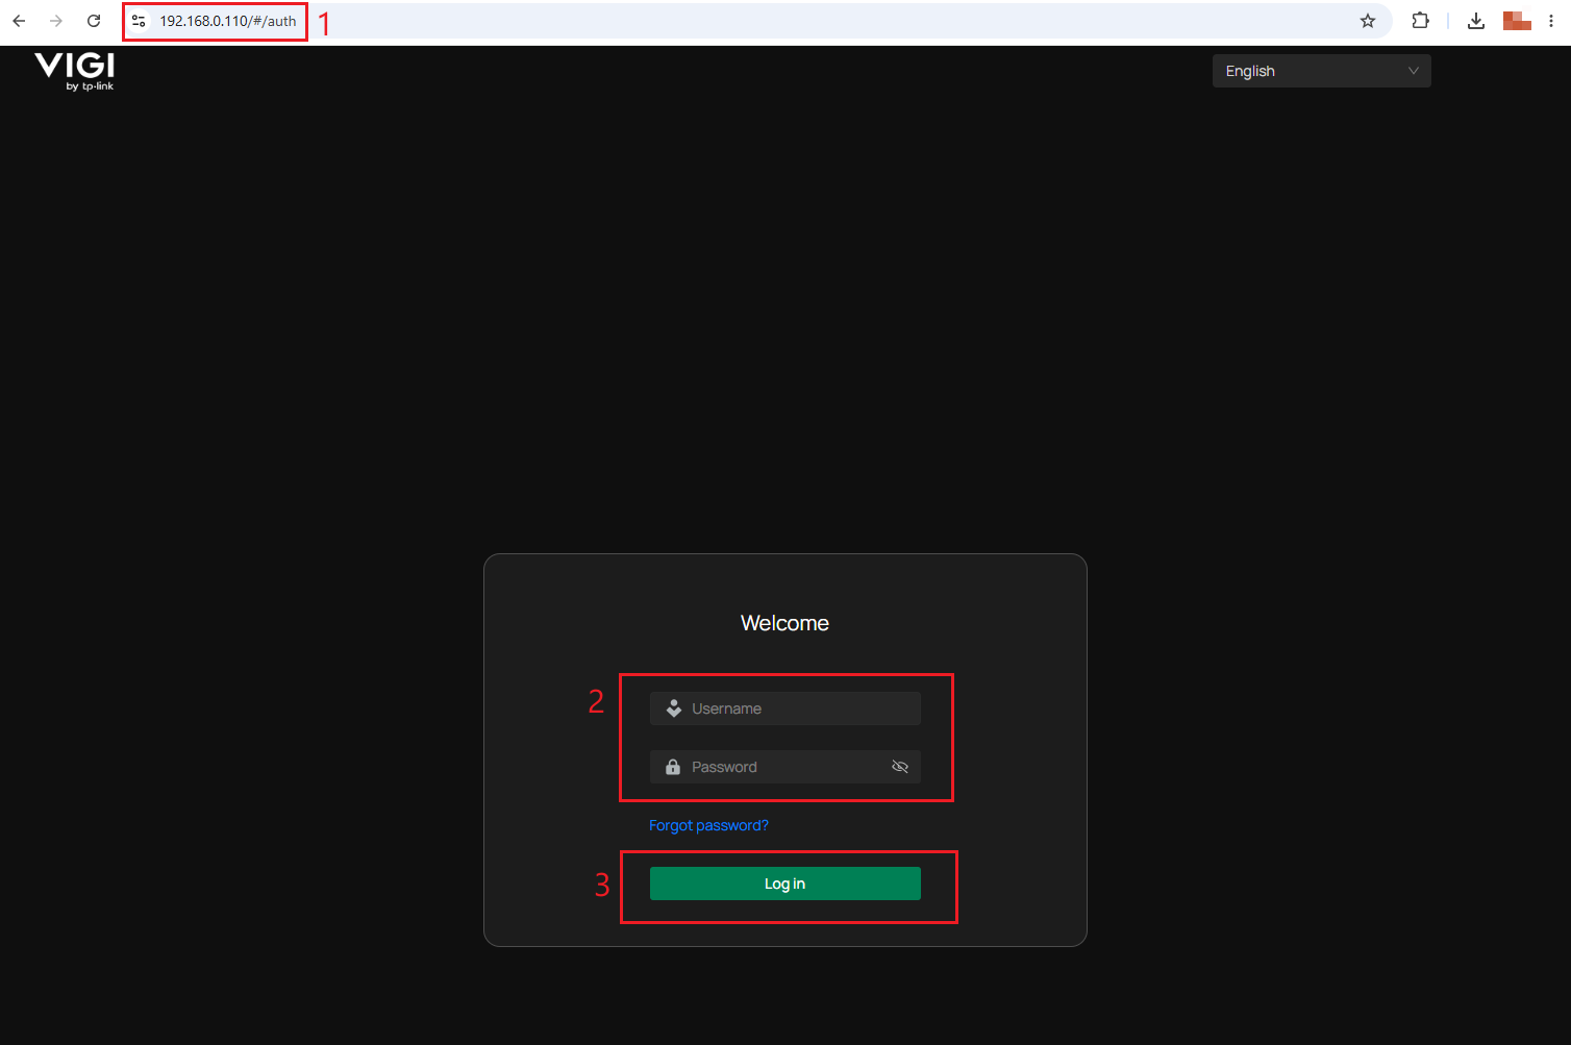
Step 1. Log in NVR’s web interface with its’ IP address. Enter the Username and Password, click Log in.
Step 2. Navigate to Settings > Network > Openapi. Enable OpenAPI function.
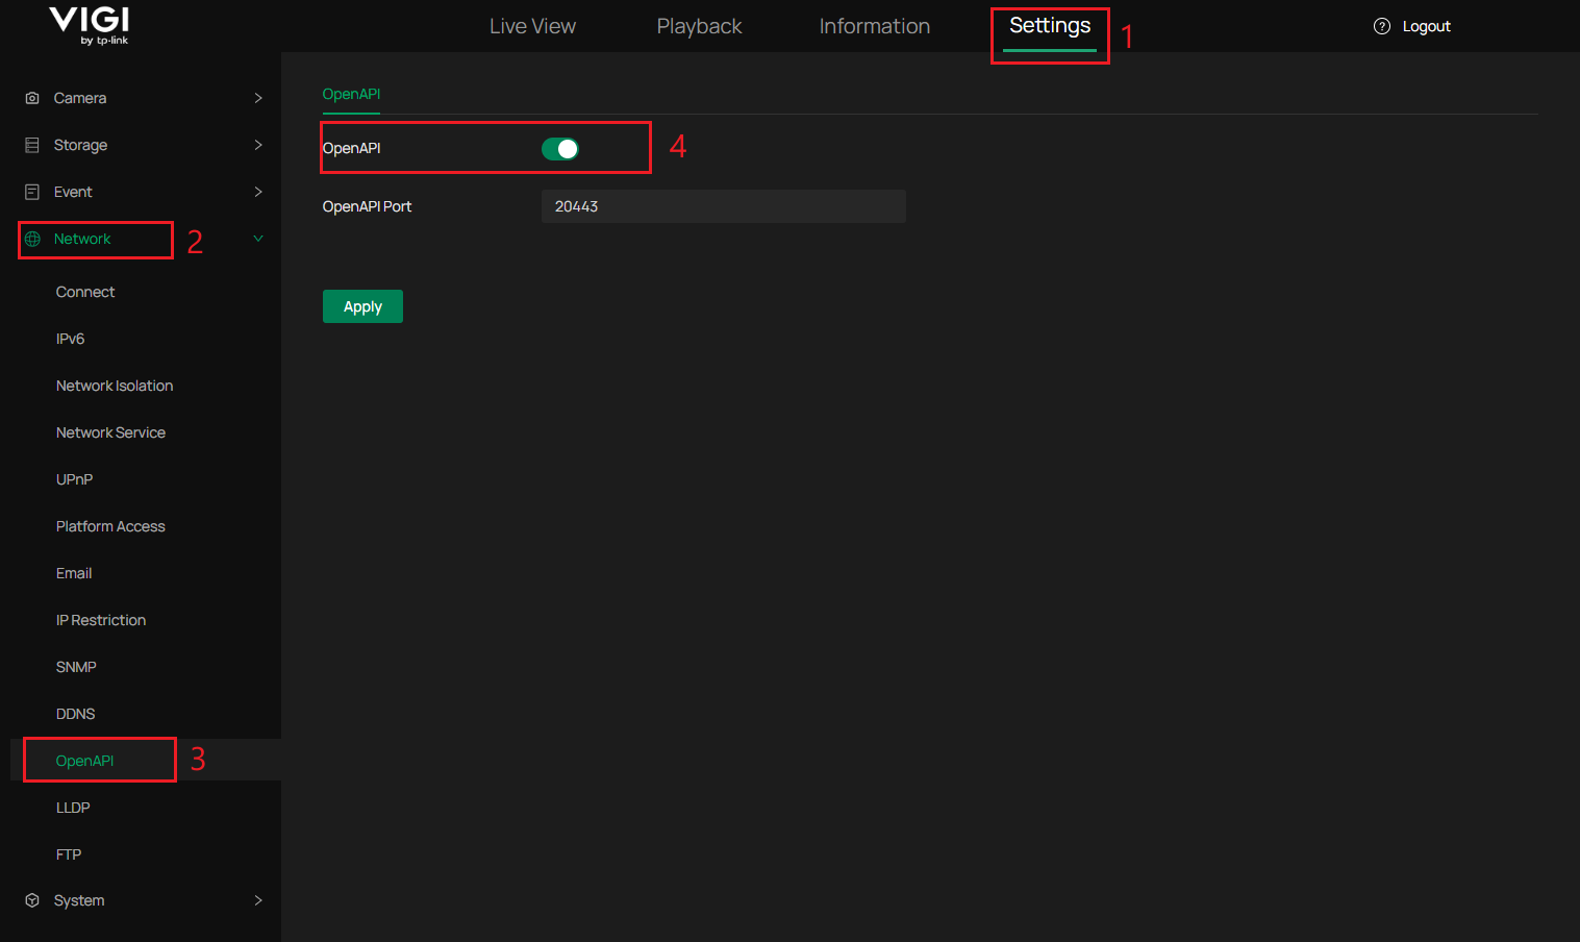
Notes: The default OpenAPI port is 20443. If you modify the port or configure port forwarding for remote access, ensure that the OpenAPI port at your request is updated to match the actual OpenAPI port in use.
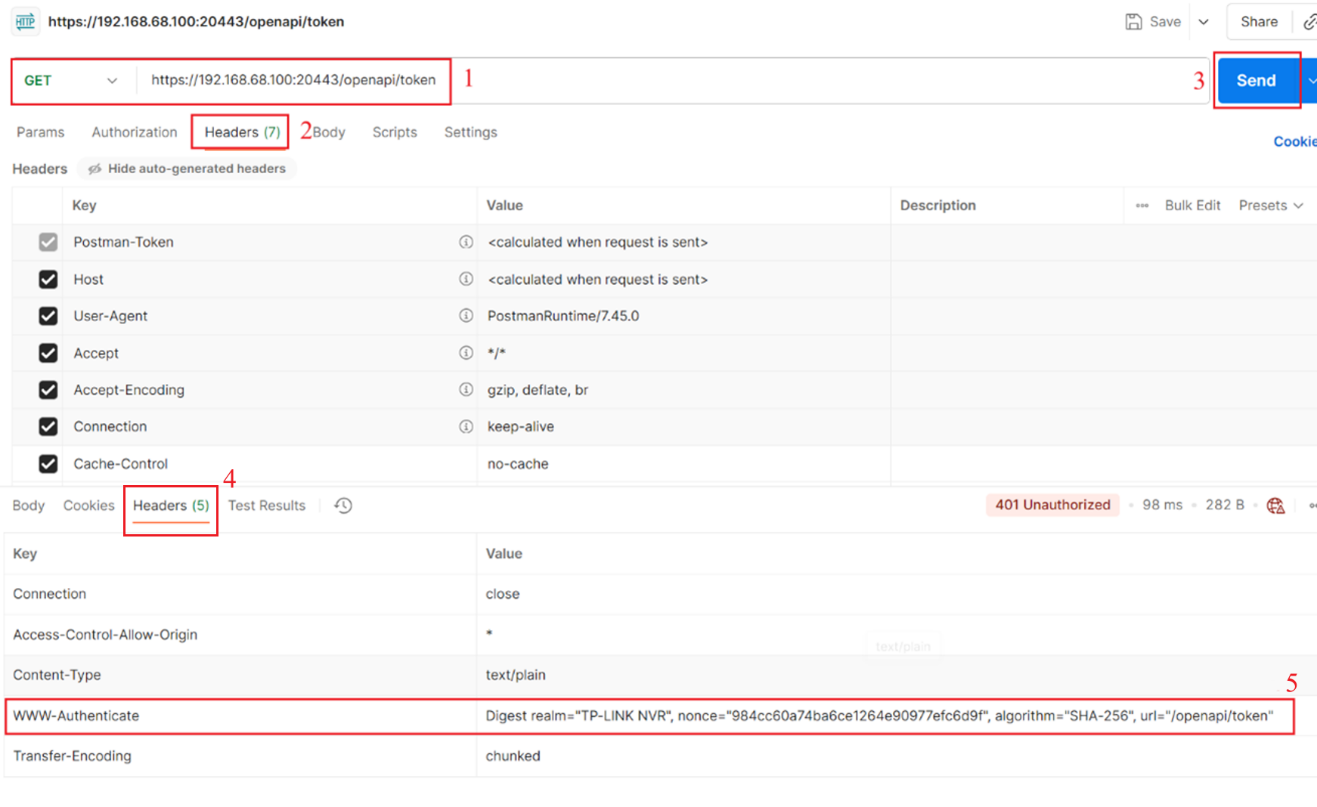
Step 3. Open Postman. Refer to the document, select the GET method and enter: https://192.168.68.100:20443/openapi/token. Send a No Auth request to obtain the nonce and other parameters from the response header.
Step 4. Referring to the document, calculate the response in the request header for Digest Authentication. The response is derived from the username, password and the authentication information returned by the NVR. If the NVR specifies SHA-256 as the algorithm, the calculation is performed as follows:
- A1 = SHA256(admin:realm:password)
- A2 = SHA256(method:url)
- response = SHA256(A1:nonce:A2)
Use the information obtained from the previous step’s response header together with the calculation method described above to generate the response.
Notes: For NVR OpenAPI authentication, the method value used to calculate A2 is GET.
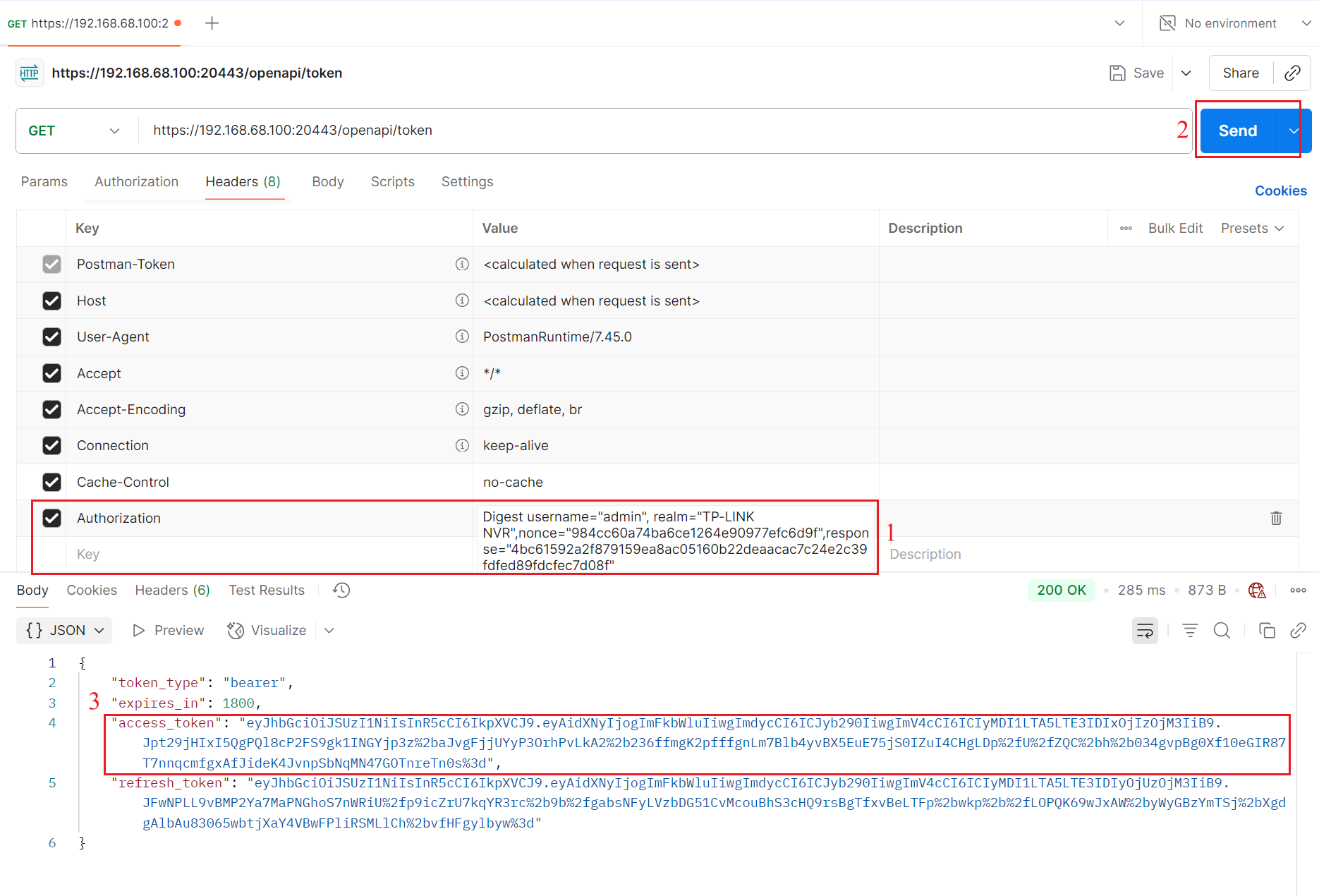
Step 5. Referring to the OpenAPI document. In the request header, add the Authorization, enter the value, which is Digest username="admin", nonce="", realm="TP-LINK NVR", response=" ". Click Send.
You will get the access_token.
Call API Interface
Step 1. The access_token is encoded by Percent-encoding as URL, remember decoding because Header Field needs origin string. You can decode it using online tools, for example: https://url-decode.com/.
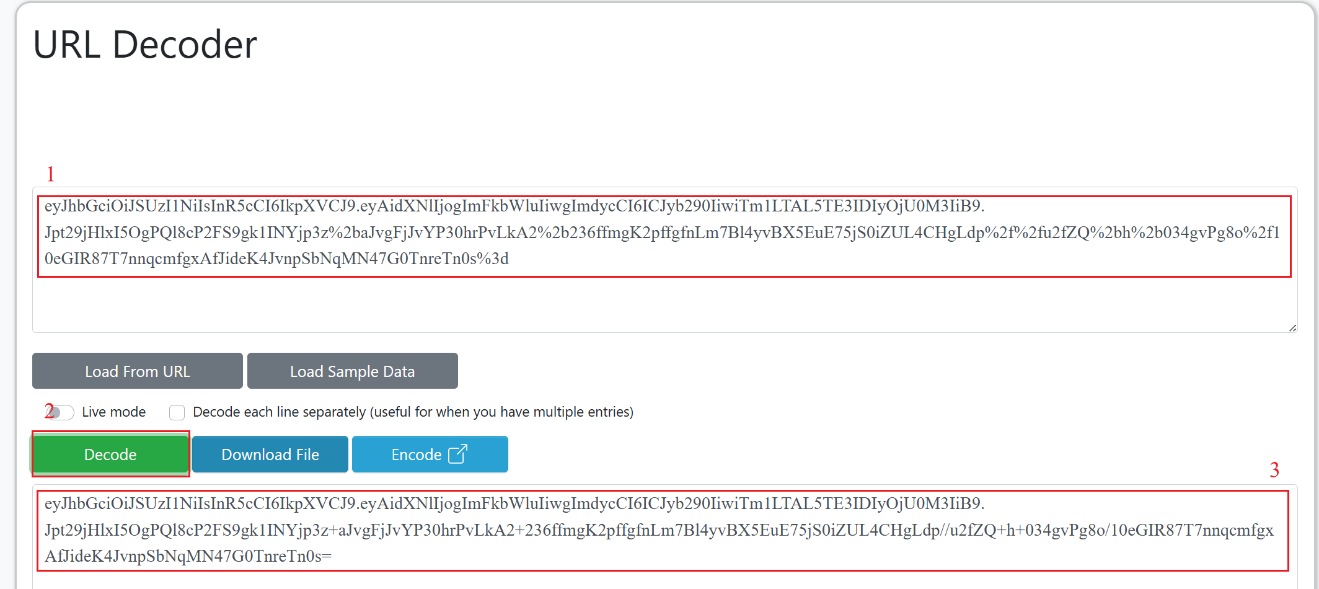
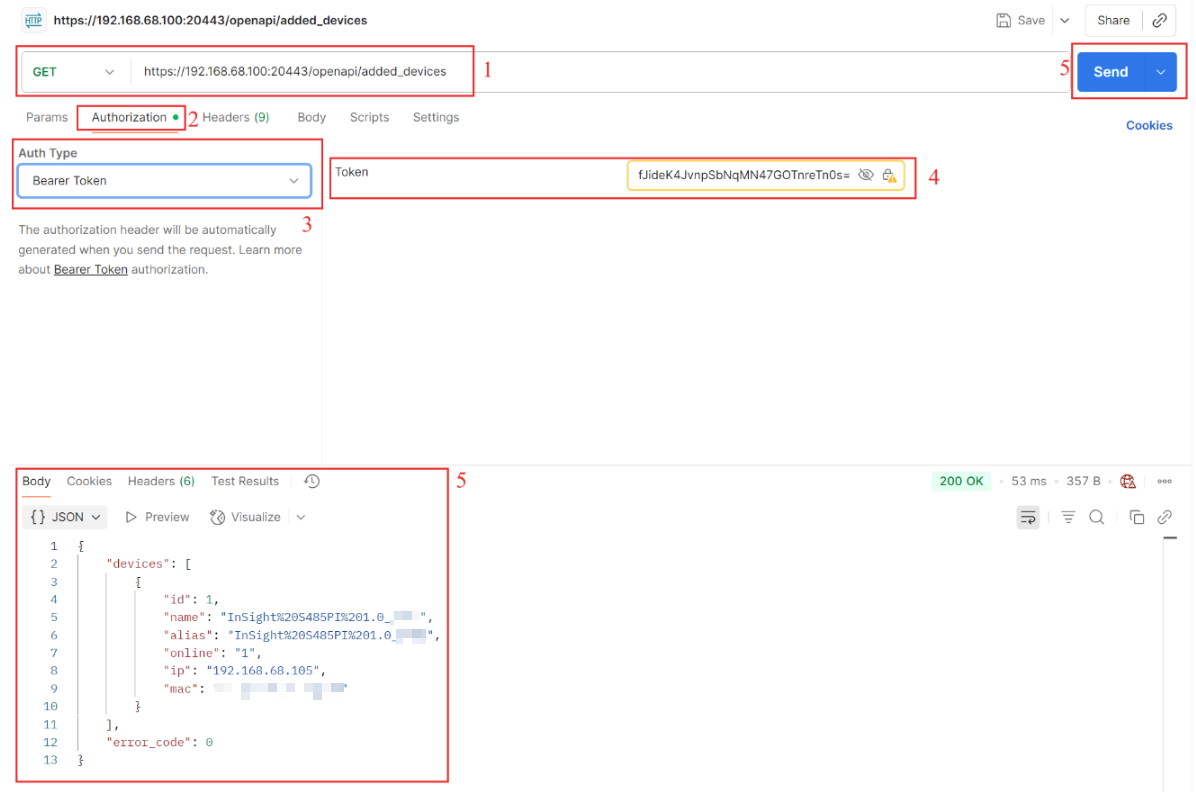
Step 2. In the Authorization, select Bearer Token, enter the decoded access_token. Referring to the document. Select the API method and enter the Request and Request Body (some API methods require a Body).
This document provides detailed instructions for calling some specific APIs, depending on whether a Request Body is included.
- added_devices. This API is used for getting added devices.
Referring to the OpenAPI document. Select the GET method, enter the request, click Send. The response body will contain the information of added devices.
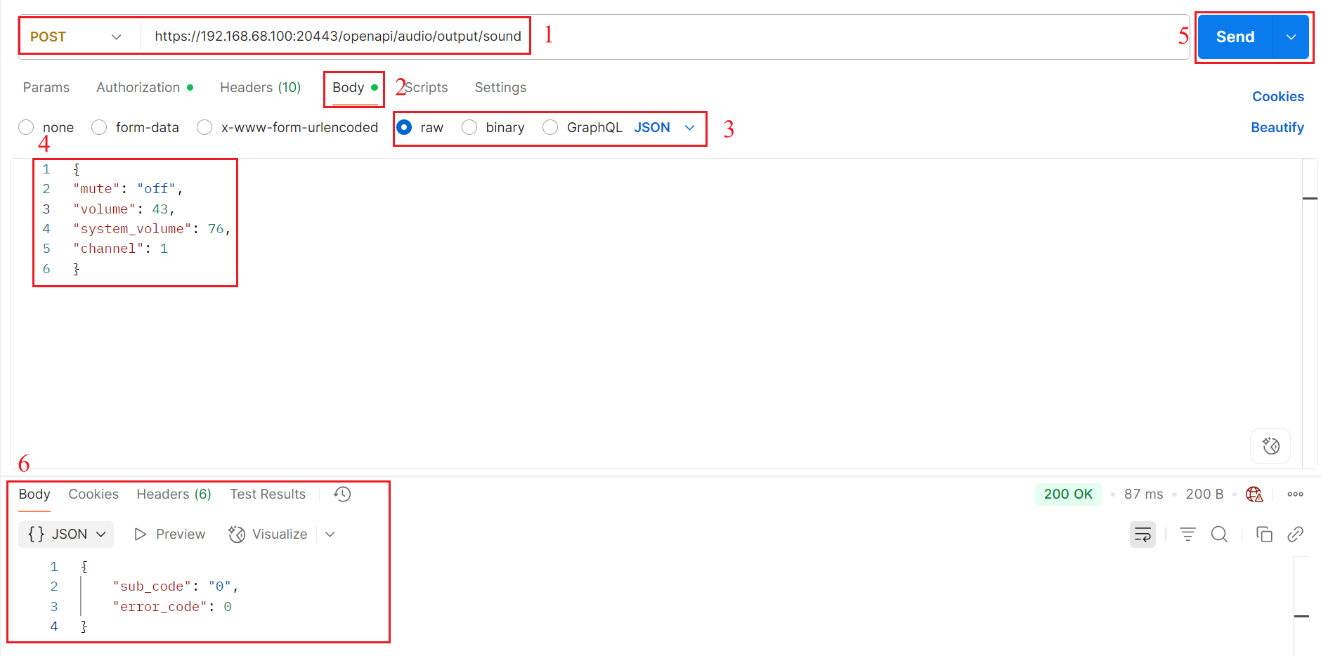
- sound. This API is used for setting output sound.
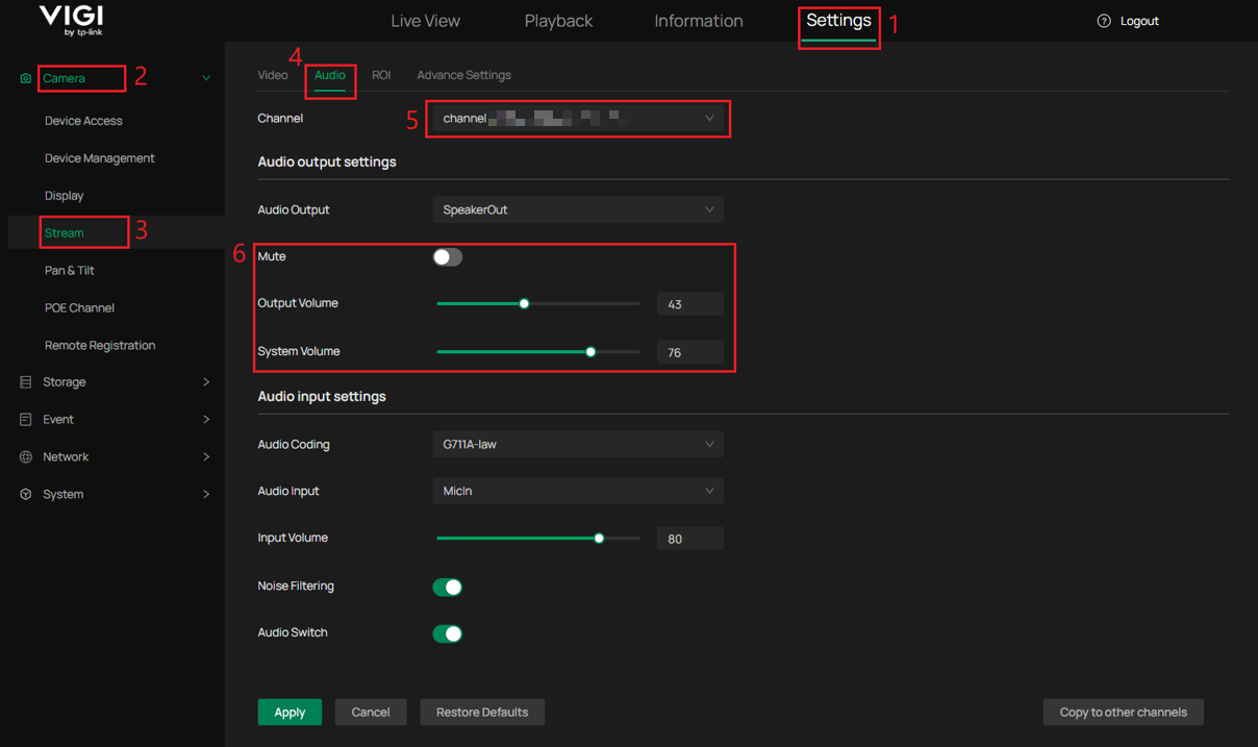
Referring to the OpenAPI document. Select the POST method, enter the request. In the Request Body, select raw and JSON format. Enter the Body ,turn off the mute function for the camera on Channel 1, set the camera volume to 43, and set the system volume to 76, then click Send.
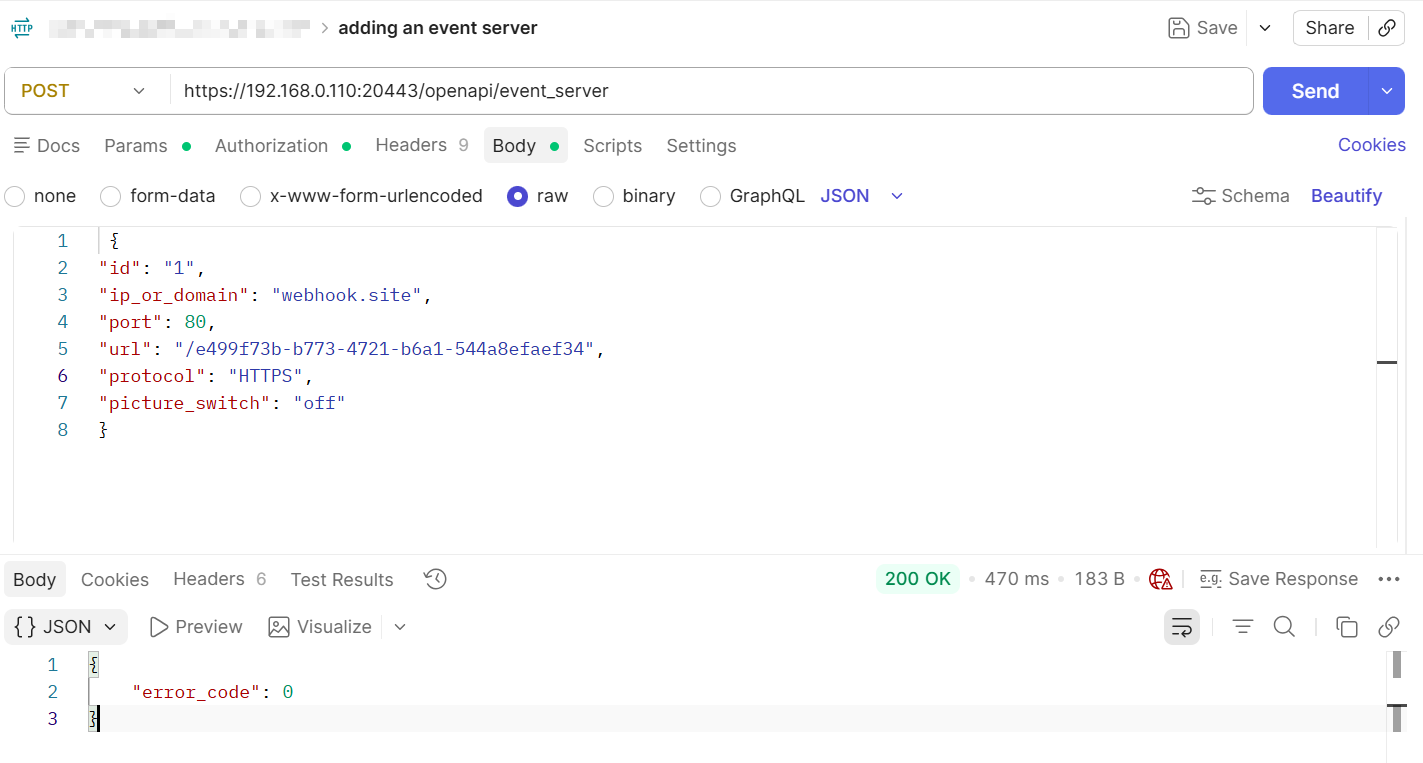
- Event server. This API is used for adding an event server.
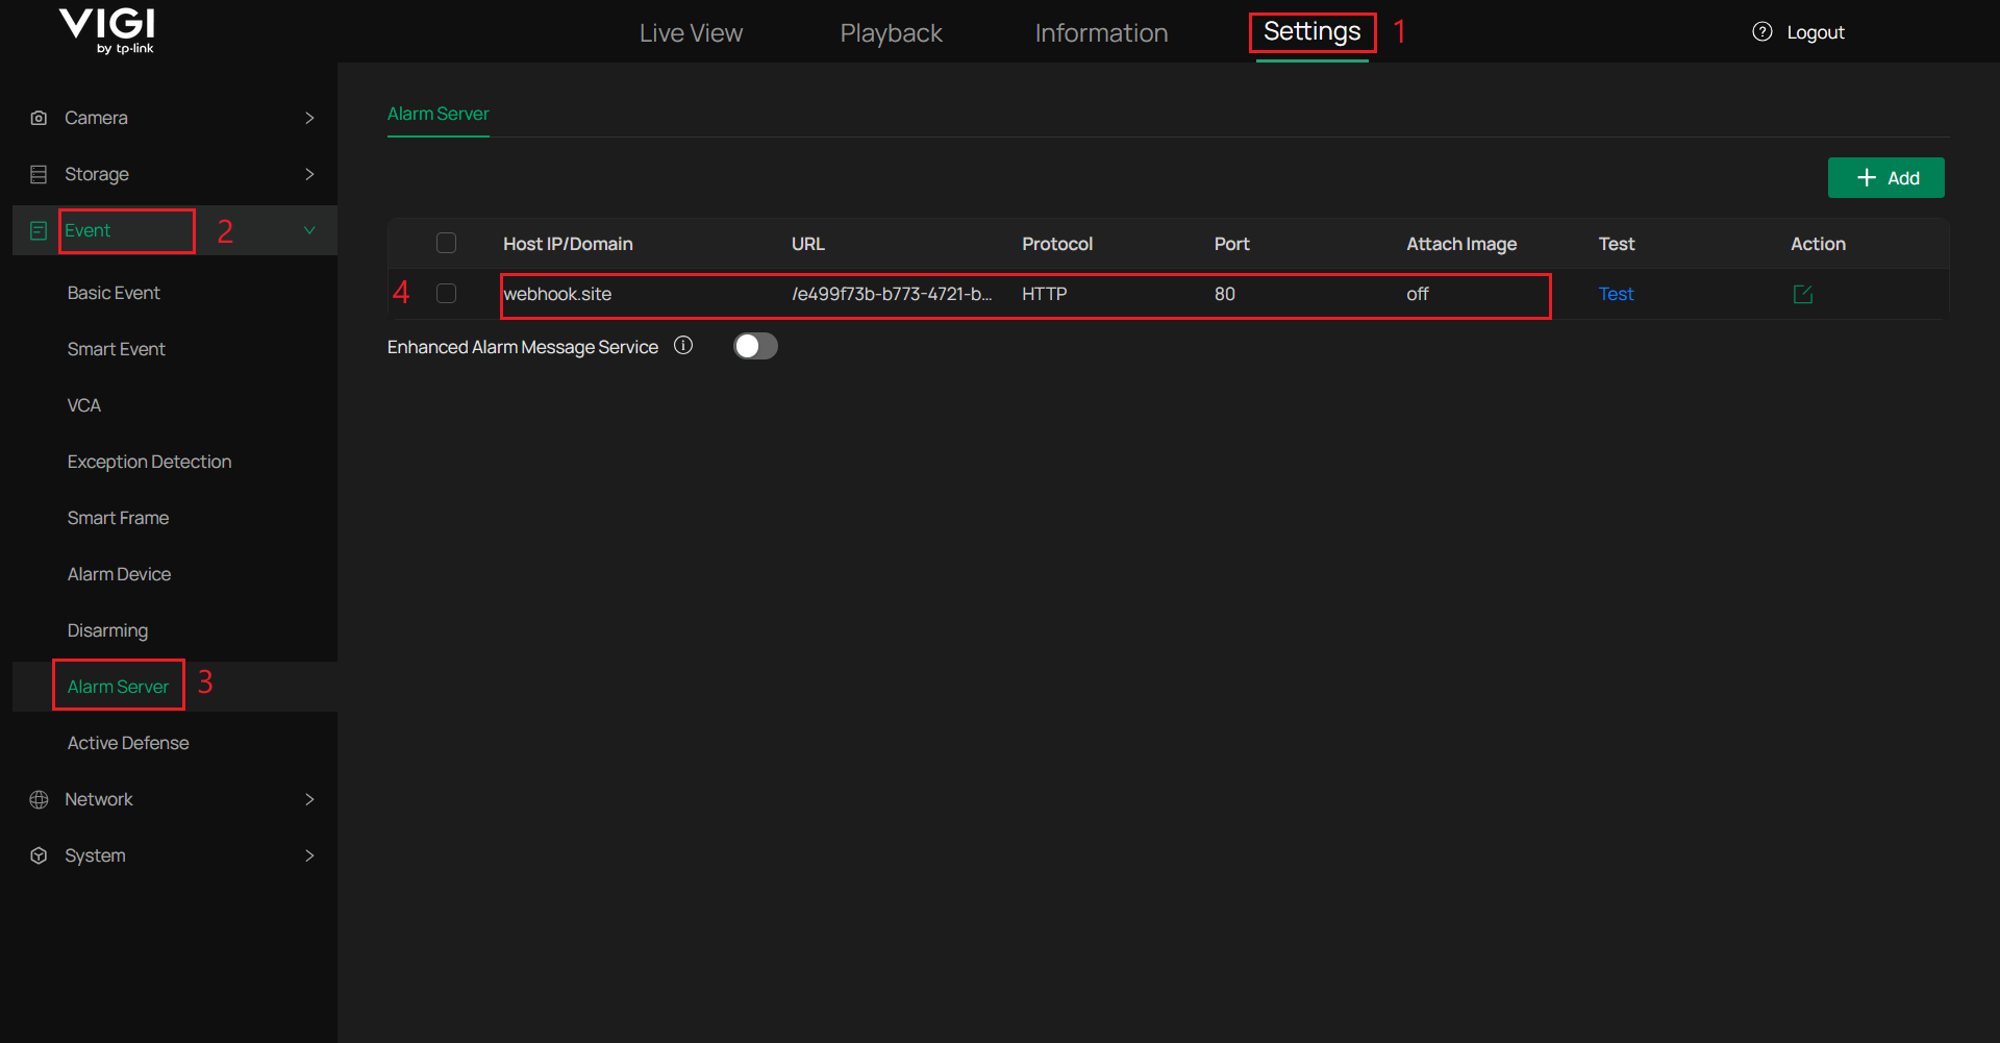
Referring to the OpenAPI document, select the POST method and enter the request URL. In the Request Body, select raw and JSON format, then enter the following example body to add an Alarm Server. This example uses webhook.site as the domain, port 80, HTTP protocol, the specified URL, and disables image attachment. Click Send. If the request is successful, error_code: 0 will be returned in the response body.
Notes: For more information about Alarm Server, refer to How to configure Alarm Server.
Verification
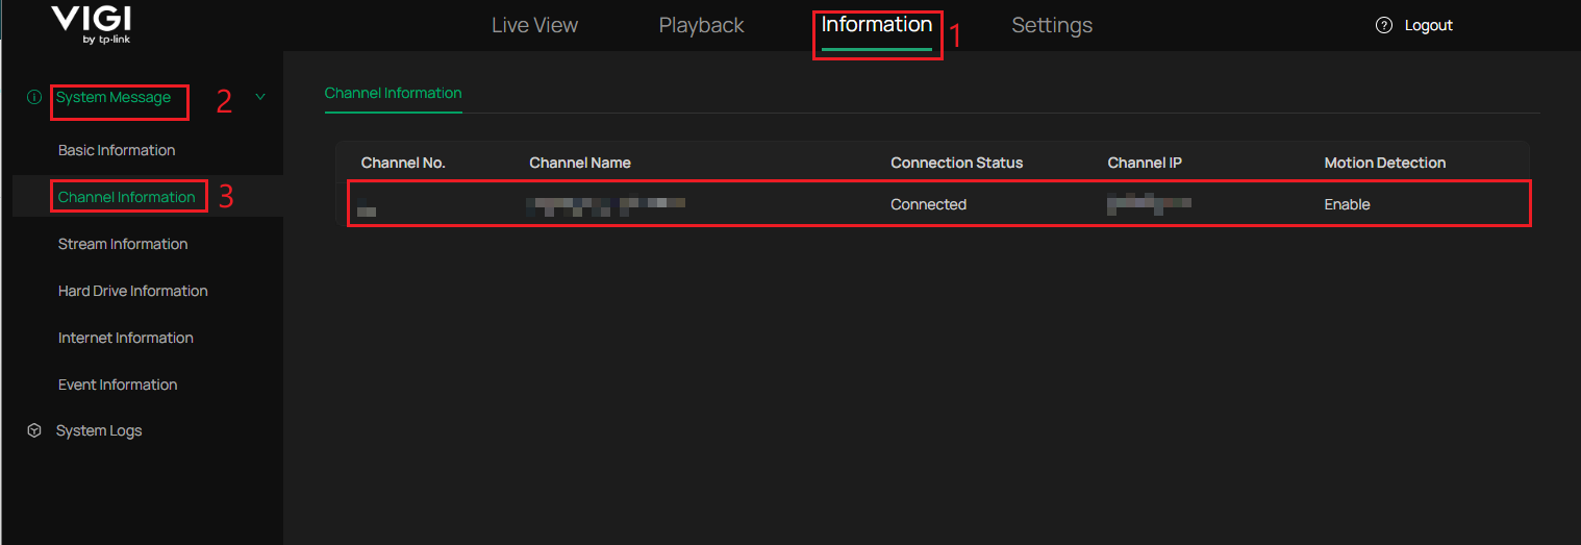
Step 1. Navigate to Information >System Message > Channel Information. Check the added camera’s information. Compare the device information in the returned Response Body to verify consistency.
Step 2. Navigate to Settings > Camera > Stream > Audio. Check that the mute function of the camera on Channel 1 is disabled, the camera volume is set to 43, and the system volume is set to 76.
Step 3. Navigate to Settings > Event > Alarm Server and check that the new Alarm Server with webhook.site has been added successfully.
Conclusion
You have successfully called the added_devices, sound, and event_server APIs using the VIGI NVR OpenAPI. These examples demonstrate how to retrieve device information, configure camera audio settings, and add an Alarm Server, and can serve as a reference for calling other API interfaces.
To learn more about each function and configuration, please visit Support Home to download or check the manual for your product.
Looking For More
¿Es útil esta pregunta frecuente?
Sus comentarios nos ayudan a mejorar este sitio.



TP-Link Community
Still need help? Search for answers, ask questions, and get help from TP-Link experts and other users around the world.