TL-WR702N에서 클라이언트 모드를 구성하는 방법
본 내용은 다음 항목에 적용됩니다:
참고 :이 FAQ는 펌웨어 버전이 130314 또는 이전 인 TL-WR702N에만 적합합니다. 130528 이상의 버전에는 적합하지 않습니다.
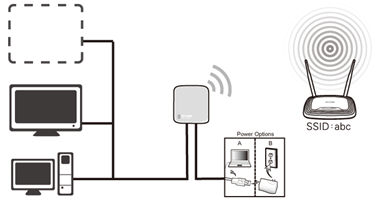
정의 : TL-WR702N은 이더넷 코어를 통해 다른 장치에 연결되며 무선 네트워크에서 무선 신호를 송수신하는 어댑터 역할을합니다.
응용 프로그램 : 이더넷 포트가있는 스마트 TV, 미디어 플레이어 또는 게임 콘솔의 경우. 702N을 사용하여 장치를 Wi-Fi 지원으로 설정하여 무선 네트워크에 대한 액세스 권한을 부여하십시오.
물리적 연결
1 단계:
이더넷 케이블을 사용하여 WR702N을 컴퓨터의 이더넷 포트에 직접 연결하십시오.
2 단계:
WR702N 전원 켜기
.jpg)
초기 컴퓨터 설정 - Windows 7, Vista 및 XP (Mac OS X의 경우 3 페이지로 이동하십시오)
1 단계:
Windows 7 및 Windows Vista : 시작 -> 제어판 -> 네트워크 및 공유 센터로 이동하십시오.
Windows XP: Go to Start -> Control Panel -> Network Connections
.png)
Step 2:
Windows 7: Go to Network and Sharing Center -> Change Adapter settings
Windows Vista: Go to Network and Sharing Center -> Manage Network Connections
Windows XP: (Go to Next Step)
.png)
Step 3:
Windows 7, Vista and XP: Right Click Local Area Connection ->Select Properties > Double Click Internet Protocol Version 4 (TCP/IPv4) or Internet Protocol (TCP/IP) forWindows XP.
.png)
Step 4:
Windows 7, Vista and XP: Select “Use the Following IP address:”
Type the following information:
1. IP address: 192.168.0.10
2. Subnet mask: 255.255.255.0
Click OK to exit
Click OK again to apply the settings.
.png) Windows 7, Vista & XP
|
Initial Computer Setup – For Mac OS X
Go to the Apple -> System Preferences -> Network -> Highlight Ethernet -> Configure IPv4: Using DHCP with manual address
Input the IPv4 Address: 192.168.0.10
Click Apply
.jpg)
Access the Management Page
Open a Web Browser > Type 192.168.0.254 in the address bar -> Press Enter
.jpg)
Enter the default User Name: admin
Enter the default Password: admin
Click OK
.jpg)
Run Quick Setup
Step 1:
Go to Quick Setup -> Click Next
.jpg)
Step 2:
Select Client -> Click Next

Step 3:
Click Survey
.png)
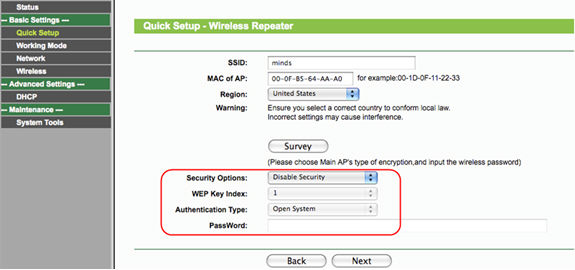
Locate your router network name under the SSID column -> Click Connect
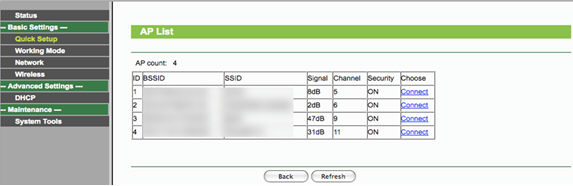
Security Options: (Please match Security Options with your existing router)
Please refer to Original Equipment Manufacturer for details
Password: (Please match Security Password with your existing router)
Step 4:
Click: Next
Step 5:
Click Reboot, and wait until it goes to 100%
.jpg)
Relocate the WR702N
You may now connect the WR702N directly into your Media Device, Game Console, Smart TV, Desktop Computer, or other devices that utilize an Ethernet port.
Congratulations! Your wired device is Wi-Fi enabled. It can connect to your wireless network without the Ethernet core.
Final Computer Reversion – For Windows 7, Vista & XP (For Mac OS X, please go to page 8)
Step 1:
Windows 7 & Windows Vista: Go to Start -> Control Panel -> Network and Sharing Center
Windows XP: Go to Start -> Control Panel -> Network Connections
Step 2:
Windows 7: Go to Network and Sharing Center > Change Adapter settings
Windows Vista: Go to Network and Sharing Center > Manage Network Connections
Windows XP: (Go to Next Step)
Step 3:
Windows 7, Vista and XP: Right Click Local Area Connection ->Select Properties -> Double Click Internet Protocol Version 4 (TCP/IPv4) or Internet Protocol (TCP/IP) forWindows XP.
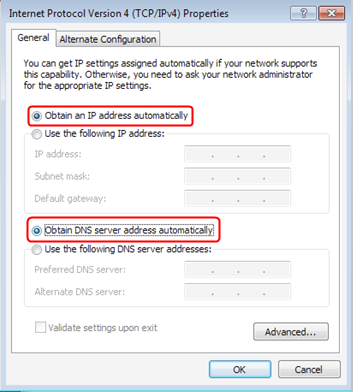
Step 4:
Windows 7, Vista and XP: Select “Obtain an IP address automatically” and “Obtain DNS server address automatically”
Click OK to exit
Click OK again to apply the settings.
 Windows 7, Vista & XP
|
Final Computer Reversion – For Mac OS X
Go to the Apple -> System Preferences -> Network -> Highlight Ethernet -> Configure IPv4: Using DHCP
Click Apply
If it doesn't work, please feel free to contact us(support@tp-link.com).
Get to know more details of each function and configuration please go to Download Center to download the manual of your product.
해당 FAQ가 유용했나요?
여러분의 의견은 사이트 개선을 위해 소중하게 사용됩니다.