Archer MR200 V4 User Guide
- About This Guide
- Chapter 1 Get to Know Your 4G LTE Router
- Chapter 2 Connect the Hardware
- Chapter 3 Log In to Your 4G LTE Router
- Chapter 4 Set Up Internet Connections
- Chapter 5 QoS
- Chapter 6 Network Security
- Chapter 7 Parental Controls
- Chapter 8 SMS
- Chapter 9 Guest Network
- Chapter 10 NAT Forwarding
- Chapter 11 Specify Your Network Settings
- Chapter 12 Administrate Your Network
- FAQ
- Authentication
Chapter 6 Network Security
This chapter guides you on how to protect your home network from cyber attacks and unauthorized users by implementing these three network security functions. You can protect your home network against DoS (Denial of Service) attacks from flooding your network with server requests using DoS Protection, block or allow specific client devices to access your network using Access Control, or you can prevent ARP spoofing and ARP attacks using IP & MAC Binding.
1. Protect the Network from Cyber Attacks
The SPI Firewall can prevent cyber attacks and validate the traffic that is passing through the router based on the protocol. This function is enabled by default, and it’s recommended to keep the default settings.
DoS Protection can protect your home network against DoS attacks from flooding your network with server requests.
Follow the steps below to configure Firewall and DoS Protection.
1.Visit http://tplinkmodem.net, and log in with the password you set for the router.
2.Go to Advanced > Security > Firewall & DoS Protection.
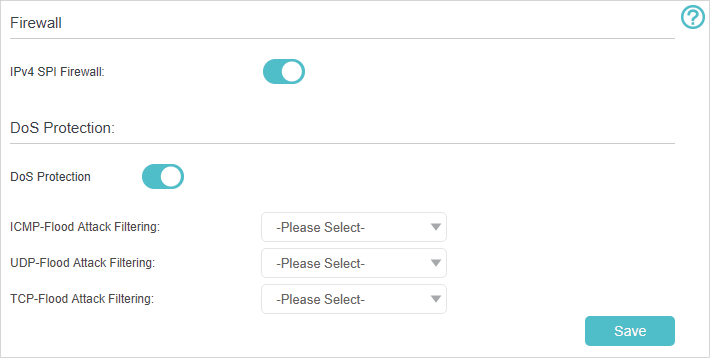
3.Enable IPv4 SPI Firewall.
4.Enable DoS Protection.
 Note: DoS protection and Traffic Statistics must be enabled at the same time. To enable Traffic Statistics, go to System > Traffic Monitor and toggle on Traffic Monitor.
5.Set the level (Low, Middle or High) of protection for ICMP-FLOOD Attack Filtering, UDP-FlOOD Attack Filtering and TCP-FLOOD Attack Filtering.
•ICMP-FLOOD Attack Filtering - Enable to prevent the ICMP (Internet Control Message Protocol) flood attack.
•UDP-FlOOD Attack Filtering - Enable to prevent the UDP (User Datagram Protocol) flood attack.
•TCP-FLOOD Attack Filtering - Enable to prevent the TCP-SYN (Transmission Control Protocol-Synchronize) flood attack.
 Tips:
Tips:
The level of protection is based on the number of traffic packets. The protection will be triggered immediately when the number of packets exceeds the preset threshold value (the value can be set on Dos Protection Level Settings section of the same page), and the vicious host will be displayed in the Blocked DoS Host List.
6.Click Save.
With Service Filtering, you can prevent certain users from accessing the specified service, even block Internet access completely.
1.Visit http://tplinkmodem.net, and log in with the password you set for the router.
2.Go to Advanced > Wireless > Service Filtering and enable Service Filtering.
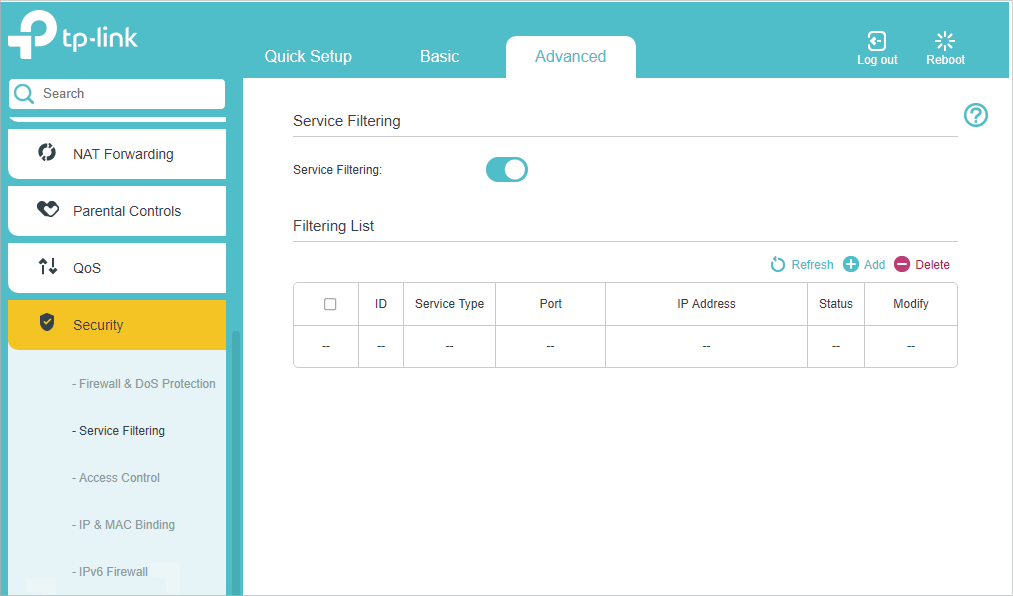
3.Click Add.
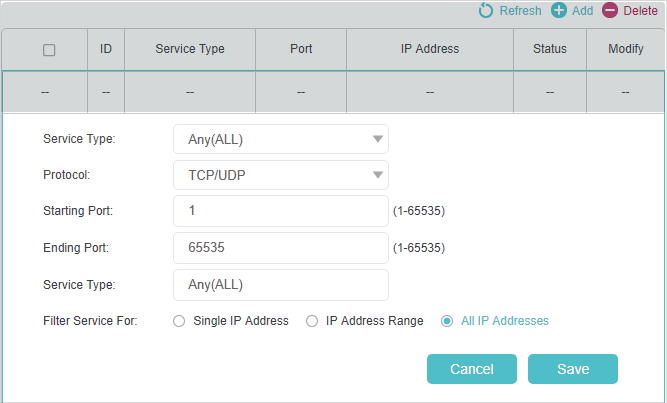
4.Select a service type from the drop-down list and the following four fields will be auto-populated. Select Custom when your desired service type is not listed, and enter the information manually.
5.Specify the IP address(es) that this filtering rule will apply to.
6.Click Save.
Access Control is used to block or allow specific client devices to access your network (via wired or wireless) based on a list of blocked devices (Blacklist) or a list of allowed devices (Whitelist).
I want to:
Block or allow specific client devices to access my network (via wired or wireless)
How can I do that?
1.Visit http://tplinkmodem.net, and log in with the password you set for the router.
2.Go to Advanced > Security > Access Control and enable Access Control.
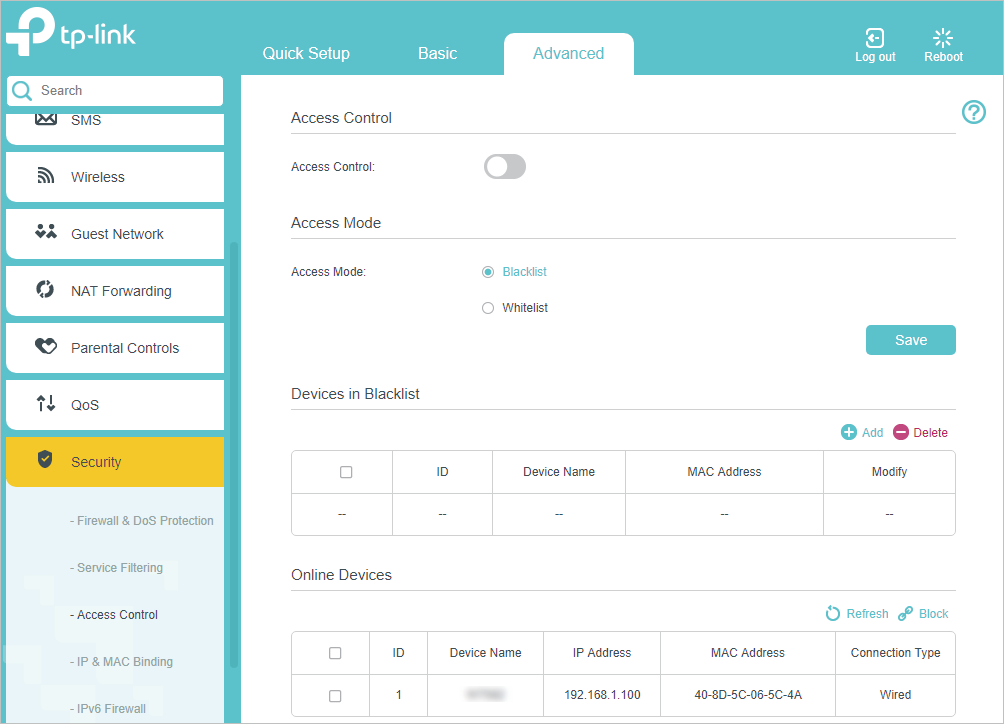
3.Select the access mode to either block (recommended) or allow the device(s) in the list.
To block specific device(s)
1 )Select Blacklist and click Save.
2 )Select the device(s) to be blocked in the Online Devices table.
3 )Click Block above the Online Devices table. The selected devices will be added to Devices in Blacklist automatically.
To allow specific device(s)
1 )Select Whitelist and click Save.
2 )Click Add.
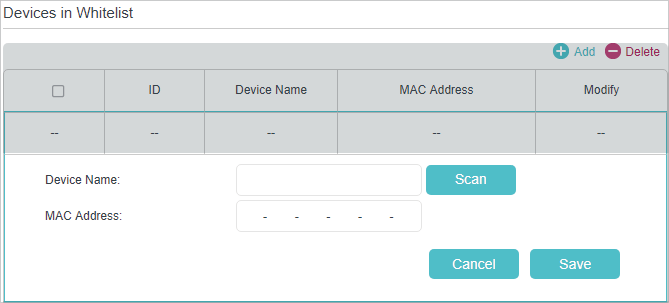
3 )Enter the Device Name and MAC Address (You can copy and paste the information from Online Devices table if the device is connected to your network).
4 )Click Save.
Done!
Now you can block or allow specific client devices to access your network (via wired or wireless) using the Blacklist or Whitelist.
IP & MAC Binding, namely, ARP (Address Resolution Protocol) Binding, is used to bind network device’s IP address to its MAC address. This will prevent ARP spoofing and other ARP attacks by denying network access to a device with matching IP address in the Binding list, but unrecognized MAC address.
I want to:
Prevent ARP spoofing and other ARP attacks.
How can I do that?
1.Visit http://tplinkmodem.net, and log in with the password you set for the router.
2.Go to Advanced > Security > IP & MAC Binding and enable IP & MAC Binding.
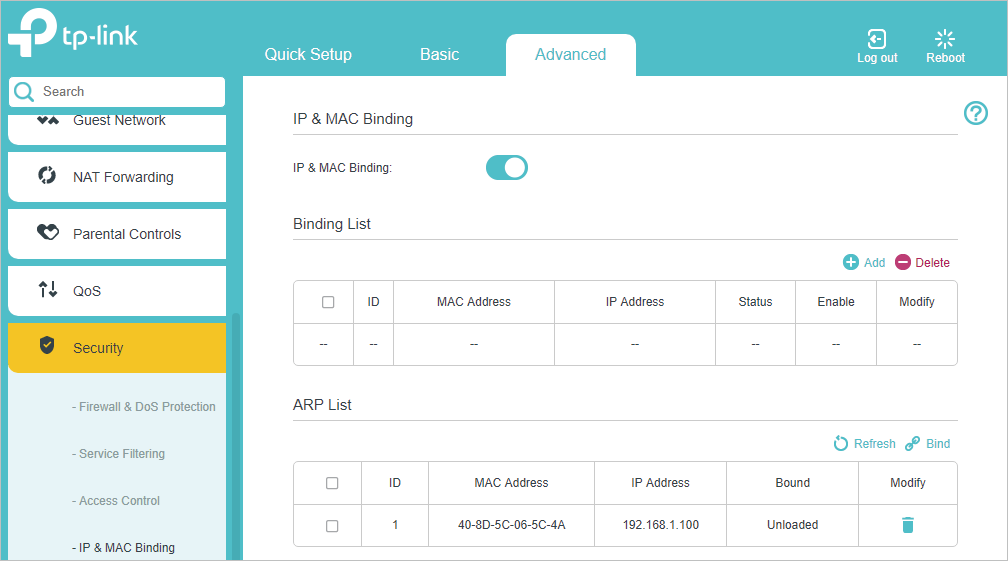
3.Bind your device(s) according to your needs.
To bind the connected device(s)
1 )Select the device(s) to be bound in the ARP List.
2 )Click Bind to add to the Binding List.
To bind the unconnected device
1 )Click Add.
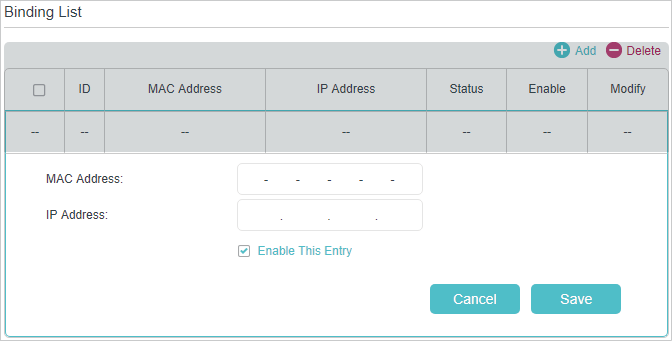
2 )Enter the MAC address and IP address that you want to bind.
3 )Select the checkbox to enable the entry and click Save.
Done!
Now you don’t need to worry about ARP spoofing and other ARP attacks.