How to Set Up a Dynamic DNS Service Account on the AC VDSL/ADSL Modem Router
Most ISPs (Internet service providers) assign a dynamic IP address to the router and you can use this IP address to access your router remotely. However, the IP address can change any time and you don’t know when it changes. In this case, you might need the DDNS (Dynamic Domain Name Server) feature on the router to allow you and your friends to access your router and local servers (FTP, HTTP, etc.) using domain name, in no need of checking and remembering the IP address.
Note: DDNS does not work if the ISP assigns a private WAN IP address (such as 192.168.1.x) to the modem router.
Follow the steps below.
Note: Archer VR2600 is used for demonstration in this article.
Step 1
Please refer to How to log into the web-based interface of the AC VDSL/ADSL Modem Router?
Step 2
Go to Advanced > Network> Dynamic DNS.
Step 3
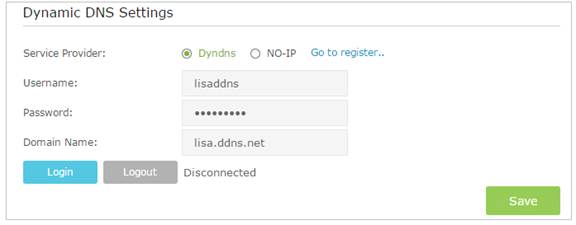
Select the DDNS service provider (Dyndns or NO-IP). If you don’t have a DDNS account, select a service provider and click Go to register.

Step 4
Enter the username, password and domain name of the account (such as lisa.ddns.
net).
Step 5
Click Login and Save.
Tips: If you want to use a new DDNS account, please Logout first, then login with the new account.
Get to know more details of each function and configuration please go to Download Center to download the manual of your product.
Is this faq useful?
Your feedback helps improve this site.
TP-Link Community
Still need help? Search for answers, ask questions, and get help from TP-Link experts and other users around the world.


