


How to adjust orientation of outdoor AP for better signal coverage
Different from SOHO wireless router, outdoor AP mainly aims at long distance transmission. Improper position or angle deviation would be enlarged in remote side. As a result, wireless clients obtain weak signal even no SSID. Therefore, when using outdoor AP an alignment procedure is needed.
Introduction of directional antenna on outdoor AP
Usually TP-Link outdoor access point products are equipped with build-in directional antennas, except WBS510 & WBS210. A directional antenna focuses all its gains on specific directions for increased performance. Take CPE210 for example, energy of antenna concentrates on the front panel with horizontal 65° and vertical 35° like this:
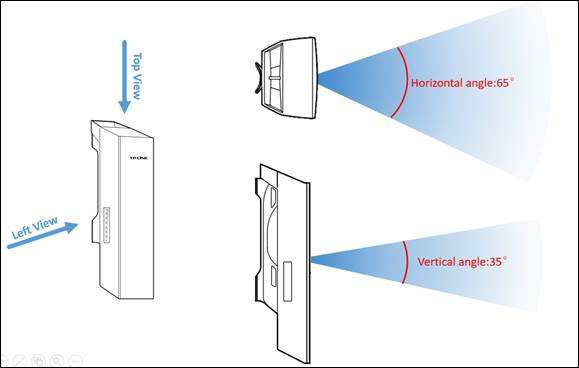
Position under coverage is able to get good signal. This can also be imagined as a flashlight for better understanding. And we use the phrase Beam Width to describe the approximate coverage angle. Beam width parameter is available on SPEC of AP/antenna products:

Note: Generally H-Plane is for Horizontal and E-Plane for Vertical on TP-Link outdoor APs.
Notes relevant to coverage angle during deployment
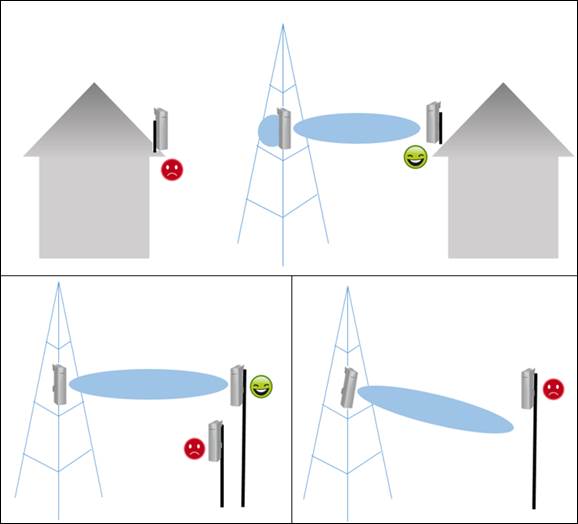
First of all, Repeater/Bridge mode is not recommended on outdoor Aps, because in the backside of device, signal strength is weak.
Besides, keep the clients at the same height with root AP and do not deviate from AP’s front panel as far as possible. Refer to below cases for comprehension:
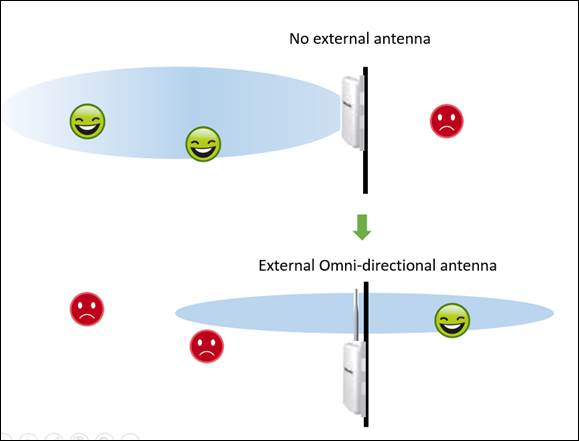
Last but not least, adding an Omni-directional antenna doesn’t mean that clients could get better signal strength than before. Since energy is finite, wider angle on horizontal leads to narrower vertical beam width and shorter distance.
Antenna Alignment
As adjustment of position and orientation on outdoor AP are so important, this part will introduce process of antenna alignment in real field deployment.
Root AP side
1. After software configuration, mount the AP/Antenna high enough to avoid 1st Fresnel zone clearance and record the height value. About Fresnel zone refer to FAQ-907.
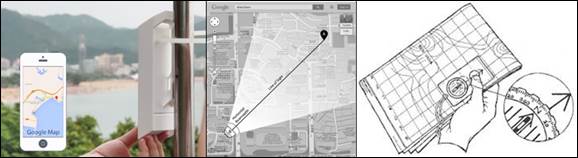
2. Adjust the front panel to face Client’s direction with help of tools like Map, GPS, Compass or Telescope.
3. Have the device placed strictly vertical and fixed it with attached ribbon. A plumb line could help.
Remote Client side
1. Coarse turning with directing tools like in AP side to locate the remote AP/Antenna then turn the client device towards that direction.
2. Mount the Client/Antenna in the same height to find the signal and connect to root AP/Antenna.
3. After connected, there are two ways to adjust the Client/Antenna.
a) Adjust the direction of Client/Antenna until the device reaches the best signal strength. Refer to the RSSI or Signal Strength value on different model.

Antenna Alignment function is available in Repeater/Client/AP Client Router mode on TL-WA5210G/TL-WA7510N and in Repeater/Bridge/Client/AP Client Router mode on TL-WA7210N.
b) Adjust the direction of Client/Antenna, observe the LEDs on device until it gets the best signal strength. The more LEDs indicates better signal strength.
This method is more practical if you are adjusting the Client device alone. Especially on Pharos series’ Web-UI you can setup RSSI LED thresholds while it’s hard to evaluate an accurate value.

4. At last fix the device vertically.
Is this faq useful?
Your feedback helps improve this site.
TP-Link Community
Still need help? Search for answers, ask questions, and get help from TP-Link experts and other users around the world.