Configuration of VMS Auto Snapshot
Contents
Configuration for Instant Snapshot
Configuration for Scheduled Snapshot
Recommended Deployment Scenarios for Auto Snapshot with Person Count Alert enabled
Objective
This article would show you how to setup Auto Snapshot on VIGI VMS with supported IP cameras.
Requirements
- VIGI camera that supports VMS Auto Snapshot
- VIGI NVR that supports VMS Auto Snapshot
- VIGI Cloud VMS or VIGI VMS above V1.8.56
Introduction
The Auto Snapshot feature provides an efficient way to monitor on-site activities across multiple sites. It offers two modes: Instant Snapshot and Scheduled Snapshot.
Instant Snapshot automatically captures the most recent images from each camera, allowing users to quickly preview real-time scenes from all sites.
Scheduled Snapshot enables users to set up automated tasks that capture images at specific times. When used with the People Counting feature, it identifies the number of people in each image.
As this Auto Snapshot feature is currently in the limited release phase, please contact your local sales channel for details.
Configuration
After connecting and setting up the IPCs and NVR in the network, log in to the VMS and add the NVR. Once added, access the NVR’s device settings page in the VMS to add the IPCs. Then perform the following operations to use Auto Snapshot.
Configuration for Instant Snapshot
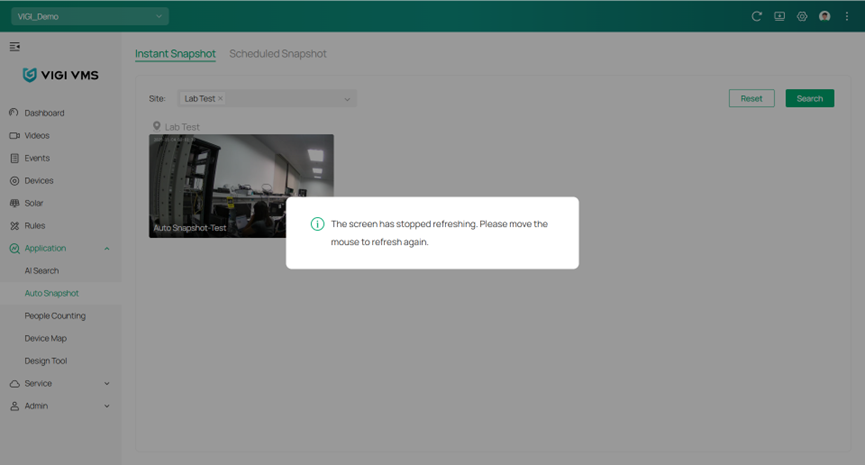
Step 1. After adding the devices, navigate to Application > Auto Snapshot > Instant Snapshot. Select the site you want to view, and then click Search.
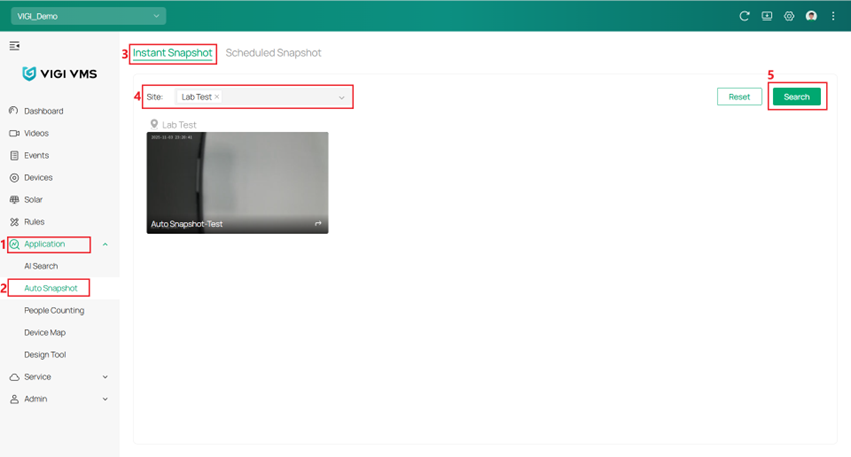
Note: The Site field is set to All by default. Clicking Reset will restore this default selection and display the real-time snapshots from all sites.
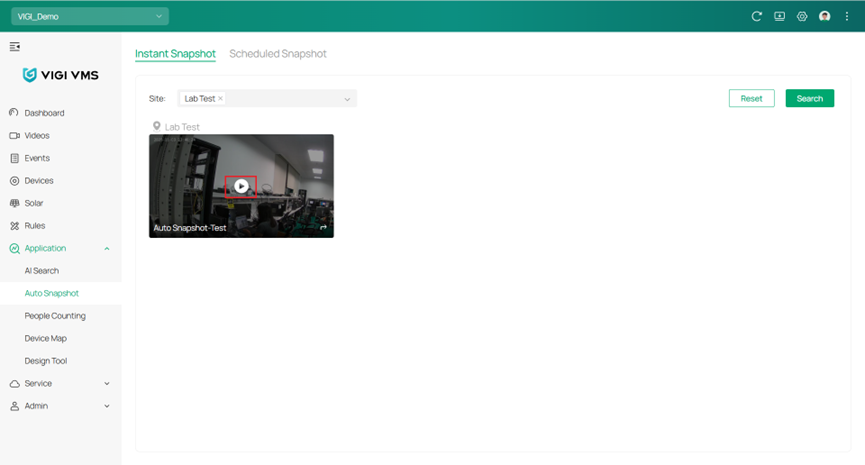
Step 2. Click the Play icon in the center of a snapshot to open the Live View window.
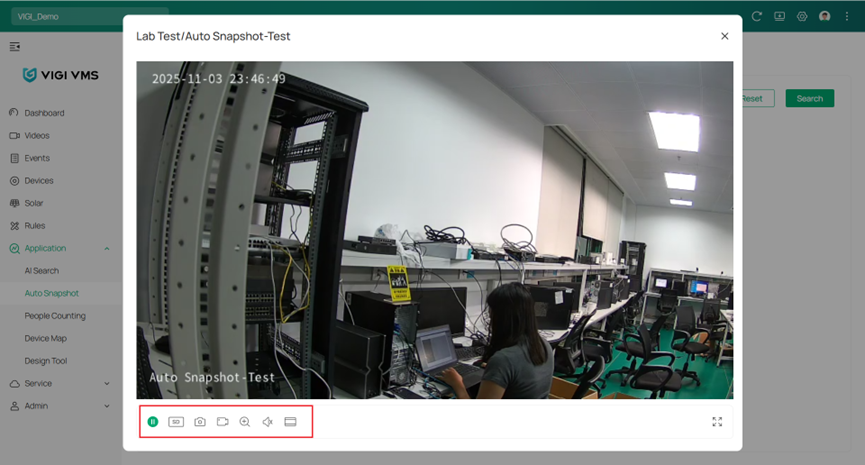
Step 3. In the Live View window, users can use the toolbar at the bottom to switch between SD/HD, take screenshots, record video, perform digital zoom, turn the sound on or off, set the display ratio, or switch to full-screen mode.
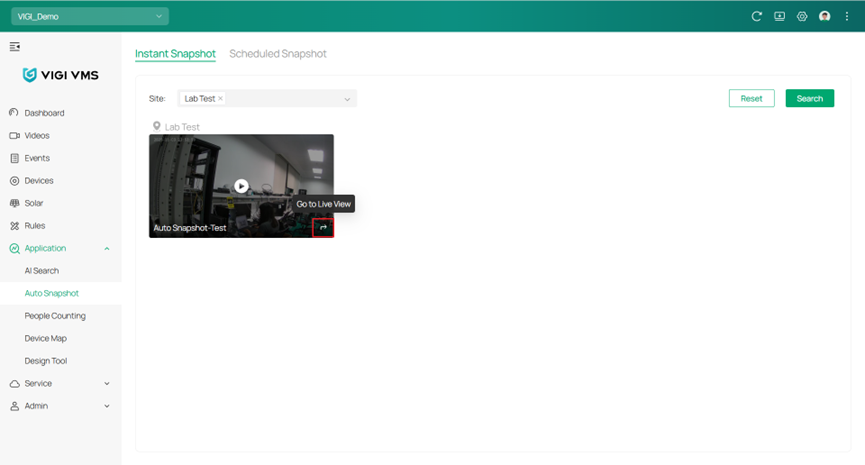
Step 4. Click the Go to Live View button at the bottom right corner of the snapshot to navigate to Videos > Live View and play the live view of the selected IPC.
Note: If no mouse movement is detected for 60 seconds, a pop-up message appears to remind the user to move the mouse to refresh again.
Configuration for Scheduled Snapshot
To display an alert when the number of people in a scheduled snapshot falls below the defined threshold, configure the sub-IPC to People Counting mode first, and then enable Person Count Alert in the task settings. If Person Count Alert is not needed, Step 1–Step 3 can be skipped.
Note: Visit Devices Supporting People Counting to view the list of VIGI IPC and VIGI NVR models that support the People Counting feature.
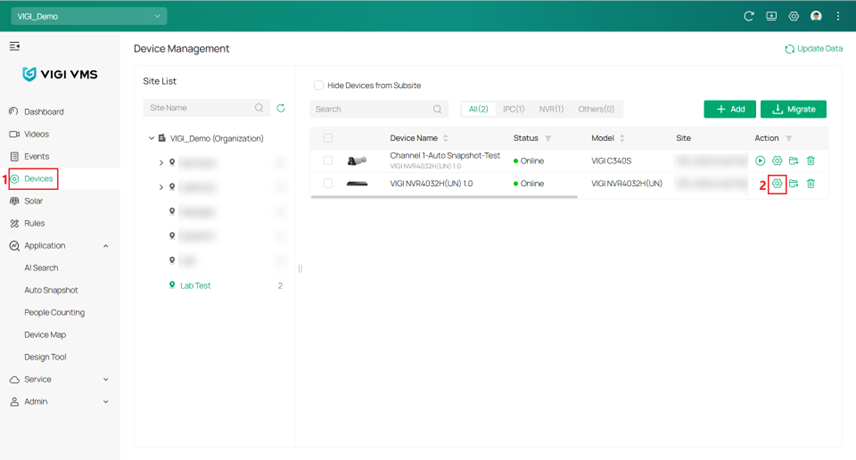
Step 1. Click the Edit button in the Device list to enter the NVR’s device settings page.
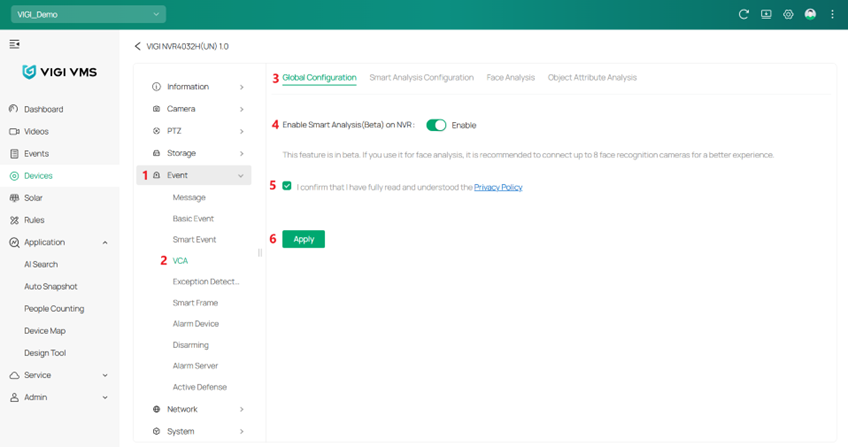
Step 2. Navigate to Event > VCA > Global Configuration, toggle on “Enable Smart Analysis (Beta) on NVR”, then review and agree to the Privacy Policy. Click Apply to save the configuration.
Step 3. Navigate to Event > VCA > Smart Analysis Configuration, expand the Channel drop-down list and select the target IPC channel to configure, choose People Counting Mode(Beta), and click Apply to save the configuration.

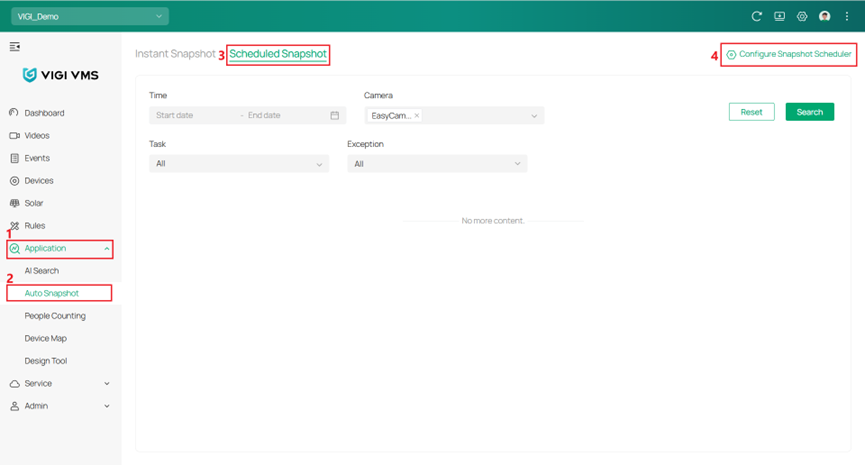
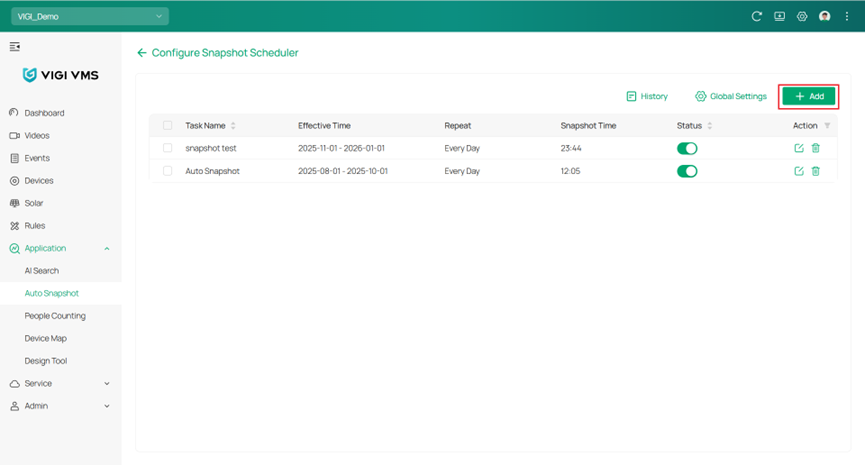
Step 4. Navigate to Application > Auto Snapshot > Scheduled Snapshot > Configure Snapshot Scheduler to create or edit a task.
Step 5. Click the Add button in the upper-right corner to open the Edit Snapshot Task window for creating a new task.
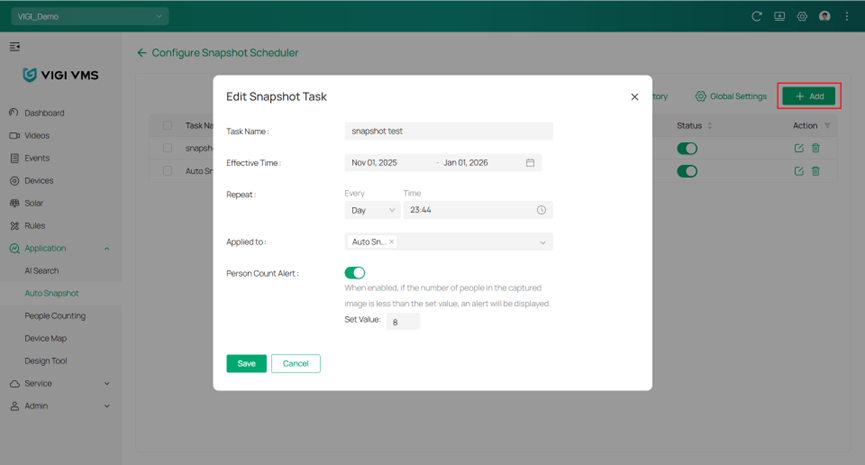
Step 6. In the Edit Snapshot Task window, enter the Task Name, set the Effective Time and Repeat schedule, select the device under Applied to, and configure Person Count Alert if needed. When enabled, a threshold from 1 to 8 can be set. If the number of people in a snapshot is below the set value, a red alert icon will appear at the bottom right of the scheduled snapshot. Click Save to apply the settings.
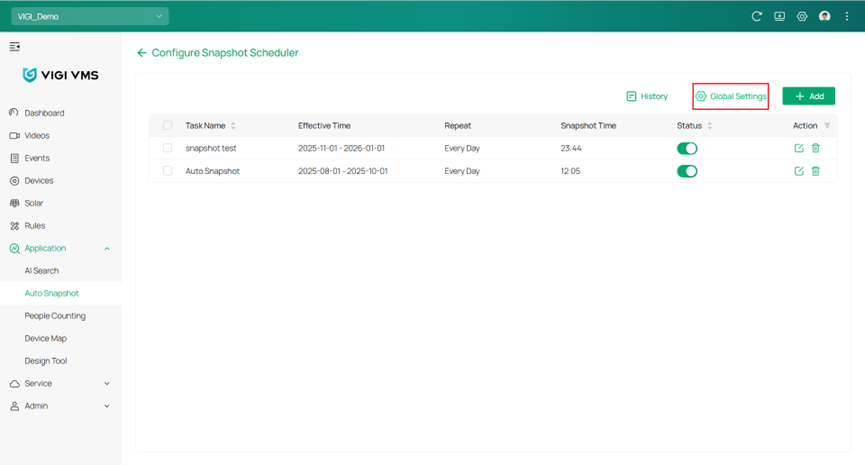
Step 7. Click Global Settings in the upper-right corner to open the Global Settings window.
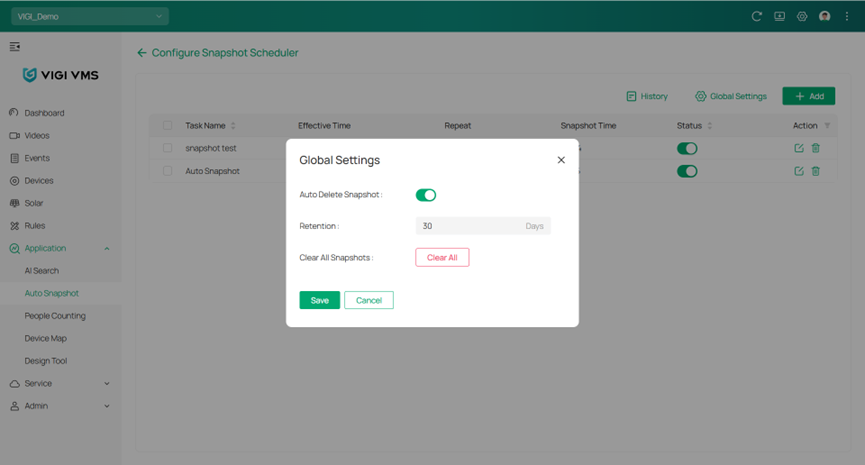
Step 8. In the Global Settings window, enable or disable the Auto Delete Snapshot feature as needed, set the Retention period (1–365 days) for automatic snapshot deletion, or click Clear All to permanently delete all snapshots generated by scheduled tasks. Click Save to apply the settings.
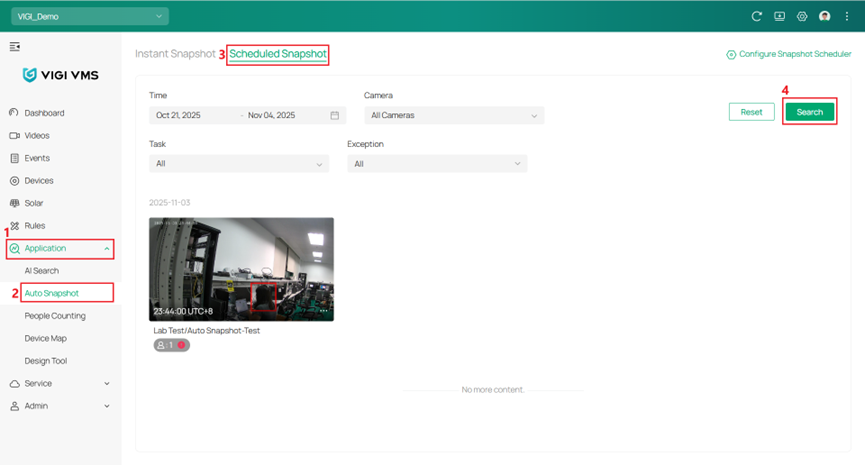
Step 9. Back to Application > Auto Snapshot > Scheduled Snapshot to check the execution results of scheduled tasks. Use the filters Time, Camera, and Task, then click Search to view the corresponding snapshots.
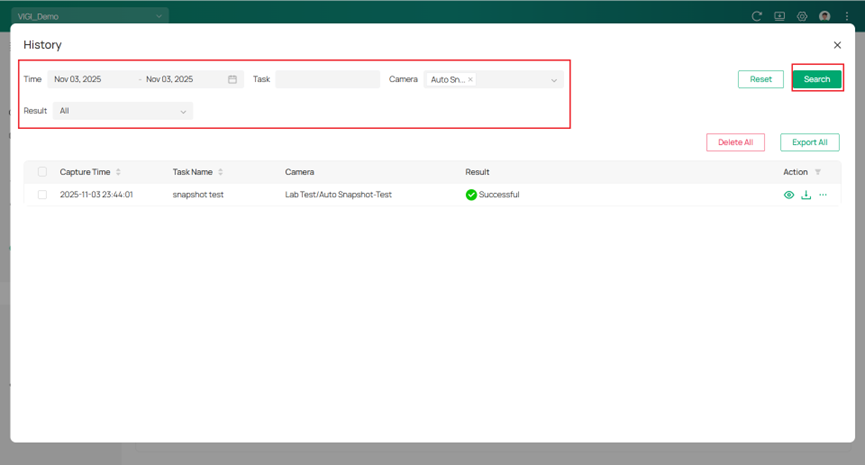
Step 10. In the Scheduled Snapshot page, click Configure Snapshot Scheduler, then click History to open the History window and view the execution records of scheduled snapshot tasks. In the History window, users can view or download snapshots, or delete the corresponding snapshot records as needed.
Recommended Deployment Scenarios for Auto Snapshot with Person Count Alert enabled
Follow the camera installation guidelines below to ensure accurate counting performance:
- Ensure the installation site has stable and sufficient lighting, avoiding overly dark or overexposed environments. For indoor scenes, adequate supplementary lighting is required.
- Ensure the monitoring area is open and unobstructed.
- Install the camera at a downward angle between 20° and 60° to provide a clear view of people in the monitored area.
- Keep the installation height below 5 m for optimal detection accuracy.
- Ensure that a person’s head in the image appears large enough for clear recognition to maintain reliable counting accuracy.
Conclusion
With the above information and configuration, you can set up the Auto Snapshot with your specific requirements.
Get to know more details of each function and configuration please go to Download Center to download the manual of your product.
Esta FAQ é útil?
Seu feedback ajuda a melhorar este site.


