


Como adicionar câmeras de terceiros ao NVR VIGI via RTSP
Conteúdo
Objetivo
Este artigo fornece um guia passo a passo sobre como adicionar câmeras de terceiros ao VIGI NVR usando o protocolo RTSP.
Requisitos
- VIGI NVR
- Câmera de Terceiros
Introdução
Alguns modelos de câmeras mais antigos não suportam o protocolo ONVIF, tornando necessário o uso do protocolo RTSP para adicionar esses dispositivos ao NVR. Uma vez adicionada com sucesso, a transmissão de vídeo da câmera pode ser visualizada no NVR e armazenada nele.
Configuração
Para adicionar uma câmera via RTSP, a interface gráfica (GUI) do VIGI NVR deve ser utilizada, o que requer a conexão de um monitor externo VGA ou HDMI ao NVR. Além disso, você deve verificar a URL do fluxo RTSP no site do fabricante da câmera antes de prosseguir.
Este artigo usará uma câmera Tapo como exemplo para demonstrar como adicionar uma câmera ao VIGI NVR usando o protocolo RTSP:
Passo 1. Conecte a câmera e o NVR na mesma sub-rede. Verifique o endereço IP da câmera e a URL do fluxo RTSP no site ou manual do fabricante da câmera.
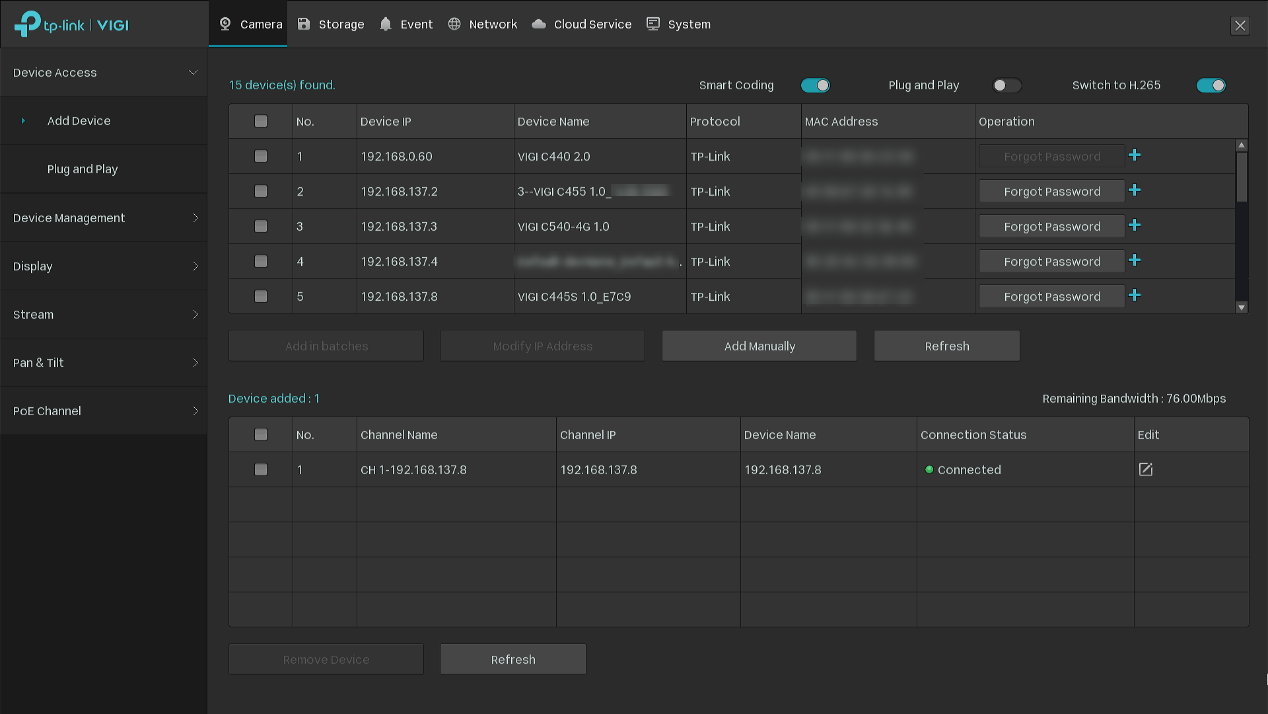
Passo 2. Clique com o botão direito na interface do VIGI NVR para acessar as Configurações (Settings).

Passo 3. Na lista de dispositivos, clique em Adicionar Manualmente (Add Manually), selecione o protocolo RTSP e insira o endereço IP da câmera, junto com o nome de usuário e a senha de administrador.

Passo 4. Clique em Gerenciar RTSP (Manage RTSP), selecione um protocolo RTSP e especifique os parâmetros.

Passo 5. Insira a URL do fluxo RTSP da câmera e clique em Salvar (Save).

Passo 6. A câmera de terceiros foi adicionada com sucesso ao VIGI NVR usando o protocolo RTSP.
Para saber mais detalhes de cada função e configuração, visite o Centro de Downloads para baixar o manual do seu produto.
Esta FAQ é útil?
Seu feedback ajuda a melhorar este site.

-1.0_normal_1614068215524j.png)