How to configure a L2TP Server on TP-Link Router
Configuring a L2TP Server on TP-LINK router
Step 1:
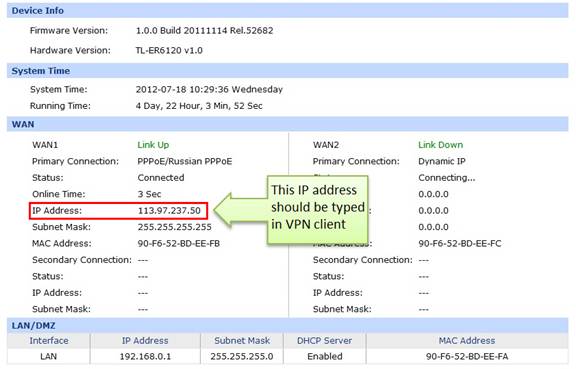
Access the router’s management web page; verify the settings needed on the router.

Step 2:
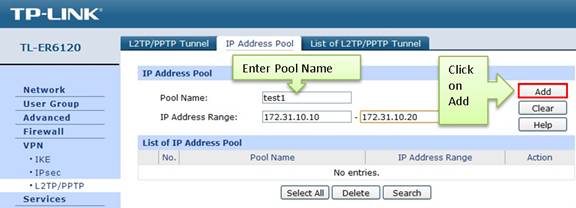
Click on VPN->L2TP/PPTP->IP Address Pool, enter Pool Name and IP Address Range, and then click on Add.

NOTE: IP Address pool must be different range from LAN IP address range.
Step 3:
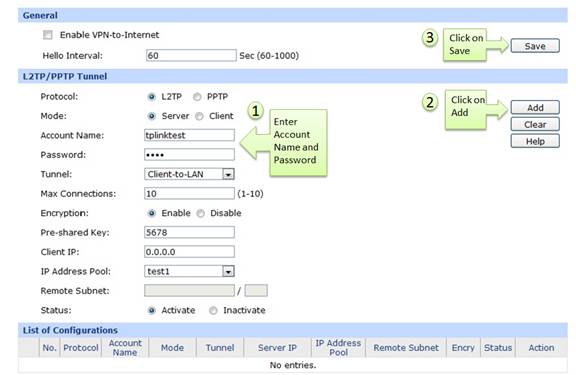
Look for protocol, select L2TP; the Mode should be Server.

Step 4:
Enter Account Name and Password whatever you like, here we use “tplinktest” as account name, password is “1234”.
Step 5:
Under Tunnel, select Client-to-LAN.
Step 6:
The tunnel supports up to 10 connections, we enter 10 in this example.
Step 7:
Under Encryption, select Enable, and then enter “5678” as Pre-shared Key.
Step 8:
Under IP Address Pool, select “test1” we have added before.
Step 9:
Look for Status, select Active.
Step 10:
Click on Add.
Step 11:
As we enabled Encryption, we need to go to VPN->IPsec, enable IPsec and then click on Save.

Till now, we have finished the L2TP Server in the router, as for the client setting on remote PC, please refer to the FAQ
Step 12:
If the LPTP tunnel is established successfully, you can check it on List of Tunnel.

¿Es útil esta pregunta frecuente?
Sus comentarios nos ayudan a mejorar este sitio.


