How to save NVR and IPC video footage to an FTP Server
Contents
Introduction
Backing up information is essential for protecting your data. Today, there are multiple methods to safeguard data and minimize the risk of loss. This FAQ explains how to configure an FTP backup using the settings available in VIGI NVR and IPC systems.
Requirements
- VIGI NVR or VIGI IPC
- A computer and browser to access the GUI of devices
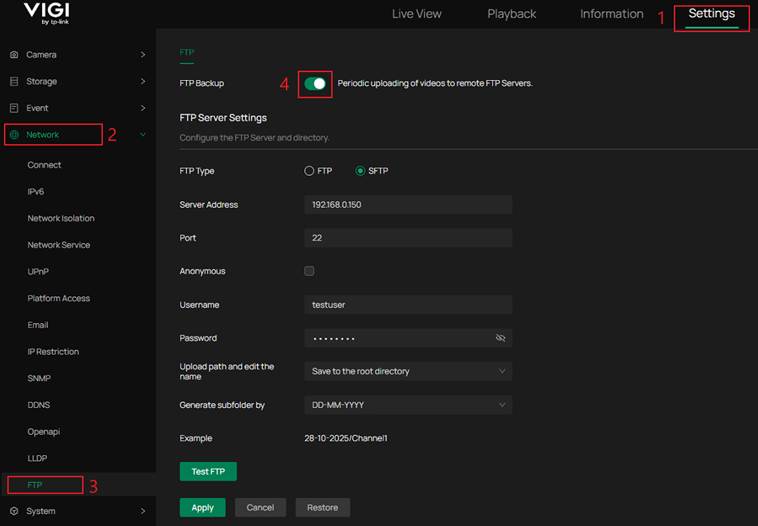
Configuration - NVR
Step 1. Go to Settings, Network, FTP and enable FTP Backup. Configure the FTP server settings.
Server Address: Enter the IP address of the FTP server.
Port: Use port 21 for FTP or port 22 for SFTP.
Anonymous: Select this option if a username and password are not required to upload files to the FTP server. If authentication is needed, leave this unchecked and enter the username and password.
Upload Path and Name: Specify the destination folder and file name on the server.
Generate Subfolder By (GUI: Upload Directory): Select the preferred date format for automatically creating subfolders. An example will be displayed below.
Test FTP: Creates and uploads a test file to the FTP server to verify the connection.
Step 2. Fill out Video Settings.
Video Type: Select the desired video format.
Max File Size: Specify the maximum file size for uploaded videos.
Video Retention: Define how long videos will be stored before being automatically deleted.
Select: Choose the channel or channels to upload. You may upload all channels, specific channels, or a single channel.
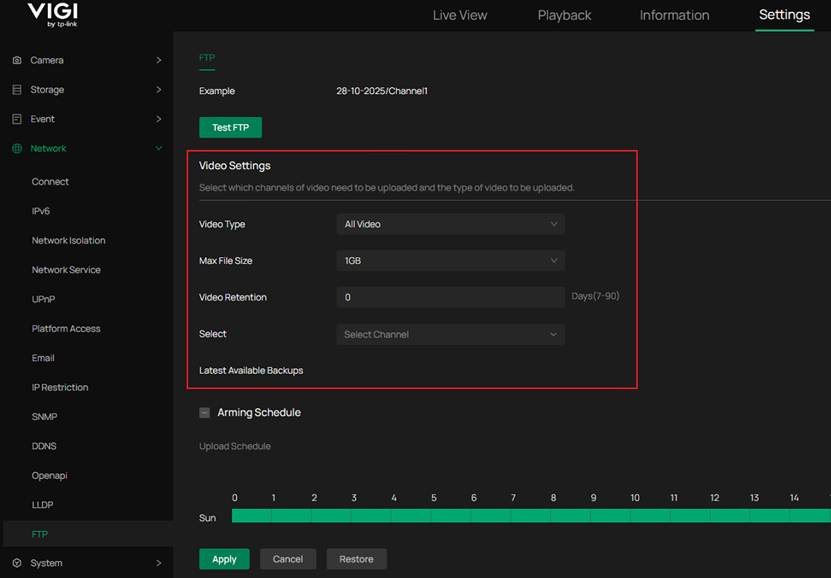
Step 3. Configure the Arming Schedule (GUI: Upload Schedule)
The Arming Schedule specifies the time periods during which the NVR will upload files to the FTP server.
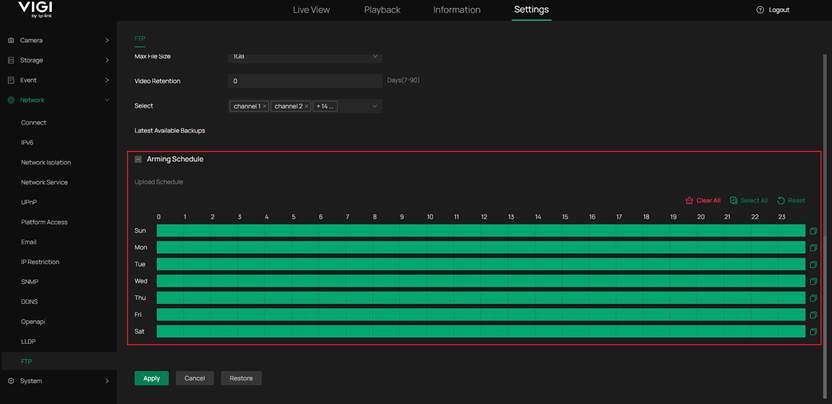
Step 4. Apply settings.
Selecting Apply saves the settings and activates the configuration. The NVR will then upload data according to the defined Arming Schedule.

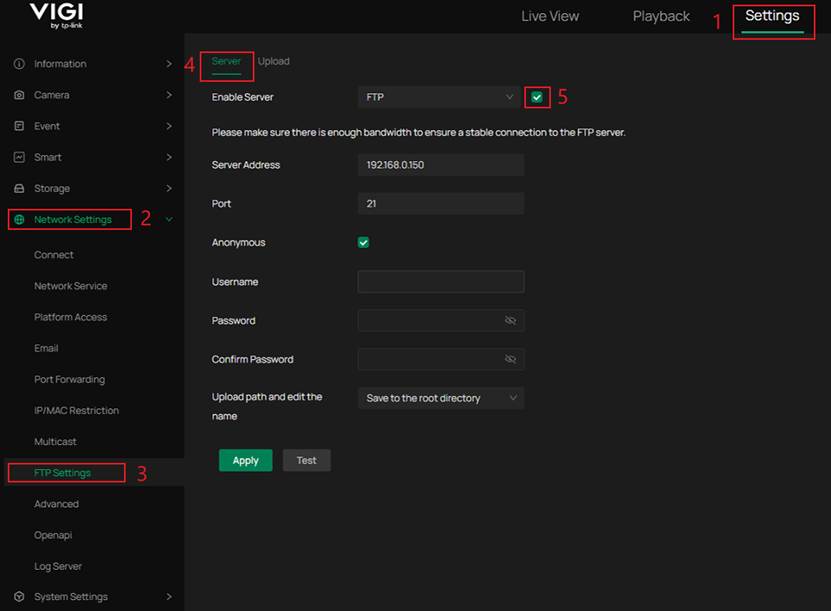
Configuration - IPC
Step 1. Go to Settings, Network Settings, FTP Settings, Server and select the checkbox to the right of Enable Server to enable FTP.
Enable Server: Select FTP or SFTP
Server Address: Enter the IP address of the FTP server.
Port: Use port 21 for FTP or port 22 for SFTP.
Anonymous: Select this option if a username and password are not required to upload files to the FTP server. If authentication is needed, leave this unchecked and enter a username and password.
Upload Path and edit the name: Specify the destination folder and file name on the server.
Select Apply once these settings are configured.
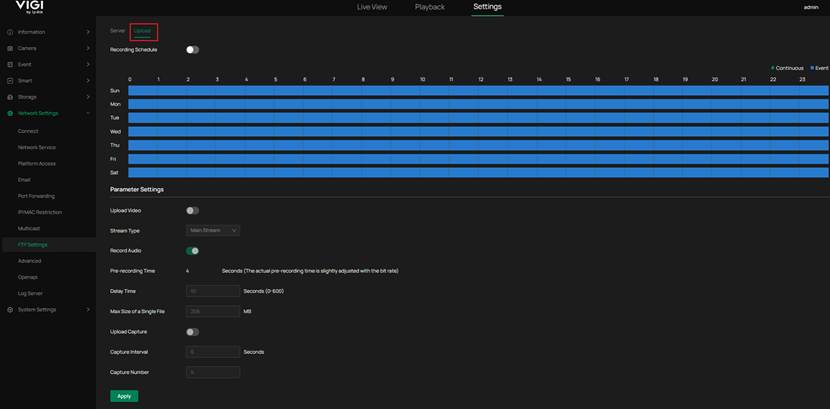
Step 2. Select the Upload tab.
Recording Schedule:
This switch must be turned on for videos or images to be uploaded.
Please also note:
Each time period configured under Recording Schedule determines whether to upload continuous or event-triggered recordings and images at the configured interval, or to disable uploads.
For example:
If 8:00 AM–10:00 AM is set to continuous recording, then the uploaded video will be continuous footage, and uploaded images at the configured interval.
If 8:00 AM–10:00 AM is set to event recording, then only event-triggered videos and images will be uploaded at the configured interval and within the specified capture number after the event is triggered.
Upload Video: Enables video file uploads to the FTP server. When disabled, only captured images (if enabled below) will be uploaded.
Stream Type: Selects which video stream to upload. This specifies whether the stream is the Main Stream or Sub Stream. The Main Stream provides higher image quality but results in larger file sizes. You can check stream configuration under Camera > Stream.
Record Audio: Enables or disables audio recording for the uploaded video files.
Pre-recording Time: Specifies how many seconds before an event the camera begins recording. This ensures that moments leading up to the event are included.
Delay Time: Determines how long the recording continues after the event ends. This ensures the entire event is captured. (Range: 0–600 seconds)
Max Size of a Single File: Defines the maximum file size for each uploaded video file. Once this limit is reached, a new file is created automatically. (Default shown: 256 MB)
Upload Capture: Enables image uploads to the FTP server. When enabled, the IP camera captures and uploads still images at defined intervals.
Capture Interval: Specifies the time interval between each image capture.
Capture Number: defines how many images will be captured after an event is triggered, based on the interval set in Capture Interval.
Apply: Saves and applies all configured upload settings.
Conclusion
Setting up FTP backup for your NVR and IPC provides a reliable way to store important recordings using another backup medium. Once configured, the system automatically uploads data according to your defined schedule, ensuring your video footage remains protected and accessible even if local storage fails.
Get to know more details of each function and configuration please go to Download Center to download the manual of your product.
QA
Q1: Why should I use FTP backup with my NVR or IPC?
A1: FTP backup adds an extra layer of data protection by storing recordings on an external server. This helps preserve important footage if the local storage device becomes damaged or inaccessible.
Q2: What is the difference between FTP and SFTP?
A2: FTP (File Transfer Protocol) transfers files between your device and a server without encryption. SFTP (Secure File Transfer Protocol) performs the same function but encrypts both data and login credentials. SFTP offers greater security, while FTP may provide slightly faster transfer speeds on trusted local networks.
Q3: Why is my FTP test upload failing?
A3: Check the server address, port number, and login credentials. Ensure the FTP server is active, that your NVR or IPC has permission to access it, and that network connectivity is stable.
Q4: Can I limit when uploads occur?
A4: Yes. You can configure the Arming Schedule to define specific times or days when the device uploads files to the FTP server.
Q5: How can I confirm that uploads are working correctly?
A5: After saving the settings, use the Test FTP option to verify the connection. You can also check the FTP server folder to confirm that new files appear according to your schedule or event triggers.
Q6: Does enabling audio recording increase file size?
A6: Yes, enabling Record Audio adds an audio stream to each video file, which slightly increases overall file size. For longer storage times, consider disabling audio or reducing video quality.
Q7: Do I need to open specific ports on my router for FTP or SFTP to work?
A7: Yes. Port 21 is required for FTP and port 22 for SFTP. If your FTP server is on a different network, ensure these ports are open and properly forwarded in your router’s settings.
Is this faq useful?
Your feedback helps improve this site.


TP-Link Community
Still need help? Search for answers, ask questions, and get help from TP-Link experts and other users around the world.