How to Add VIGI Devices to VIGI Local VMS
Contents
Introduction
VIGI Local VMS provides centralized management for VIGI Cameras, VIGI NVRs, and VIGI Solar Panels. This article introduces the available methods for adding VIGI devices to VIGI Local VMS.
VIGI Local VMS Server is installed on a Windows PC and can be used to centrally manage VIGI devices on the local network or at remote locations. Depending on the network environment and deployment requirements, devices can be added using one of the following methods:
Auto Add: Automatically discovers and adds VIGI devices that are in the same network segment as the VIGI Local VMS Server.
Manually Add: Adds devices by specifying an IP address or IP address range. The VIGI Local VMS Server performs a targeted search for devices within the specified address or range.
Remotely Add: Adds devices that are not in the same network segment as the VIGI Local VMS Server. The VIGI device actively initiates a connection to the server. This method generally requires the appropriate port forwarding configuration on the server-side network.
Inform URL: Adds a device by configuring the VIGI Local VMS Server address as the device's Inform URL. The device then uses the configured Inform URL to establish a connection with VIGI Local VMS.
Requirements
- VIGI Local VMS
- VIGI Camera/VIGI NVR/VIGI Solar Power System
Local device configuration
Use the following methods when the VIGI device is on the same local network as the VIGI Local VMS Server.
Auto Add
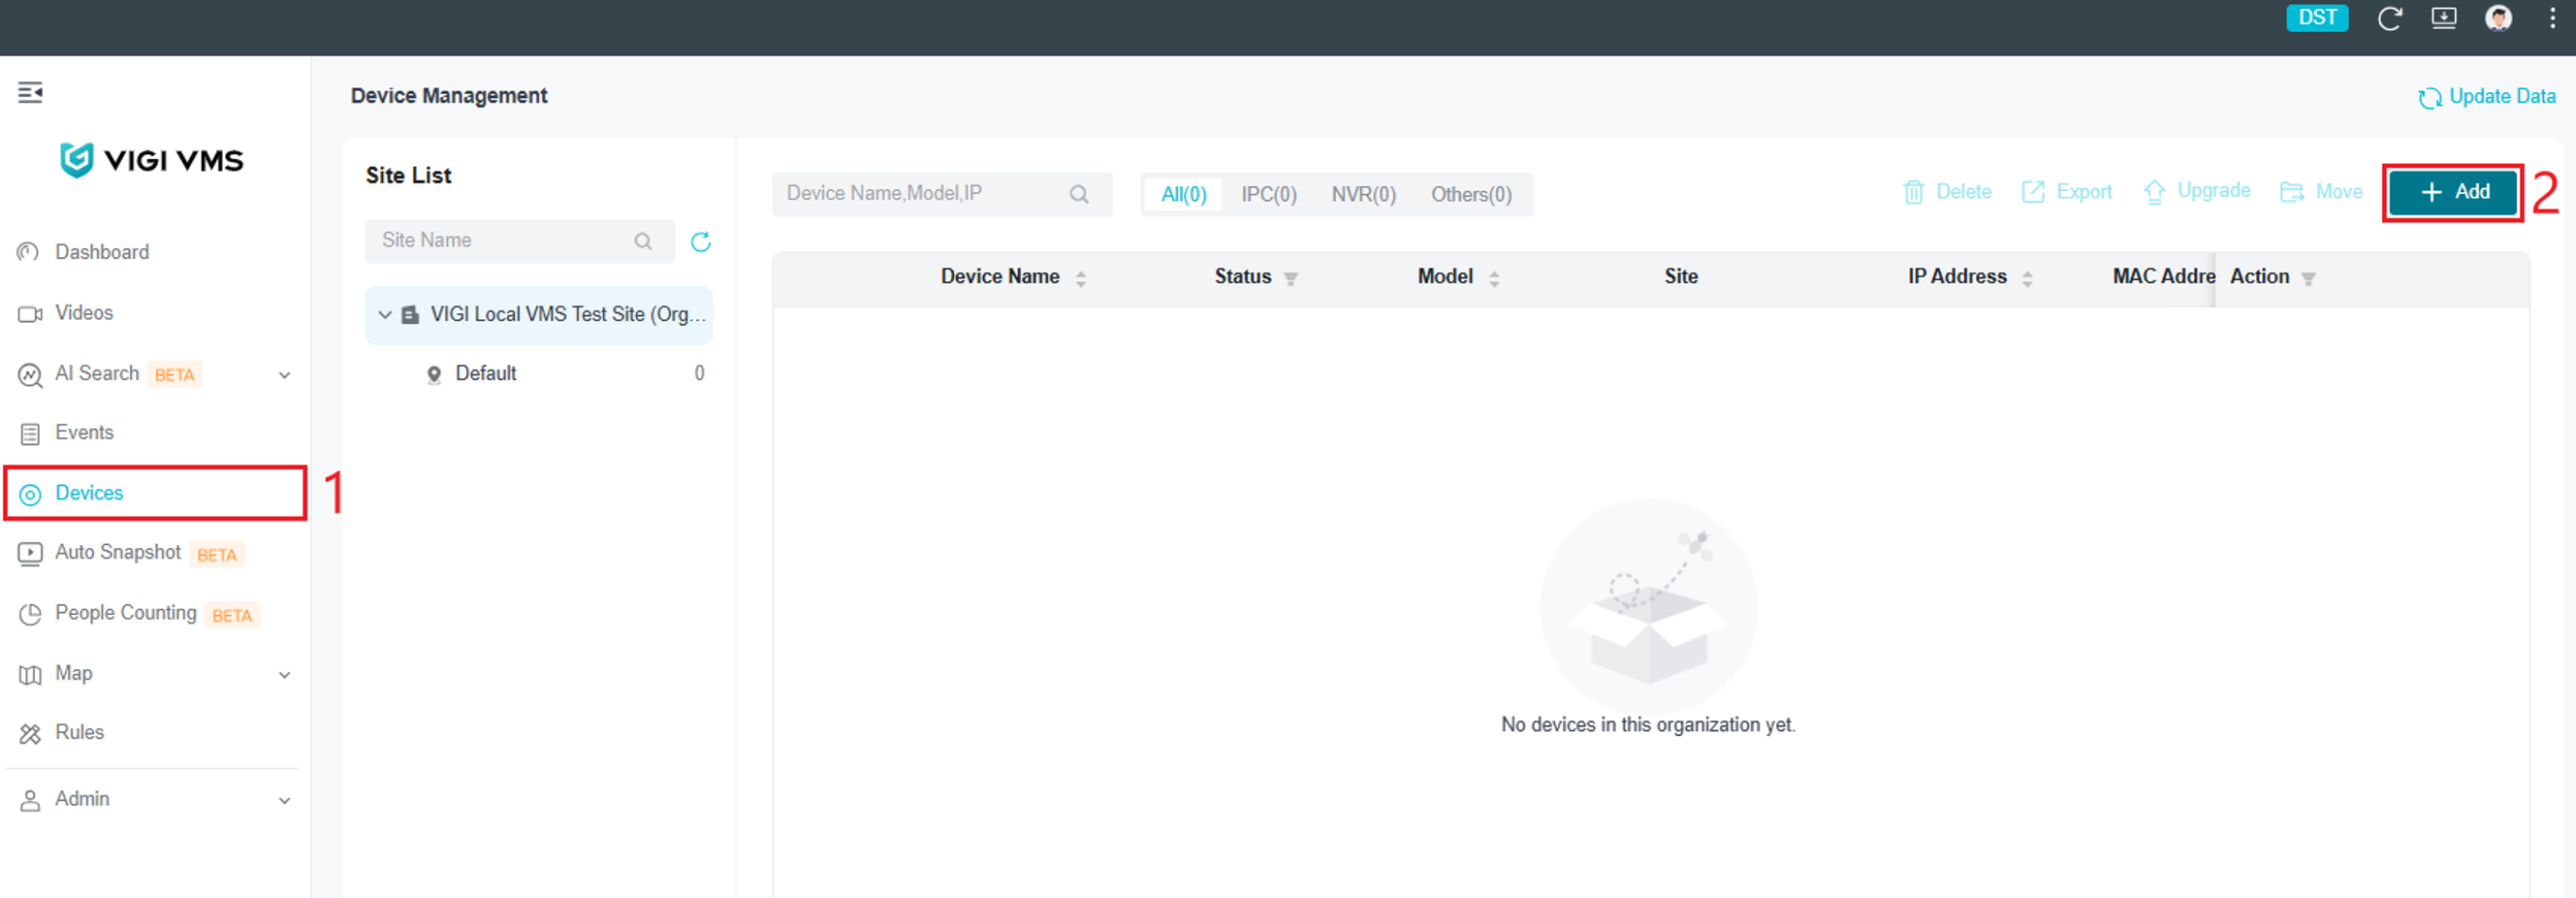
Step 1. Log in to the web portal of VIGI Local VMS, and select Devices to enter the device management page. Select the Add button.
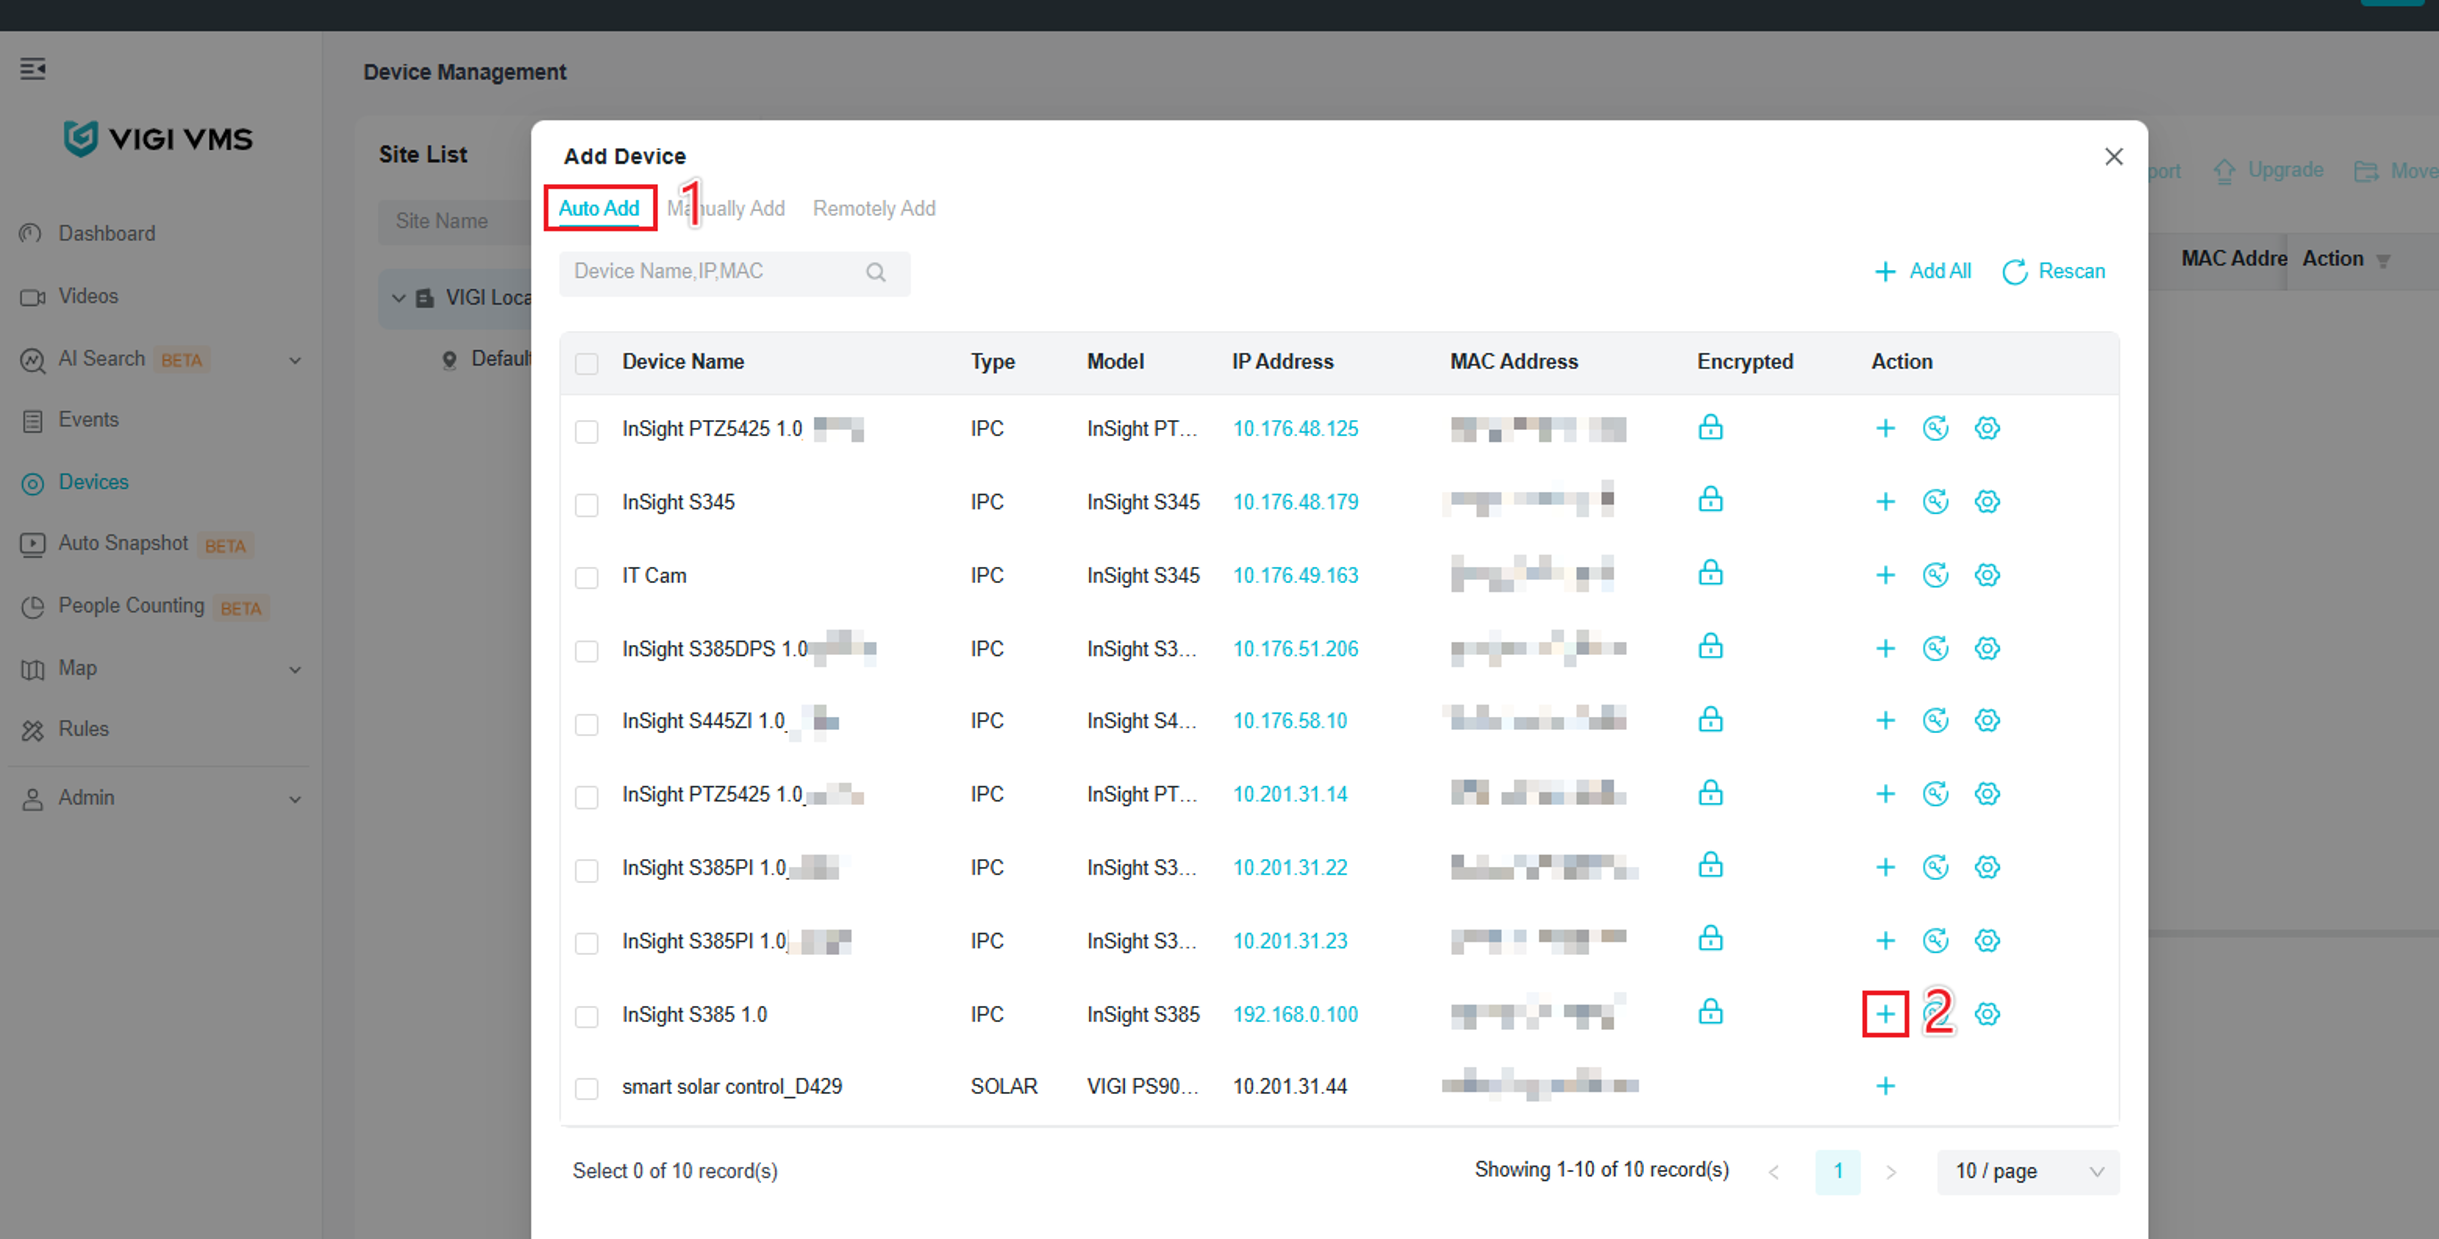
Step 2. An Add Device menu will appear. Select Auto Add. The VMS will then automatically search and display VIGI devices in the same network segment. When the correct device has been found, select the plus sign to add it to a site.
Note: Devices can be added in a batch or by using the Add All function. To add devices in a batch, select the checkboxes on the left. The Batch Add option will appear.
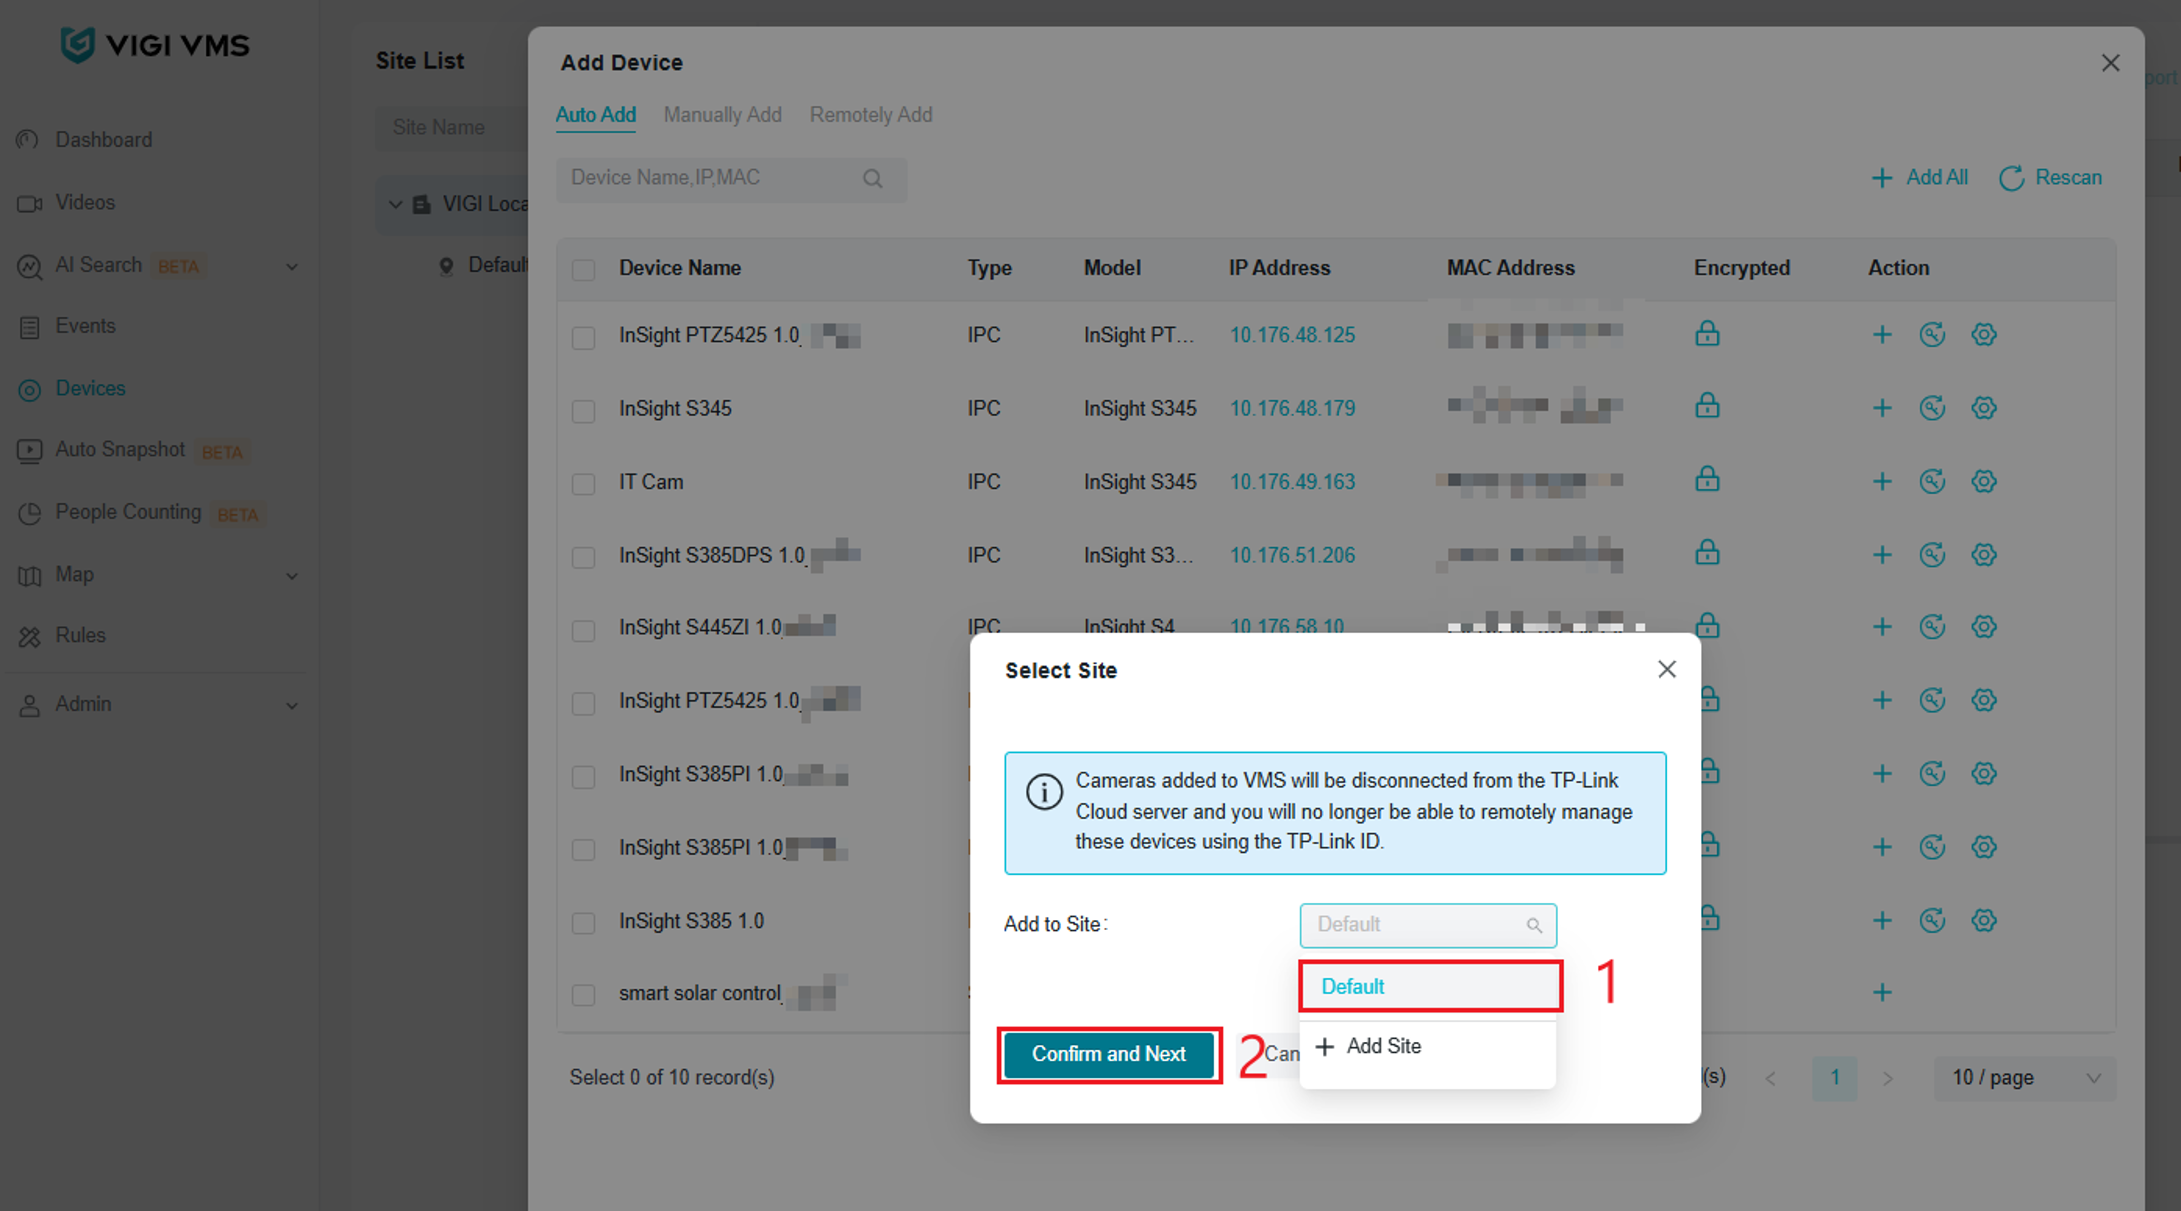
Step 3. A Select Site menu will appear. Select the site to add the device to using the Add to Site dropdown menu. Select Confirm and Next.
Step 4. A Verify Device Password menu will appear. Enter the credentials of the device and select Confirm. 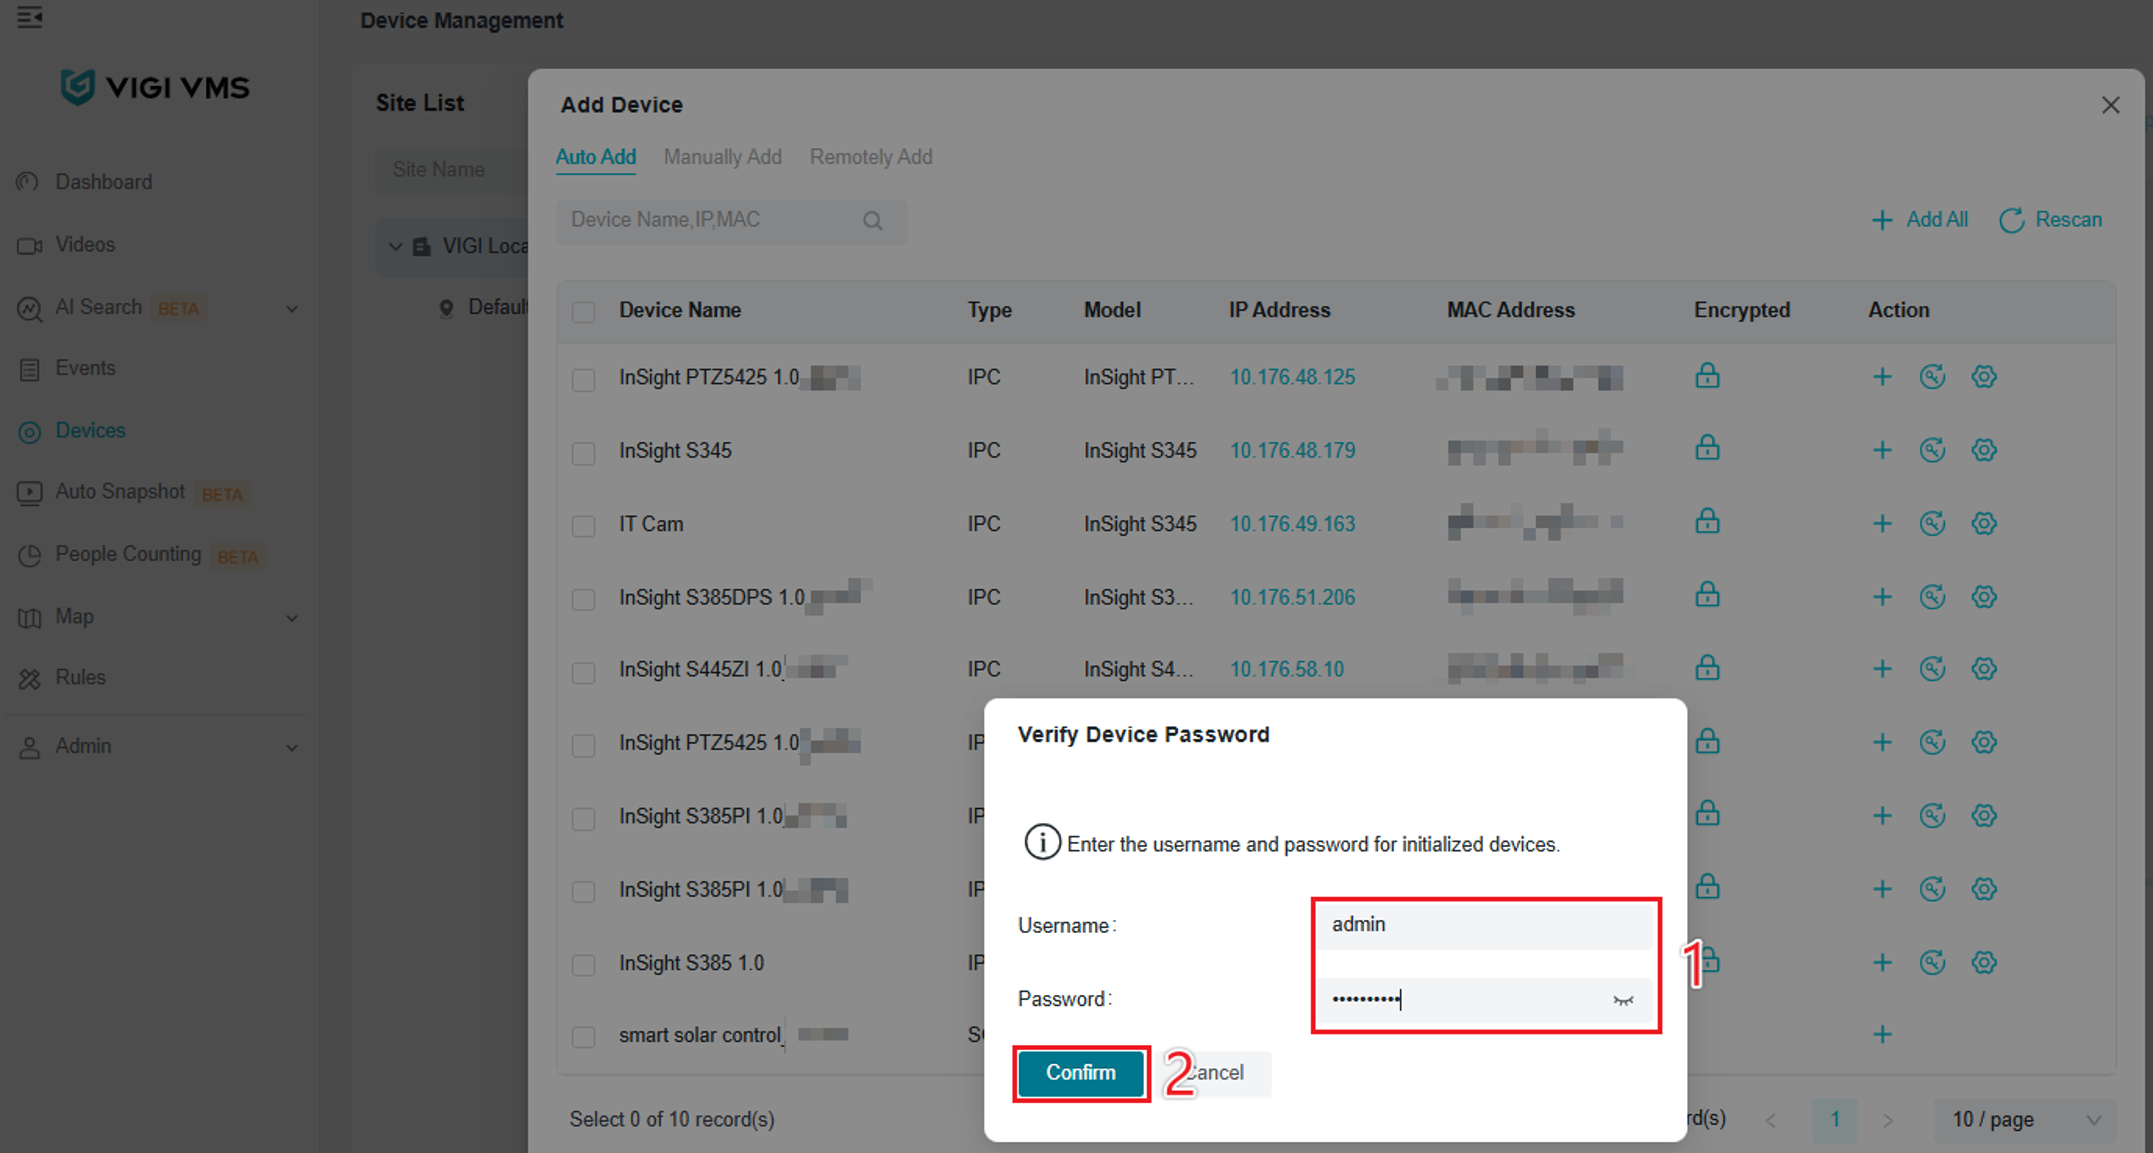
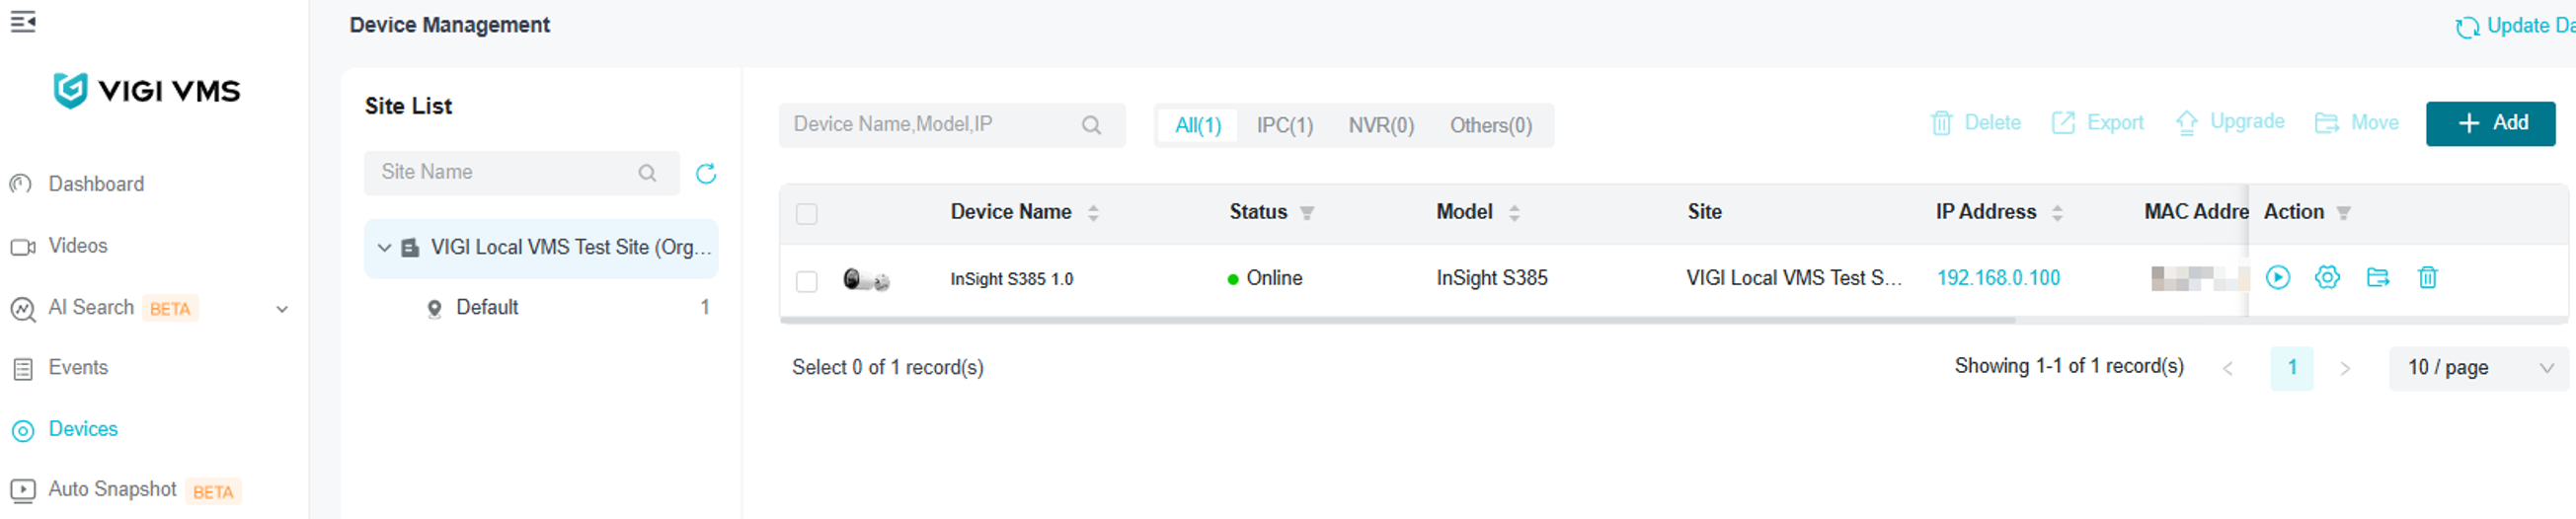
The device has been successfully added using Auto Add.
Manually Add
Step 1. Log in to the web portal of VIGI Local VMS and select Devices to enter the device management page. Select the Add button.
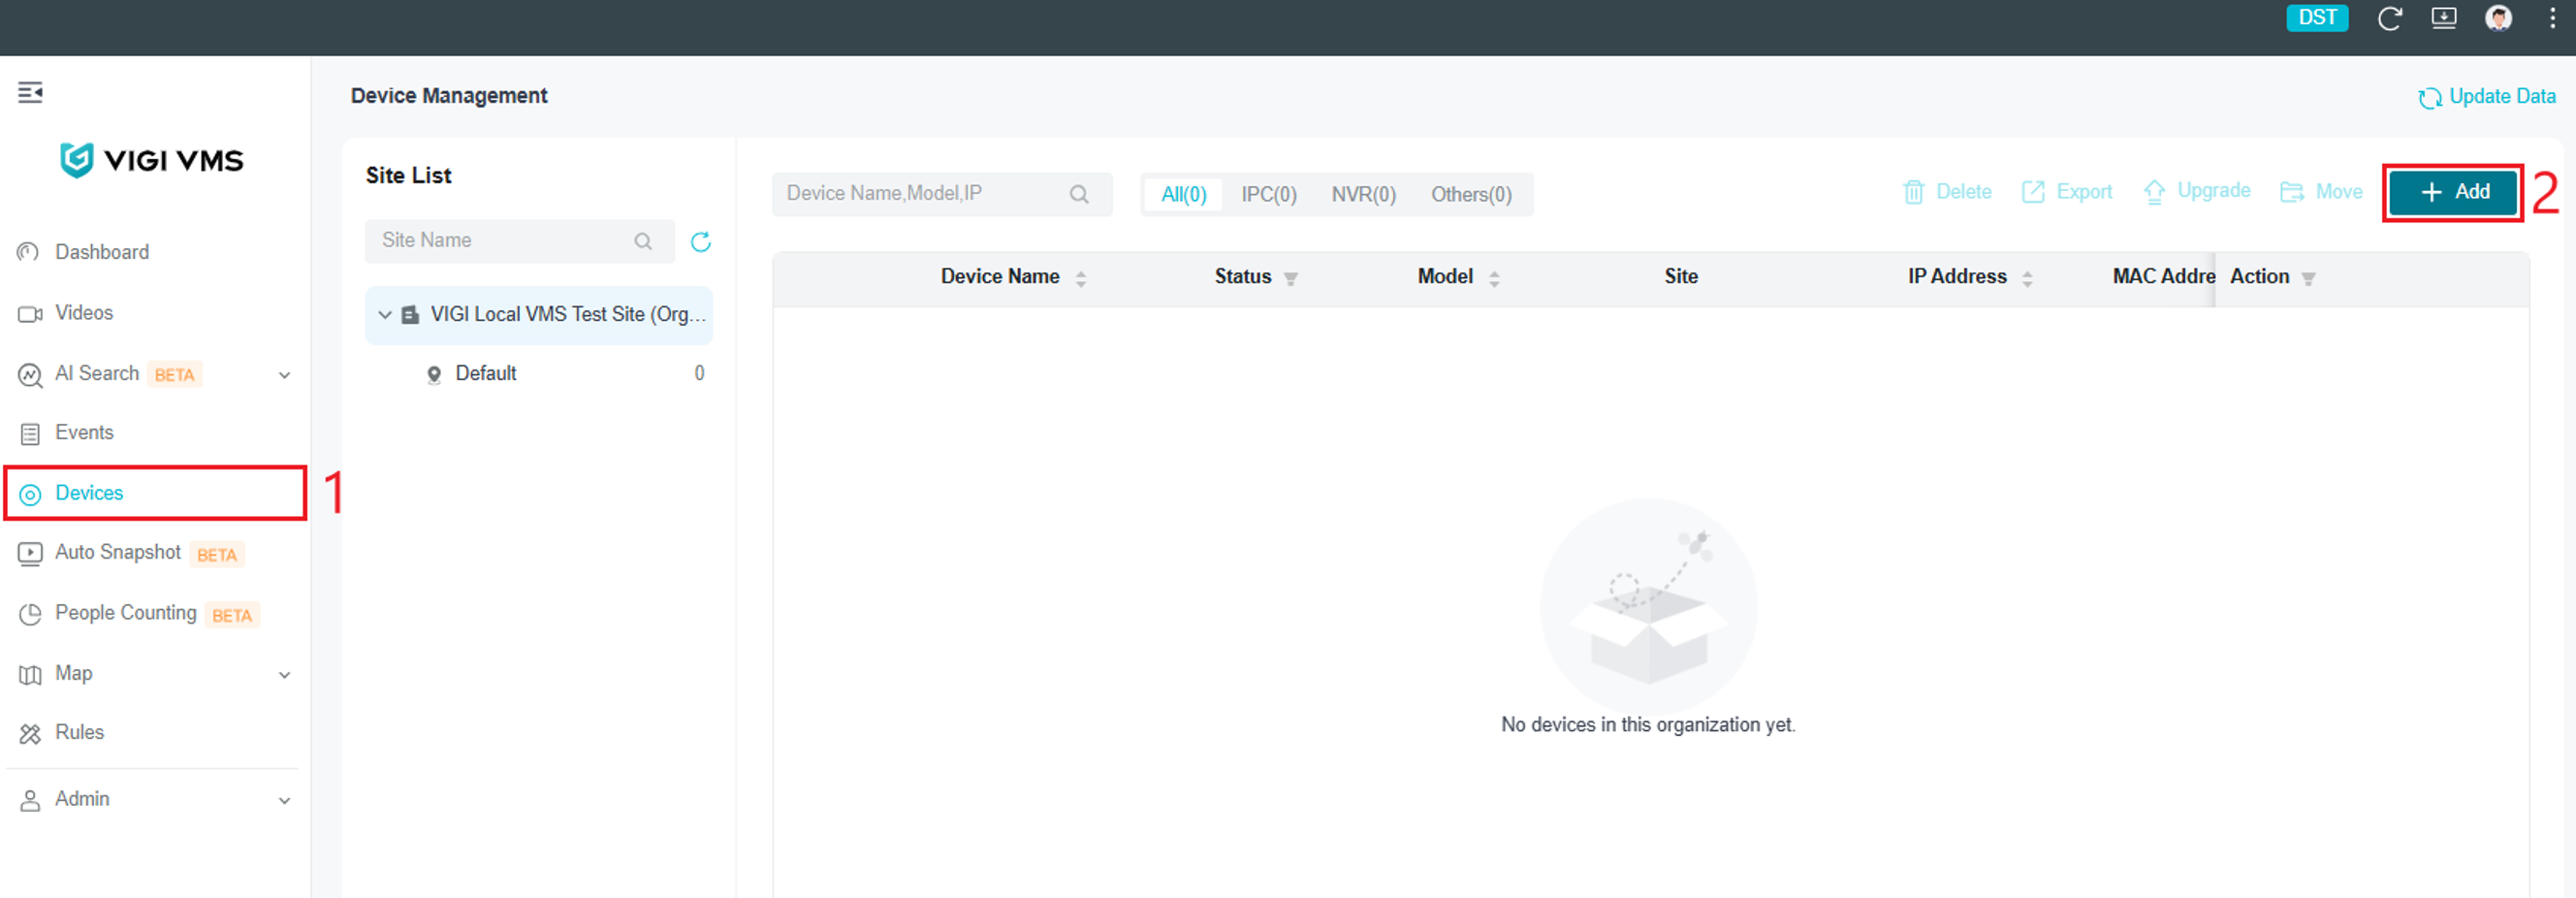
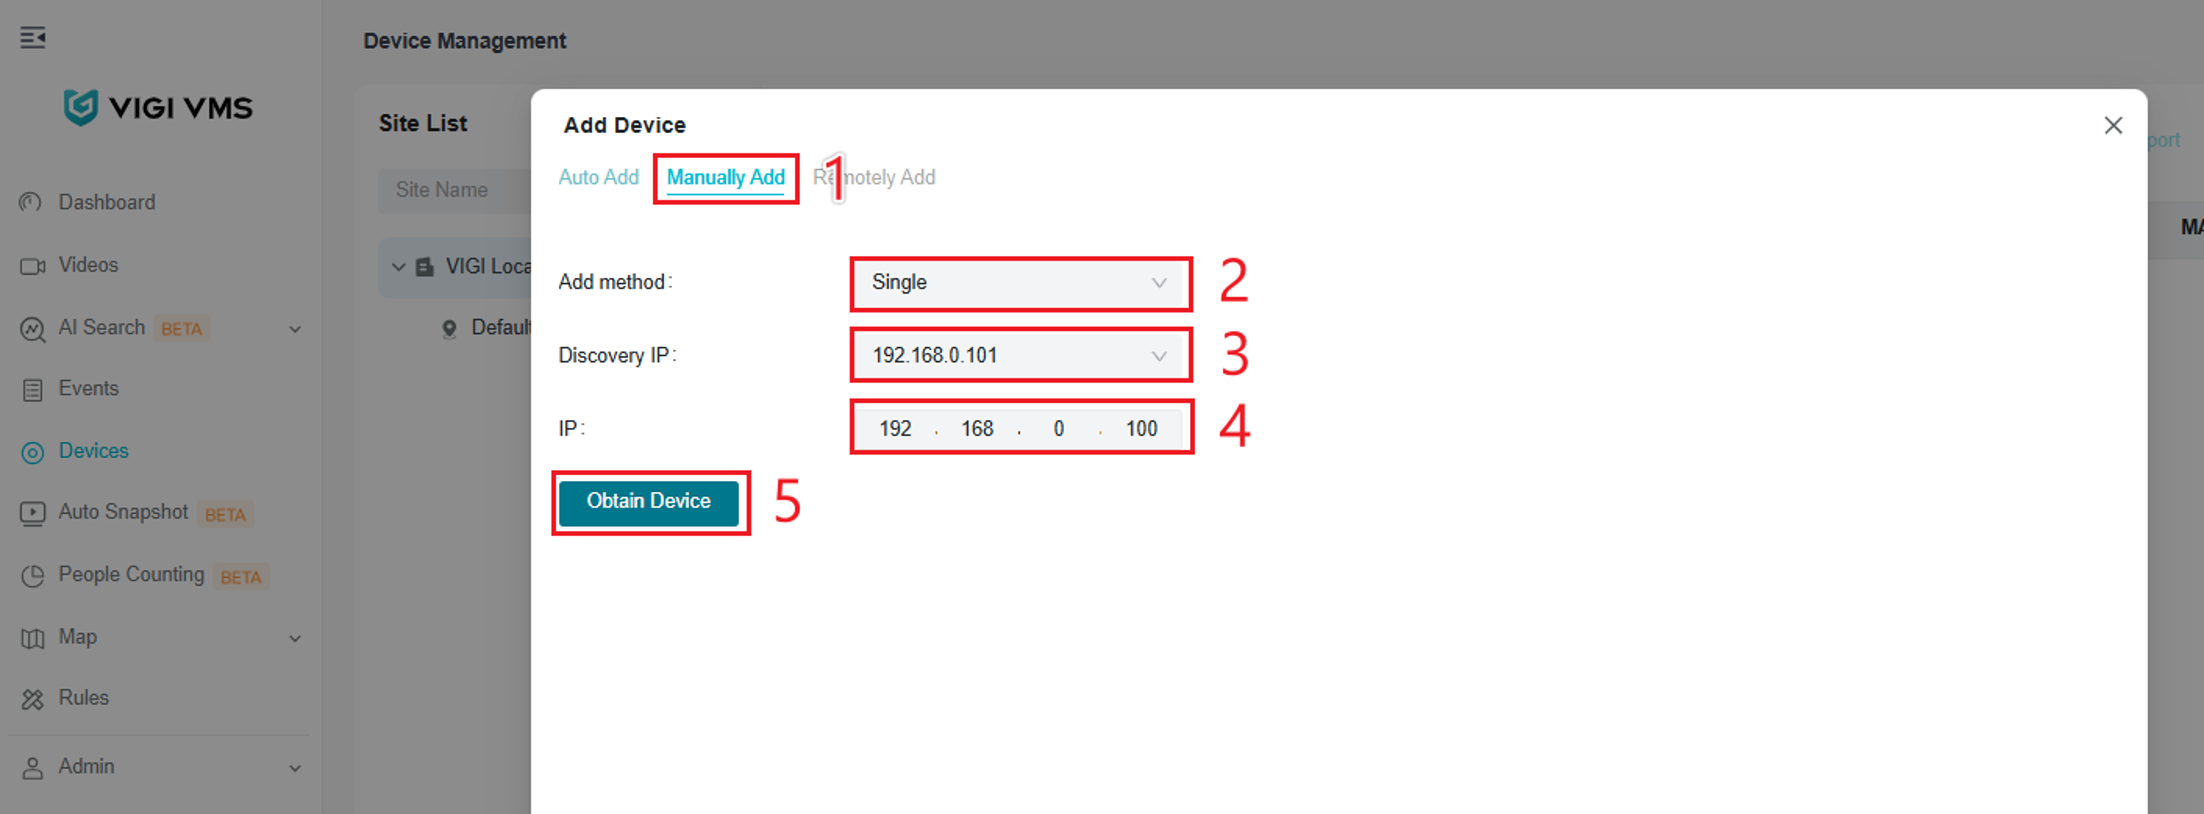
Step 2. An Add Device menu will appear. Select Manually Add. For this example, we are adding a single camera. Select Single for the Add method, then input the Discovery IP (the IP of the VIGI Local VMS) and IP (the IP address of the camera). Select Obtain Device.
Note: Two methods are available for adding devices: Single and Multiple. In Single mode, the IP address of a single camera can be entered to add one device. In Multiple mode, a range of IP addresses can be used to add multiple IP cameras at the same time.
Step 3. After selecting Obtain Device, the device information will be displayed. Select Add Device. 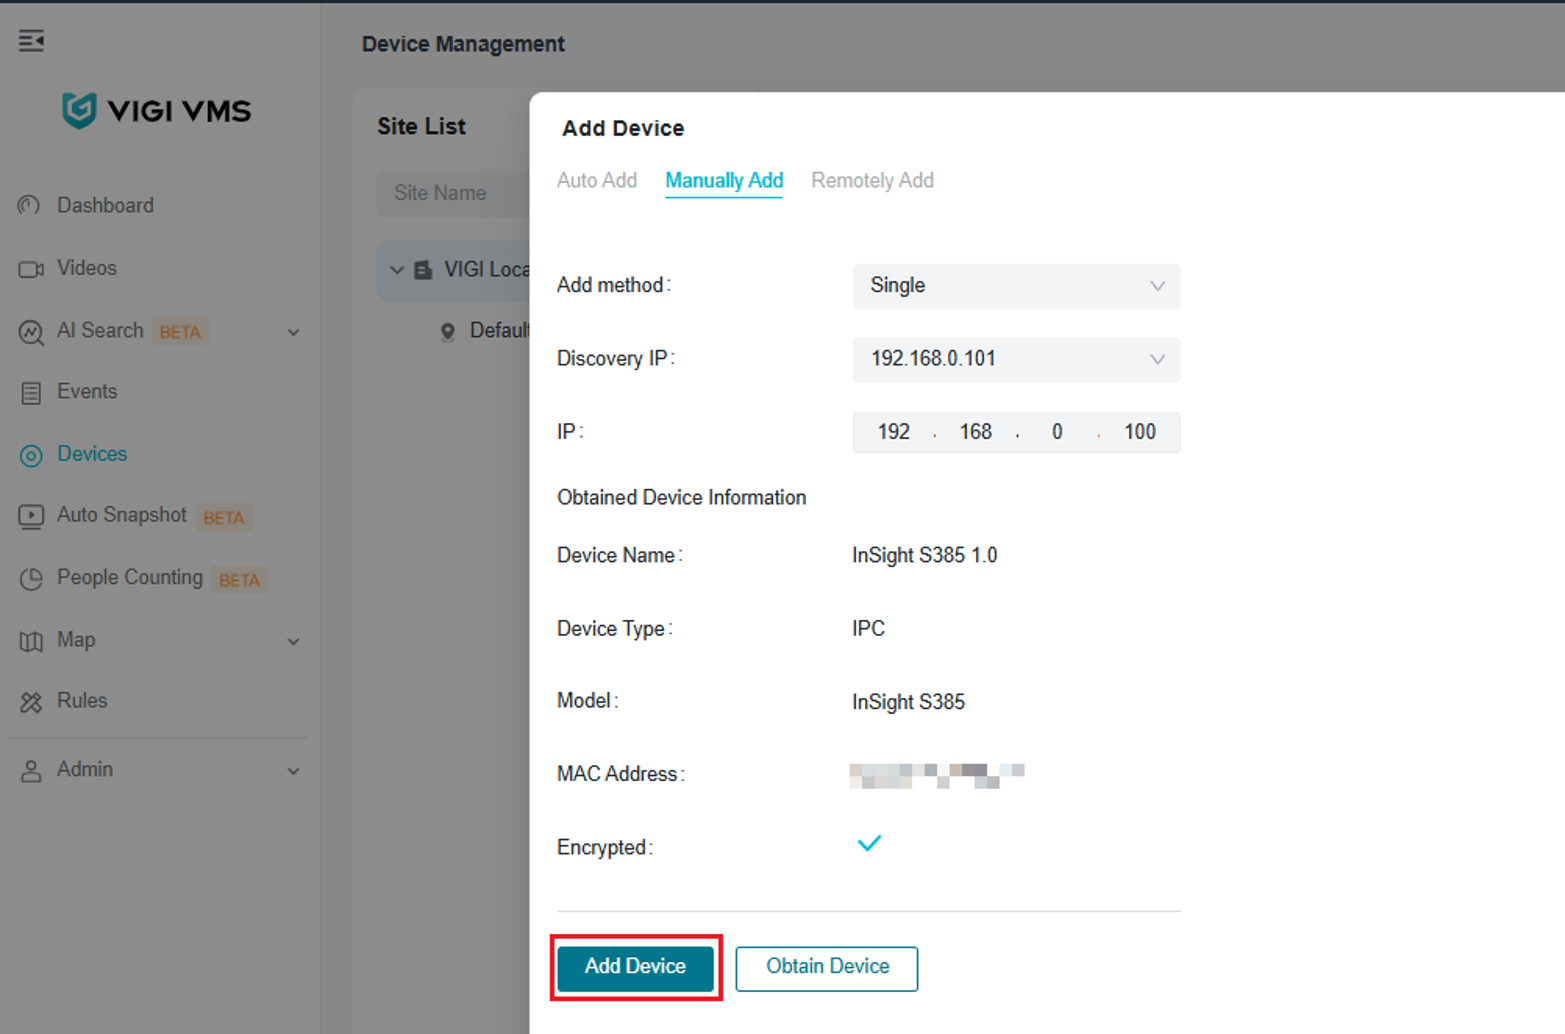
Step 4. Select Add Device, select a site, then select Confirm and Next.
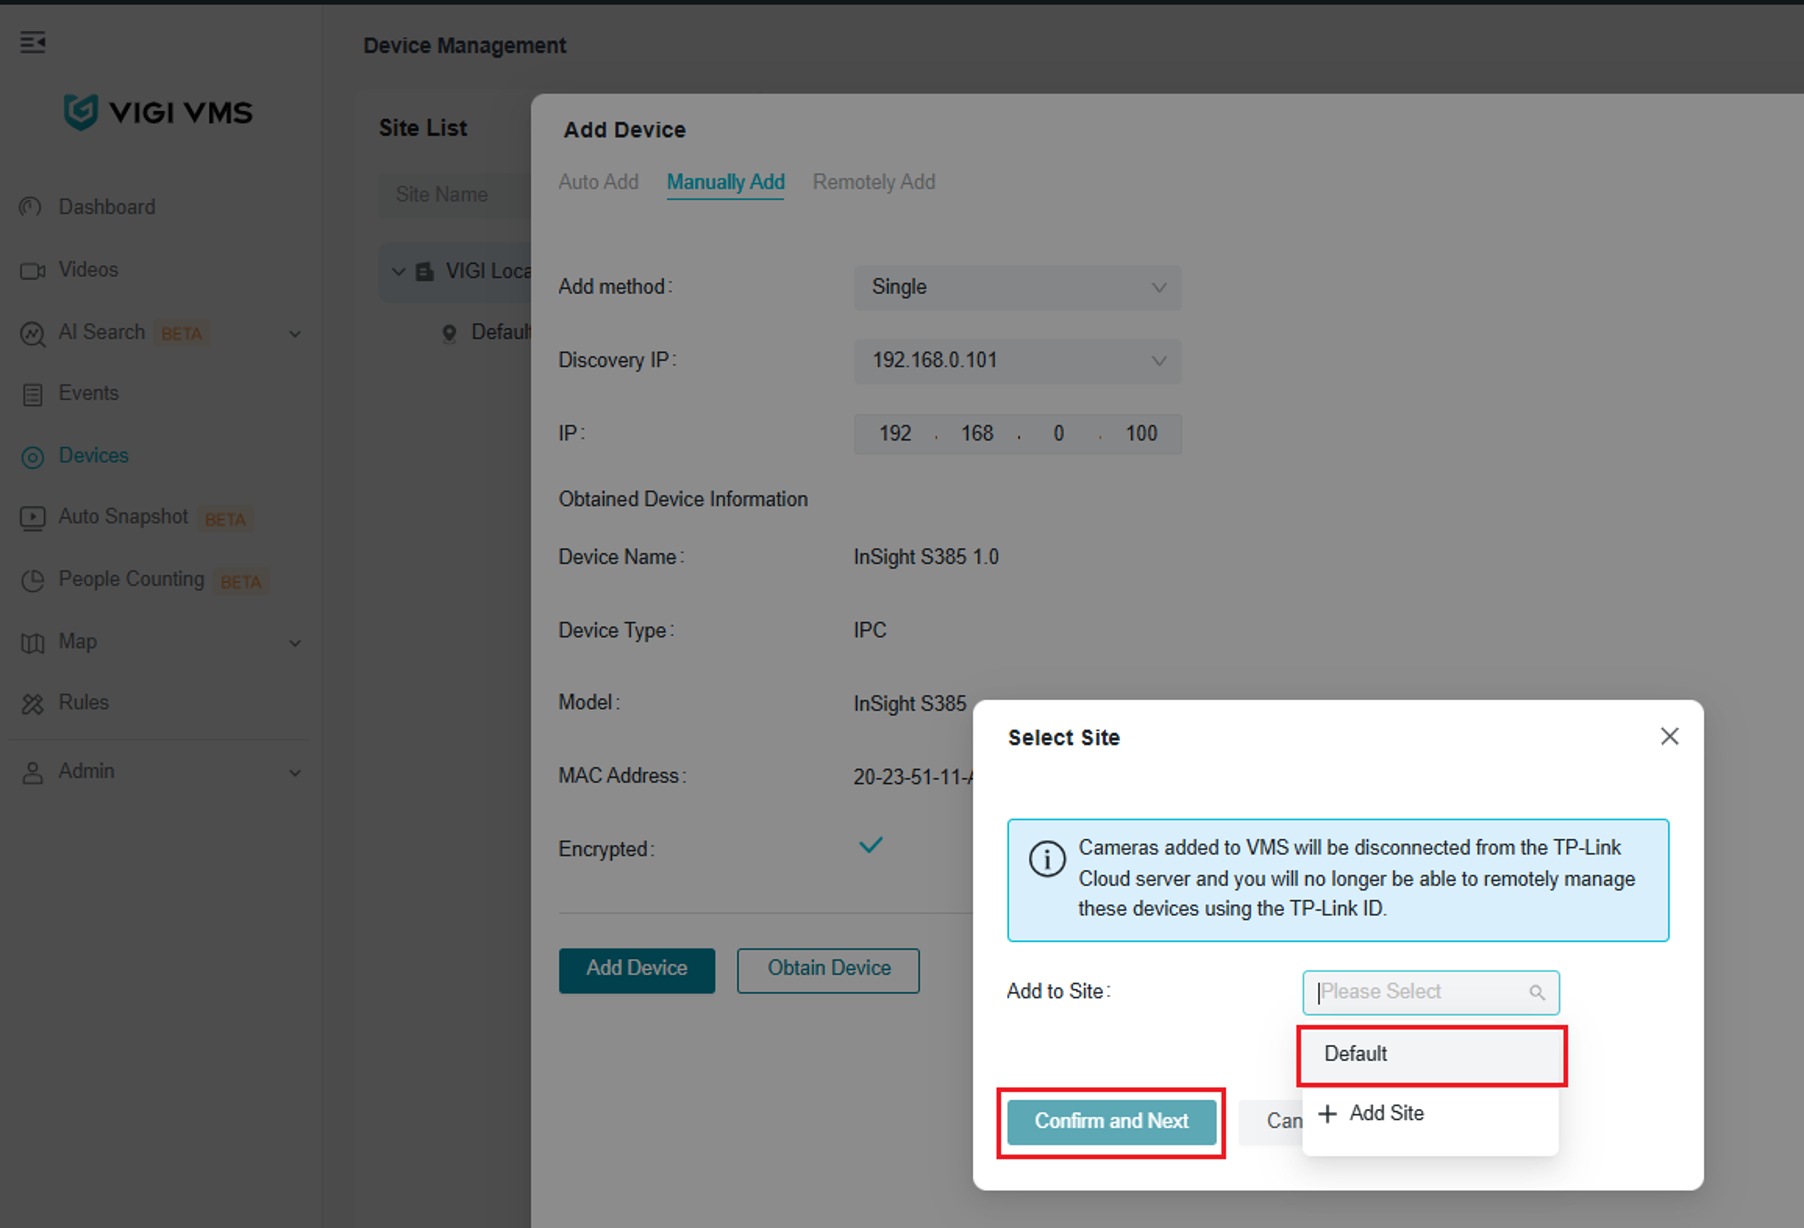
Step 5. A Verify Device Password screen may appear. Enter the preconfigured device credentials and select Confirm. 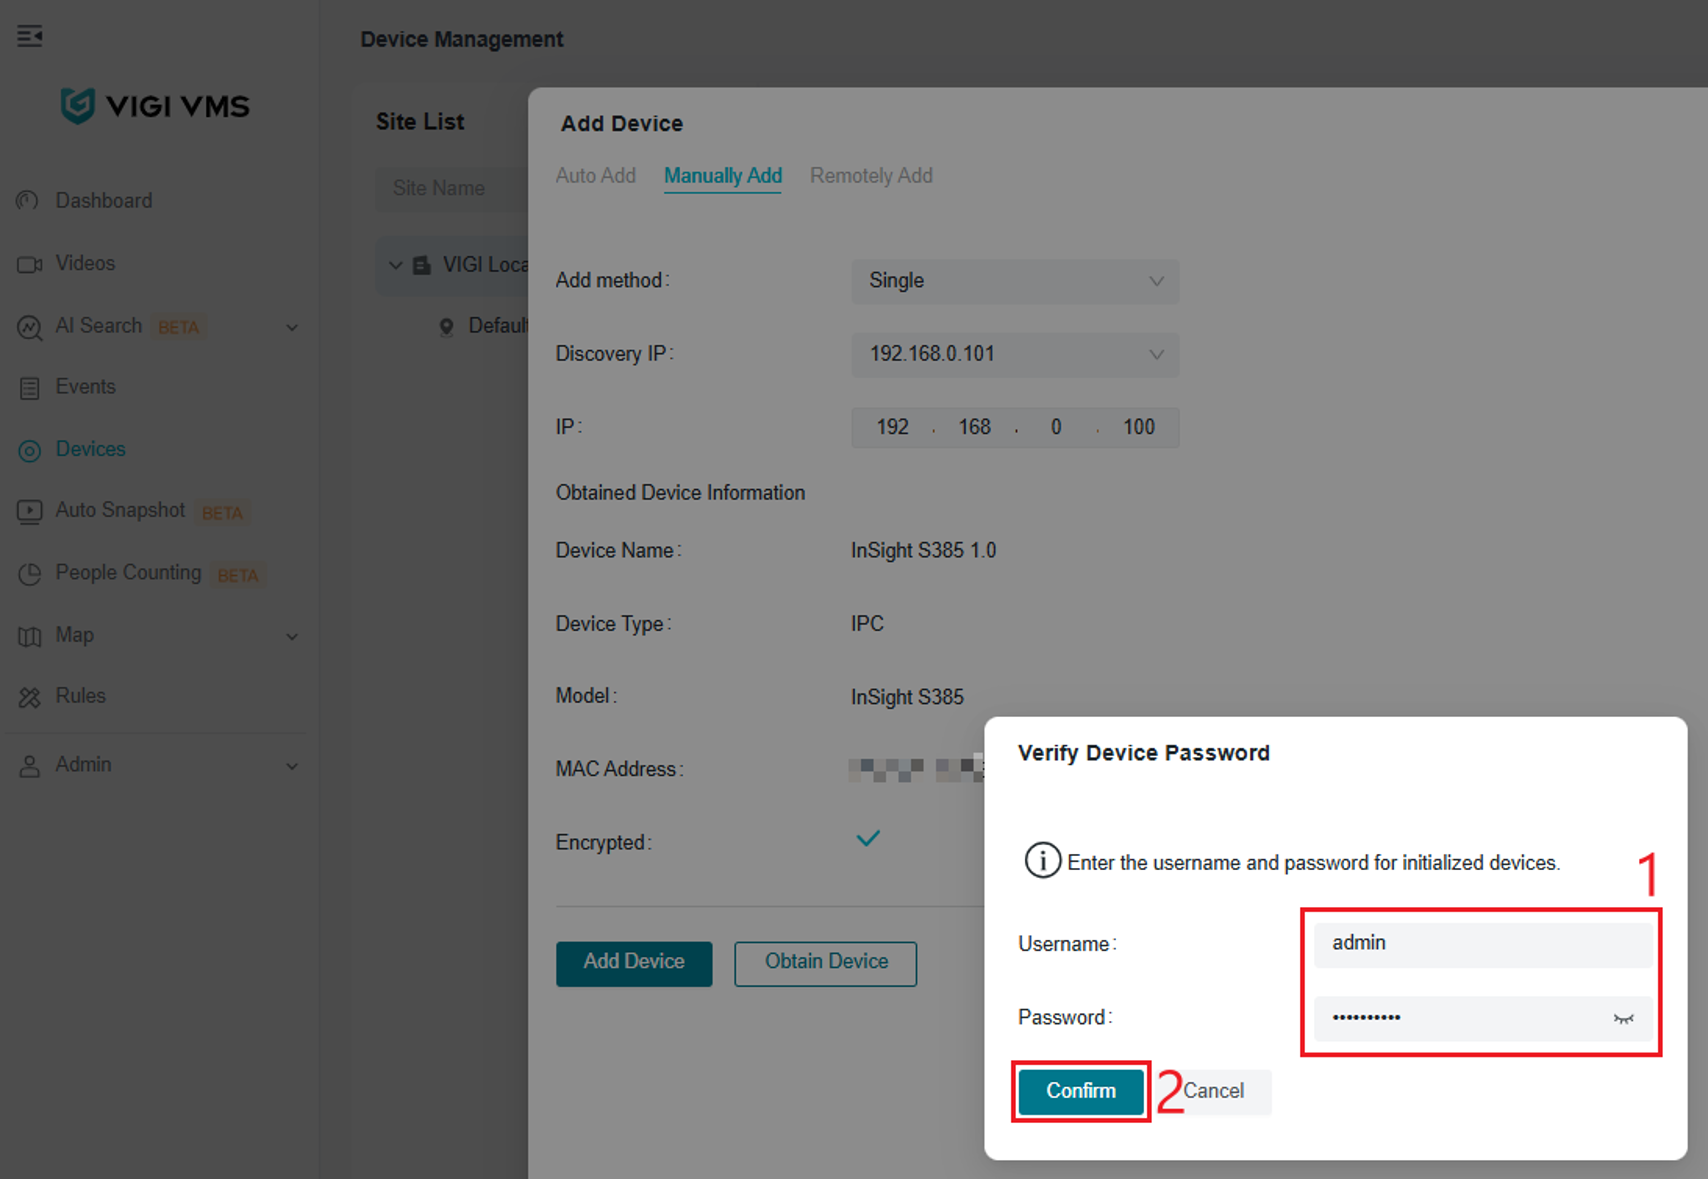
The device has been successfully added using the Manually Add method.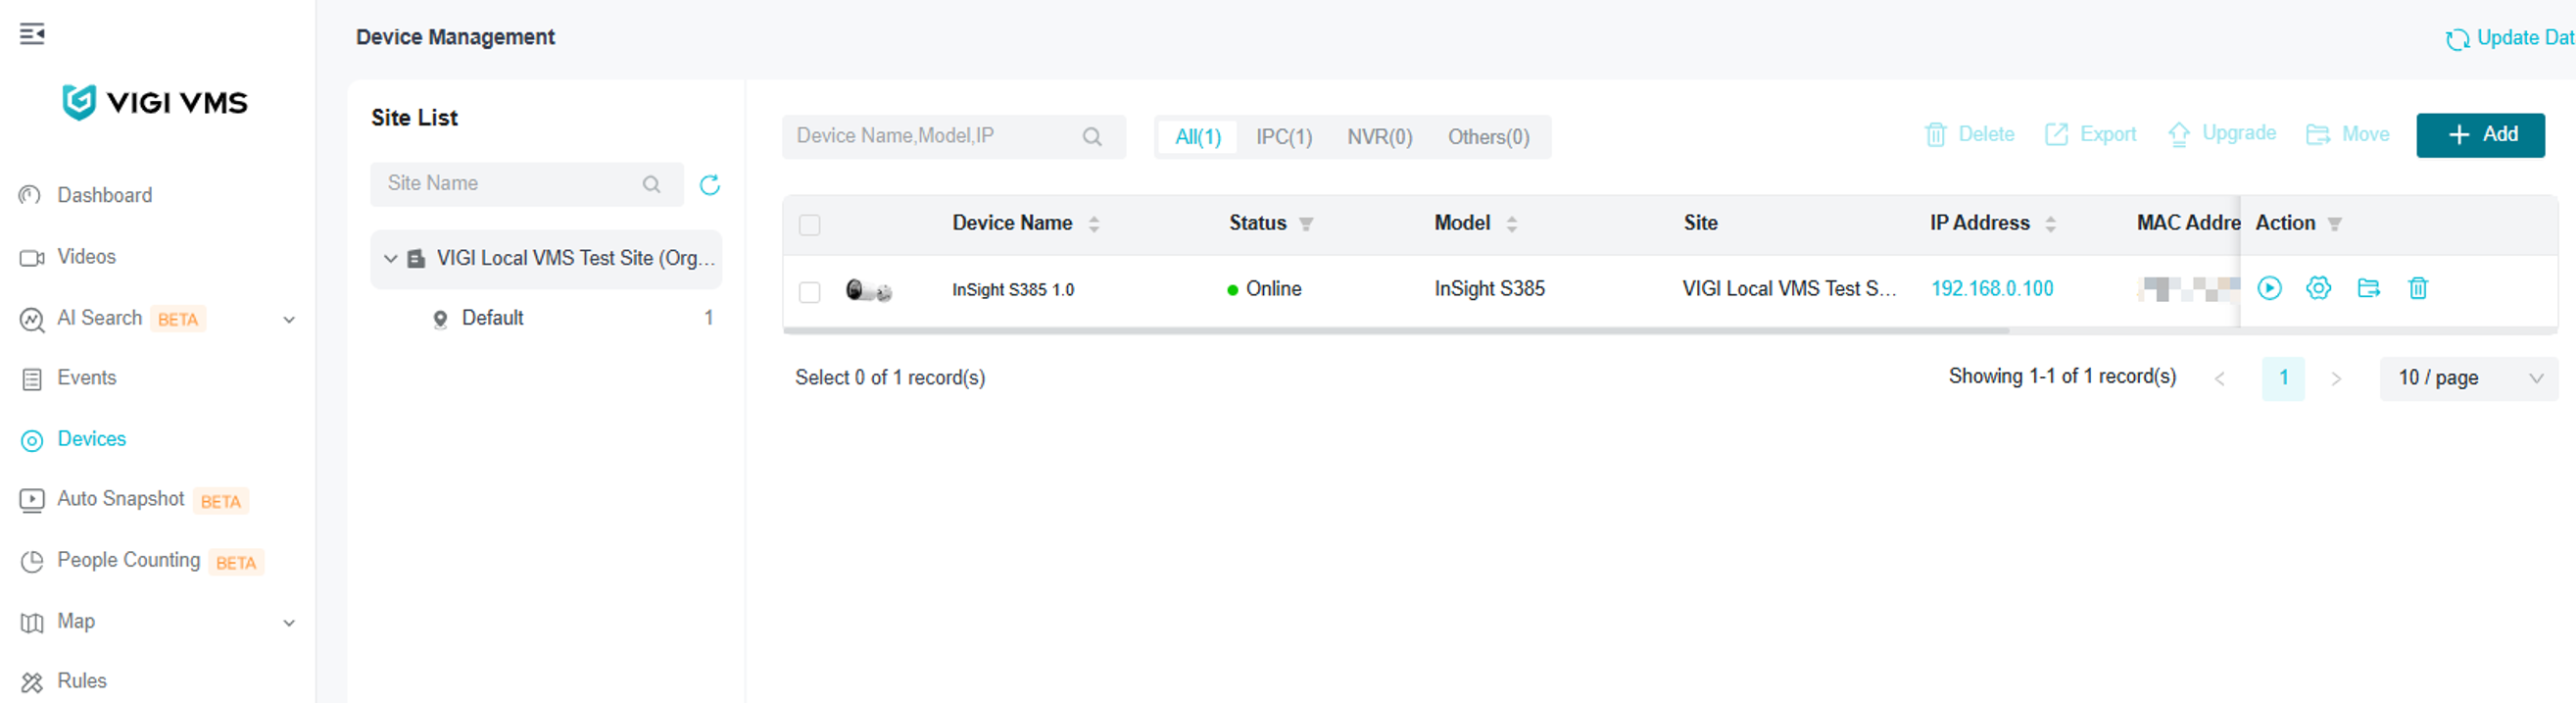
Remote device configuration
Use the following methods when the VIGI device is located at a remote site and needs to connect to the VIGI Local VMS Server over the internet.
Remotely Add
Remotely Add is usually used when the VIGI Local VMS Server is located behind a NAT device and the VIGI device is at a remote location. In this case, the device needs to be connected to the server via the internet. Therefore, Remotely Add requires reliable network connectivity and port forwarding settings on the NAT device.
In addition, using Remotely Add will expose the server to the public internet, which is less secure than using a local network. For distributed network management, it is recommended to use VIGI Cloud VMS.
Step 1. Configure port forwarding on the router connected to the VIGI Local VMS Server. Configure ports 8081, 8082, 10123, and 10556.
Step 2. Log in to the web management interface of the remote VIGI device and then go to Settings > Network Settings > Platform Access. Enable Access to VIGI VMS, enter the public IP address of the router connected to the VIGI Local VMS Server, and configure the port for connecting VMS (10123 by default). Select Apply.
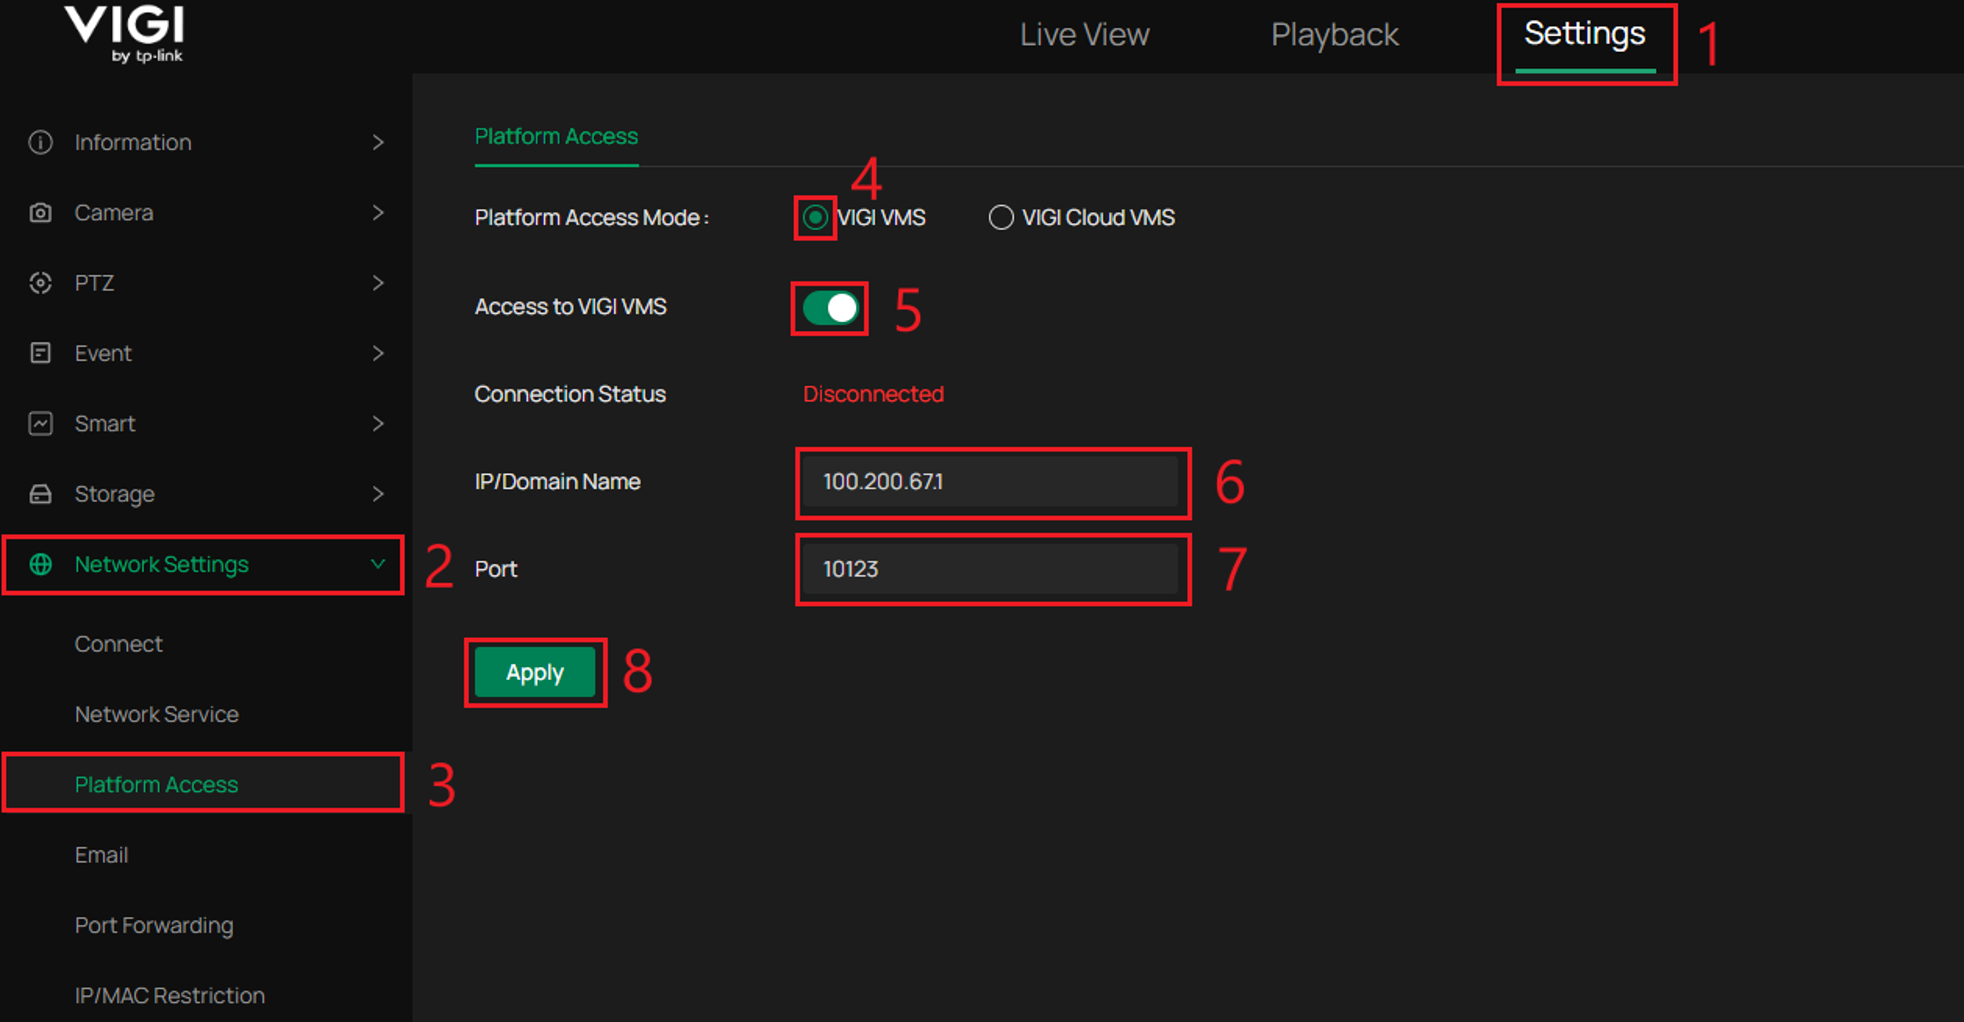
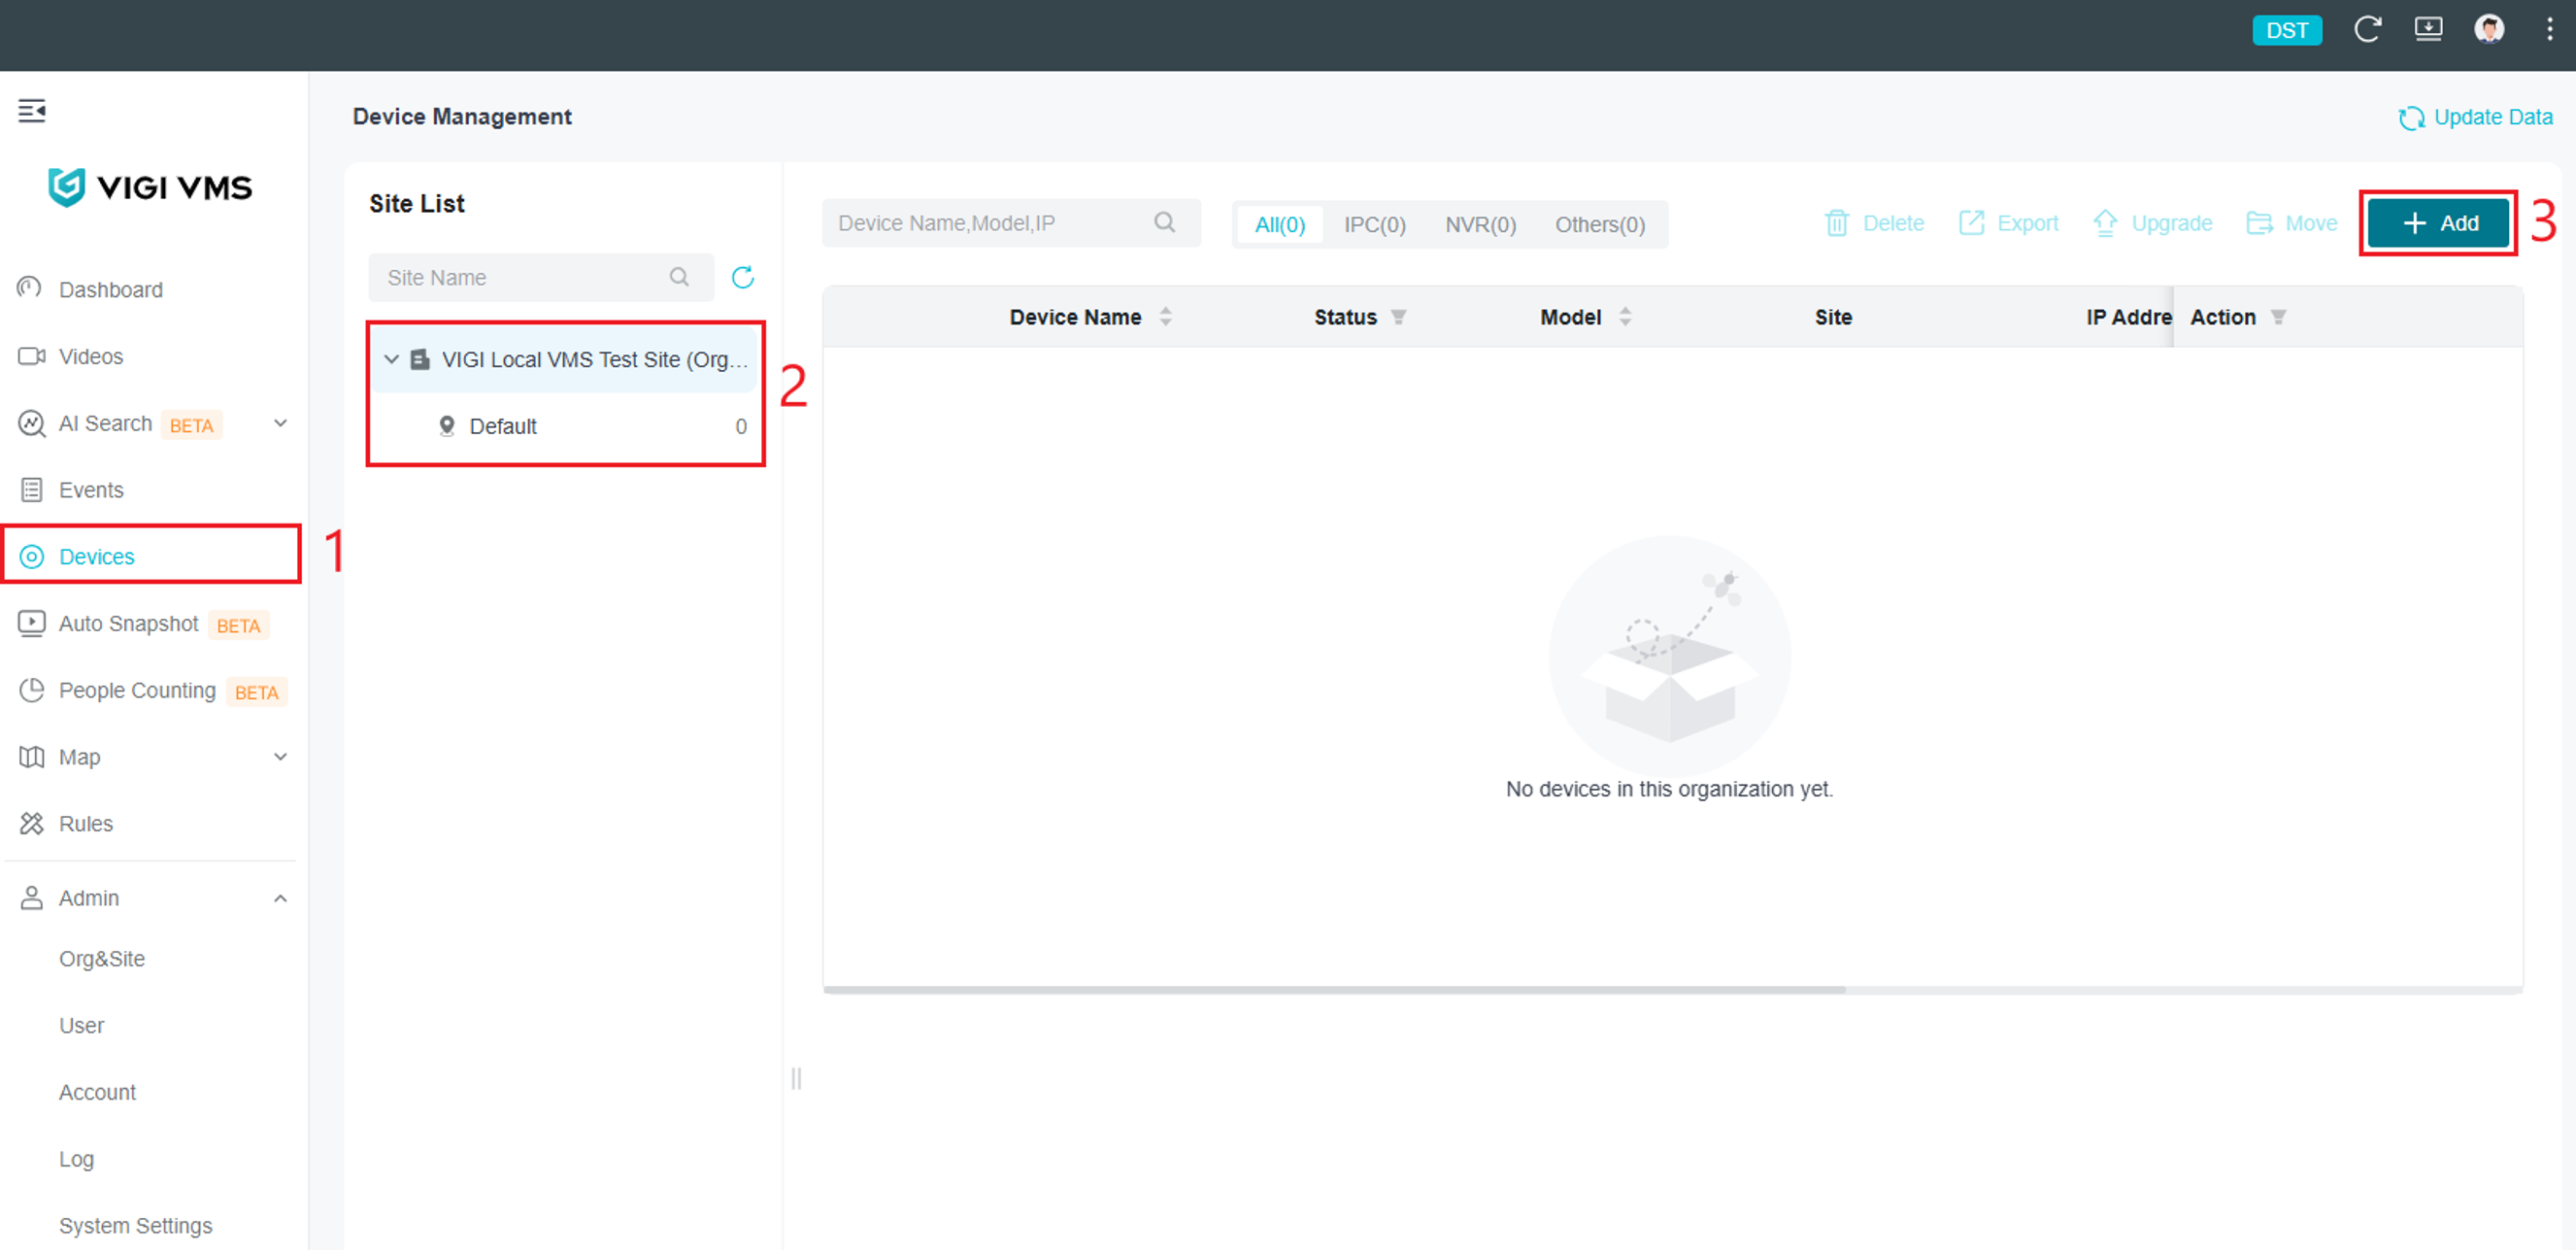
Step 3. Open VIGI Local VMS. Go to Devices, select the site, then select Add.
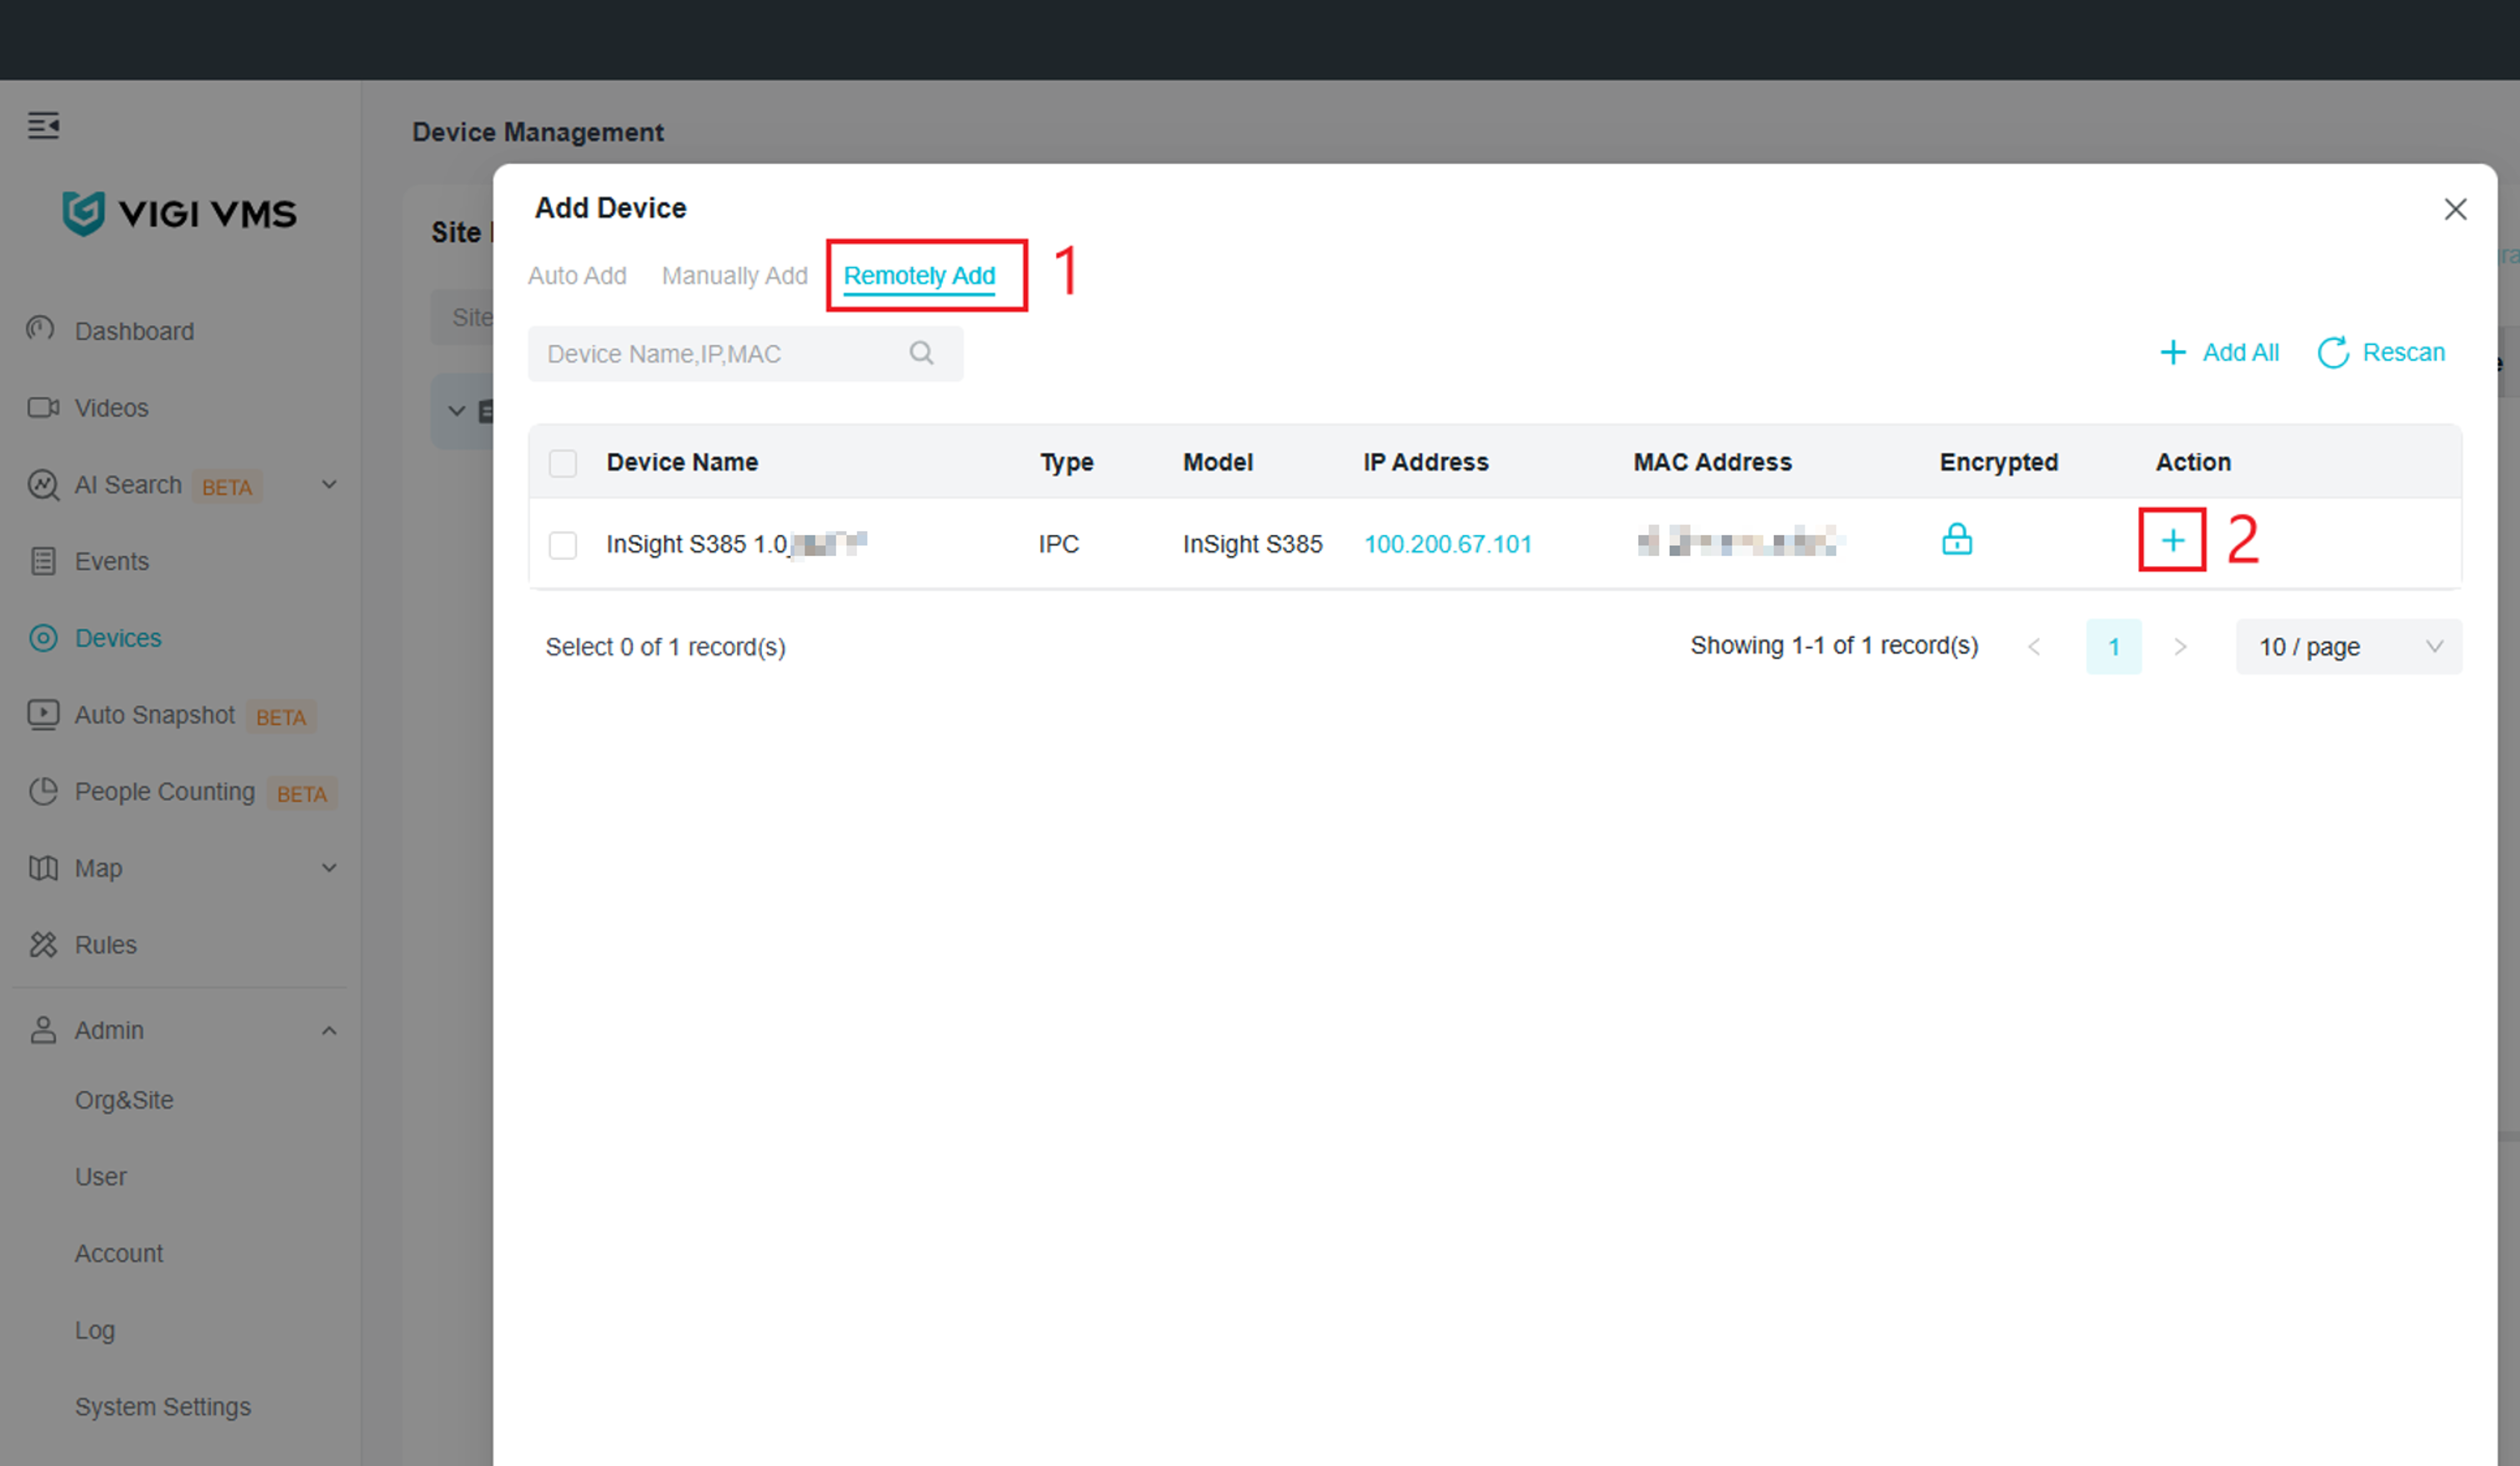
Step 4. Select Remotely Add. Select the plus button next to the device to add it to VIGI Local VMS.
Note: Devices can be added in a batch or by using the Add All function. To add devices in a batch, select the checkboxes on the left. The Batch Add option will appear, allowing you to add the selected devices to VIGI Local VMS.
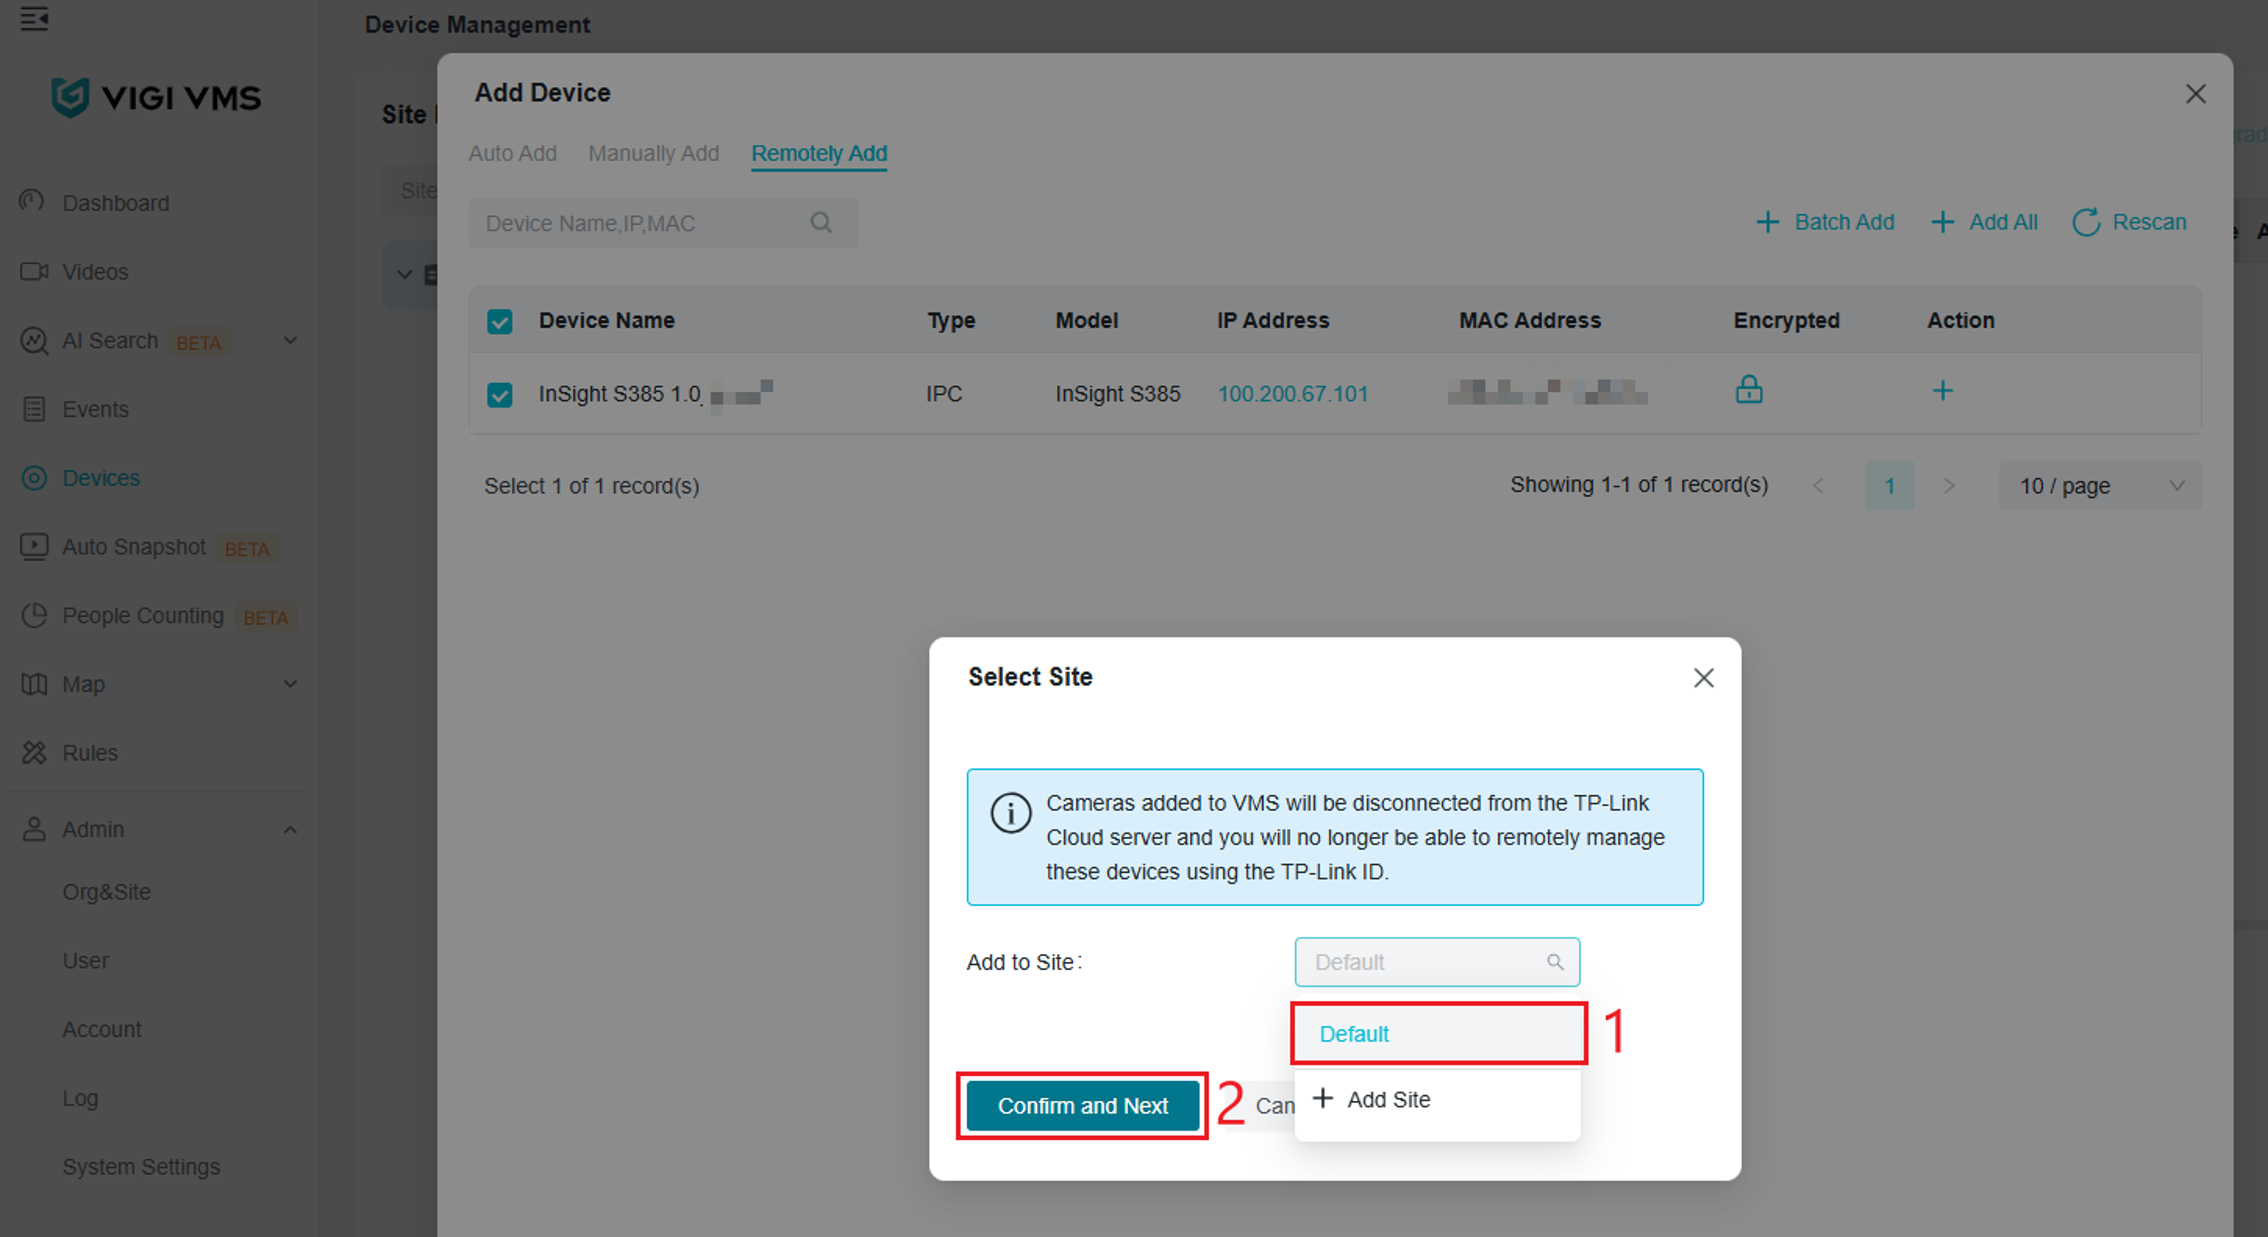
Step 5. A Select Site menu will appear. Select the site to add the device to using the Add to Site dropdown menu. Select Confirm and Next.
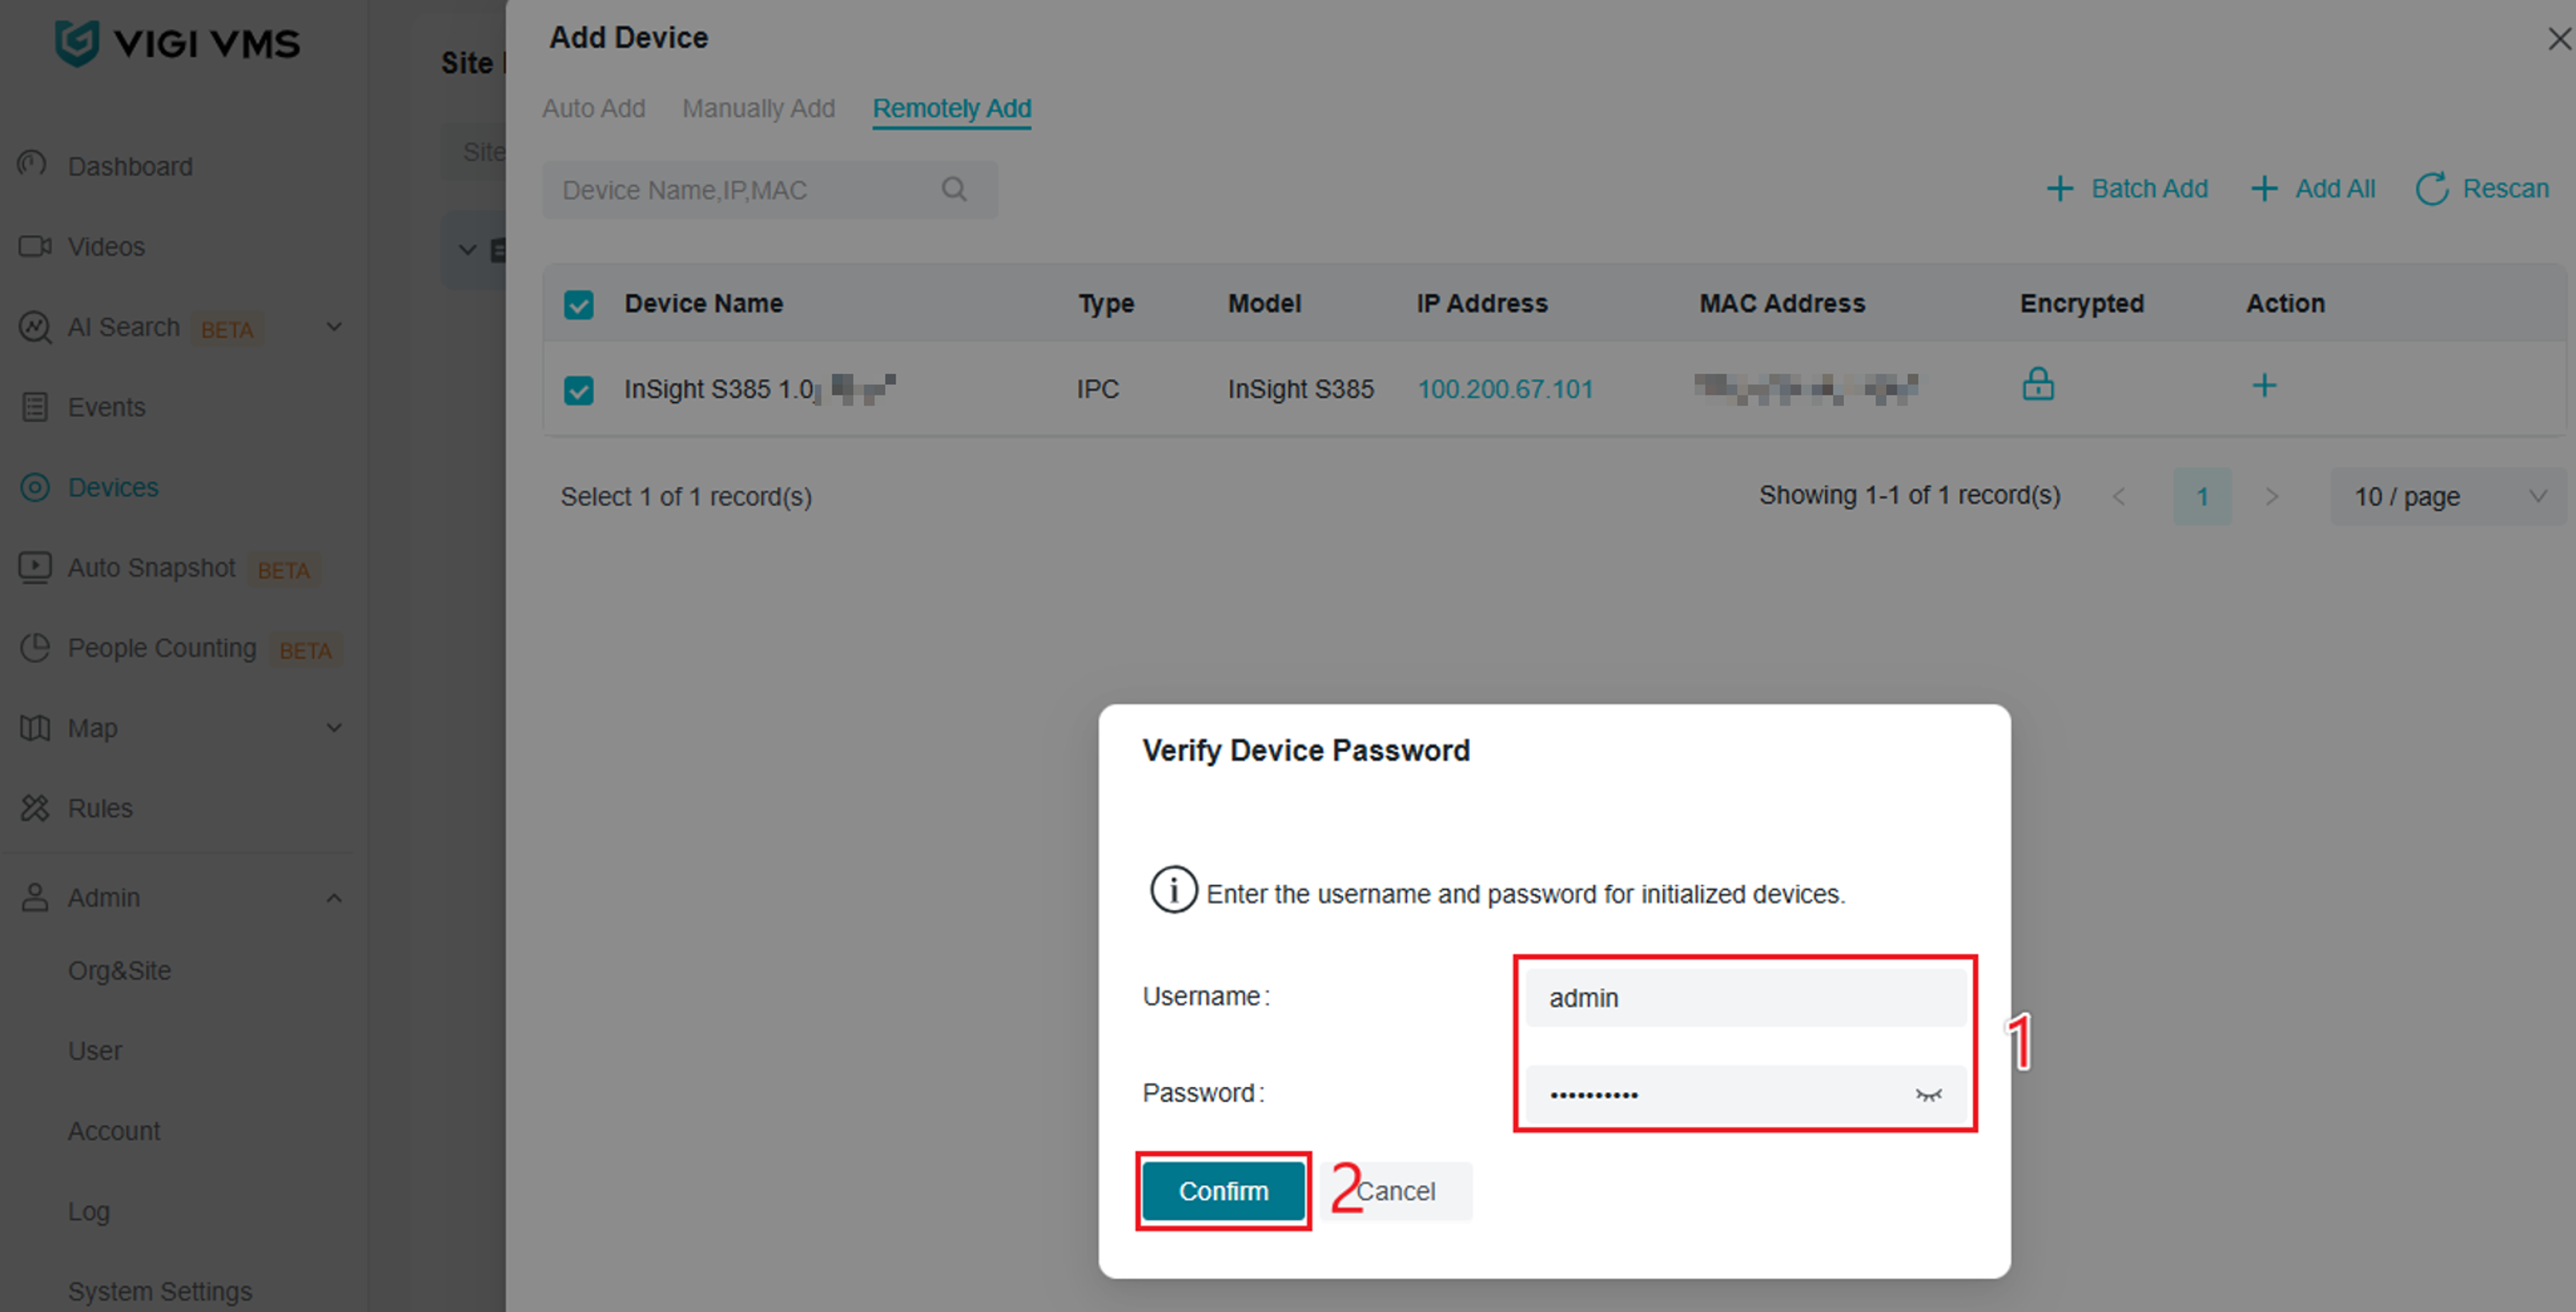
Step 6. A Verify Device Password menu will appear. Enter the credentials of the device and select Confirm.
The device has been successfully added using the Remotely Add method.
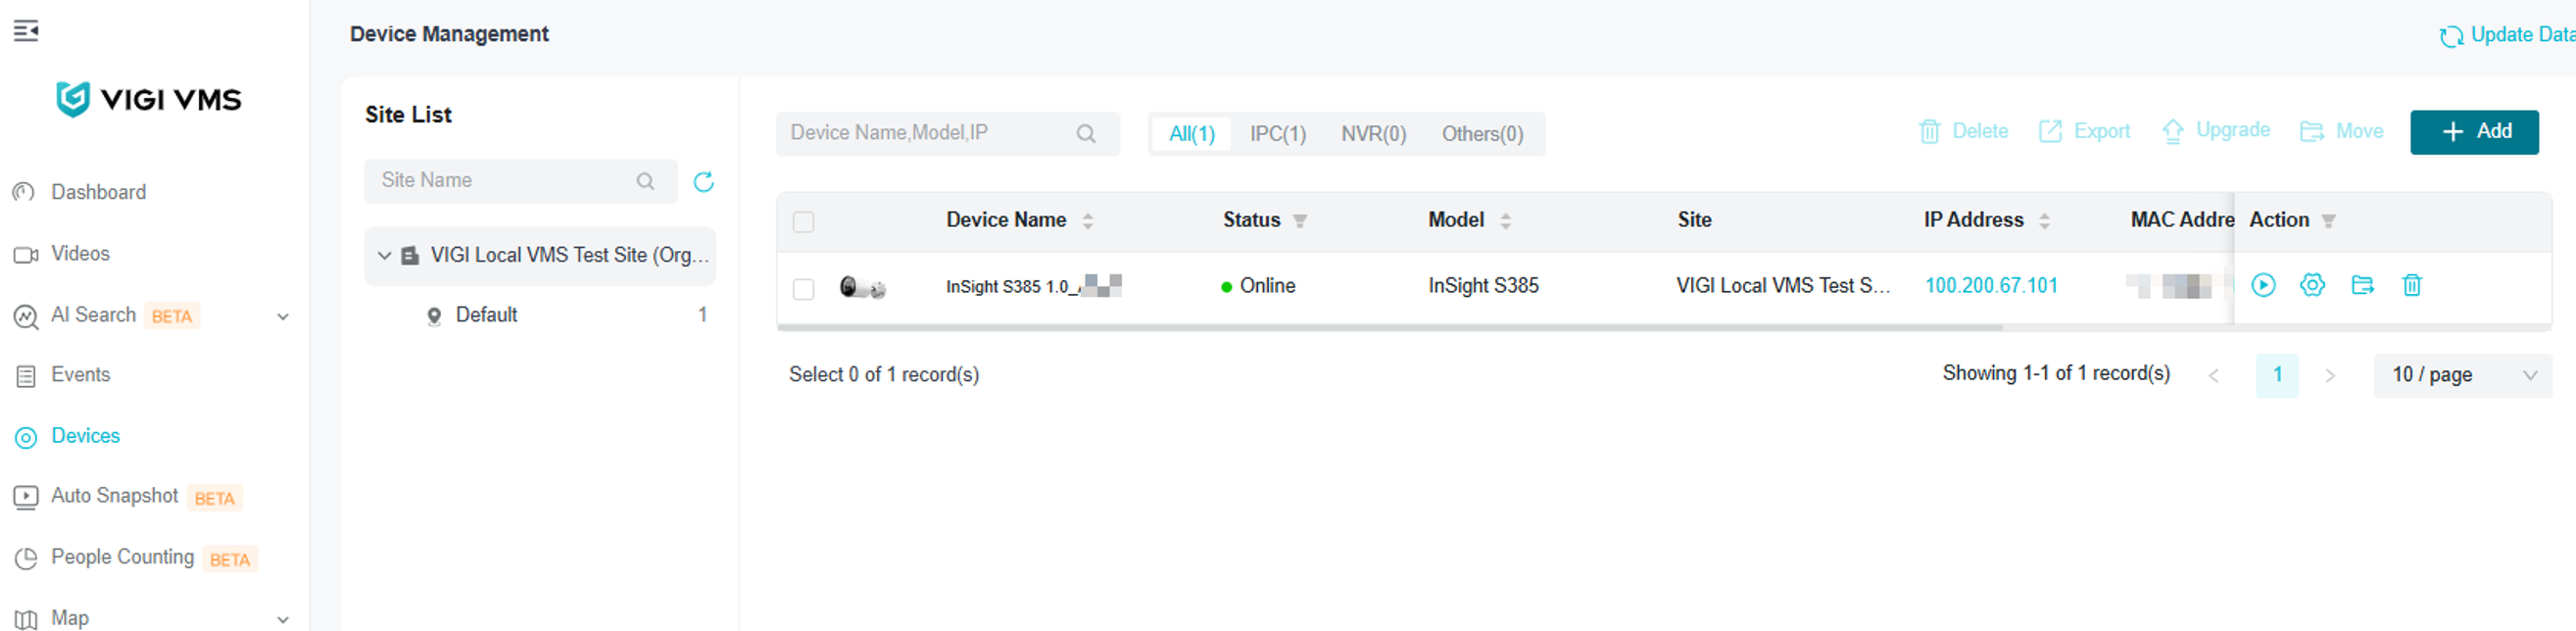
Inform URL
Inform URL is usually used when a VIGI device is located at a remote site and needs to connect to a VIGI Local VMS over the internet. With this method, the VIGI Local VMS URL is configured on the device, and the device then initiates the connection to the VMS.
Because the connection is initiated by the VIGI device, the VMS does not need to discover the device across the remote network. However, the device must be able to reach the configured VMS Inform URL, and the VIGI Local VMS must be accessible from the device's network.
Step 1. Configure port forwarding on the router connected to the VIGI Local VMS Server. Ensure that service ports 6000, 6005, 10122, and 10123, as well as Inform URL ports 29810 and 29814, are reachable from the VIGI device through the WAN interface.
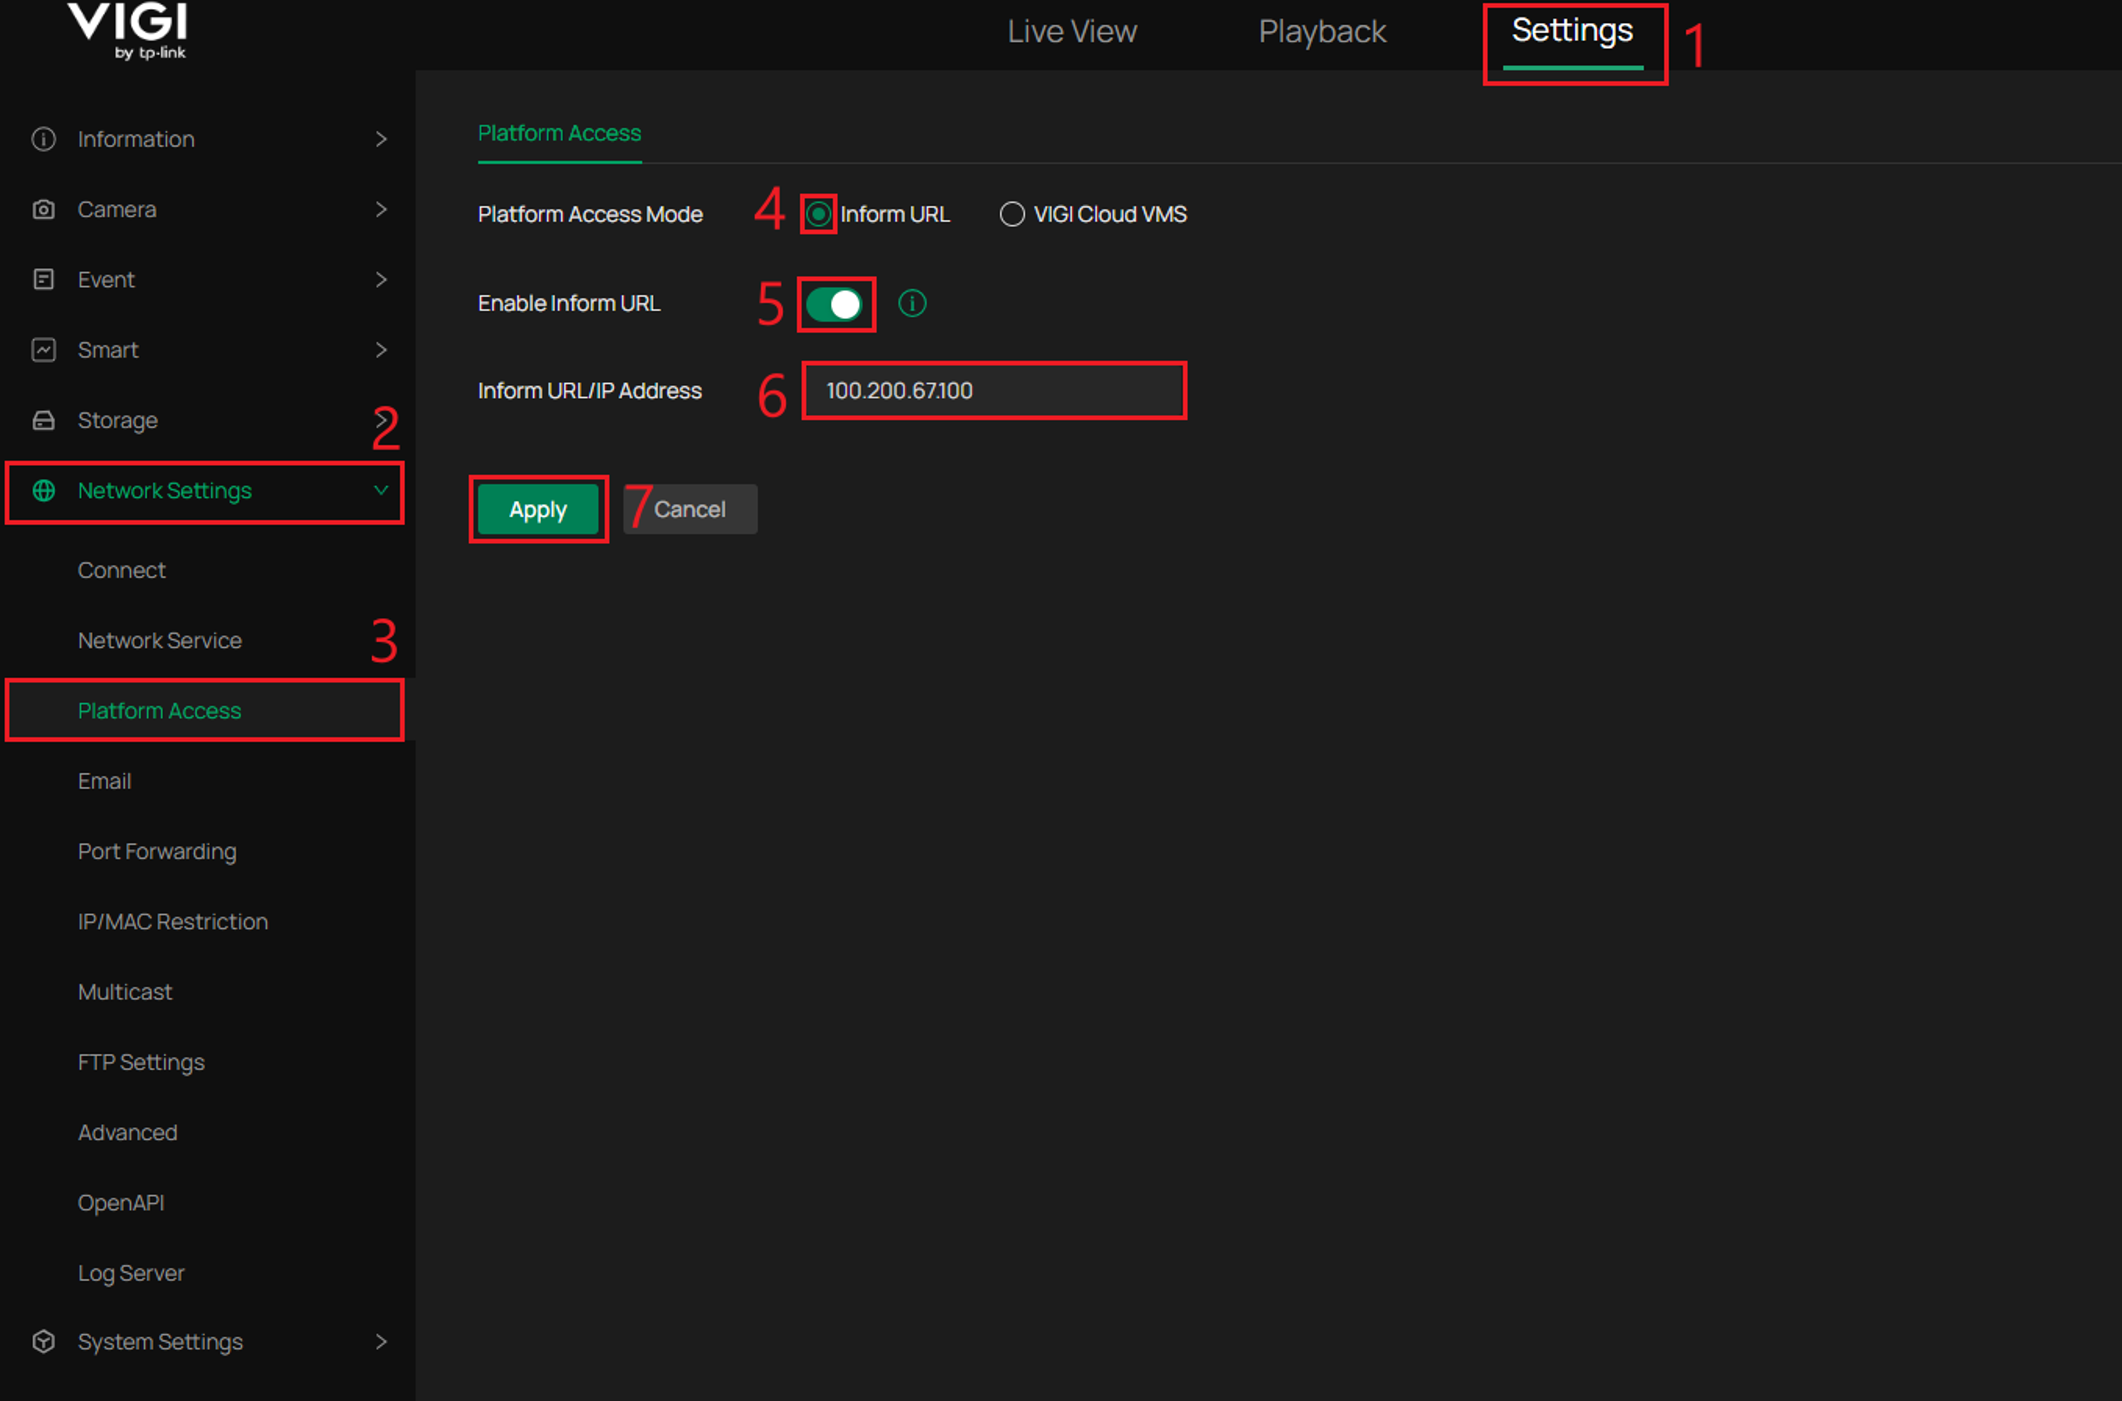
Step 2. Log in to the web management interface of the remote VIGI device and then go to Settings > Network Settings > Platform Access. Select Inform URL, Enable Inform URL, then set the Inform URL address of the VIGI Local VMS Server.
Note: The Inform URL should be set to the WAN IP address of the router at the VIGI Local VMS site. The router will receive the connection from the remote VIGI device and forward the required traffic to the VIGI Local VMS Server.
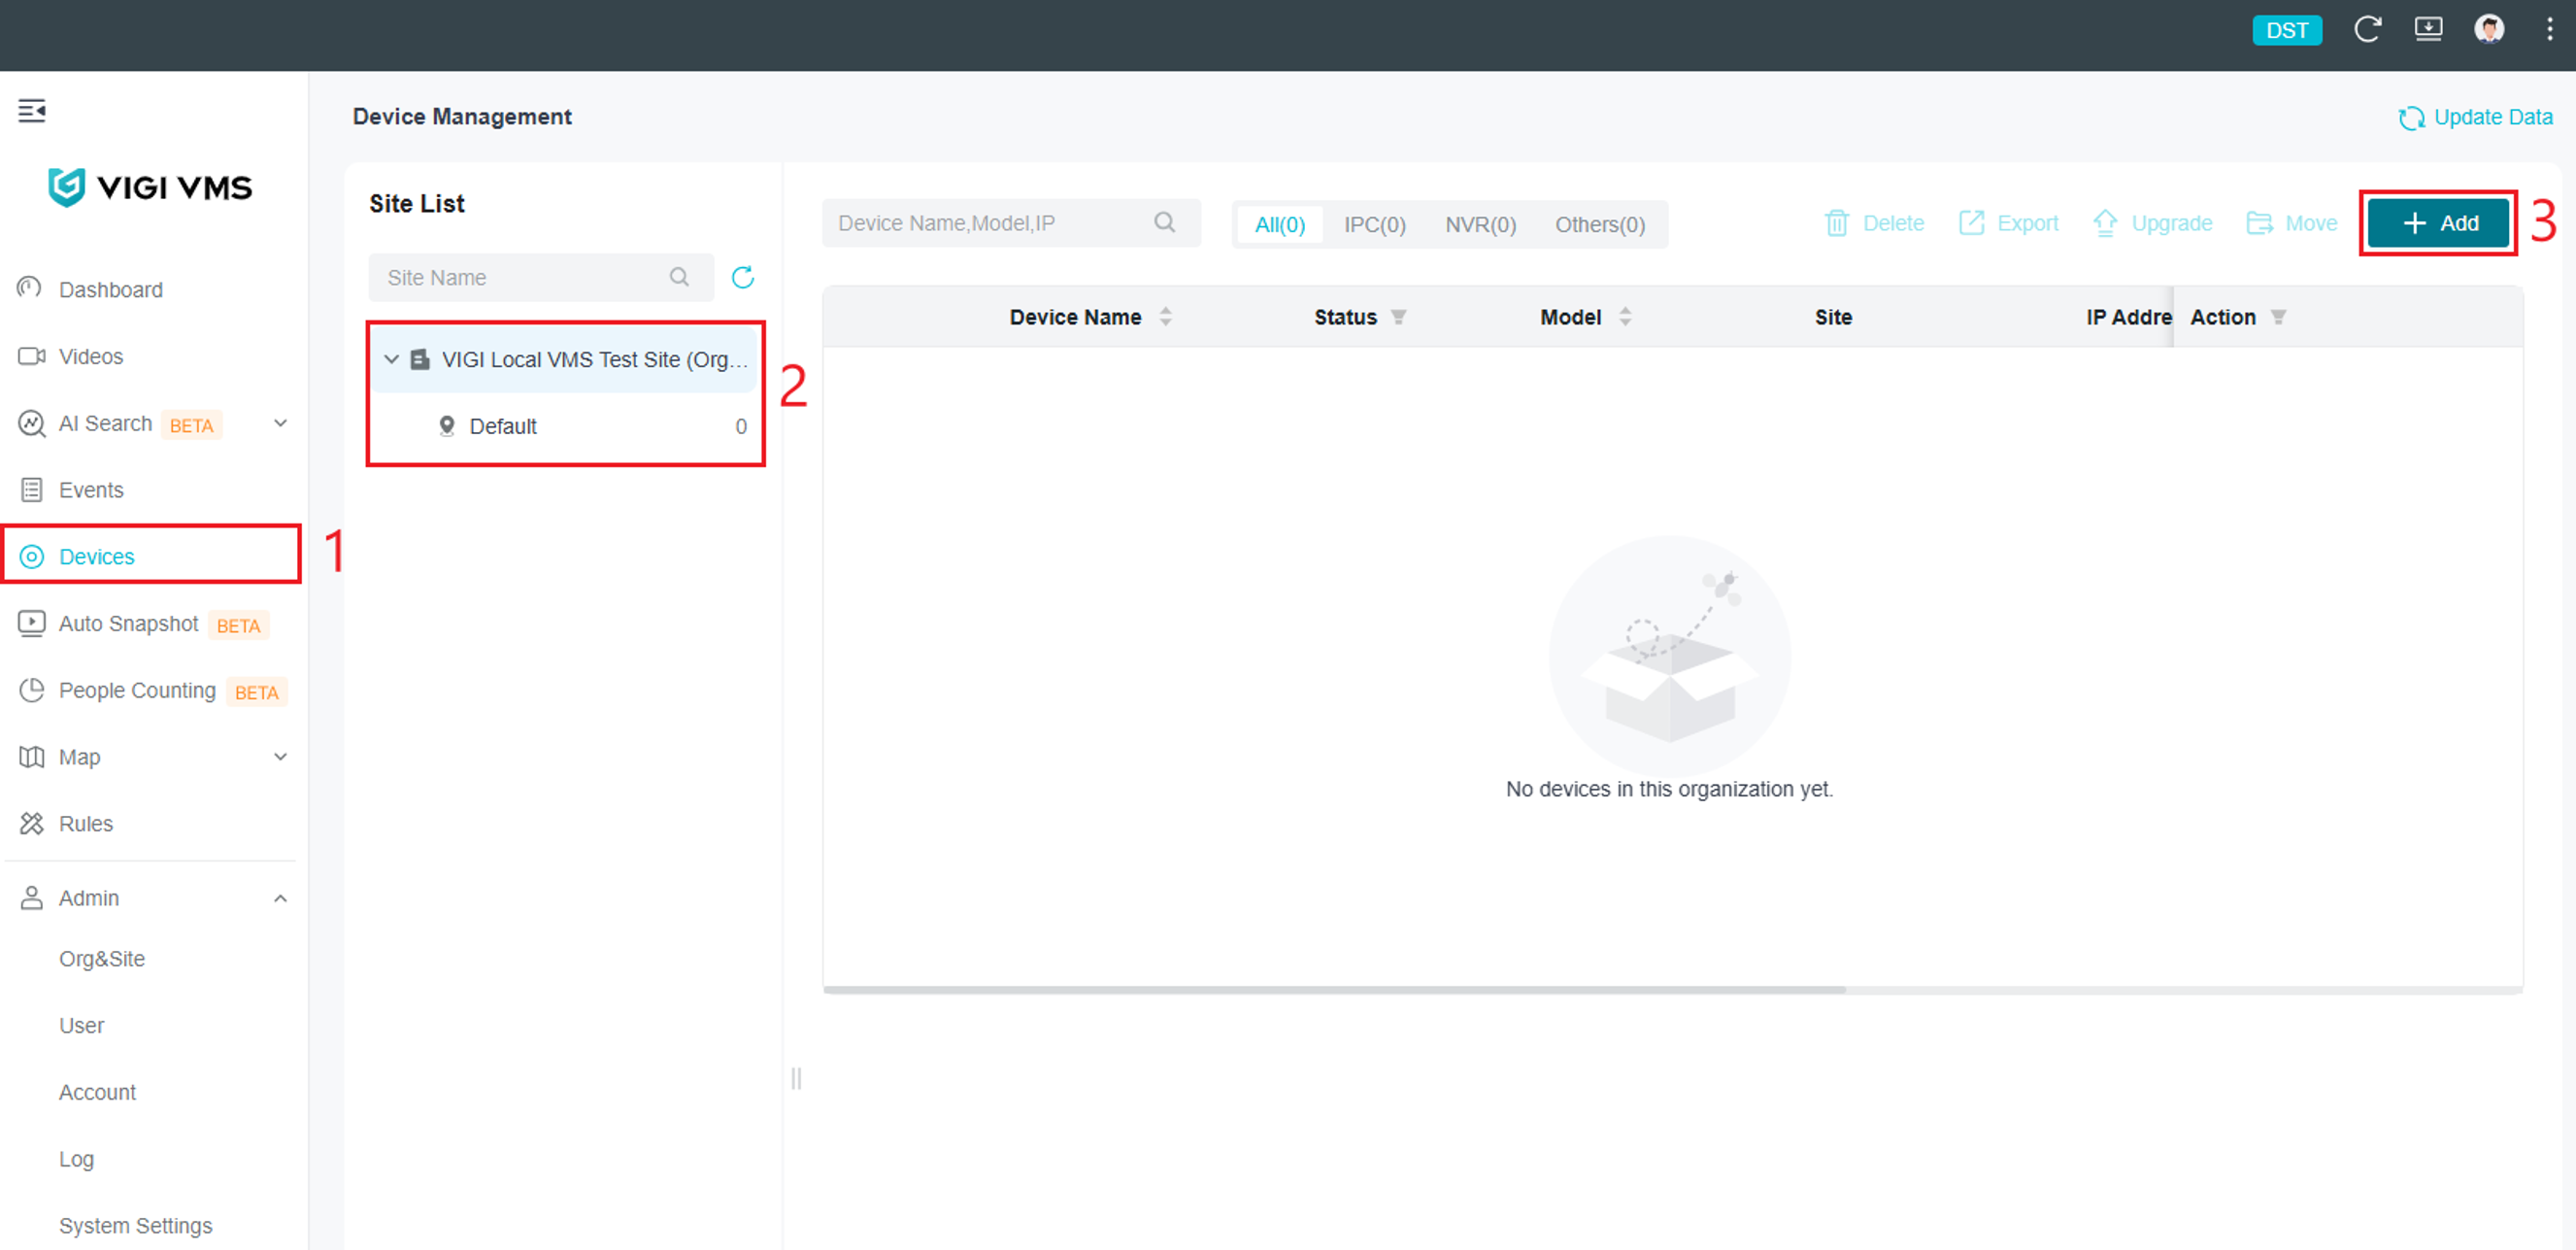
Step 3. Open VIGI Local VMS. Go to Devices, select the site, then select Add.
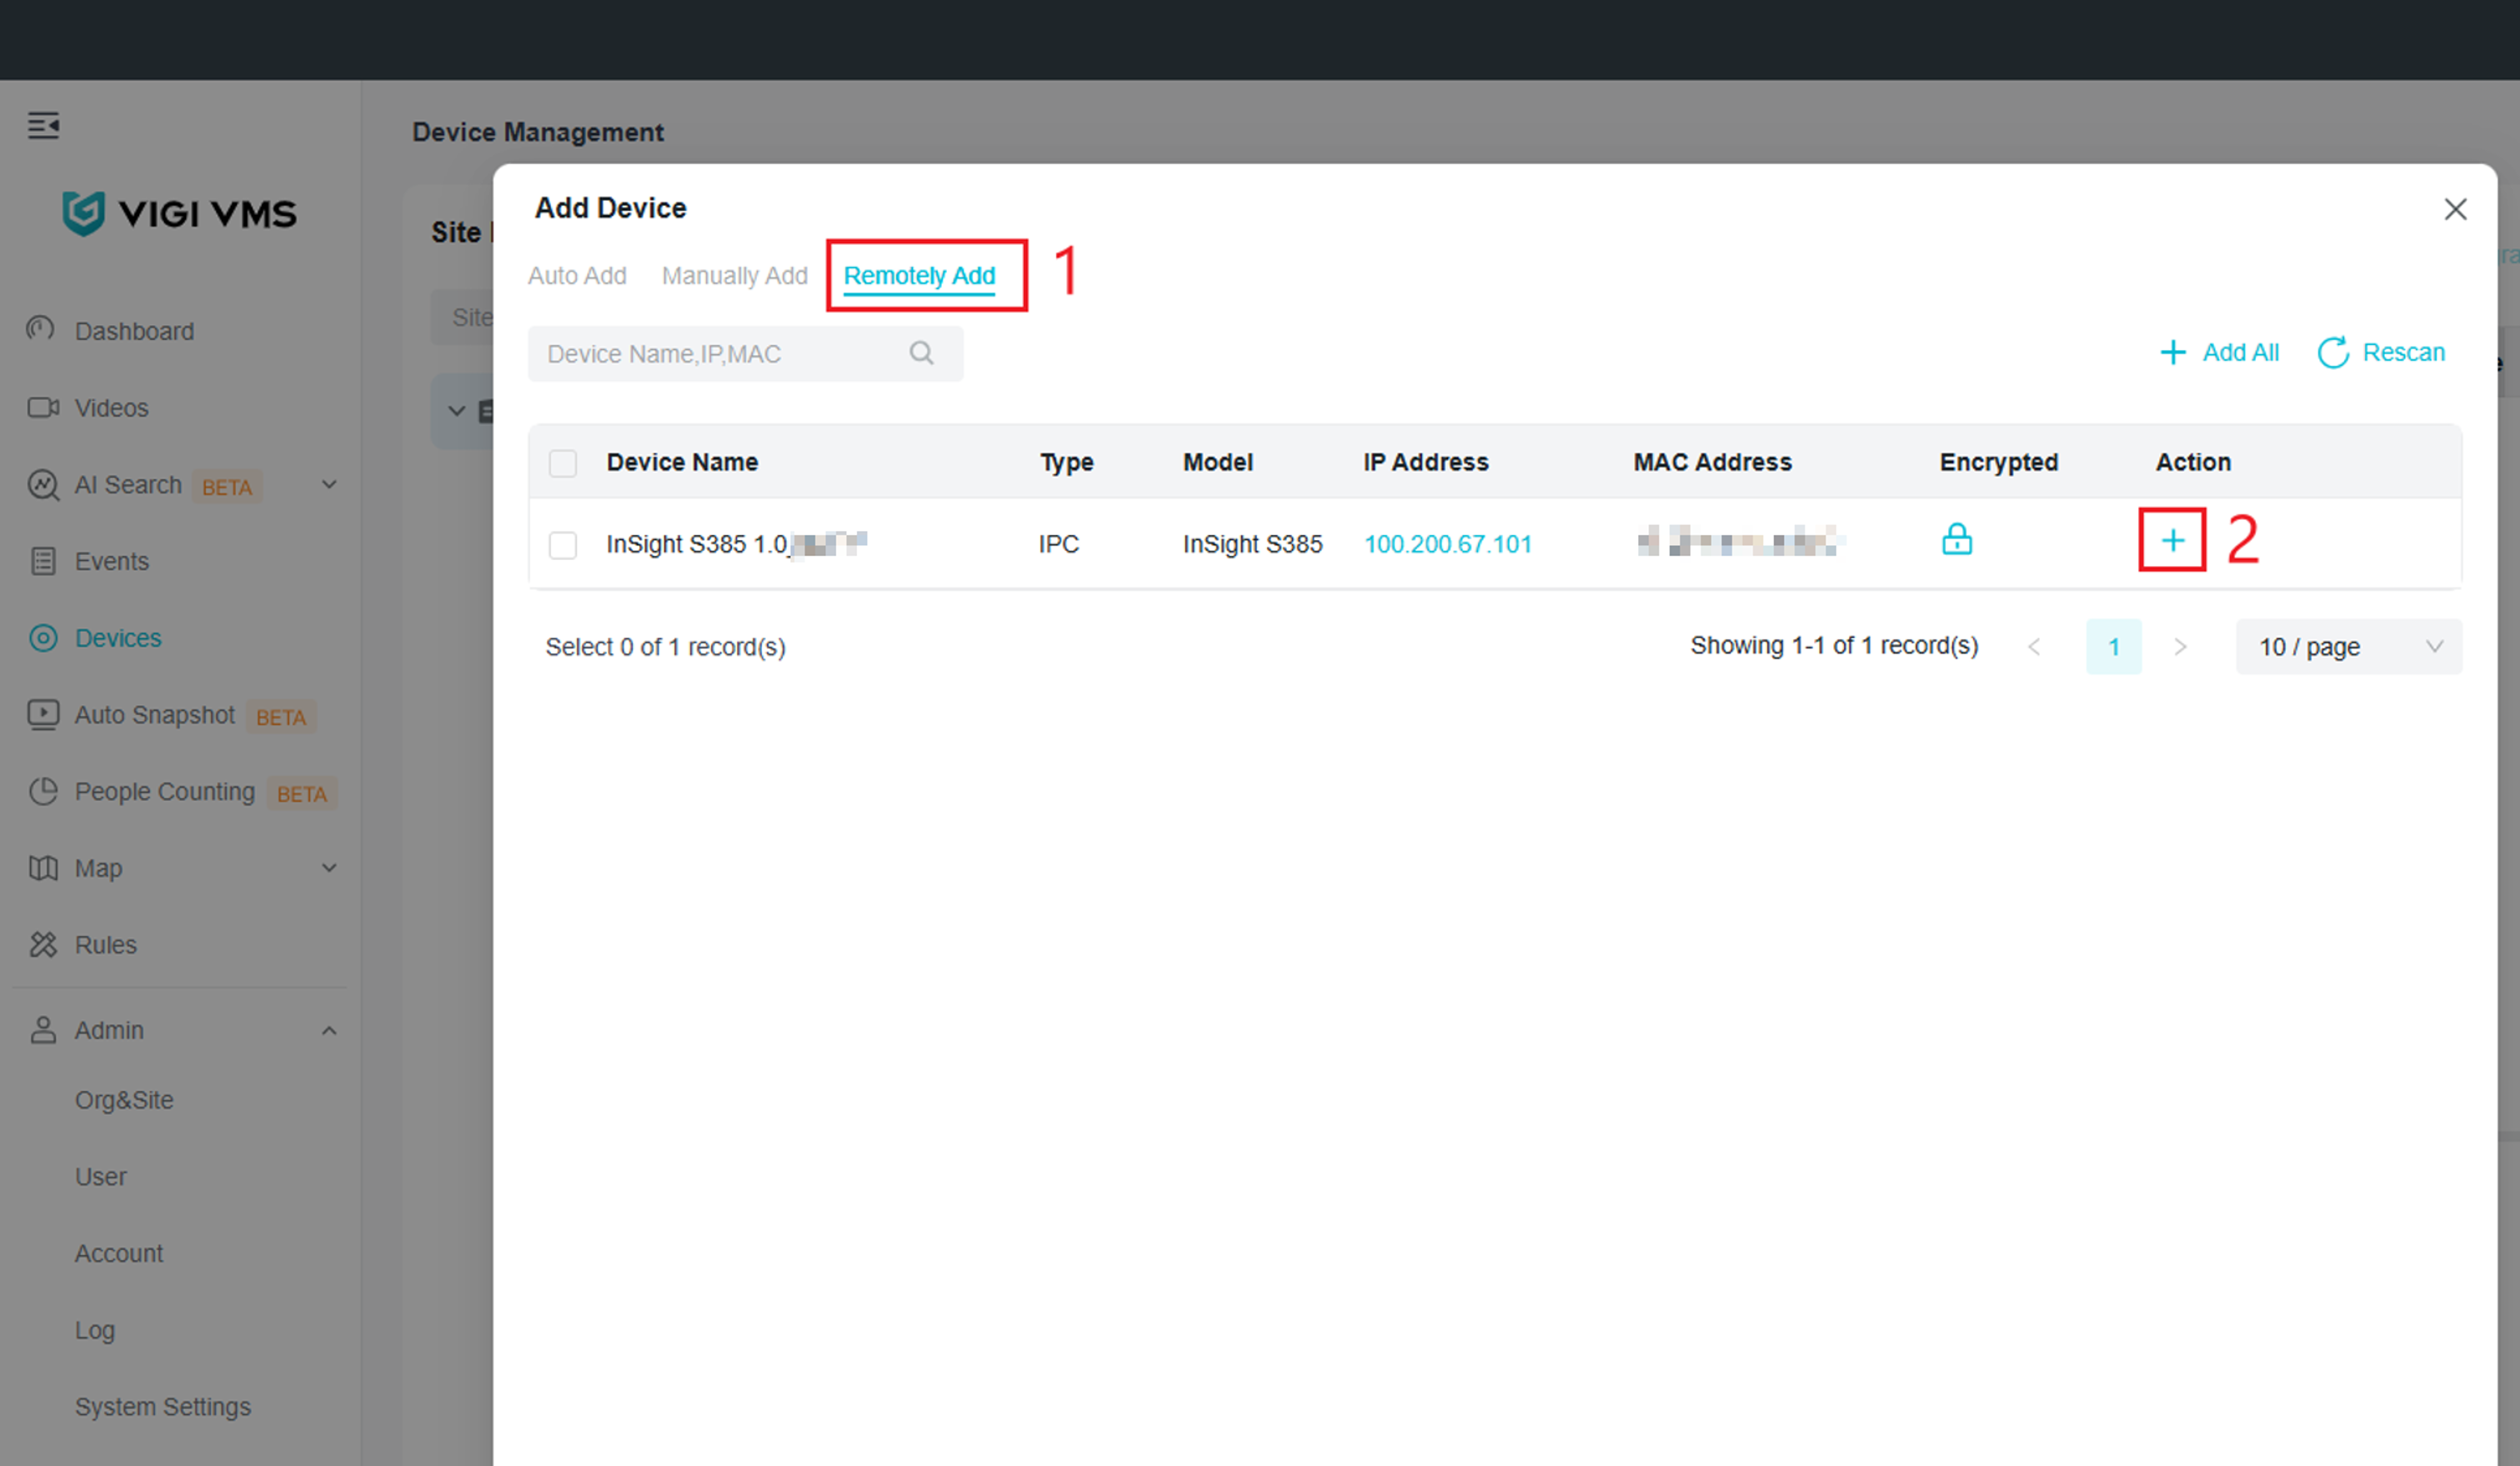
Step 4. Select Remotely Add. Select the plus button next to the device to add it to VIGI Local VMS.
Note: Devices can be added in a batch or by using the Add All function. To add devices in a batch, select the checkboxes on the left. The Batch Add option will appear, allowing you to add the selected devices to VIGI Local VMS.
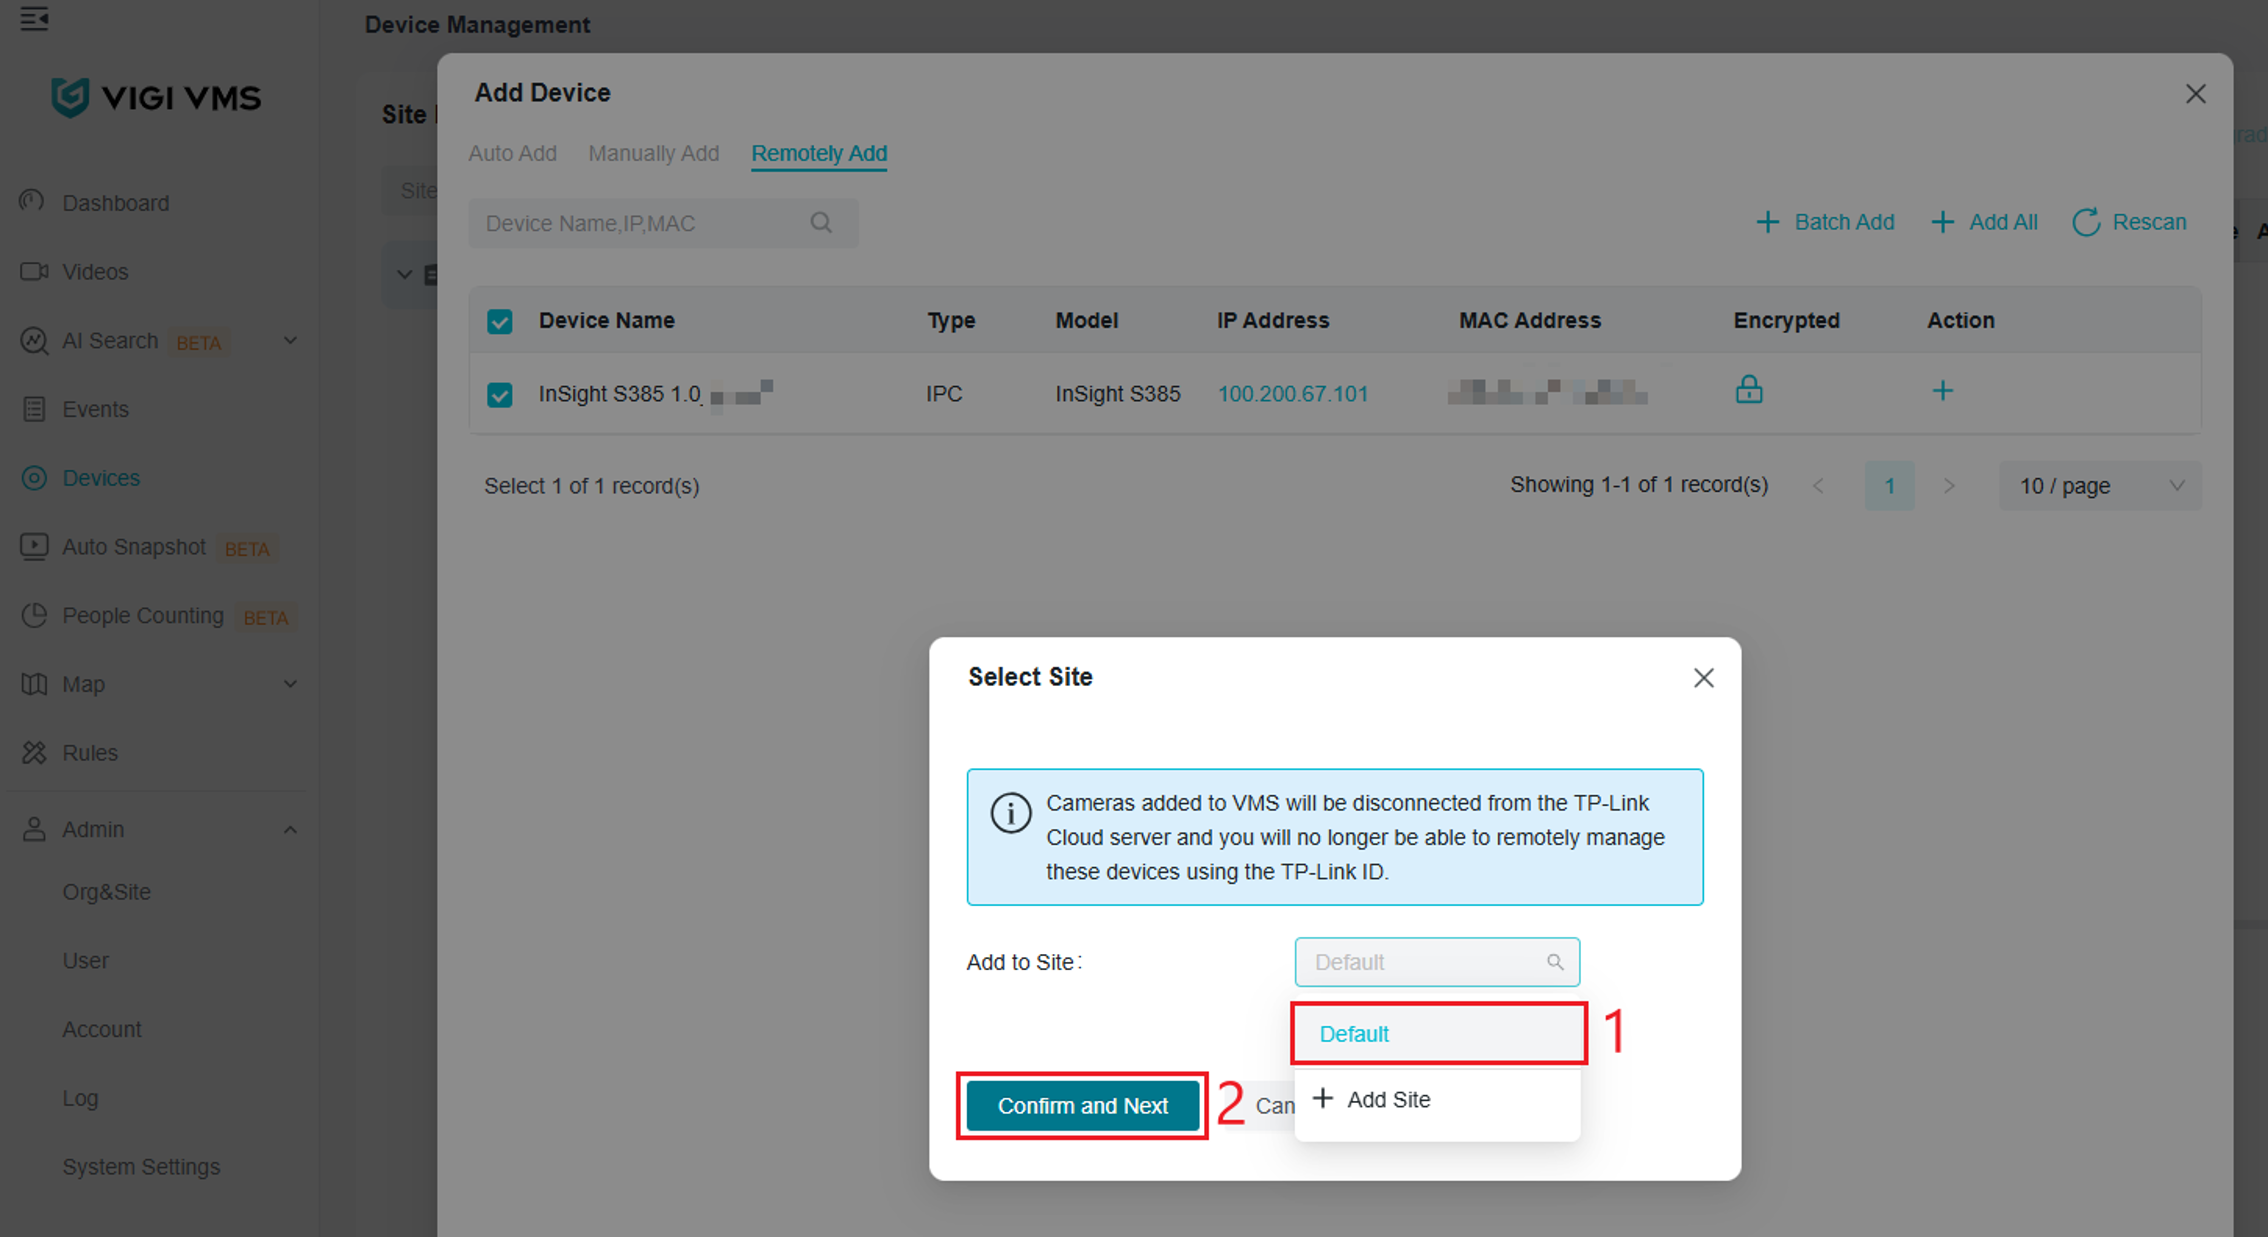
Step 5. A Select Site menu will appear. Select the site to add the device to using the Add to Site dropdown menu. Select Confirm and Next.
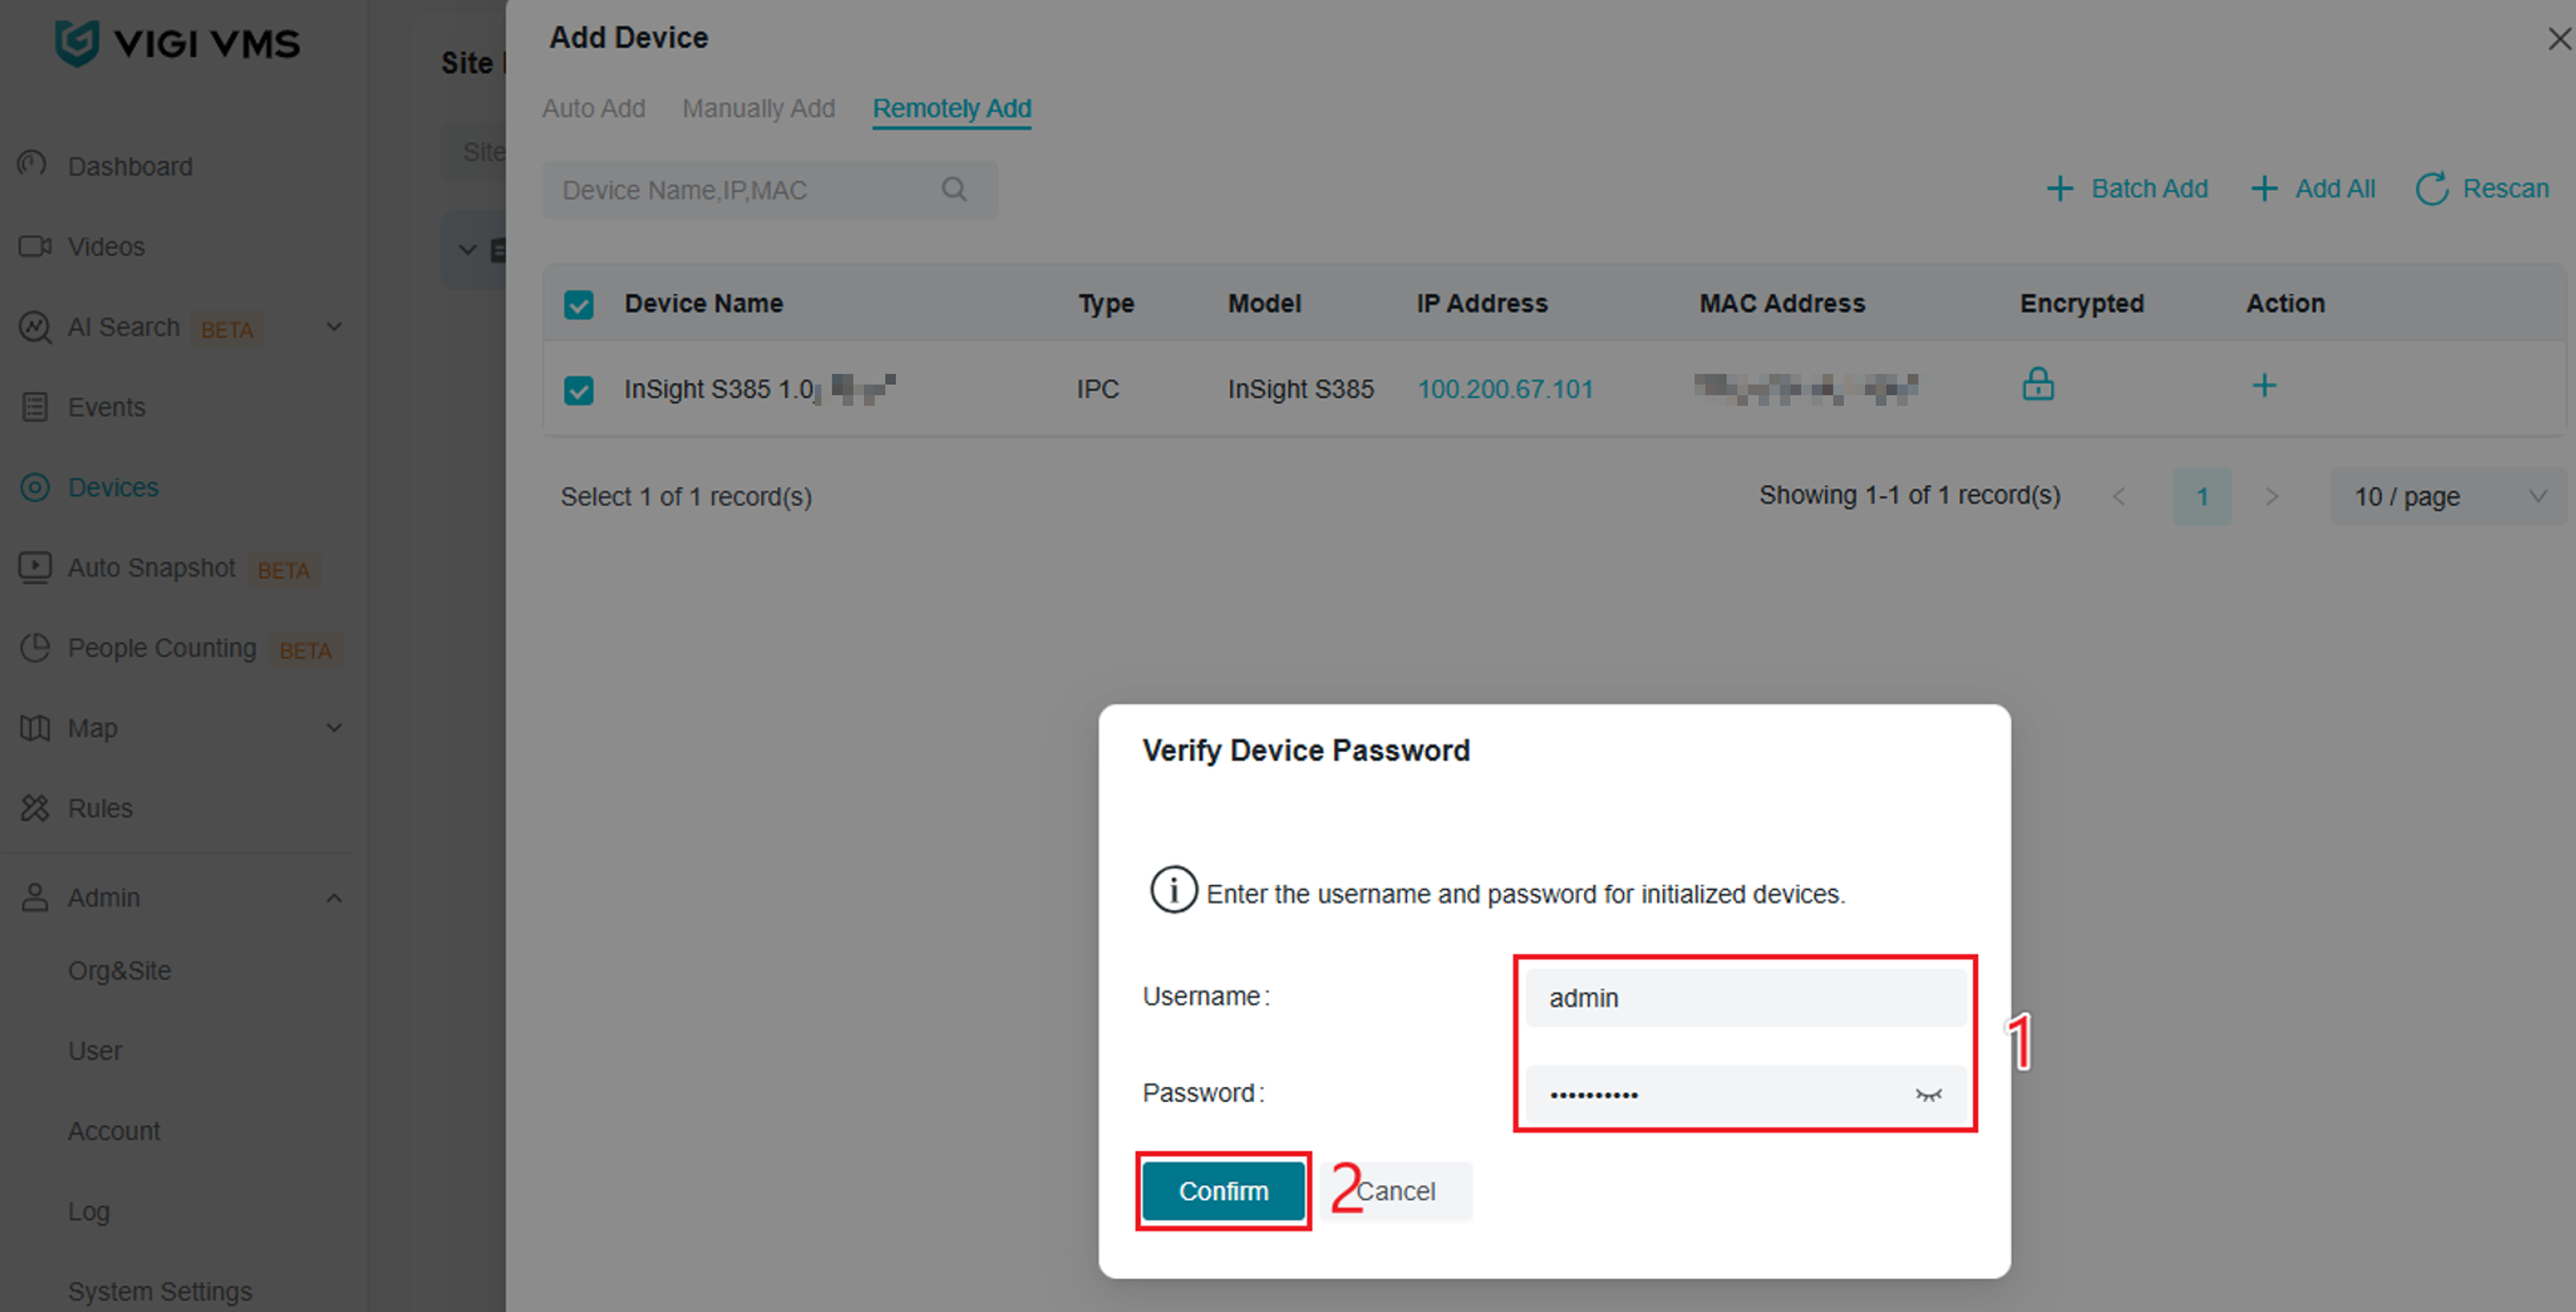
Step 6. A Verify Device Password menu will appear. Enter the credentials of the device and select Confirm.
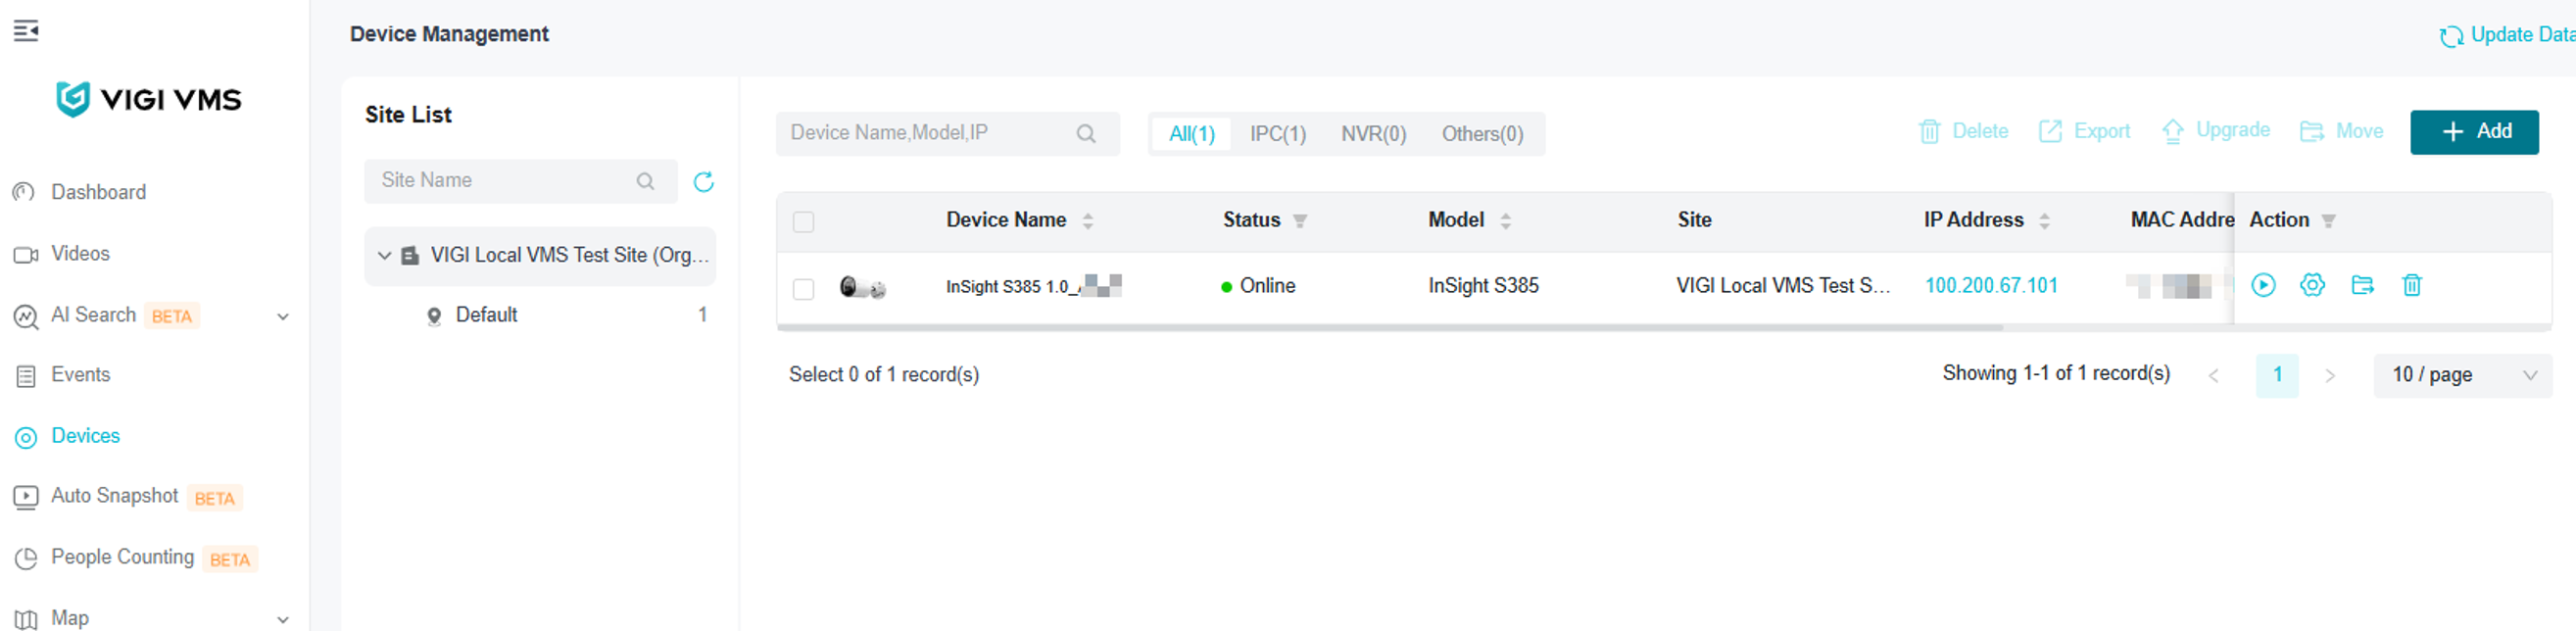
The device has been successfully added using Inform URL.
Conclusion
You have now successfully added VIGI devices to VIGI Local VMS using Auto Add, Manually Add, Remotely Add, or Inform URL. Select the appropriate method based on the location of the devices and your network environment.
To learn more about each function and configuration, please visit Support Home to download or check the manual for your product.
QA
Q1: Why does my VIGI device not appear when using Auto Add?
A1: Ensure the VIGI device and VIGI Local VMS Server are on the same network segment and can communicate with each other.
Q2: Can I add multiple VIGI devices at the same time?
A2: Yes. Auto Add and Remotely Add support batch addition. Manually Add also allows you to specify an IP address range to locate multiple devices.
Q3: Which method should I use if I know the IP address of the VIGI device?
A3: Use Manually Add to search for the device using its IP address. You can also specify an IP address range when adding multiple devices.
Q4: Why does VIGI Local VMS ask for the device password?
A4: VIGI Local VMS requires the credentials configured on the VIGI device to verify and add it.
Q5: Which method should I use for a device at a remote location?
A5: You can use Remotely Add or Inform URL. These methods allow the remote VIGI device to initiate a connection to VIGI Local VMS over the network.
Q6: Which ports should I forward when adding a remote device?
A6: The example in this guide requires ports 8081, 8082, 10123, and 10556 to be forwarded to the VIGI Local VMS Server.
Q7: Which ports are required when using Inform URL with VIGI Local VMS?
A7: Ensure service ports 6000, 6005, 10122, and 10123, as well as Inform URL ports 29810 and 29814, are reachable from the remote VIGI device.
Q8: Why does my remotely added device not appear in VIGI Local VMS?
A8: Ensure the device can reach the VIGI Local VMS Server and verify that the required port forwarding rules are correctly configured.
Q9: What address should I enter when configuring Inform URL for a VIGI Local VMS Server behind NAT?
A9: Use the public WAN IP address of the router connected to the VIGI Local VMS Server and configure the required port forwarding rules.
Q10: Is Remotely Add recommended for managing multiple remote sites?
A10: VIGI Cloud VMS is recommended for distributed network management because exposing the VIGI Local VMS Server to the public internet is less secure than local management.
Looking For More
Is this faq useful?
Your feedback helps improve this site.



TP-Link Community
Still need help? Search for answers, ask questions, and get help from TP-Link experts and other users around the world.