Archer C50 V5 User Guide
•The product should not be located in a place where it will be exposed to moisture or excessive heat.
•Place the router in a location where it can be connected to multiple devices as well as to a power source.
•Make sure the cables and power cord are safely placed out of the way so they do not create a tripping hazard.
•The router can be placed on a shelf or desktop.
•Keep the router away from strong devices with strong electromagnetic interference, such as Bluetooth devices, cordless phones and microwaves.
This mode enables multiple users to share internet connection via ADSL/Cable Modem.
1.Follow the steps below to connect your router.
If your internet connection is through an Ethernet cable directly from the wall instead of through a DSL / Cable / Satellite modem, connect the Ethernet cable to the router’s Internet port, and then follow Step 4 and 5 to complete the hardware connection.
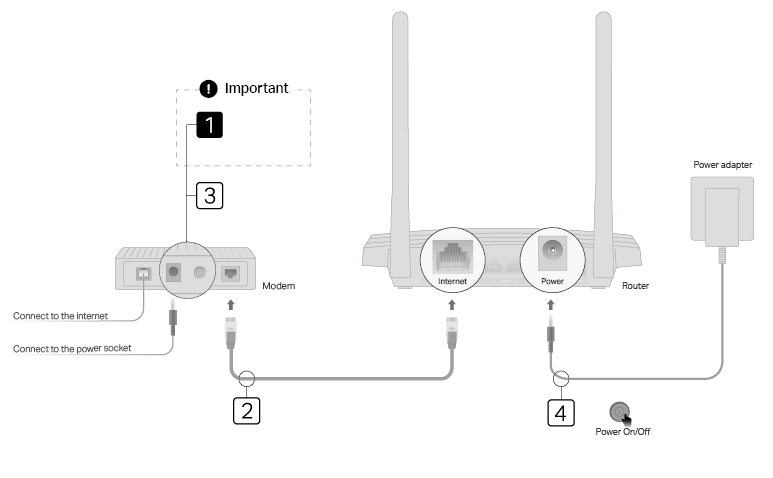
1 )Important: Unplug your modem, and remove the backup battery if it has one.
2 )Connect the powered-off modem to the router’s Internet port with an Ethernet cable.
3 )Turn on the modem, and then wait about 2 minutes for it to restart.
4 )Connect the power adapter to the router and turn it on.
5 )Verify that the hardware connection is correct by checking these LEDs.

 Note:
Note:
If the 2.4G and 5G Wi-Fi LEDs are off, press and hold the Wi-Fi/WPS button on the rear panel for about 3 seconds. Both LEDs will turn on.
2.Connect your computer to the router.
•Method 1: Wired
Turn off the Wi-Fi on your computer and connect the devices as shown below.

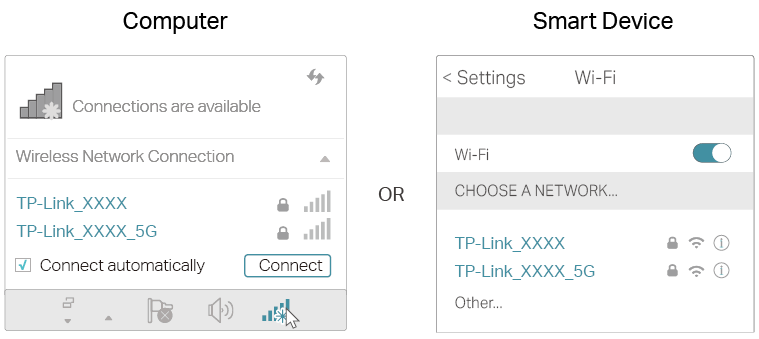
•Method 2: Wirelessly
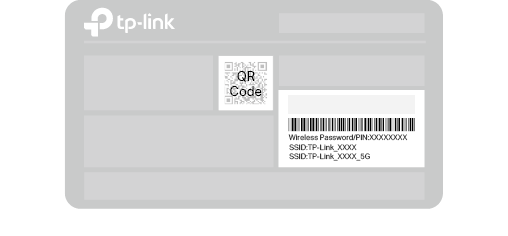
1 )Find the product label at the bottom of the router.
2 )Scan the QR code to join the preset 2.4 GHz network directly, or use the default network names (SSIDs) and password to join the 2.4 GHz or 5 GHz network.
3 )Click the network icon of your computer or go to Wi-Fi Settings of your smart device, and then select the SSID to join the network.
Wireless devices that support WPS, including Android phones, tablets and most USB network cards, can be connected to your router through this method ( not supported by iOS devices).
Note:
The WPS function cannot be configured if the wireless function of the router is disabled. Also, the WPS function will be disabled if your wireless encryption is WEP. Please make sure the wireless function is enabled and is configured with the appropriate encryption before configuring the WPS.
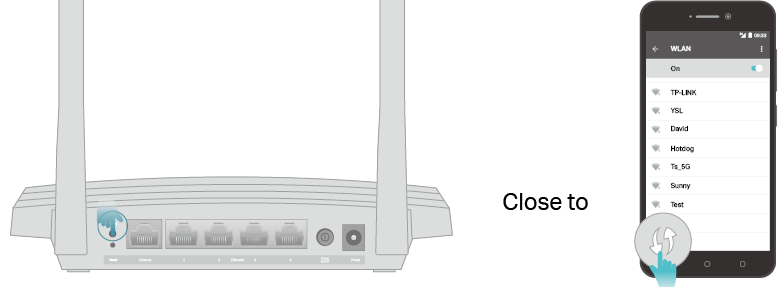
1 )Tab the WPS icon on the device’s screen. Here we take an Android phone as an example.
2 )Immediately press the WPS button on your router.