Archer AX3000 V1 User Guide
- About This Guide
- Chapter 1 Get to Know About Your Router
- Chapter 2 Connect the Hardware
- Chapter 3 Log In to Your Router
- Chapter 4 Set Up Internet Connection
- Chapter 5 TP-Link Cloud Service
- Chapter 6 Guest Network
- Chapter 7 USB Settings
- Chapter 8 Homecare – Parental Controls, QoS
- Chapter 9 Network Security
- Chapter 10 NAT Forwarding
- Chapter 11 VPN Server
- Chapter 12 Customize Your Network Settings
-
Chapter 13 Manage the Router
- Set Up System Time
- Control LEDs
- Test the Network Connectivity
- Upgrade the Firmware
- Backup and Restore Configuration Settings
- Set the Router to Reboot Regularly
- Change the Administrator Account
- Password Recovery
- Local Management
- Remote Management
- System Log
- Monitor the Internet Traffic Statistics
- System Parameters
- Log Out
- Chapter 14 Work with Alexa
- FAQ
- Authentication
Chapter 8 Homecare – Parental Controls, QoS
TP-Link Homecare provides a kit of features to help you create a personalized network that caters for the whole family. You can ensure appropriate internet access for everyone with Parental Controls and save bandwidth for the things that matter with QoS.
It contains the following sections:
Parental Controls allows you to set up unique restrictions on internet access for each member of your family. You can block inappropriate content, set daily limits for the total time spent online and restrict internet access to certain times of the day.
1.1. Setting Up Access Restrictions
I want to:
Block access to inappropriate online content for my child’s devices, restrict internet access to 2 hours every day and block internet access during bed time (10 PM to 6 AM) on weekdays.
How can I do that?
1.Visit http://tplinkwifi.net, and log in with your TP-Link ID or the password you set for the router.
2.Go to Advanced > Parental Controls.
3.Click  to create a profile for a family member.
4.Add basic profile information.
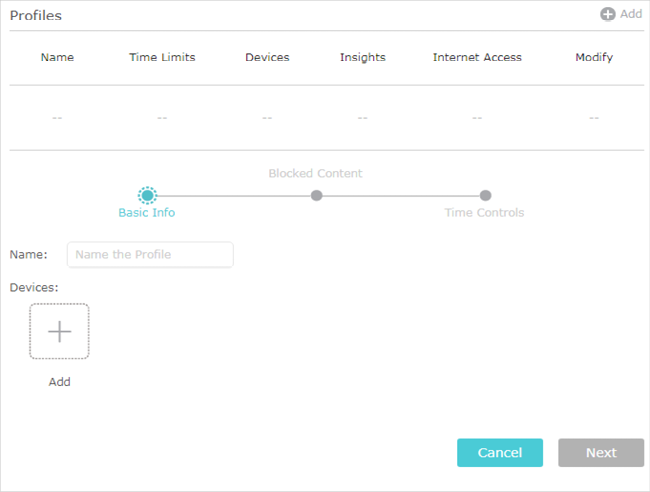
1 )Enter a Name for the profile to make it easier to identify.
2 )Under Devices, click  .
.
3 )Select the devices that belong to this family member. Access restrictions will be applied to these devices. Click Add when finished.
 Note: Only devices that have previously been connected to your router’s network are listed here. If you are unable to find the device you want to add, connect it to your network and then try again.
4 )Click Next.
5.Customize the Blocked Content according to your needs for this profile.
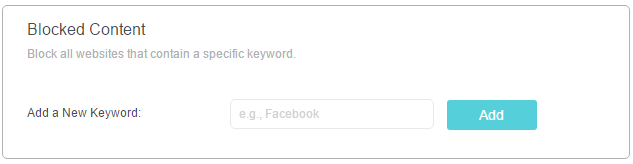
1 )Enter a keyword (for example, “Facebook”) or a URL (for example, “www.facebook.com”), then click Add. All websites containing the keywords will be blocked.
2 )Click Next.
6.Set time restrictions on internet access.
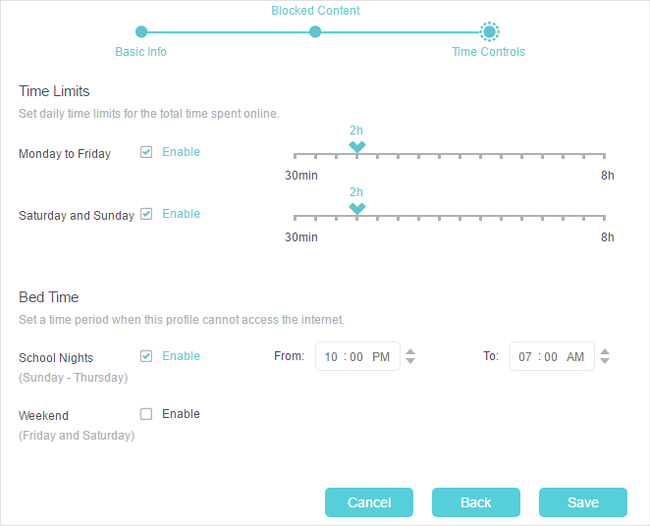
1 )Enable Time Limits on Monday to Friday and Saturday & Sunday then set the allowed online time to 2 hours each day.
2 )Enable Bed Time on Monday to Friday and use the up/down arrows or enter times in the fields. Devices under this profile will be unable to access the internet during this time period.
3 )Click Save.
Done!
The amount of time your child spends online is controlled and inappropriate content is blocked on their devices.
1.2. Monitoring Internet Usage
I want to:
Check which websites my child has visited and how much time they have spent online recently.
How can I do that?
1.Visit http://tplinkwifi.net, and log in with your TP-Link ID or the password you set for the router.
2.Go to Advanced > Parental Controls.
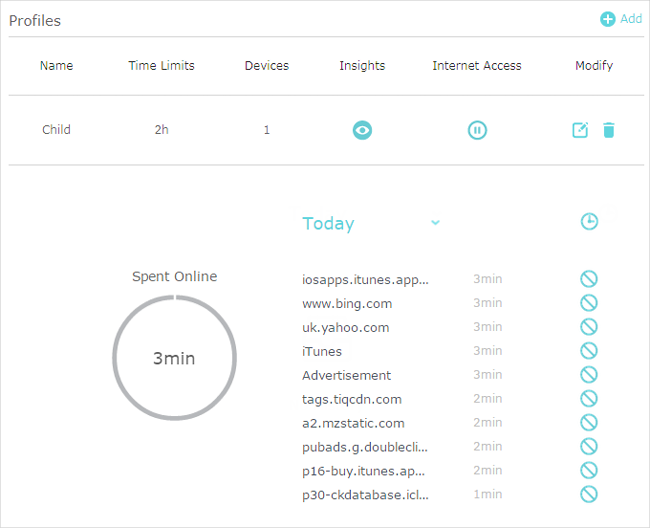
3.Find the correct profile and click  in the Insights column.
Note: If you have not set up a profile for your child yet, you should do that first by clicking  , then follow the steps to create a profile. Refer to Setting Up Access Restrictions for detailed instructions.
4.Use the drop-down menu to view the websites visited and time spent online for any of the last 7 days. Click  to view a complete history.
 Tip: Click
  to block the corresponding content for this profile.
Done!
You can now check up on your child’s online activities.
QoS (Quality of Service) allows you to prioritize the internet traffic of specific online activities, such as gaming or streaming. Activities set as high priority will be allocated more bandwidth and so continue to run smoothly even when there is heavy traffic on the network. You can also prioritize the connection of specific devices for a set duration.
I want to:
Specify priority levels for some devices or applications.
For example, I have several devices that are connected to my wireless network. I would like to set an intermediate speed on the internet for my computer for the next 2 hours.
How can I do that?
1.Enable QoS and set bandwidth allocation.
1 )Visit http://tplinkwifi.net, and log in with your TP-Link ID or the password you set for the router.
2 )Go to Advanced > QoS.
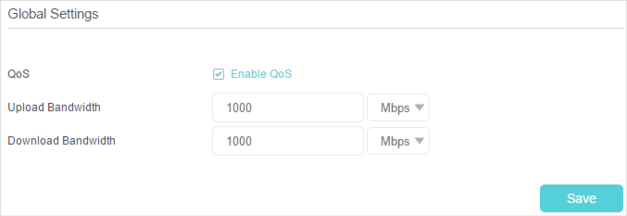
3 )Select Enable QoS.
4 )Input the maximum upload and download bandwidth provided by your internet service provider. 1Mbps equal s to 1000Kbps.
5 )Click Save.
2.In the Device Priority section, find your computer and toggle on Priority. Click the entry in the Timing column and select 2 hours as the duration you want the device to be prioritized for.
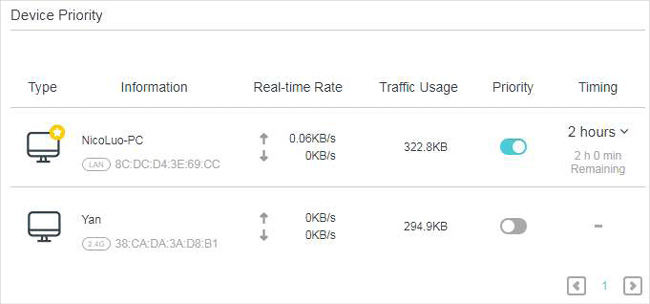
Done! You can now enjoy using your computer for the next 2 hours.