Archer C90 V6 User Guide
- About This Guide
- Chapter 1 Get to Know About Your Router
- Chapter 2 Connect the Hardware
- Chapter 3 Log In to Your Router
- Chapter 4 Set Up Internet Connection
- Chapter 5 TP-Link Cloud Service
- Chapter 6 Guest Network
- Chapter 7 USB Settings
- Chapter 8 Parental Controls
- Chapter 9 QoS
- Chapter 10 Network Security
- Chapter 11 NAT Forwarding
- Chapter 12 VPN Server
- Chapter 13 Customize Your Network Settings
- Chapter 14 Manage the Router
- FAQ
- Authentication
Q1.What should I do if I forget my wireless password?
The default wireless password is printed on the label of the router. If the password has been altered:
1.Connect your computer to the router using an Ethernet cable.
2.Visit http://tplinkwifi.net, and log in with your TP-Link ID or the password you set for the router.
3.Go to Basic > Wireless to retrieve or reset your wireless password.
Q2.What should I do if I forget my web management password?
•If you are using a TP-Link ID to log in, or you have enabled the Password Recovery feature of the router, click Forgot password on the login page and then follow the instructions to reset it.
•Alternatively, press and hold the Reset button of the router until the Power LED blinks to reset it, and then visit http://tplinkwifi.net to create a new login password.
 Note:
Note:
•Please refer to Password Recovery to learn how to configure Password Recovery.
•You’ll need to reconfigure the router to surf the internet once the router is reset, and please mark down your new password for future use.
Q3.What should I do if I cannot log in to the router’s web management page?
This can happen for a variety of reasons. Please try the methods below to log in again.
•Make sure your computer is connected to the router correctly and the corresponding LED indicator(s) light up.
•Make sure the IP address of your computer is configured as Obtain an IP address automatically and Obtain DNS server address automatically.
•Make sure http://tplinkwifi.net or http://192.168.0.1 is correctly entered.
•Check your computer’s settings:
1 )Go to Start > Control Panel > Network and Internet, and click View network status and tasks.
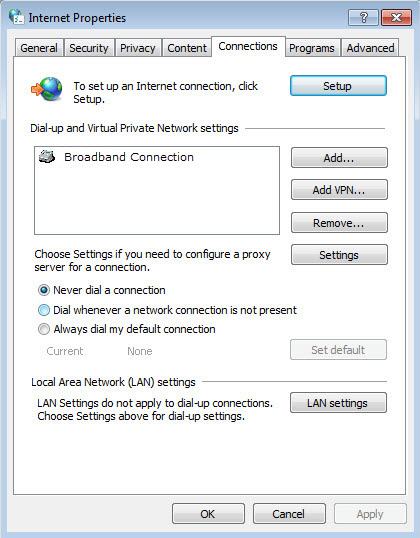
2 )Click Internet Options on the bottom left.
3 )Click Connections and select Never dial a connection.
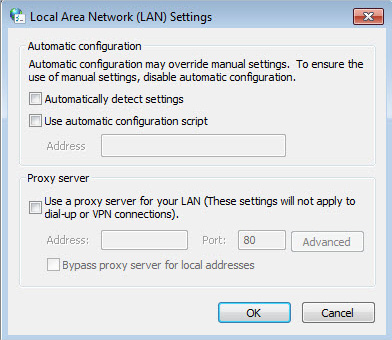
4 )Click LAN settings and deselect the following three options and click OK.
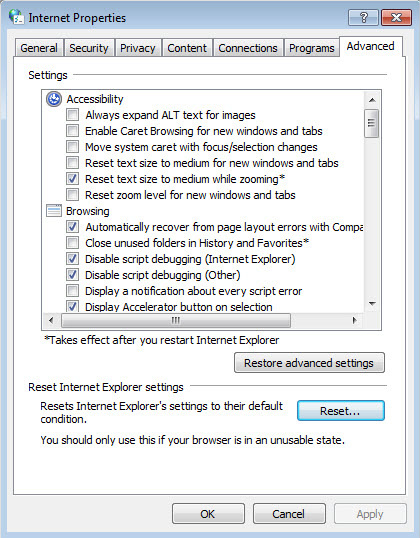
5 )Go to Advanced > Restore advanced settings, click OK to save the settings.
•Use another web browser or computer to log in again.
•Reset the router to factory default settings and try again. If login still fails, please contact the technical support.
Note: You’ll need to reconfigure the router to surf the internet once the router is reset.
Q4.How do I use the WDS Bridging function to extend my wireless network?
For example, my house covers a large area. The wireless coverage of the router I’m using (the root router) is limited. I want to use an extended router to extend the wireless network of the root router.
Note:
•WDS bridging only requires configuration on the extended router.
•WDS bridging function can be enabled either in 2.4GHz frequency or 5GHz frequency for a dual-band router. We use the WDS bridging function in 2.4GHz frequency as example.
1.Visit http://tplinkwifi.net, and log in with your TP-Link ID or the password you set for the router.
2.Configure the IP address of the router:
1 )Go to Advanced > Network > LAN, configure the IP address of the extended router to be in the same subnet with the root router; (For example, the IP address of the root router is 192.168.0.1, the IP address of the extended router can be 192.168.0.2~192.168.0.254. We take 192.168.0.2 as example.)
2 )Click Save.
Note: Log in to the web management page again if the IP address of the router is altered.

3.Survey the SSID to be bridged:
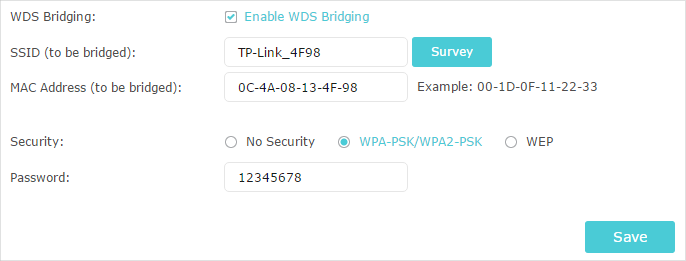
1 )Go to Advanced > System Tools > System Parameters and focus on the 2.4GHz WDS section, click Enable WDS Bridging.
2 )Click Survey, locate the root router’s SSID and click Choose (Here we take
TP-Link_4F98 as example).
3 )If the root router has wireless password, you should enter the wireless password of the root router.
4 )Click Save.
4.Disable DHCP:
1 )Go to Network > DHCP Server.
2 )Deselect Enable DHCP Server and click Save.
Now you can go to Advanced > Status > Wireless to check the WDS status. When the WDS status is Run, it means WDS bridging is successfully built.
Q5.What should I do if I cannot access the internet even though the configuration is finished?
1.Visit http://tplinkwifi.net, and log in with your TP-Link ID or the password you set for the router.
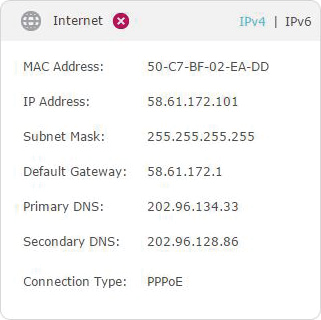
2.Go to Advanced > Status to check internet status:
As the follow picture shows, if IP address is a valid one, please try the methods below and try again:
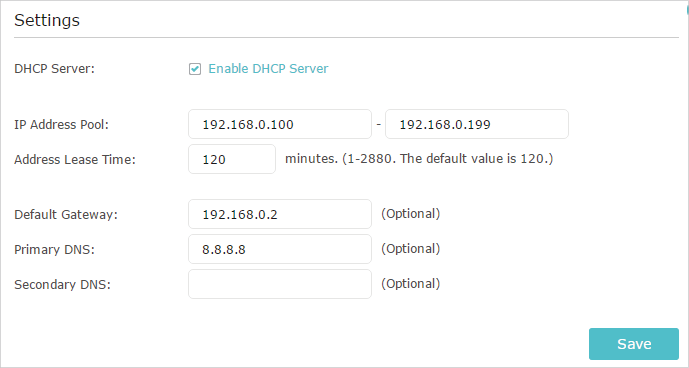
•Your computer might not recognize any DNS server addresses. Please manually configure the DNS server.
1 )Go to Advanced > Network > DHCP Server.
2 )Enter 8.8.8.8 as Primary DNS, click Save.
 Tips: 8.8.8.8 is a safe and public DNS server operated by Google.
•Restart the modem and the router.
1 )Power off your modem and router, and leave them off for 1 minute.
2 )Power on your modem first, and wait about 2 minutes until it gets a solid cable or Internet light.
3 )Power on the router.
4 )Wait another 1 or 2 minutes and check the internet access.
•Reset the router to factory default settings and reconfigure the router.
•Upgrade the firmware of the router.
•Check the TCP/IP settings on the particular device if all other devices can get internet from the router.
As the picture below shows, if the IP address is 0.0.0.0, please try the methods below and try again:
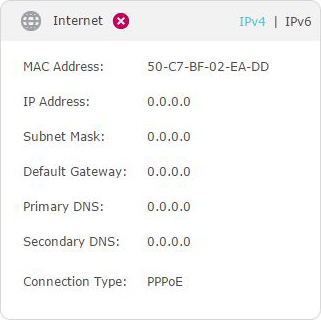
•Make sure the physical connection between the router and the modem is proper.
•Clone the MAC address of your computer.
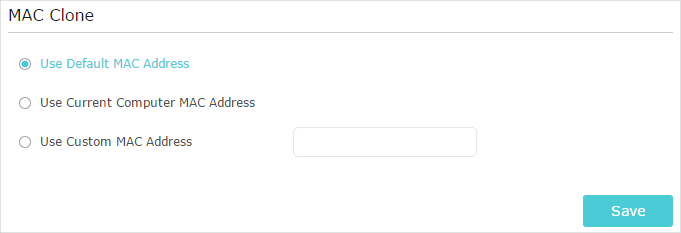
1 )Visit http://tplinkwifi.net, and log in with your TP-Link ID or the password you set for the router.
2 )Go to Advanced > Network > Internet and focus on the MAC Clone section.
3 )Choose an option as needed (enter the MAC address if Use Custom MAC Address is selected), and click Save.
 Tips:
Tips:
•Some ISP will register the MAC address of your computer when you access the internet for the first time through their Cable modem, if you add a router into your network to share your internet connection, the ISP will not accept it as the MAC address is changed, so we need to clone your computer’s MAC address to the router.
•The MAC addresses of a computer in wired connection and wireless connection are different.
•Modify the LAN IP address of the router.
Note:
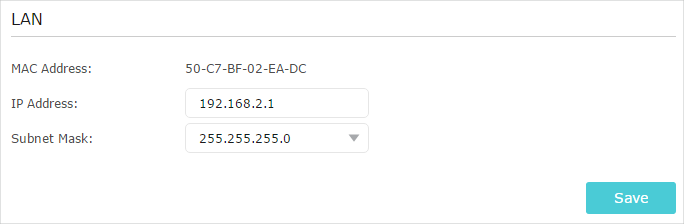
Most TP-Link routers use 192.168.0.1/192.168.1.1 as their default LAN IP address, which may conflict with the IP range of your existing ADSL modem/router. If so, the router is not able to communicate with your modem and you can’t access the internet. To resolve this problem, we need to change the LAN IP address of the router to avoid such conflict, for example, 192.168.2.1.
1 )Visit http://tplinkwifi.net, and log in with your TP-Link ID or the password you set for the router.
2 )Go to Advanced > Network > LAN.
3 )Modify the LAN IP address as the follow picture shows. Here we take 192.168.2.1 as an example.
4 )Click Save.
•Restart the modem and the router.
1 )Power off your modem and router, and leave them off for 1 minute.
2 )Power on your modem first, and wait about 2 minutes until it get a solid cable or Internet light.
3 )Power on the router.
4 )Wait another 1 or 2 minutes and check the internet access.
•Double check the internet connection type.
1 )Confirm your internet connection type, which can be learned from the ISP.
2 )Visit http://tplinkwifi.net, and log in with your TP-Link ID or the password you set for the router.
3 )Go to Advanced > Network > Internet.
4 )Select your Internet Connection Type and fill in other parameters.
5 )Click Save.

6 )Restart the modem and the router again.
•Please upgrade the firmware of the router.
If you’ve tried every method above but still cannot access the internet, please contact the technical support.
Q6.What should I do if I cannot find my wireless network or I cannot connect the wireless network?
If you fail to find any wireless network, please follow the steps below:
•Make sure the wireless function of your device is enabled if you’re using a laptop with built-in wireless adapter. You can refer to the relevant document or contact the laptop manufacturer.
•Make sure the wireless adapter driver is installed successfully and the wireless adapter is enabled. You can refer to the relevant document or contact the wireless adapter manufacturer.
If you can find other wireless network except your own, please follow the steps below:
•Check the WLAN LED indicator on your wireless router/modem.
•Make sure your computer/device is still in the range of your router/modem. Move it closer if it is currently too far away.
•Go to Advanced > Wireless > Wireless Settings, and check the wireless settings. Double check your Wireless Network Name and SSID is not hided.

If you can find your wireless network but fail to connect, please follow the steps below:
•Authenticating problem/password mismatch:
1 )Sometimes you will be asked to type in a PIN number when you connect to the wireless network for the first time. This PIN number is different from the Wireless Password/Network Security Key, usually you can only find it on the label of your router.
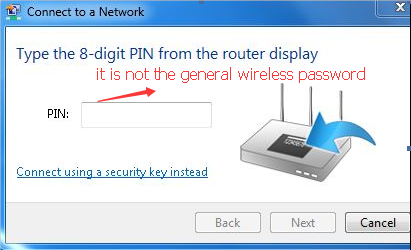
2 )If you cannot find the PIN or PIN failed, you may choose Connecting using a security key instead, and then type in the Wireless Password/Network Security Key.
3 )If it continues to show note of Network Security Key Mismatch, it is suggested to confirm the wireless password of your wireless router.
Note: Wireless Password/Network Security Key is case sensitive.
•Windows unable to connect to XXXX / Can not join this network / Taking longer than usual to connect to this network:
•Check the wireless signal strength of your network. If it is weak (1~3 bars), please move the router closer and try again.
•Change the wireless Channel of the router to 1, 6 or 11 to reduce interference from other networks.
•Re-install or update the driver for your wireless adapter of the computer.