Archer AX6000 V1 User Guide
- About This Guide
- Chapter 1 Get to Know About Your Router
- Chapter 2 Connect the Hardware
- Chapter 3 Log In to Your Router
- Chapter 4 Set Up Internet Connection
- Chapter 5 TP-Link Cloud Service
- Chapter 6 Guest Network
- Chapter 7 USB Settings
- Chapter 8 HomeCare – Parental Controls, QoS, Antivirus
- Chapter 9 Network Security
- Chapter 10 NAT Forwarding
- Chapter 11 VPN Server
- Chapter 12 Customize Your Network Settings
-
Chapter 13 Manage the Router
- Set Up System Time
- Control LEDs
- Test the Network Connectivity
- Test Your Internet Speed
- Upgrade the Firmware
- Backup and Restore Configuration Settings
- Set the Router to Reboot Regularly
- Change the Administrator Account
- Password Recovery
- Local Management
- Remote Management
- System Log
- Monitor the Internet Traffic Statistics
- System Parameters
- Log Out
- Chapter 14 Work with Alexa and IFTTT
- FAQ
- Authentication
Chapter 11 VPN Server
The VPN (Virtual Private Networking) Server allows you to access your home network in a secured way through internet when you are out of home. The router offers two ways to setup VPN connection: OpenVPN and PPTP (Point to Point Tunneling Protocol) VPN.
OpenVPN is somewhat complex but with greater security and more stable. It is suitable for restricted environment, such as campus network and company intranet.
PPTP VPN is more easily used and its speed is faster, it’s compatible with most operating systems and also supports mobile devices. Its security is poor and your packets may be cracked easily, and PPTP VPN connection may be prevented by some ISP.
It contains the following sections, please choose the appropriate VPN server connection type as needed.
1. Use OpenVPN to Access Your Home Network
In the OpenVPN connection, the home network can act as a server, and the remote device can access the server through the router which acts as an OpenVPN Server gateway. To use the VPN feature, you should enable OpenVPN Server on your router, and install and run VPN client software on the remote device. Please follow the steps below to set up an OpenVPN connection.

Step1. Set up OpenVPN Server on Your Router
1.Visit http://tplinkwifi.net, and log in with your TP-Link ID or the password you set for the router.
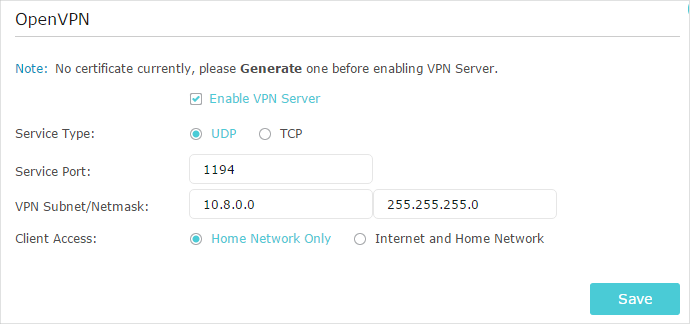
2.Go to Advanced > VPN Server > OpenVPN, and select Enable VPN Server.
 Note:
Note:
•Before you enable VPN Server, we recommend you configure Dynamic DNS Service (recommended) or assign a static IP address for router’s WAN port and synchronize your System Time with internet.
•The first time you configure the OpenVPN Server, you may need to Generate a certificate before you enable the VPN Server.
3.Select the Servive Type (communication protocol) for OpenVPN Server: UDP, TCP.
4.Enter a VPN Service Port to which a VPN device connects, and the port number should be between 1024 and 65535.
5.In the VPN Subnet/Netmask fields, enter the range of IP addresses that can be leased to the device by the OpenVPN server.
6.Select your Client Access type. Select Home Network Only if you only want the remote device to access your home network; select Internet and Home Network if you also want the remote device to access internet through the VPN Server.
7.Click Save.
8.Click Generate to get a new certificate.

Note:
If you have already generated one, please skip this step, or click Generate to update the certificate.
9.Click Export to save the OpenVPN configuration file which will be used by the remote device to access your router.

Step 2. Configure OpenVPN Connection on Your Remote Device
1.Visit http://openvpn.net/index.php/download/community-downloads.html to download the OpenVPN software, and install it on your device where you want to run the OpenVPN client utility.
Note:
You need to install the OpenVPN client utility on each device that you plan to apply the VPN funxtion to access your router. Mobile devices should download a third-party app from Google Play or Apple App Store.
2.After the installation, copy the file exported from your router to the OpenVPN client utility’s “config” folder (for example, C:\Program Files\OpenVPN\config on Windows). The path depends on where the OpenVPN client utility is installed.
3.Run the OpenVPN client utility and connect it to OpenVPN Server.
2. Use PPTP VPN to Access Your Home Network
PPTP VPN Server is used to create a VPN connection for remote device. To use the VPN feature, you should enable PPTP VPN Server on your router, and configure the PPTP connection on the remote device. Please follow the steps below to set up a PPTP VPN connection.
Step 1. Set up PPTP VPN Server on Your Router
1.Visit http://tplinkwifi.net, and log in with your TP-Link ID or the password you set for the router.
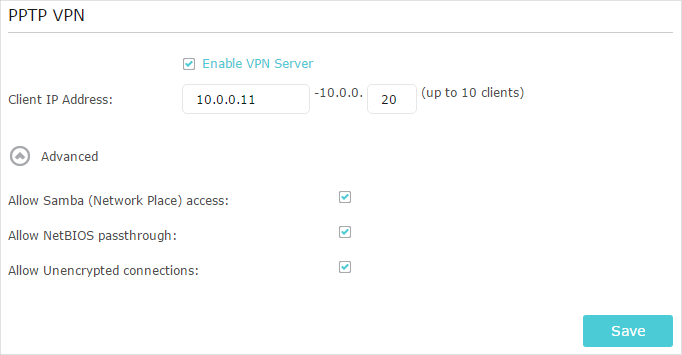
2.Go to Advanced > VPN Server > PPTP VPN, and select Enable VPN Server.
Note:
Before you enable VPN Server, we recommend you configure Dynamic DNS Service (recommended) or assign a static IP address for router’s WAN port and synchronize your System Time with internet.
3.In the Client IP Address filed, enter the range of IP addresses (up to 10) that can be leased to the devices by the PPTP VPN server.
4.Click Advanced to set the PPTP connection permission according to your needs.
•Select Allow Samba (Network Place) access to allow your VPN device to access your local Samba server.
•Select Allow NetBIOS passthrough to allow your VPN device to access your Samba server using NetBIOS name.
•Select Allow Unencrypted connections to allow unencrypted connections to your VPN server.
5.Click Save.
6.Configure the PPTP VPN connection account for the remote device, you can create up to 16 accounts.
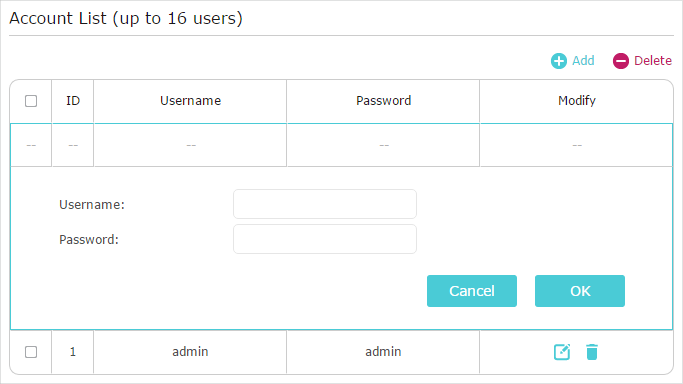
1 )Click Add.
2 )Enter the Username and Password to authenticate devices to the PPTP VPN Server.
3 )Click OK.
Step 2. Configure PPTP VPN Connection on Your Remote Device
The remote device can use the Windows built-in PPTP software or a third-party PPTP software to connect to PPTP Server. Here we use the Windows built-in PPTP software as an example.
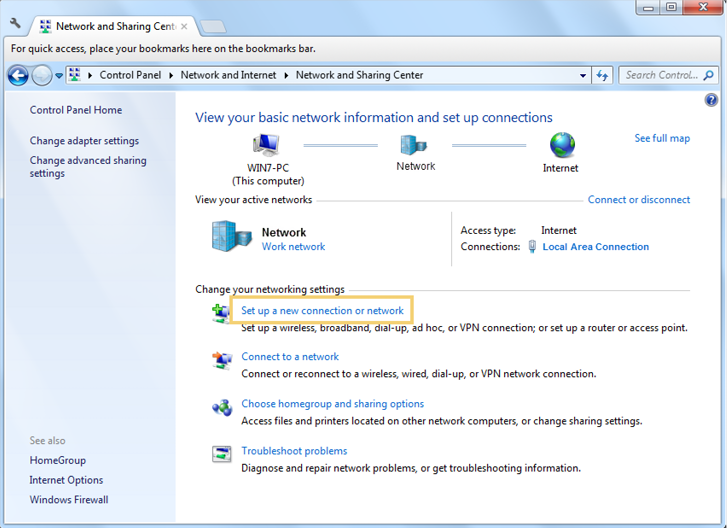
1.Go to Start > Control Panel > Network and Internet > Network and Sharing Center.
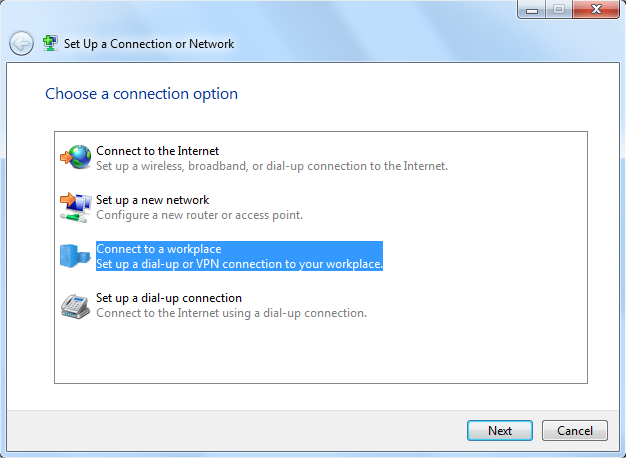
2.Select Set up a new connection or network.
3.Select Connect to a workplace and click Next.
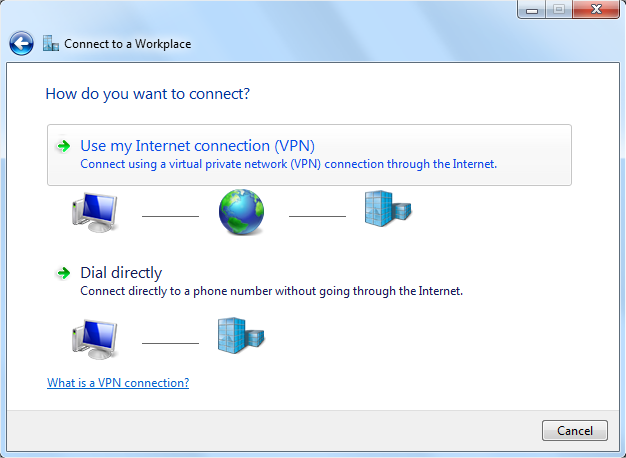
4.Select Use my Internet connection (VPN).
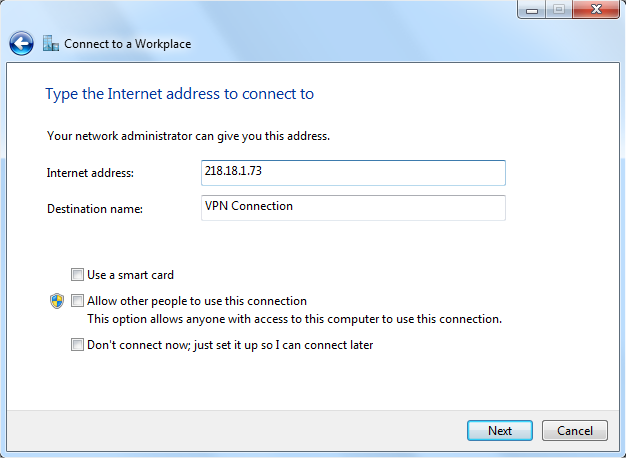
5.Enter the internet IP address of the router (for example: 218.18.1.73) in the Internet address field. Click Next.
6.Enter the User name and Password you have set for the PPTP VPN server on your router, and click Connect.
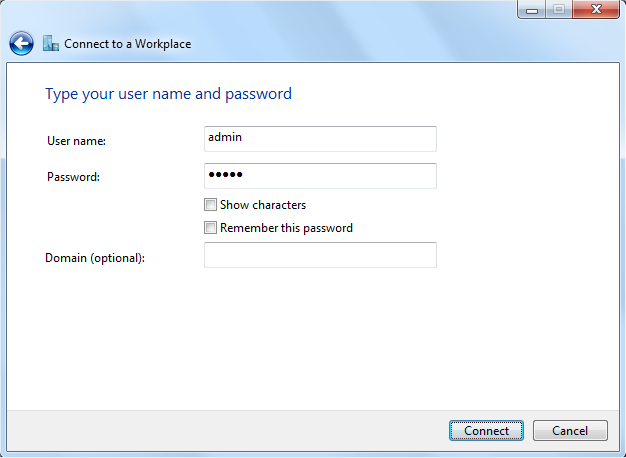
7.The PPTP VPN connection is created and ready to use.
