Archer A6 V2 User Guide
- About This Guide
- Chapter 1 Get to Know About Your Router
- Chapter 2 Connect the Hardware
- Chapter 3 Log In to Your Router
- Chapter 4 Set Up Internet Connection
- Chapter 5 TP-Link Cloud Service
- Chapter 6 Guest Network
- Chapter 7 Parental Controls
- Chapter 8 QoS
- Chapter 9 Network Security
- Chapter 10 NAT Forwarding
- Chapter 11 VPN Server
- Chapter 12 Customize Your Network Settings
-
Chapter 13 Manage the Router
- Set Up System Time
- Control LEDs
- Test the Network Connectivity
- Upgrade the Firmware
- Backup and Restore Configuration Settings
- Set the Router to Reboot Regularly
- Change the Login Password
- Password Recovery
- Local Management
- Remote Management
- System Log
- Monitor the Internet Traffic Statistics
- Configure the System Parameters
- FAQ
- Authentication
Chapter 4 Set Up Internet Connection
This chapter introduces how to connect your router to the internet. The router is equipped with a web-based Quick Setup wizard. It has necessary ISP information built in, automates many of the steps and verifies that those steps have been successfully completed. Furthermore, you can also set up an IPv6 connection if your ISP provides IPv6 service.
It contains the following sections:
•Manually Set up Your Internet Connection
The Quick Setup Wizard will guide you to set up your router.
 Tips:
Tips:
If you need the IPv6 internet connection, please refer to the section of Set Up an IPv6 Internet Connection.
Follow the steps below to set up your router.
1.Visit http://tplinkwifi.net, and log in with the password you set for the router.
2.Click Quick Setup on the top of the page. Then follow the step-by-step instructions to connect your router to the internet.
2. Manually Set up Your Internet Connection
In this part, you can check your current internet connection settings. You can also modify the settings according to the service information provided by your ISP.
Follow the steps below to check or modify your internet connection settings.
1.Visit http://tplinkwifi.net, and log in with the password you set for the router.
2.Go to Basic > Internet.
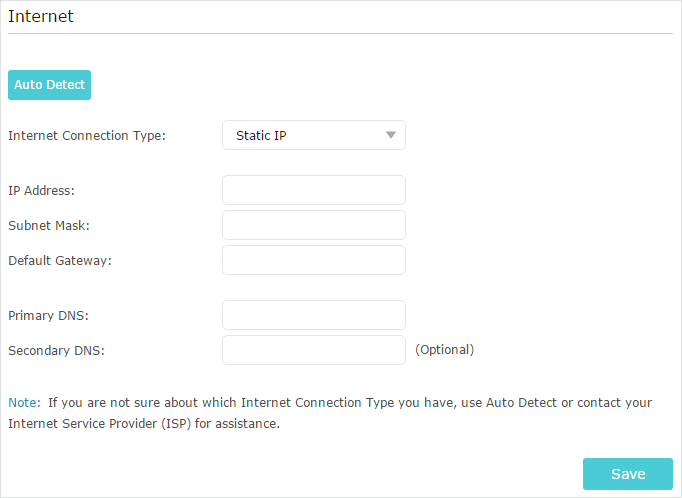
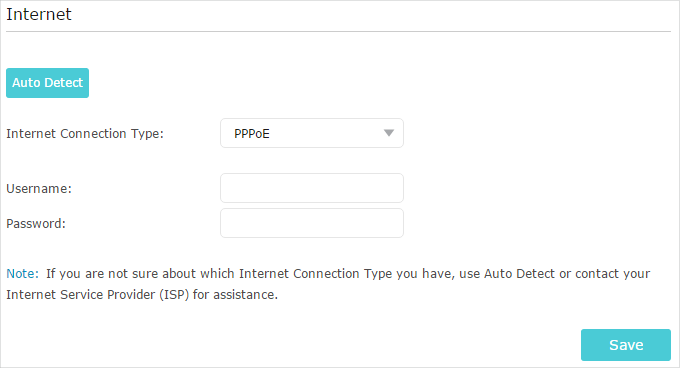
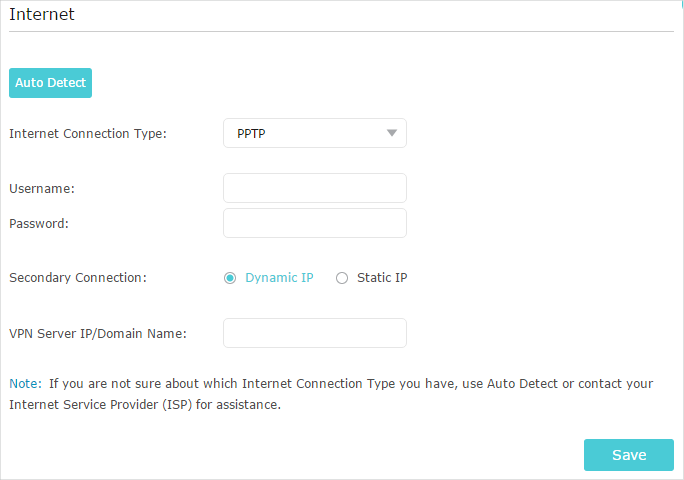
3.Select your internet connection type from the drop-down list.

 Note:
Note:
If you are unsure of what your connection type is, click Auto Detect. Since different connection types require different cables and connection information, you can also refer to the demonstrations in Step 4 to determine your connection type.
4.Follow the instructions on the page to continue the configuration. Parameters on the figures are just used for demonstration.
1 )If you choose Dynamic IP, you need to select whether to clone the MAC address. Dynamic IP users are usually equipped with a cable TV or fiber cable.

2 )If you choose Static IP, enter the information provided by your ISP in the corresponding fields.
3 )If you choose PPPoE, enter the username and password provided by your ISP. PPPoE users usually have DSL cable modems.
4 )If you choose L2TP, enter the username and password and choose the Secondary Connection provided by your ISP. Different parameters are needed according to the Secondary Connection you have chosen.

5 )If you choose PPTP, enter the username and password, and choose the Secondary Connection provided by your ISP. Different parameters are needed according to the Secondary Connection you have chosen.
5.Click Save.
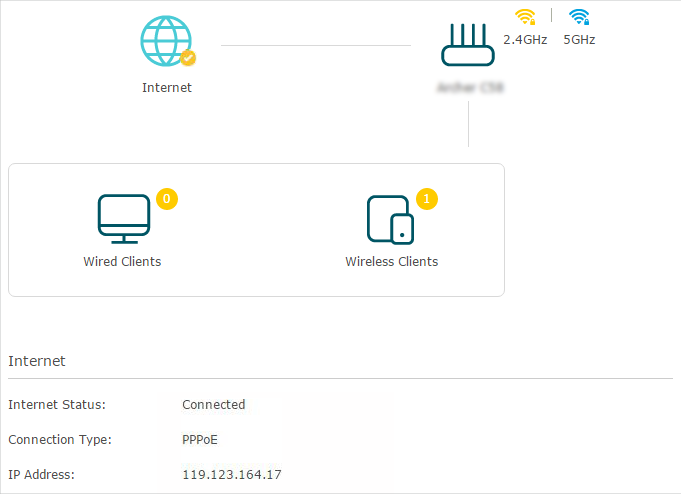
6.To check your internet connection, click Network Map on the left of the page. After the connection succeeds, the screen will display as follows. Here we take PPPoE as an example.
Note:
It may take 1-2 minutes to make the settings valid.
 Tips:
Tips:
•If your internet connection type is BigPond Cable, please go to Advanced > Network > Internet to set your router.
•If you use Dynamic IP and PPPoE and you are provided with any other parameters that are not required on the page, please go to Advanced > Network > Internet to complete the configuration.
•If you still cannot access the internet, refer to the FAQ section for further instructions.
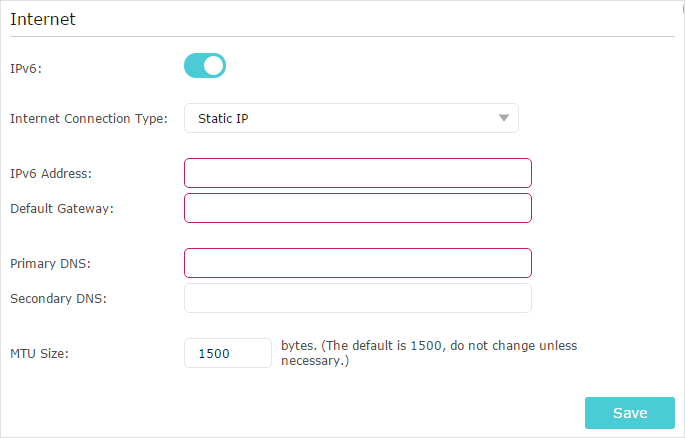
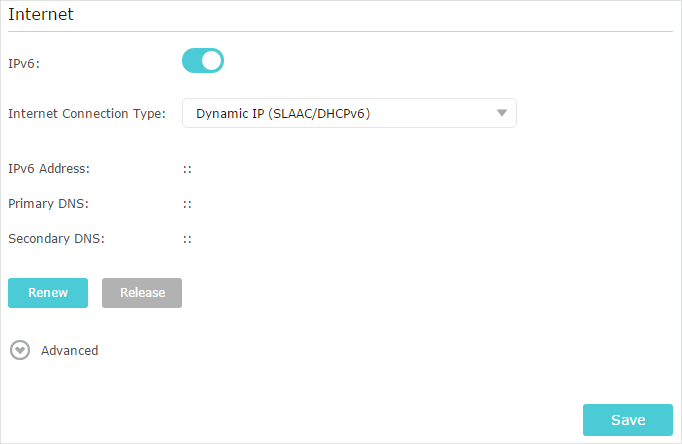
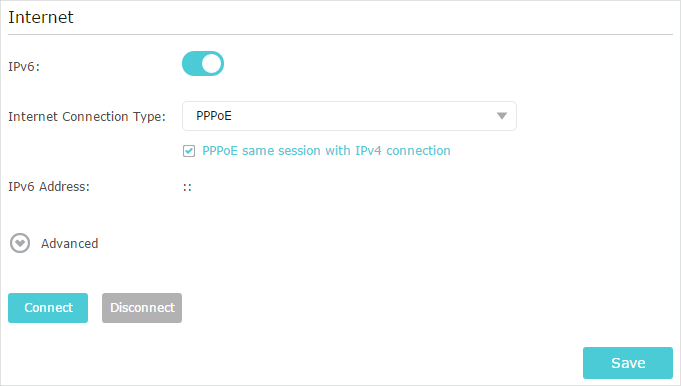
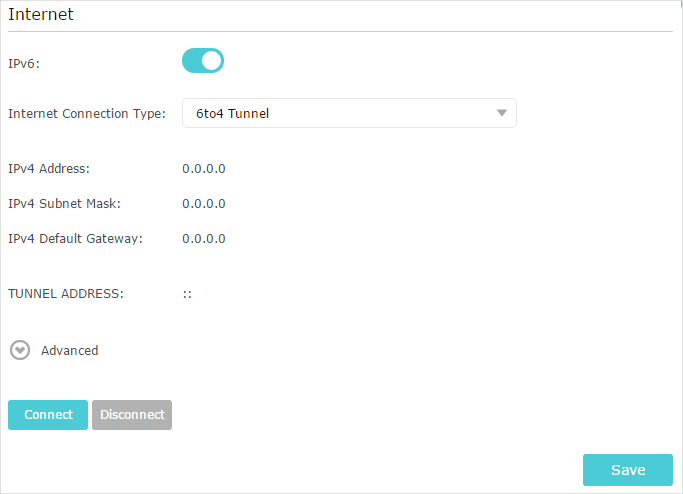
3. Set Up an IPv6 Internet Connection
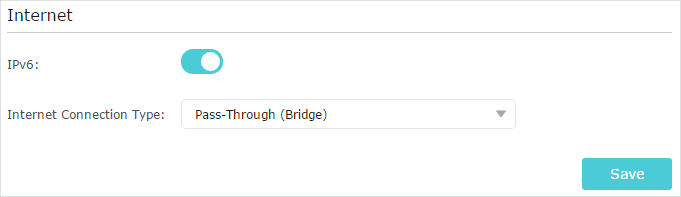
Your ISP provides information about one of the following IPv6 internet connection types: PPPoE, Dynamic IP(SLAAC/DHCPv6), Static IP, 6to4 tunnel, Pass-Through (Bridge).
1.Visit http://tplinkwifi.net, and log in with the password you set for the router.
2.Go to Advanced > IPv6.
3.Enable IPv6 and select the internet connection type provided by your ISP.
Tips:
If you do not know what your internet connection type is, contact your ISP or judge according to the already known information provided by your ISP.
4.Fill in information as required by different connection types. Red blanks must be filled in.
1 )Static IP: Fill in blanks and click Save.
2 )Dynamic IP (SLAAC/DHCPv6): Click Advanced to input further information if your ISP requires. Click Save and then click Renew.
3 )PPPoE: By default, the router uses the IPv4 account to connect to the IPv6 server. Click Advanced to input further information if your ISP requires. Click Save and then click Connect.
Note:
If your ISP provides two separate accounts for the IPv4 and IPv6 connections, please untick the Use the same session with IPv4 connection checkbox and manually enter the username and password for the IPv6 connection.
4 )6to4 Tunnel: An IPv4 internet connection type is a prerequisite for this connection type (Manually Set up Your Internet Connection). Click Advanced to input further information if your ISP requires. Click Save and then click Connect.
5 )Pass-Through (Bridge): Click Save and skip to step 6.
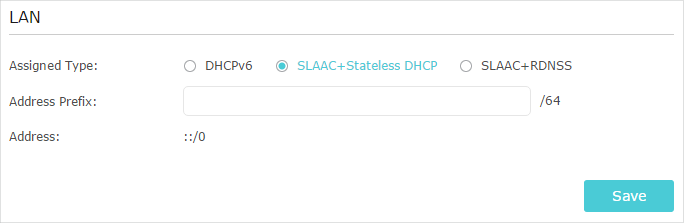
5.Configure LAN ports. Windows users are recommended to choose from the first two types. Fill in Address Prefix provided by your ISP, and click Save.
Tips:
Find Help on the management interface to know more about items.
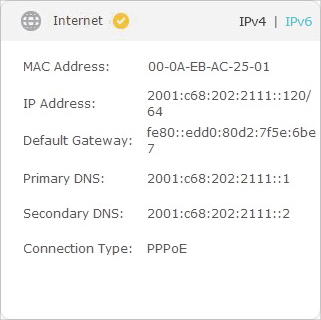
6.Click Status to check whether you have successfully set up an IPv6 connection. The following figure is an example of a successful PPPoE configuration.
 Tips:
Tips:
Visit the FAQ section if there is no internet connection.
4. Configure the Router in Access Point Mode
In Access Point mode, the device can be connected to a wired network and transform the wired access into wireless one to extend the wireless coverage of your existing network. Advanced functions like NAT, Parental Controls and QoS are not supported in this mode.
If you already have a wired router, you can use this mode. To switch to Access Point mode:
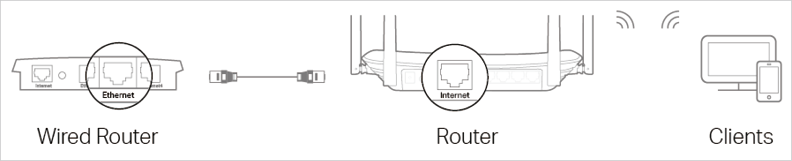
1.Connect the router’s Internet port to your wired router’s Ethernet port via an Ethernet cable as shown above. And power on the router.
2.Connect a computer to the router via an Ethernet cable or wirelessly by using the SSID (network name) and Wireless Password printed on the label at the bottom of the router.
3.Visit http://tplinkwifi.net, and log in with the password you set for the router.
4.Go to Advanced > Operation Mode, select Access Point and click Save. Log in to the router via http://tplinkwifi.net after the router reboots.
5.Go to Quick Setup or Settings > Wireless > Wireless Settings and set the SSIDs and passwords for the wireless network.
Now, you can connect to the SSIDs and enjoy your existing network.