Archer A20 V1 User Guide
- About This Guide
- Chapter 1 Get to Know About Your Router
- Chapter 2 Connect the Hardware
- Chapter 3 Log In to Your Router
- Chapter 4 Set Up Internet Connection
- Chapter 5 TP-Link Cloud Service
- Chapter 6 Guest Network
- Chapter 7 USB Settings
- Chapter 8 HomeCare – Parental Controls, QoS, Antivirus
- Chapter 9 Network Security
- Chapter 10 NAT Forwarding
- Chapter 11 VPN Server
- Chapter 12 Customize Your Network Settings
-
Chapter 13 Manage the Router
- Set Up System Time
- Control the LED
- Test the Network Connectivity
- Test Your Internet Speed
- Upgrade the Firmware
- Backup and Restore Configuration Settings
- Set the Router to Reboot Regularly
- Change the Login Password
- Default Password Recovery
- Local Management
- Remote Management
- System Log
- Monitor the Internet Traffic Statistics
- Chapter 14 Work with Alexa and IFTTT
- FAQ
- Authentication
Chapter 1 Get to Know About Your Router
This chapter introduces what the router can do and shows its appearance.
It chapter contains the following sections:
The TP-Link router is designed to fully meet the need of Small Office/Home Office (SOHO) networks and users demanding higher networking performance. The powerful antennas ensure continuous Wi-Fi signal to all your devices while boosting widespread coverage throughout your home, and the built-in Ethernet ports supply high-speed connection to your wired devices.
Moreover, it is simple and convenient to set up and use the TP-Link router due to its intuitive web interface and the powerful Tether app.
2.1. The Back Panel
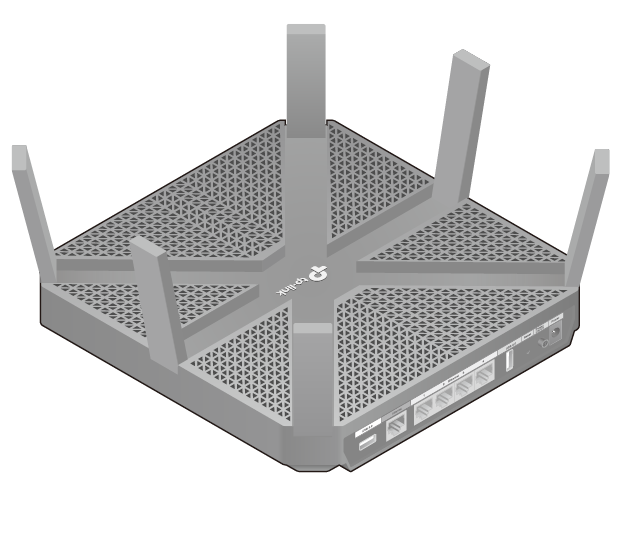
The router’s ports (view from left to right) are located on the rear panel.
| Item | Description |
| USB 3.0 Port | For connecting to a USB 3.0 device. It is also compatible with USB 2.0 devices. |
| Internet Port | For connecting to a DSL/Cable modem, or an Ethernet jack. |
| Ethernet Ports (1/2/3/4) | For connecting your PC or other wired devices to the router. |
| USB 2.0 Port | For connecting to a USB 2.0 device. |
| Reset Button | Press this button for more than 5 seconds to reset the router to its factory default settings. |
| Power On/Off Button | Press this button for 1 second to power on or off the router. |
| Power Port | For connecting the router to power socket via the provided power adapter. |
| Antennas | Used for wireless operation and data transmit. Upright them for the best Wi-Fi performance. |
2.2. The Front Panel
The router’s LEDs and buttons (view from left to right) are located on the front panel. You can check the router’s working status by following the LED Explanation table.
LED Explanation
| Name | Status | Indication |
|
| On | The system has started up successfully. |
| Flashing | The system is starting up or the firmware is being upgraded. Do not disconnect or power off your router. | |
| Off | Power is off. | |
|
| On | The 2.4GHz wireless band is enabled. |
| Off | The 2.4GHz wireless band is disabled. | |
|
| On | The 5GHz-1 wireless band is enabled. |
| Off | The 5GHz-1 wireless band is disabled. | |
|
| On | The 5GHz-2 wireless band is enabled. |
| Off | The 5GHz-2 wireless band is disabled. | |
|
| On | At least one powered-on device is connected to the router’s Ethernet port. |
| Off | No powered-on device is connected to the router’s Ethernet port. | |
|
| Blue On | The internet is available. |
| Orange On | The router’s Internet port is connected, but the internet is not available. | |
| Off | The router’s Internet port is unplugged. | |
|
| On/Off | This light remains on for 5 minutes when a WPS connection is established, then turns off. |
| Flashing | WPS connection is in progress. This may take up to 2 minutes. | |
|
| On | The inserted USB device is ready to use. |
| Flashing | A USB device is being identified. | |
| Off | No device is plugged into the USB port. |
 (Power)
 (2.4GHz Wireless)
 (5GHz-1 Wireless)
 (Ethernet)
 (Internet)
 (WPS)
(WPS) (USB)
(USB)Button Explanation
| Item | Description |
|
| Press and hold the Wi-Fi button for about 1 second to turn on or off the wireless function of your router. |
|
| Press this WPS button for 1 second to enable the WPS function. |
|
| Press the LED button for about 1 second to turn on or off the LEDs of your router. |
 (Wi-Fi Button)
 (WPS Button)
 (LED Button)