如何將VIGI攝影機與其他品牌的NVR或NAS一起使用

VIGI C400HP , VIGI C340HPWSM , VIGI C540HPWSM , InSight S345-4G , VIGI C540V , VIGI C540S , VIGI C250 , VIGI C450 , VIGI C330 , VIGI C330I , VIGI C455 , VIGI C440HWSM-W4 , VIGI C230I Mini , VIGI C580-W , InSight S655I , VIGI C340 , VIGI C540-4G , VIGI C340-W , VIGI C540 , VIGI C385 , VIGI C420 , VIGI C430I , VIGI C220I , VIGI C240I , VIGI C440-W , VIGI C540HWSM-W4 , InSight S445ZI , VIGI C340S , VIGI C540-W , VIGI C230 , VIGI C350 , VIGI C300P , VIGI C430 , VIGI C355 , InSight S345ZI , VIGI C320I , VIGI C340I , VIGI C580-4G , VIGI C420I , InSight S245ZI , VIGI C340HWSM-W4 , EasyCam C320 , VIGI C300HP , VIGI C340 (VIGI C340HPWSM) , VIGI C240 , VIGI C485 , VIGI C400P , VIGI C440 , VIGI C440I , VIGI C445 , VIGI C230I
Recent updates may have expanded access to feature(s) discussed in this FAQ. Visit your product's support page, select the correct hardware version for your device, and check either the Datasheet or the firmware section for the latest improvements added to your product. Please note that product availability varies by region, and certain models may not be available in your region.
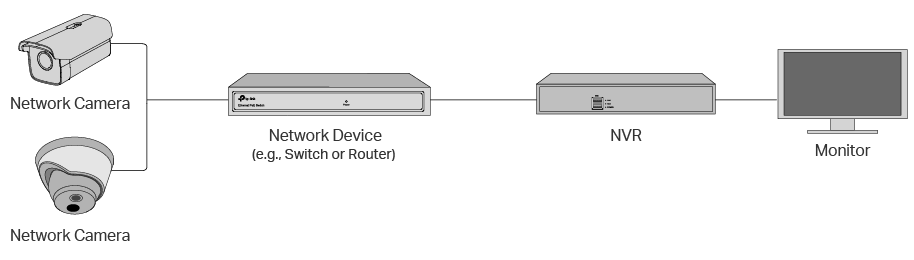
VIGI攝影機可與VIGI NVR或是其他品牌的NVR、NAS互相配合使用,得以更輕鬆的統一遠端監控和管理。建議將VIGI攝影機與VIGI NVR搭配使用。對於其他品牌的NVR,請確保它們有支援ONVIF和RTSP協定。接下來,我們將向您說明如何將VIGI攝影機與其他品牌的NVR做使用。
步驟1:開啟您的攝影機並將網路連接至您NVR相同的網路。
步驟2: 使用VIGI Security Manager 或 VIGI App來啟用您的攝影機。
1.於Windows系統的電腦下載VIGI Security Manager。https://www.tp-link.com/download-center/
2.VIGI Security Manager安裝完成後,開啟此程式。
3.點擊設定 >發現的設備。可以自動偵測與您的電腦連線同一個網路的攝影機。
4.點擊+新增透過設定密碼來啟用您的攝影機。
5.按照步驟來新增您的攝影機。
步驟3:參考NVR的使用手冊來新增攝影機。
我們將與您說明VIGI攝影機連接到NVR可能會需要的基本參數。
1.攝影機的IP位址。
開啟VIGI Security Manager到 設定> 設備 > 設備列表 > 我的設備>攝影機的設定 >設定網路>連接。
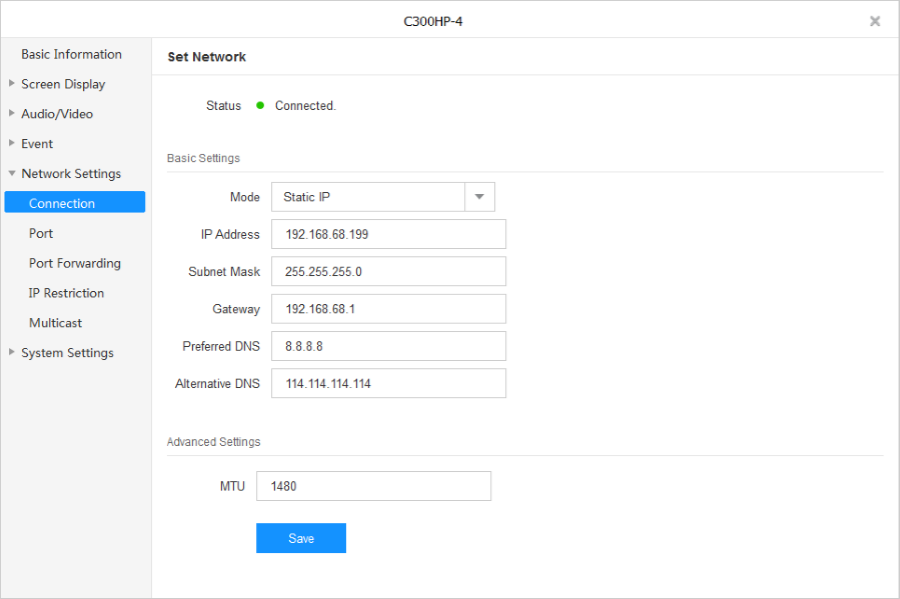
對於部分NVR,您需要將VIGI攝影機的IP位址更改和NVR相同的網段才能成功加入攝影機。
2.標準ONVIF、RTSP通訊協定。
請選擇Onvif協定來新增您的VIGI攝影機。
ONVIF通訊埠: 2020
RTSP通訊埠: 554
3.攝影機的使用者名稱/密碼。
使用者名稱:admin
密碼:起初設定攝影機時建立的密碼。若忘記密碼,請參考連結重置密碼。
欲了解更多功能和設定詳情,請至技術支援-檔案下載下載您的產品使用手冊。
這篇faq是否有用?
您的反饋將幫助我們改善網站
What’s your concern with this article?
- Dissatisfied with product
- Too Complicated
- Confusing Title
- Does not apply to me
- Too Vague
- 其他
謝謝
感謝您的反饋。
點擊此處與TP-Link技術支持聯繫。
基本 Cookies
These cookies are necessary for the website to function and cannot be deactivated in your systems.
TP-Link
SESSION, JSESSIONID, accepted_local_switcher, tp_privacy_base, tp_privacy_marketing, tp_smb-select-product_scence, tp_smb-select-product_scenceSimple, tp_smb-select-product_userChoice, tp_smb-select-product_userChoiceSimple, tp_smb-select-product_userInfo, tp_smb-select-product_userInfoSimple, tp_top-banner, tp_popup-bottom, tp_popup-center, tp_popup-right-middle, tp_popup-right-bottom, tp_productCategoryType
Youtube
id, VISITOR_INFO1_LIVE, LOGIN_INFO, SIDCC, SAPISID, APISID, SSID, SID, YSC, __Secure-1PSID, __Secure-1PAPISID, __Secure-1PSIDCC, __Secure-3PSID, __Secure-3PAPISID, __Secure-3PSIDCC, 1P_JAR, AEC, NID, OTZ
Zendesk
OptanonConsent, __cf_bm, __cfruid, _cfuvid, _help_center_session, _pendo___sg__.<container-id>, _pendo_meta.<container-id>, _pendo_visitorId.<container-id>, _zendesk_authenticated, _zendesk_cookie, _zendesk_session, _zendesk_shared_session, ajs_anonymous_id, cf_clearance
分析和行銷 Cookies
Analysis cookies enable us to analyze your activities on our website in order to improve and adapt the functionality of our website.
The marketing cookies can be set through our website by our advertising partners in order to create a profile of your interests and to show you relevant advertisements on other websites.
Google Analytics & Google Tag Manager
_gid, _ga_<container-id>, _ga, _gat_gtag_<container-id>
Google Ads & DoubleClick
test_cookie, _gcl_au