How to access TP-Link JetStream Managed Switch via the Console port

TL-SG3424 , TL-SG5428 , SX3008F , SG3428MP , SG3428X , T2600G-52TS , SG3452P , SX3016F , T2600G-28TS , T2500-28TC , T2700G-28TQ , T2500G-10TS , TL-SG5412F , T2600G-28MPS , TL-SX3008F , TL-SG3424P , TL-SG3428 , TL-SX3016F , SG3428 , TL-SL3428 , TL-SG3452P , TL-SG3428X , S5500-8MHP2XF , TL-SL3452 , TL-SG3428MP , TL-SG3216 , TL-SL5428E , T3700G-52TQ , T2600G-18TS , TL-SG3210 , TL-SG3452 , T2500G-10MPS , SG3210 , SG3452 , TL-SG3210XHP-M2 , S5500-24GP4XF , SG3428XMP , TL-SG3428XMP , T3700G-28TQ
Recent updates may have expanded access to feature(s) discussed in this FAQ. Visit your product's support page, select the correct hardware version for your device, and check either the Datasheet or the firmware section for the latest improvements added to your product. Please note that product availability varies by region, and certain models may not be available in your region.
You can use the console cable to connect your PC to the console port of the TP-Link JetStream managed Switch and then manage the switch with the CLI.
Follow the steps below to manage the switch via the console port:
Step 1. Connect your computer to the switch.
If your computer has a serial port (COM), connect it to the console port (RJ45) of the switch, with the RJ45 console cable.
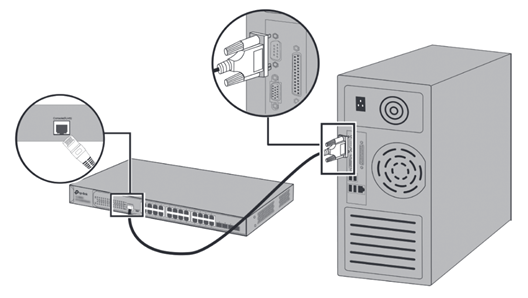
If you only have USB ports on your computer, you can get a USB-to-RS232 cable. You need to install the RS232 driver for the cable, which is provided by your cable vendor.
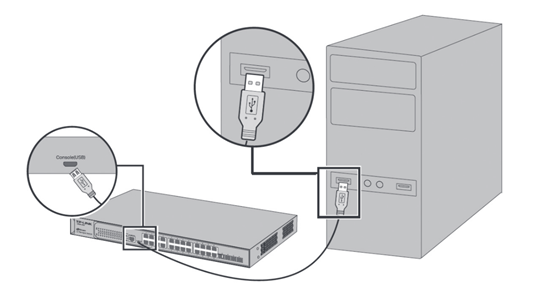
You can also choose a Micro-USB cable that supports data transfer to connect your computer to the switch. Then for Windows computers, click here to download and install the TP-Link USB Console Driver then continue. For Mac, please follow FAQ 3177.
Note: If you need to enter the BootUtil menu to reset the switch or recover the password, please refer to FAQ 3146. We recommend an RJ45 Console cable or USB-to-RS232 cable, as it might be more difficult to enter the BootUtil menu with a Micro-USB cable. If you still cannot enter the BootUtil after several attempts, you may get a USB-to-RS232 cable.
Step 2. Install a Terminal Emulator.
For Windows computers, you need to install a terminal emulator, such as Putty, Tera Term. Go to the official website to download the installer and follow the prompts to install the terminal emulator.
Note: If you use the Micro-USB cable, we recommend “Tera Term”, which you can download and install from the official website.
Step 3. Launch and Configure the Terminal Emulator.
Run your terminal emulator with the following serial parameters
- Baud Rate: 38400bps
- Data Bits: 8
- Parity: None
- Stop Bits: 1
- Flow Control: None
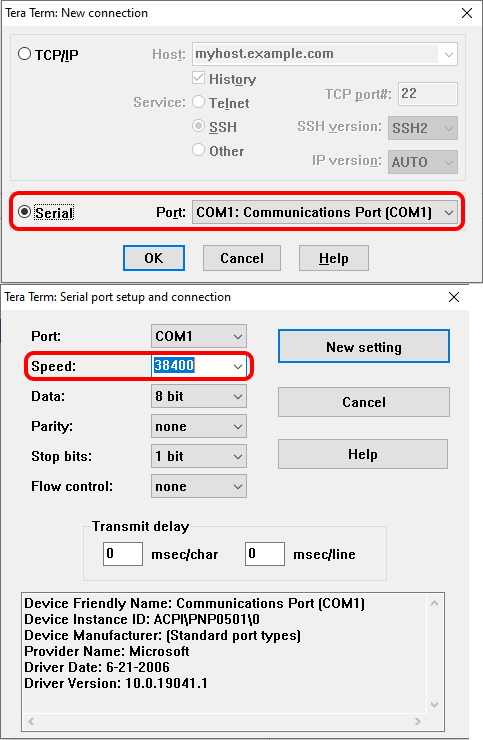
For Tera Term, choose the serial port, then go to Setup – Serial Port, set the speed to 38400, then click “New setting”.
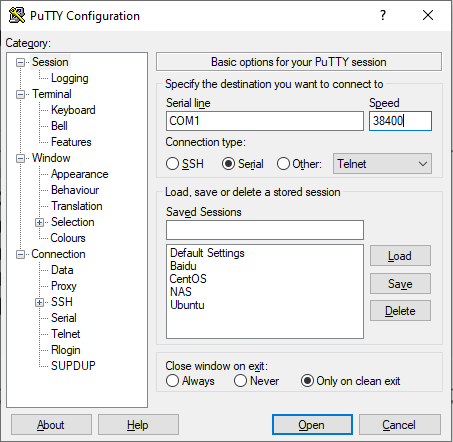
For Putty, select Serial, change the Speed to 38400, and then click “Open”.
Step 4 Launching the CLI
Enter the username and password, then you can manage the switch. Please refer to the User Guide, and CLI Reference Guide, which can be found on the support page for your switch model.
İlgili SSS
Daha Fazlasını Arıyorum
Bu SSS faydalı mı?
Your feedback helps improve this site.
Bu makaleyle ilgili sorununuz nedir?
- Üründen memnun kalmadım
- Çok Karışık
- Karışık Başlık
- Bu benim için geçerli değil
- Çok Belirsiz
- Diğer
Teşekkürler
We appreciate your feedback.
Click here to contact TP-Link technical support.
Bu web sitesi çerezler içermektedir. Çerezlerin kullanım amacı ve 6698 sayılı Kişisel Verilerin Korunması Kanunu uyarınca kişisel verilerin kullanımına dair şirket politikası hakkında daha fazla bilgi için buraya basınız. Tekrar Gösterme
Your Privacy Choices
Bu web sitesi çerezler içermektedir. Çerezlerin kullanım amacı ve 6698 sayılı Kişisel Verilerin Korunması Kanunu uyarınca kişisel verilerin kullanımına dair şirket politikası hakkında daha fazla bilgi için buraya basınız. Tekrar Gösterme
Temel Çerezler
Bu çerezler, web sitesinin çalışması için gereklidir ve sistemlerinizde devre dışı bırakılamaz.
TP-Link
SESSION, JSESSIONID, accepted_local_switcher, tp_privacy_banner, tp_privacy_base, tp_privacy_marketing, tp_top-banner, tp_popup-bottom, tp_popup-center, tp_popup-right-middle, tp_popup-right-bottom, tp_productCategoryType
Youtube
id, VISITOR_INFO1_LIVE, LOGIN_INFO, SIDCC, SAPISID, APISID, SSID, SID, YSC, __Secure-1PSID, __Secure-1PAPISID, __Secure-1PSIDCC, __Secure-3PSID, __Secure-3PAPISID, __Secure-3PSIDCC, 1P_JAR, AEC, NID, OTZ
Zendesk
OptanonConsent, __cf_bm, __cfruid, _cfuvid, _help_center_session, _pendo___sg__.<container-id>, _pendo_meta.<container-id>, _pendo_visitorId.<container-id>, _zendesk_authenticated, _zendesk_cookie, _zendesk_session, _zendesk_shared_session, ajs_anonymous_id, cf_clearance
Analiz ve Pazarlama Çerezleri
Analiz çerezleri, web sitemizin işlevselliğini geliştirmek ve uyarlamak için web sitemizdeki faaliyetlerinizi analiz etmemizi sağlar.
Pazarlama çerezleri, ilgi alanlarınıza uygun bir profil oluşturmak ve size diğer web sitelerinde alakalı reklamlar göstermek için reklam ortaklarımız tarafından web sitemiz aracılığıyla ayarlanabilir.
Google Analytics & Google Tag Manager
_gid, _ga_<container-id>, _ga, _gat_gtag_<container-id>
Google Ads & DoubleClick
test_cookie, _gcl_au