How to Configure Management VLAN on TP-Link Smart and Managed Switches Using the New GUI

TL-SG3452X , SG2428LP , TL-SG3452XP , SX3008F , SG3428MP , SG3428X , SX3016F , TL-SG2210P , SG2428P , SG3452XP , SG2210MP , TL-SX3008F , TL-SL2428P , TL-SG3428 , TL-SG2218 , SG2210P , TL-SX3016F , S4500-8G , SG2218 , SG3428 , TL-SG3428X , S5500-4XHPP2XF , S5500-8MHP2XF , SL2428P , TL-SG3428X-M2 , TL-SG3428MP , S4500-8GHP2F , TL-SG2008 , S4500-16G2F , TL-SG3428XF , TL-SG2210MP , TL-SG3210 , TL-SG3452 , SG3428X-M2 , SG3210 , SG3452 , SG3452X , Festa FS310GP , TL-SX3206HPP , TL-SG3210XHP-M2 , S5500-24GP4XF , SG3428XMP , TL-SG2428P , TL-SG3428XMP , SX3206HPP , T3700G-28TQ , SG3428XF
Recent updates may have expanded access to feature(s) discussed in this FAQ. Visit your product's support page, select the correct hardware version for your device, and check either the Datasheet or the firmware section for the latest improvements added to your product. Please note that product availability varies by region, and certain models may not be available in your region.
Introduction
Management VLAN provides a safer method to manage the switch. With management VLAN configured, only the hosts in the management VLAN can access switches’ GUI.
Network Requirements
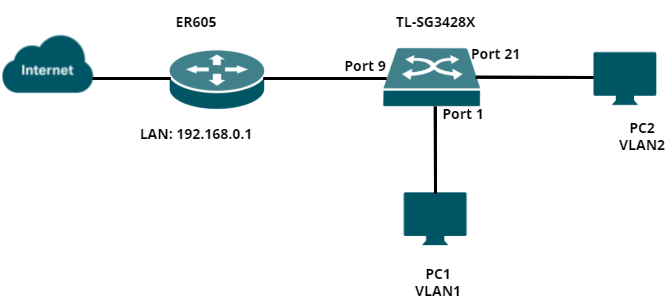
As the following topology shows, PC1 and PC2 are connected to port 1 and port 21 of the switch. The switch (TL-SG3428X) is connected to the internet via a router through port 9. The IP address of the switch is 192.168.0.100, which is assigned by the router (ER605). In this example, we will configure management VLAN to only allow the hosts in VLAN2 to access the GUI of the switch.
Configuration Overview
1. Create a VLAN interface on the router
2. Create the corresponding VLAN on the switch
3. Create an access control rule
4. Verification
Configuration Steps
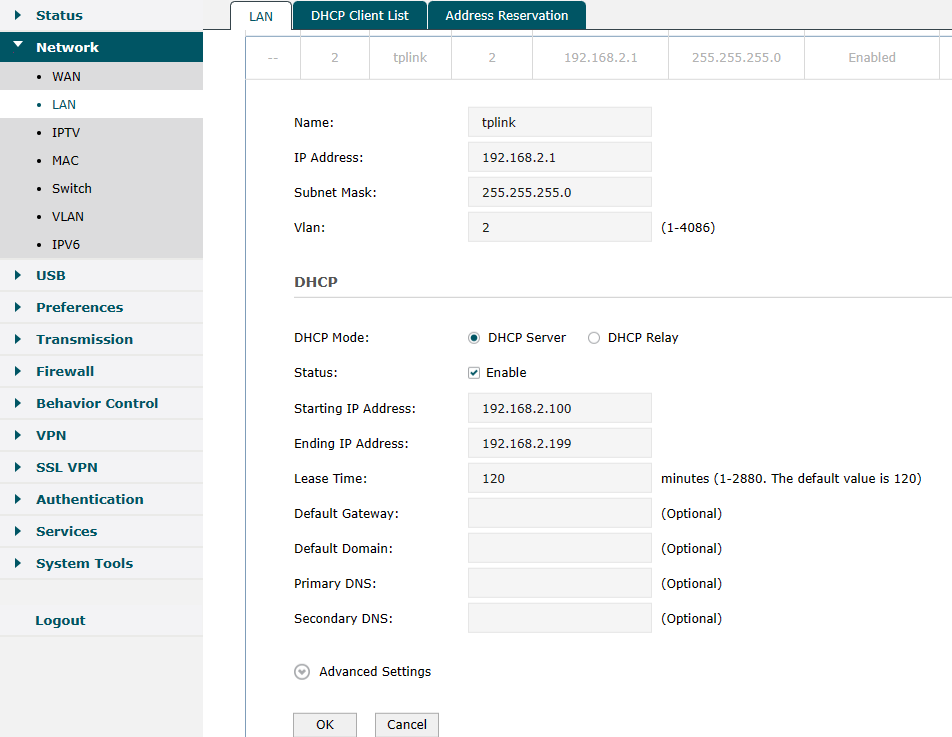
Step 1. Log in to the router’s GUI and navigate to Network → LAN to add a new VLAN interface — VLAN 2.
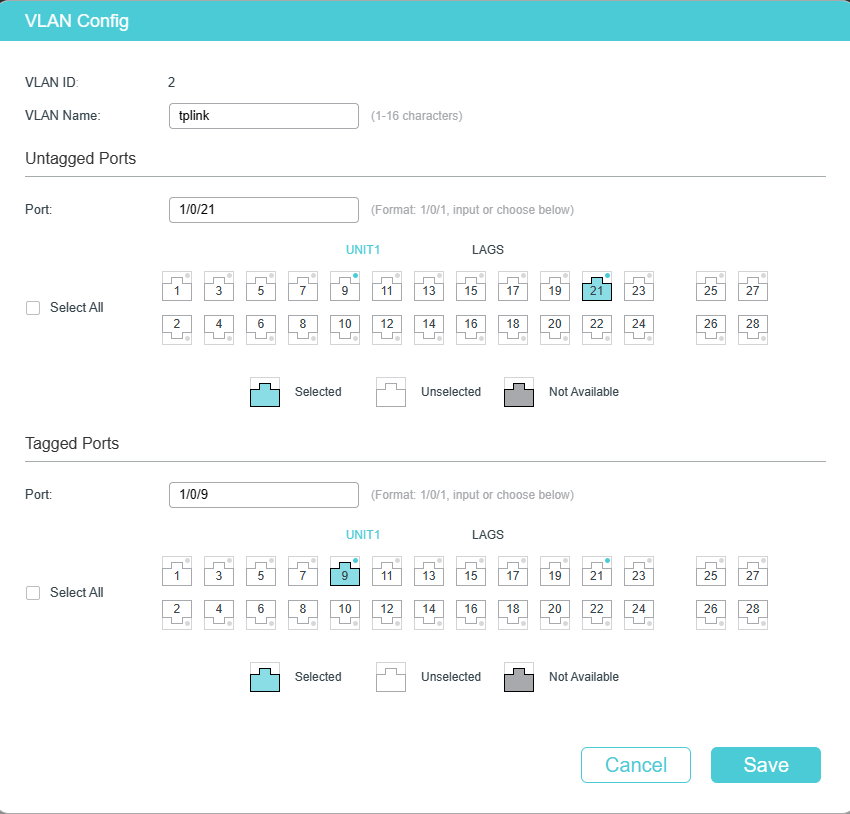
Step 2. Log in to the GUI of the switch and navigate to L2 Features → VLAN → 802.1Q VLAN → VLAN Config to add a new entry for VLAN — VLAN2. The uplink port of the switch should be tagged.
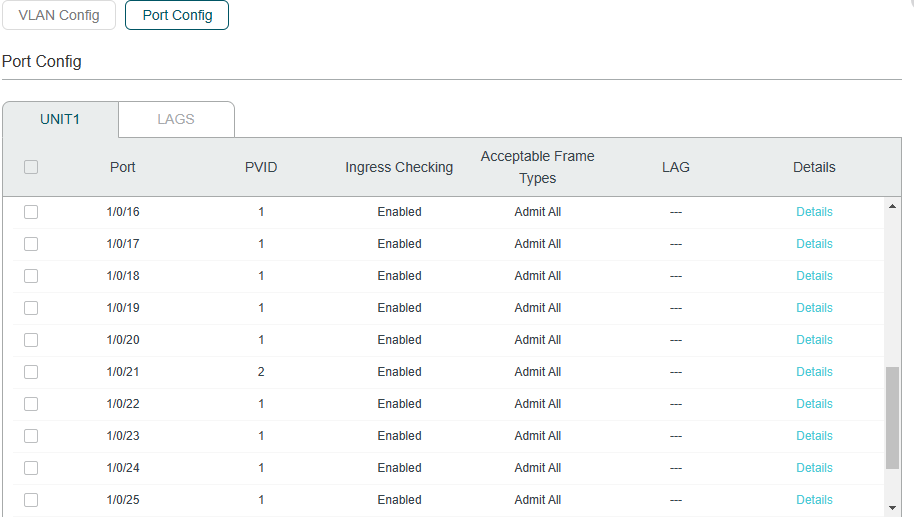
Then navigate to Port Config and change the PVID of Port 21 to 2.
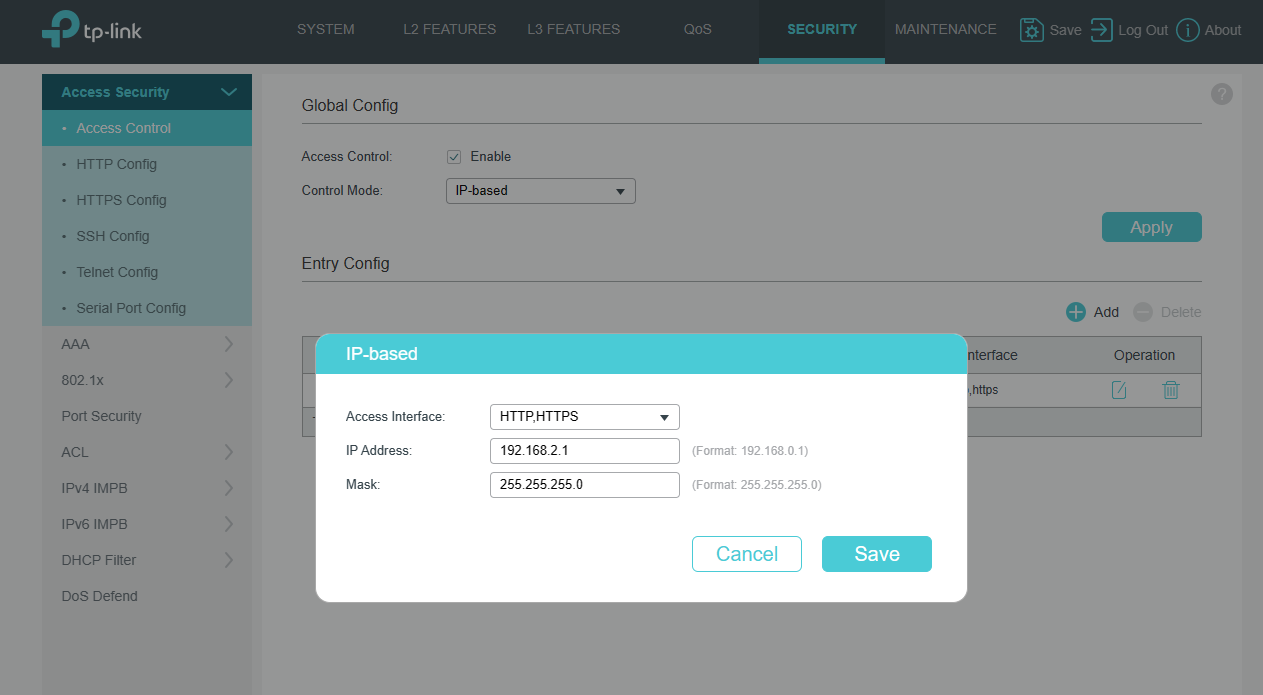
Step 3. Navigate to Security → Access Security → Access control to create an IP-based ACL (Access Control List).
Specify the Access interface as HTTP and HTTPS, and only allow devices in 192.168.2.1/24 to access the GUI of switch.
Step 4. Verification
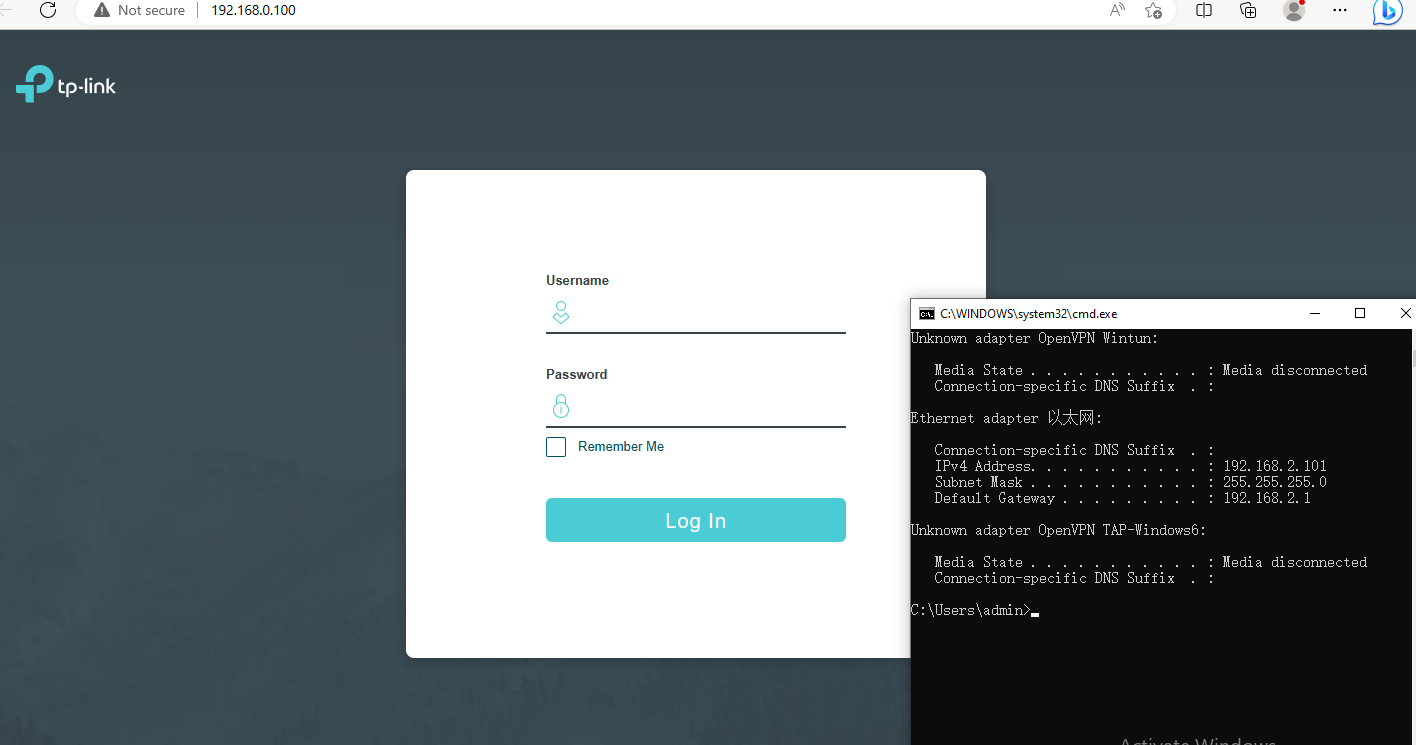
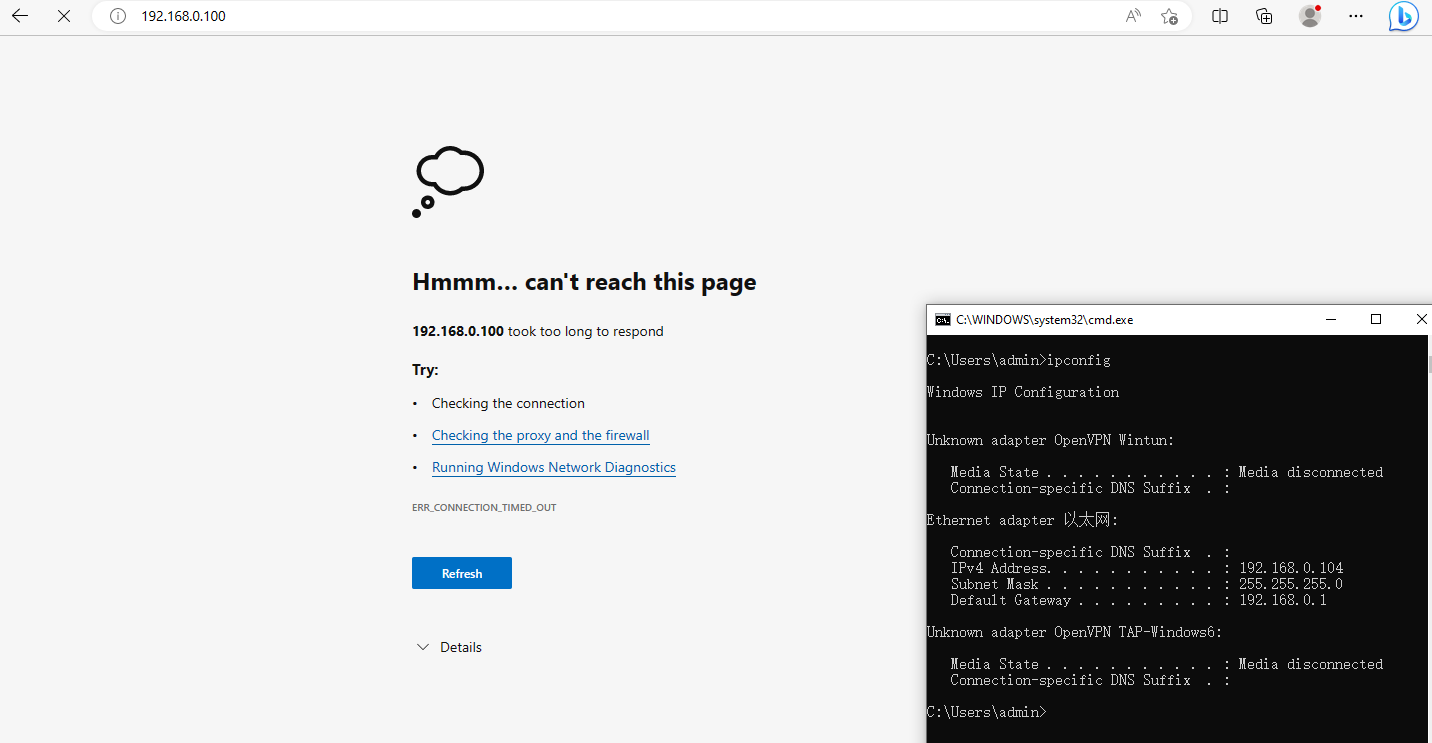
Lastly, you can verify whether the settings have been successfully applied. For example: PC2 in VLAN2 can access 192.168.0.100; however, PC1 cannot.
คำถามที่พบบ่อยนี้มีประโยชน์หรือไม่?
ความคิดเห็นของคุณช่วยปรับปรุงเว็บไซต์นี้
คุณกังวลอะไรเกี่ยวกับบทความนี้?
- ไม่พอใจกับผลิตภัณฑ์
- ยุ่งยากเกินไป
- มีชื่อเรื่องที่สับสน
- ใช้ไม่ได้กับฉัน
- คลุมเครือเกินไป
- อื่น ๆ
ขอบคุณ
เราขอขอบคุณสำหรับคำติชมของคุณ
คลิกที่นี่ เพื่อติดต่อฝ่ายสนับสนุนด้านเทคนิคของ TP-Link
เว็บไซต์นี้ใช้คุกกี้เพื่อปรับปรุงการนำทางเว็บไซต์ วิเคราะห์กิจกรรมออนไลน์ และมอบประสบการณ์การใช้งานที่ดีที่สุดแก่ผู้ใช้บนเว็บไซต์ของเรา คุณสามารถปฏิเสธการใช้คุกกี้ได้ตลอดเวลา คุณสามารถดูข้อมูลเพิ่มเติมได้ใน นโยบายความเป็นส่วนตัว ของเรา อย่าแสดงอีก
Your Privacy Choices
เว็บไซต์นี้ใช้คุกกี้เพื่อปรับปรุงการนำทางเว็บไซต์ วิเคราะห์กิจกรรมออนไลน์ และมอบประสบการณ์การใช้งานที่ดีที่สุดแก่ผู้ใช้บนเว็บไซต์ของเรา คุณสามารถปฏิเสธการใช้คุกกี้ได้ตลอดเวลา คุณสามารถดูข้อมูลเพิ่มเติมได้ใน นโยบายความเป็นส่วนตัว ของเรา อย่าแสดงอีก
คุกกี้พื้นฐาน
คุกกี้เหล่านี้จำเป็นต่อการทำงานของเว็บไซต์และไม่สามารถปิดการใช้งานในระบบของคุณได้
TP-Link
SESSION, JSESSIONID, accepted_local_switcher, tp_privacy_banner, tp_privacy_base, tp_privacy_marketing, tp_top-banner, tp_popup-bottom, tp_popup-center, tp_popup-right-middle, tp_popup-right-bottom, tp_productCategoryType
Youtube
id, VISITOR_INFO1_LIVE, LOGIN_INFO, SIDCC, SAPISID, APISID, SSID, SID, YSC, __Secure-1PSID, __Secure-1PAPISID, __Secure-1PSIDCC, __Secure-3PSID, __Secure-3PAPISID, __Secure-3PSIDCC, 1P_JAR, AEC, NID, OTZ
Zendesk
OptanonConsent, __cf_bm, __cfruid, _cfuvid, _help_center_session, _pendo___sg__.<container-id>, _pendo_meta.<container-id>, _pendo_visitorId.<container-id>, _zendesk_authenticated, _zendesk_cookie, _zendesk_session, _zendesk_shared_session, ajs_anonymous_id, cf_clearance
คุกกี้การวิเคราะห์และการตลาด
คุกกี้การวิเคราะห์ช่วยให้เราวิเคราะห์กิจกรรมของคุณบนเว็บไซต์ของเราเพื่อปรับปรุงและปรับการทำงานของเว็บไซต์ของเรา
คุกกี้การตลาดสามารถตั้งค่าผ่านเว็บไซต์ของเราโดยพันธมิตรโฆษณาของเราเพื่อสร้างโปรไฟล์ความสนใจของคุณและแสดงโฆษณาที่เกี่ยวข้องกับคุณบนเว็บไซต์อื่นๆ
Google Analytics, Google Tag Manager
_gid, _ga_<container-id>, _ga, _gat_gtag_<container-id>
Google Ads และ DoubleClick
test_cookie, _gcl_au