-
Para Casa
Modems/ Gateways
A sua porta de acesso à internet
Expansão de Rede
Forma mais fácil para expandir e melhorar a sua rede
SOHO Switches
Conexões de qualidade através de cabo de rede
Adaptadores
Equipe os seus equipamentos com um acesso Wi-Fi mais rápido
Acessórios
Tudo o que precisa para um estilo de vida conectado
-
Smart Home
Câmaras Cloud
Um olhar no que é importante
Smart Plugs
Autonomia nos equipamentos domésticos
Smart Bulbs
Luz para todas as ocasiões
-
Para Empresas
JetStream Switches
Rede com fios de alta velocidade com e sem gestão L3
Omada EAP Series
Professional business Wi-Fi with centralized management
Omada Cloud SDN
A solução Wi-Fi Cloud inteligente para redes de negócios
Pharos Wireless Broadband
Ideal para redes Wi-Fi bridge ponto a ponto de longo alcance
SafeStream Router
Secure VPNs e Gateways de balanceamento de carga para negócios
-
Para ISP
DSL
Capable of high-speed network and integrated broadband applications
LTE/3G
Maintains internet access wherever you go.
PON
The leading technology for delivering gigabit Internet services
Powerline Adapter
Transforms electrical wiring to carry the network signal.
Range Extender
Easily expand your Wi-Fi coverage.
Switches
Boosts your business network with premium performance.
Business Wireless
Takes your enterprise Wi-Fi to new levels.
How to configure a PPTP Server on TP-Link Router?
PPTP (Point to Point Tunneling Protocol) Server is used to create a VPN connection for remote clients. To configure PPTP Server on TP-LINK router, please follow the instructions below.
Configuring a PPTP Server on TP-LINK router
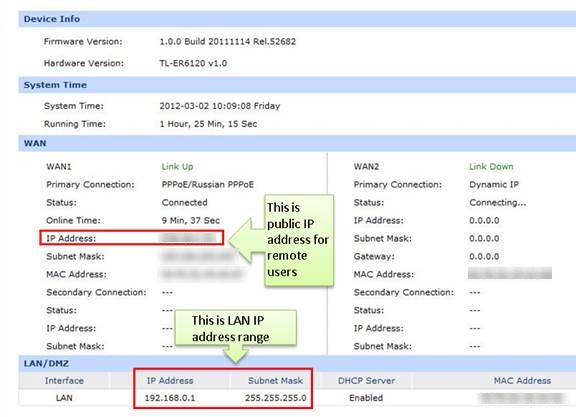
Step 1: Access the router’s management webpage, verify the settings needed on the router.
Step 2: Click on VPN->L2TP/PPTP->IP Address Pool, enter Pool Name and IP Address Range, and then click on Add.
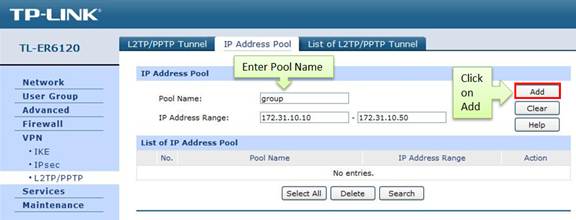
NOTE: IP Address pool must be different range from LAN IP address range.
Step 3: Look for protocol, select PPTP; the Mode should be Server.
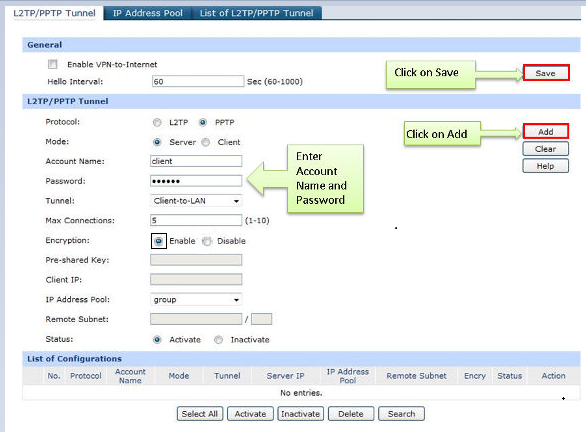
Step 4: Enter Account Name and Password whatever you like, here we use “client” as account name, password is “123456”.
Step 5: Under Tunnel, select Client-to-LAN.
Step 6: The tunnel supports up to 10 connections, we enter 5 in this example.
Step 7: Under IP Address Pool, select “group” we have added before.
Step 8: Look for Status, select Active.
Step 9: Click on Add and then click on Save.
Then, we finish the configure of PPTP Server, as for the client setting on remote PC, please refer to the FAQ
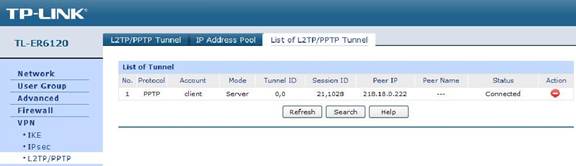
Step 10: If the PPTP tunnel is established successfully, you can check it on List of Tunnel.
A sua resposta ajuda-nos a melhorar o nosso site.