


How to configure the default gateway of the smart and managed switches using the old GUI
The introduction of the default route
A default route in TCP/IP network is a setting that tell the device how to forward the packets when their destination IP is not in the same subnet of the device. If we want a device to access the Internet, we need to configure the default route. And when we designate the default gateway of the device, it will create a default route automatically whose Next hop is the gateway’s IP.
For example, we assume a network shown as the picture below

After setting the Default gateway as the router’s LAN IP 172.31.48.1, the PC will generate a default route automatically.

The default route consists of three parameters: Destination, Subnet Mask and Next hop (Gateway) as shown in the picture above. The Destination IP and Mask 0.0.0.0 means arbitrary destination IP addresses that are not matched by other route entries. According to this default route, all the traffics that go to the Internet will be forwarded to the gateway router (172.31.48.1). Then we can say, the PC can access the Internet if all the other settings are OK.
How to configure the default gateway in the T series switches
When we want to use NTP (Network Time Protocol), access the switch remotely, or some other functions that need the switch acting like a computer that can access the Internet by themselves, we need to configure the default gateway route for the switch as well.
We still assume a network shown as in the picture below

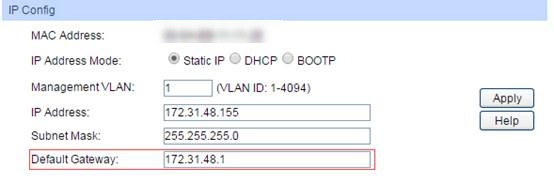
1) For TP-Link L2 switches without IP routing function like T1500 series switches, we just need to designate the Default Gateway in the System-System Info-System IP-IP Config like a Windows computer as shown in the picture below. Then the switch will generate a default route for Internet as well.
2) For TP-Link L2+/L3 switches with IP routing function like T1600/T1700/T2700/T3700 Series switches, we need to add a default route manually in the Routing-Static Routing-IPv4 Static Routing Config.

As shown in the picture above, the Destination and Subnet Mask 0.0.0.0 means arbitrary destination IP addresses that are not matched by other route entries. The Next Hop is the router’s LAN IP which means all the traffic to the Internet will be forwarded to the gateway router. The Distance is an optional parameter, we can leave it as default or set it as 1 in this situation.
By the way, if you want to change the management IP address (by default, it is the interface IP of the VLAN 1) of the L2+/L3 switches, you need to go to Routing-Interface List-select VLAN 1 and click Edit to change the IP address.

Note: after the configuration, you need to click “Save Config” button in the web interface or use the command “copy running-config startup-config” in the CLI to save the configuration or it will lose after the power cycle.
Este guia foi útil?
A sua resposta ajuda-nos a melhorar o nosso site.