How to use IPSec VPN to access your home network on AC VDSL/ADSL Modem Router (new logo)
IPSec VPN is used to create a VPN connection between local and remote networks. To use IPSec VPN, you should check that both local and remote routers support IPSec VPN feature. Then, follow the steps below to set up an IPSec VPN connection.
Here takes Archer VR2800 as demonstration.
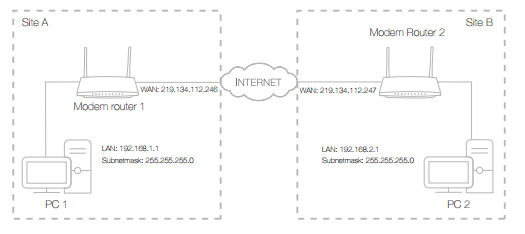
1. The typical VPN topology is here. Site A refers to local network, and Site B refers to the remote network that is to be connected. Record Site A and Site B’s LAN and WAN IP addresses before you start configuration.
2. Configuration on Site A (local network).
1) Log in the web interface of the modem router. You can refer to How to log into the web-based interface of the AC VDSL/ADSL Modem Router (new logo)?
2) Go to Advanced > VPN > IPSec VPN, and click Add.

3) In the IPSec Connection Name column, specify a name.
4) In the Remote IPSec Gateway (URL) column, Enter Site B’s WAN IP address.
5) Configure Site A’s LAN.
In the Tunnel access from local IP addresses column, we take Subnet Address as an example. Input the LAN IP range of Site A in the IP Address for VPN column, and input Subnet Mask of Site A.
6) Configure Site B’s LAN.
In the Tunnel access from remote IP addresses column, we take Subnet Address as an example. Input the LAN IP range of Site B in the IP Address for VPN column, and input Subnet Mask of Site B.
7) Select the Key Exchange Method for the policy. We select Auto(IKE) here.
8) Enter the Pre-Shared Key for IKE authentication. Then keep Perfect Forward Secrecy enabled.
Note: Make sure Site A and Site B use the same key.
9) Leave the Advanced Settings as default value. Then click Save.

3. Configuration on Site B (remote network). Refer to step 2 configuration on Site A and make sure that Site A and Site B use the same pre-shared keys and Perfect Forward Secrecy settings.
4. Check the VPN connection. You can ping site B’ LAN IP from your computer in site A to verify that the IPSec VPN connection is set up correctly.
Tips: To check the VPN connection, you can do the following.
On the host in Site A, press [Windows Logo] + [R] to open Run dialog. Input “cmd” and hit OK.

In the CLI window, type in “ping 192.168.2.x” (“192.168.2.x” can be IP address of any host in Site B). Then press [Enter].

If Ping proceeds successfully (gets replies from host in Site B), the IPSec connection is working properly now.
5. Now IPSec VPN is implemented to establish a connection.
Note:
1. The product supports a maximum of ten simultaneous connections.
2. If one of the site has been offline for a while, for example, if Site A has been disconnected, on Site B you need to click Disable and then click Enable after Site A back on line in order to re-establish the IPSec tunnel.
Get to know more details of each function and configuration please go to Download Center to download the manual of your product.
Czy ten poradnik FAQ był pomocny?
Twoja opinia pozwoli nam udoskonalić tę stronę.


z United States?
Uzyskaj produkty, wydarzenia i usługi przeznaczone dla Twojego regionu.